标签:移动 mode 无法 rand 数据库 alt 子节点 package one
正则模块
常用正则表达式列表(盗图一张:-P)
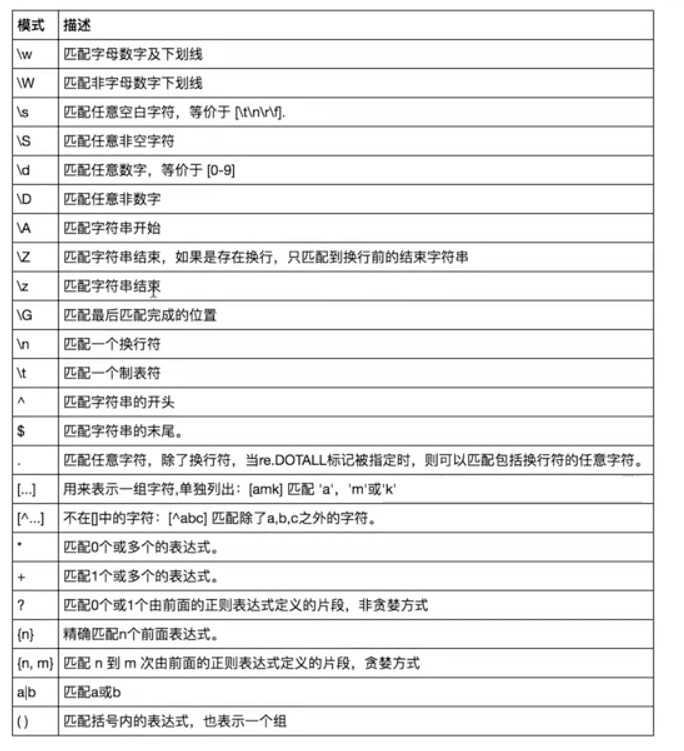
 1 import re
 2
 3 print(re.findall(‘\w‘,‘abc123d_ef * | - =‘))
 4 print(re.findall(‘\W‘,‘abc123d_ef * | - =‘))
 5 print(re.findall(‘\s‘,‘abc1\n23\td_ef * | - =‘))
 6 print(re.findall(‘\S‘,‘abc1\n23\td_ef * | - =‘))
 7 print(re.findall(‘\d‘,‘abc1\n23\td_ef * | - =‘))
 8 print(re.findall(‘\D‘,‘abc1\n23\td_ef * | - =‘))
 9 print(re.findall(‘^a‘,‘abc1\n23\tad_efa * | - =‘))
10 print(re.findall(‘a$‘,‘abc1\n23\tad_efa * | - =‘))
11 print(re.findall(‘\n‘,‘abc1\n\n23\tad_efa * | - =‘))
12 print(re.findall(‘\t‘,‘abc1\n\n23\tad_efa * | - =‘))
13 print(re.findall(‘a.c‘,‘abc1\nn2a\nc3\tad_efa * | - =‘,re.S))
14 print(re.findall(‘a[^-.\n]c‘,‘a.c1\nn2a\nc3\tad_efa * | - =‘))
15 print(re.findall(‘ab*‘,‘a‘))
16 print(re.findall(‘ab*‘,‘abbbbbbbbbbbbbbbbbbbbbbbbb‘))
17 print(re.findall(‘ab+‘,‘abbbbb‘))
18 print(re.findall(‘ab?‘,‘a‘))
19 print(re.findall(‘ab?‘,‘ab‘))
20 print(re.findall(‘ab?‘,‘abb‘))
21 print(re.findall(‘ab?c‘,‘abbc‘)) #ac  abc
22 print(re.findall(‘ab?c‘,‘ac‘)) #ac  abc
23 print(re.findall(‘ab?c‘,‘abc‘)) #ac  abc
24 print(re.findall(‘ab{2}‘,‘123123123abbbbbbbb‘)) #abb
25 print(re.findall(‘ab{2}c‘,‘123123123abbbbbbbbc‘)) #abb
26 print(re.findall(‘ab{1,}c‘,‘123123123abbbbbbbbc‘)) #abc  abbbbbbbbbbbbbc
27 print(re.findall(‘company|companies‘,‘all companies will be done,my company is already done‘))
28 print(re.findall(‘compan(y|ies)‘,‘all companies will be done,my company is already done‘)) #[‘ies‘, ‘y‘]
29 print(re.findall(‘compan(?:y|ies)‘,‘all companies will be done,my company is already done‘)) #[‘ies‘, ‘y‘]
30 print(re.findall(‘al(?:e)x‘,‘alex make love‘)) # 将目标字符串全部匹配出来
31 print(re.findall(r‘a\\c‘,‘a\c‘)) or re.findall(‘a\\\\c‘,‘a\c‘)
32 print(re.findall(‘a.*b‘,‘a123b456789b‘)) #贪婪匹配
33 print(re.findall(‘a.*?b‘,‘a123b456789b‘)) #非贪婪匹配
===========================================分割线===========================================
 1 print(re.search(‘e‘,‘alex make love‘)) # 只输出第一个匹配到的e
 2 print(re.search(‘^e‘,‘alex make love‘)) # 匹配开头为e的
 3 print(re.search(‘e‘,‘alex make love‘))
 4 print(re.match(‘e‘,‘alex make love‘))
 5 print(re.match(‘a‘,‘alex make love‘).group()) # 输出匹配的全部内容
 6 print(re.search(‘al(e)x\smak(e)‘,‘alex make love‘).group()) # alex make
 7 print(re.findall(‘al(?:e)x\smak(?:e)‘,‘alex make love‘)) # 功能同上
 8 print(re.split(‘[ab]‘,‘abcd‘)) # [‘‘,‘‘,‘cd]
 9 print(re.sub(‘^a‘,‘A‘,‘alex make love‘))
10 print(re.sub(‘a‘,‘A‘,‘alex make love‘))
11 print(re.sub(‘^(\w+)(\s)(\w+)(\s)(\w+)‘,r‘\5\2\3\4\1‘,‘alex make love‘))# love make alex
12 print(re.sub(‘^(\w+)(\s+)(\w+)(\s+)(\w+)‘,r‘\5‘,‘alex    make       love‘))
13 print(re.sub(‘^(\w+)(\W+)(\w+)(\W+)(\w+)‘,r‘\5\2\3\4\1‘,‘alex " \ + = make ----/==     love‘))
14 print(re.search(‘companies|company‘,‘my company is already done,all companies will be done‘).group())# conpany
15 print(re.findall(r‘\-?\d+\.?\d*‘,"1-12*(60+(-40.35/5)-(-4*3))")) # 匹配出所有的数字(整数和小数)
16 print(re.findall(r‘\-?\d+\.\d*‘,"1-2*(60+(-40.35/5.3+1.2)-(-4*3))")) # 匹配出所有的小数
17 print(re.findall(r‘\-?\d+\.\d+|(\-?\d+)‘,"1-2*(60+(-40.35/5.3+1.2)-(-4*3))")) # 匹配出所有的整数
时间模块
#时间戳
# print(time.time()) # 从UNIX元年(1970)计算的秒数,给机器用的

#结构化的时间
# print(time.localtime()) # 对象的形式的数据
# print(time.localtime().tm_year) # 加后缀取本地时间的年份
# print(time.gmtime()) # UTC时间,同样可加后缀显示年月日时分秒

#格式化的字符串
# print(time.strftime(‘%Y-%m-%d %H:%M:%S‘)) # 注意:区分大小写
# print(time.strftime(‘%Y-%m-%d %X‘)) # X代表时分秒相当于%H:%M:%S
# print(time.localtime(13211123)) # 将localtime转化为结构化的时间
# print(time.localtime(time.time()))
# print(time.mktime(time.localtime())) # 把当前的时间转化为时间戳
# print(time.strftime(‘%Y %X‘,time.localtime())) # 将格式化的时间转化为格式化的字符串
# print(time.strptime(‘2017-06-04 11:59:59‘,‘%Y-%m-%d %X‘)) # 把格式化的字符串转化为结构化的时间
# print(time.asctime()) # Linux 显示时间的格式
# print(time.ctime(123123132)) # 将时间戳转化为Linux格式显示时间
# print(time.asctime(time.localtime()))
Random模块
import random

print(random.random()) # 产生0-1之间的小数
print(random.random()*10) # 产生1-10之间的整数
print(random.randint(1,3)) # 产生1-3之间的整数
print(random.randrange(1,3)) # 产生大于等于1且小于3之间的整数
print(random.choice(‘a‘,‘b‘,[‘c‘,‘d‘],‘e‘)) # 任意1个元素
print(random.sample(‘a‘,‘b‘,[‘c‘,‘d‘],‘e‘)) # 任意2个元素组成的列表
print(random.uniform(1,3)) # 大于1小于3的小数

#洗牌操作,打乱列表顺序重新排列
item=[1,3,5,7,9]
random.shuffle(item)
print(item)

#生成验证码
import random
def v_code(n=5):
    res=‘‘
    for i in range(n):
        num=random.randint(0,9)
        s=chr(random.randint(65,90))
        ss = chr(random.randint(97,122))
        add=random.choice([num,s,ss])
        res+=str(add)
    return res
print(v_code(6))
OS模块
import os

print(os.path.abspath(‘a/b/c.txt‘)) #E:\wupeiqi\s17\day06\a\b\c.txt
print(os.path.abspath(‘/a/b/c.txt‘)) #E:\a\b\c.txt
print(os.path.split(‘E:\\a\\c.txt‘)) #切割文件所在文件夹路径和文件名
print(os.path.dirname(‘E:\\a\\c.txt‘)) #文件所在路径
print(os.path.dirname(‘E:\\a‘))
print(os.path.basename(‘E:\\a\\a.txt‘)) #文件名
print(os.path.exists(‘E:\\a‘)) #判断路径是否存在 False
print(os.path.exists(‘E:\wupeiqi\s17\day06‘)) # True
print(os.path.isabs(‘E:\\day06‘)) #判断是否是绝对路径True,不会判断该路径是否存在
print(os.path.isabs(‘day06‘))#False
print(os.path.getsize(r‘E:\wupeiqi\s17\day06\test.py‘)) #查看文件大小,单位是字节byte
print(os.path.join(‘a‘,‘E:\\b‘,‘c.txt‘)) # 找到第一个绝对路径开始往后拼接路径,如果没有根目录就从头开始往后拼接
print(os.path.join(‘a‘,‘/b‘,‘c.txt‘)) #/b/c.txt #Linux的路径拼接方式
print(os.path.normcase(‘c:/wIndows\\system32\\‘)) #只在windows中有效c:\wIndows\system32\
print(os.path.normpath(‘c://windows\\System32\\../Temp/‘)) #拼接为绝对路径,将路径中的..转换为上一级目录
print(os.path.dirname(os.path.dirname(os.path.abspath(__file__)))) #当前文件的主目录文件打印出来
print(os.path.normpath(os.path.join(__file__, os.pardir, os.pardir))) #效果同上
sys模块
import sys

print(sys.argv[i]) #去脚本执行后边跟着的某个参数

#打印进度条
import sys, time
for i in range(50):
    sys.stdout.write(‘%s\r‘ % (‘#‘*i)) #‘\r‘表示跳会当前行首重新覆盖打印该行。
    sys.stdout.flush() # 把打印结果刷出来
    time.sleep(0.1) # 时间控制
shutil模块
import shutil

shutil.copyfileobj(open(‘ALesson06.py‘,‘r‘),open(‘new_copy‘,‘w‘))
shutil.copyfile(‘f1.log‘,‘f2.log‘) #目标文件无需存在,没有目标文件就会自行创建,存在即被覆盖内容
shutil.copymode(‘f1.log‘,‘f2.log‘) #仅拷贝权限。内容,组,用户均不变
shutil.copystat(‘f1.log‘,‘f2.log‘) #仅拷贝状态的信息,包括:mode,bits,atime,mtime,flags
shutil.copy2(‘f1.log‘,‘f2.log‘) #拷贝文件和状态信息
shutil.copytree(‘folder1‘,‘folder2‘,ignore=shutil.ignore_patterns(‘*.pyc‘,‘tmp*‘))
# 目标目录不能存在,注意f2目录父及目录要有可写权限,ignore是排除操作
# 拷贝软连接
shutil.copytree(‘folder1‘,‘folder2‘,symlinks=True, ignore=shutil.ignore_patterns(‘*.pyc‘,‘tmp*‘))
# 通常的拷贝都把软连接拷贝成硬连接,即对待软连接来说,创建新的文件
shutil.rmtree(‘folder1‘) #递归的删除目录
shutil.move(‘folder1‘,‘folder2‘) #递归的移动文件,它类似mv命令,其实就是重命名
shutil.make_archive(‘data_bak‘,‘gztar‘,root_dir=‘/data‘) #将/data下的文件打包放置当前程序目录
shutil.make_archive(‘tmp/data_bak‘,‘gztar‘,root_dir=‘/data‘) #将/data下的文件打包放置到/tmp目录
# tarfile压缩解压缩
import tarfile
# 解压
t = tarfile.open(‘/tmp/albert.tar‘,‘r‘)
t.extractall(‘/albert‘)
t.close()
# 压缩
t = tarfile.open(‘/tmp/albert.tar‘,‘w‘)
t.add(‘/test1/a.py‘,arcname=‘a.bak‘) #arcname作用在于解压后给之前的文件起了个别名
t.close()
json模块
x = "[null,true,false,1]"
eval(x) #错误,不识别null
res = json.loads(x)
print(res) #[None, True, False, 1]

dic={‘name‘:‘aaa‘,‘age‘:111}

print(json.dumps(dic)) #将python中的字典类型转化为json能识别的字符串
with open(‘a.json‘,‘w‘) as f: #写数据,序列化的过程
    f.write(json.dumps(dic))
with open(‘a.json‘,‘r‘) as f: #读数据,反序列化的过程
    json.loads(f.read())
    print(dic[‘name‘])
#json操作精简版
json.dump(dic,open(‘b.json‘,‘w‘))
print(json.load(open(‘b.json‘,‘r‘)))
pickle模块
#序列化python任意的对象
x = "[null,true,false,1]"
pickle.loads(x) #pickle值支持python类型,此处也报错

dic={‘name‘:‘aaa‘,‘age‘:111}
print(pickle.dumps(dic))
#b‘\x80\x03}q\x00(X\x03\x00\x00\x00ageq\x01KoX\x04\x00\x00\x00nameq\x02X\x03\x00\x00\x00aaaq\x03u.‘
#pickle输出的为bytes类型
with open(‘a.pkl‘,‘wb‘) as f:
    f.write(pickle.dumps(dic))
with open(‘a.pkl‘,‘rb‘) as f:
    res = pickle.loads(f.read())
#pickle操作精简版
pickle.dump(dic,open(‘b.json‘,‘wb‘))
print(pickle.load(open(‘b.json‘,‘rb‘)))

#序列化函数,json无法序列化
def func():
    print(‘from func‘)
print(pickle.dumps(func)) #b‘\x80\x03c__main__\nfunc\nq\x00.‘
pickle.dump(func,open(‘func.pkl‘,‘wb‘))
res = pickle.load(open(‘func.pkl‘,‘rb‘))
res() #可以执行
shelve模块
import shelve
f = shelve.open(r‘shelve.txt‘)
f[‘p1‘] = {‘name‘:‘aaa‘ , ‘age‘: 111}
print(f[‘p1‘])
f.close()
xml模块
import xml.etree.ElementTree as ET

tree = ET.parse("a")
root = tree.getroot()
print(root.tag)
print(root.iter(‘year‘)) #全文搜索,不考虑层级结构
for i in root.iter(‘year‘):
    print(i.tag,i.text,i.attrib)
print(root.find(‘year‘)) #查找子节点
print(root.find(‘country‘).attrib) #查找子节点下面的一个
print(root.findall(‘country‘))
for country in root: #遍历各个country子节点
    print(‘--->‘, country.attrib[‘name‘])
    for item in country: #打印子节点下面的内容
        print(item.tag,item.text,item.attrib)

for year in root.iter(‘year‘):
    print(year.tag,year.text,year.attrib)
#修改
for year in root.iter(‘year‘):
    year.text = str(int(year.text)+1)
    year.set(‘update‘,‘yes‘)
tree.write(‘a‘)
#删除
for country in root.iter(‘country‘):
    print(country.find(‘year‘))
    res = country.find(‘year‘)
    if int(res.text) > 2010:
        country.remove(res)
tree.write(‘a‘)
#添加
for country in root.iter(‘country‘):
    for year in country.findall(‘year‘):
        if int(year.text) > 2000:
            year2 = ET.Element(‘year2‘)
            year2.text = ‘New Year‘
            year2.attrib={‘update‘:‘yes‘}
            country.append(year2) #添加子节点
tree.write(‘a‘)
hashlib模块
import hashlib #进行文本字符串校验

hmd5 = hashlib.md5()
hmd5.update(‘abcdefghigk‘.encode(‘utf-8‘))
print(hmd5.hexdigest()) #eb78bf0ff2049d407b4c5e627b75425a相同字符串的hash值是不变的
#如何校验文件
with open(‘a‘,‘rb‘) as f:
    for line in f:
        hmd5.update(line)
    md5_res = hmd5.hexdigest()
print(md5_res)#740bfdb0173ca162711f2cceca382665
hmd5.update(‘Hello‘.encode(‘utf-8‘))
hmd5.update(‘World‘.encode(‘utf-8‘))
print(hmd5.hexdigest())#68e109f0f40ca72a15e05cc22786f8e6
hmd5.update(‘HelloWorld‘.encode(‘utf-8‘))
print(hmd5.hexdigest())#68e109f0f40ca72a15e05cc22786f8e6

hsha = hashlib.sha256()
hsha.update(‘abcdefghigk‘.encode(‘utf-8‘))
print(hsha.hexdigest())

#密码加盐
import hmac
h = hmac.new(‘albert‘.encode(‘utf-8‘))
h.upate(‘hello‘.encode(‘utf-8‘))
print(h.hexdigest())
subprocess模块
import subprocess

res = subprocess.Popen(‘dir‘,shell=True,stdout=subprocess.PIPE)
print(res)
print(res.stdout.read().decode(‘gbk‘)) #管道只能取一次内容

res = subprocess.Popen(‘direrr‘,shell=True,
                       stderr=subprocess.PIPE,
                       stdout=subprocess.PIPE)
print(‘--->‘,res.stdout.read())
print(‘--->‘,res.stderr.read().decode(‘gbk‘))

# ls | grep txt$
res1 = subprocess.Popen(r‘dir E:\a\b\c ‘,shell=True,stdout=subprocess.PIPE)
res2 = subprocess.Popen(r‘findstr txt*‘, shell=True,
                        stdin=res1.stdout,
                        stderr=subprocess.PIPE,
                        stdout=subprocess.PIPE)
print(res2.stdout.read().decode(‘gbk‘))
logging模块
import logging

logging.basicConfig(filename=‘access.log‘,
                    format=‘%(asctime)s - %(name)s - %(levelname)s - %(module)s: %(message)s‘,
                    datefmt=‘%Y-%m-%d %H:%M:%S %p‘,
                    level=10)
logging.debug(‘debug‘)
logging.info(‘info‘)
logging.warning(‘warning‘)
logging.error(‘error‘)
logging.critical(‘critical‘)
configparser模块
import configparser

conf = configparser.ConfigParser()
conf.read(‘conf.ini‘)
print(conf.sections())#查看所有标题
print(conf.options(‘section1‘))#查看单个标题下的所有key
print(conf.items(‘section1‘))#查看单个标题下的所有key-value
print(conf.get(‘section1‘,‘user‘))#查看section1下user的值(字符串)
print(conf.getint(‘section1‘,‘age‘))#查看section1下age的值(整型)
print(conf.getboolean(‘section1‘,‘enable‘))查看section1下enable的值(布尔型)
conf.remove_section(‘section1‘)#删除标题下所有内容
conf.remove_option(‘section1‘,‘k1‘)#删除标题下某个键值
print(conf.has_section(‘section1‘))#是否存在该标题
print(conf.has_option(‘section1‘,‘‘))#是否存在option
conf.add_section(‘section3‘)#添加新标题
conf.set(‘section3‘,‘name‘,‘albert‘)#在新标题下添加新option
conf.set(‘section3‘,‘age‘,‘18‘)
conf.write(open(‘conf.ini‘,‘w‘))#保存到文件
软件开发规范示例
Package(该文件目录许加入环境变量中)
|___bin(可执行文件)
    |___start.py
|___conf(配置文件)
    |___settings.py
|___logs(日志文件)
|___lib(库文件)
|___db(数据库文件)
|___core(主文件)
|    |___main.py
|___readme
Python自动化开发课堂笔记【Day06】 - Python基础(模块)
标签:移动 mode 无法 rand 数据库 alt 子节点 package one
原文地址:http://www.cnblogs.com/paodanke/p/6950403.html