标签:image make 圆形 created tom 声明 enter cap cat
看支付宝蚂蚁积分,天气预报等好多APP都有圆形渐变效果,今天就试着玩了。
一.CAGradientLayer类中属性介绍
CAGradientLayer继承CALayer,主要有以下几个属性:
1.@property(nullable, copy) NSArray *colors; 渐变的颜色 这个数组中只设置一个颜色是不显示的
2.@property(nullable, copy) NSArray<NSNumber *> *locations;每种颜色的最亮的位置
3.@property CGPoint startPoint; @property CGPoint endPoint; 渐变的方向 左上(0,0) 右下(1,1) startPoint——>endPoint
4.@property(copy) NSString *type; 目前只有一种kCAGradientLayerAxial
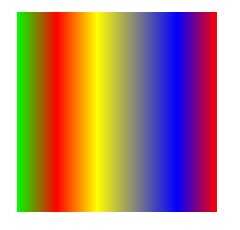
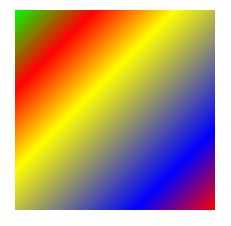
通过设置上面的属性来看下效果

#import "ViewController.h"

@interface ViewController ()

@end

@implementation ViewController

- (void)viewDidLoad {
    [super viewDidLoad];

    CAGradientLayer *gradientLayer =  [CAGradientLayer layer];

    gradientLayer.frame = CGRectMake(20, 100, 200, 200);

    //设置颜色
    [gradientLayer setColors:[NSArray arrayWithObjects:(id)[[UIColor greenColor] CGColor],(id)[[UIColor redColor] CGColor],(id)[[UIColor yellowColor] CGColor],(id)[[UIColor blueColor] CGColor],(id)[[UIColor redColor] CGColor], nil]];

    //每种颜色最亮的位置
    [gradientLayer setLocations:@[@0,@0.2,@0.4,@0.8,@1]];
    //渐变的方向StartPoint->EndPoint
    [gradientLayer setStartPoint:CGPointMake(0, 0)];
    [gradientLayer setEndPoint:CGPointMake(1, 1)];

    [self.view.layer addSublayer:gradientLayer];
}

- (void)didReceiveMemoryWarning {
    [super didReceiveMemoryWarning];
    // Dispose of any resources that can be recreated.
}

@end
二 .使用CAGradientLayer+UIBezierPath实现圆形渐变
1.自定义GredientLayerView
#import <UIKit/UIKit.h>

@interface GredientLayerView : UIView

@end
//
//  GredientLayerView.m
//  GredientLayerView
//
//  Created by City--Online on 15/10/26.
//  Copyright ? 2015年 City--Online. All rights reserved.
//

#import "GredientLayerView.h"

#define degreesToRadians(x) (M_PI*(x)/180.0) //把角度转换成PI的方式

static const float kPROGRESS_LINE_WIDTH=4.0;

@interface GredientLayerView ()

@property (nonatomic,strong) CAShapeLayer *progressLayer;

@end
@implementation GredientLayerView

- (instancetype)initWithFrame:(CGRect)frame
{
    self = [super initWithFrame:frame];
    if (self) {

        //设置贝塞尔曲线
        UIBezierPath *path = [UIBezierPath bezierPathWithArcCenter:CGPointMake(self.bounds.size.width/2, self.bounds.size.height/2) radius:(frame.size.width-kPROGRESS_LINE_WIDTH)/2 startAngle:degreesToRadians(-210) endAngle:degreesToRadians(30) clockwise:YES];

        //遮罩层
        _progressLayer = [CAShapeLayer layer];
        _progressLayer.frame = self.bounds;
        _progressLayer.fillColor =  [[UIColor clearColor] CGColor];
        _progressLayer.strokeColor=[UIColor redColor].CGColor;
        _progressLayer.lineCap = kCALineCapRound;
        _progressLayer.lineWidth = kPROGRESS_LINE_WIDTH;

        //渐变图层
        CAGradientLayer *gradientLayer =  [CAGradientLayer layer];
        gradientLayer.frame = _progressLayer.frame;
        [gradientLayer setColors:[NSArray arrayWithObjects:(id)[[UIColor redColor] CGColor],(id)[[UIColor yellowColor] CGColor],(id)[[UIColor blueColor] CGColor], nil]];
        [gradientLayer setLocations:@[@0,@0.6,@1]];
        [gradientLayer setStartPoint:CGPointMake(0, 0)];
        [gradientLayer setEndPoint:CGPointMake(1, 0)];


        //用progressLayer来截取渐变层 遮罩
        [gradientLayer setMask:_progressLayer];
        [self.layer addSublayer:gradientLayer];

        //增加动画
        CABasicAnimation *pathAnimation=[CABasicAnimation animationWithKeyPath:@"strokeEnd"];
        pathAnimation.duration = 2;
        pathAnimation.timingFunction=[CAMediaTimingFunction functionWithName:kCAMediaTimingFunctionEaseInEaseOut];
        pathAnimation.fromValue=[NSNumber numberWithFloat:0.0f];
        pathAnimation.toValue=[NSNumber numberWithFloat:1.0f];
        pathAnimation.autoreverses=NO;
        _progressLayer.path=path.CGPath;
        [_progressLayer addAnimation:pathAnimation forKey:@"strokeEndAnimation"];
    }
    return self;
}

@end
2.调用
//
//  ViewController.m
//  Gredientlayer
//
//  Created by City--Online on 15/10/26.
//  Copyright ? 2015年 City--Online. All rights reserved.
//

#import "ViewController.h"
#import "GredientLayerView.h"
@interface ViewController ()

@end

@implementation ViewController

- (void)viewDidLoad {
    [super viewDidLoad];
    GredientLayerView *gredientLayerView=[[GredientLayerView alloc]initWithFrame:CGRectMake(30, 100, 200, 200)];
    [self.view addSubview:gredientLayerView];

}

- (void)didReceiveMemoryWarning {
    [super didReceiveMemoryWarning];
    // Dispose of any resources that can be recreated.
}

@end
3.效果

关于遮罩层的定义请参考百度百科:http://baike.baidu.com/view/1140860.htm
遮罩层必须至少有两个图层,上面的一个图层为“遮罩层”,下面的称“被遮罩层”;这两个图层中只有相重叠的地方才会被显示。也就是说在遮罩层中有对象的地方就是“透明”的,可以看到被遮罩层中的对象,而没有对象的地方就是不透明的,被遮罩层中相应位置的对象是看不见的。
它的原理是:上面一层是遮罩层,下面一层是被遮罩层。遮罩层上的图,自己是不显示的。它只起到一个透光的作用。假定遮罩层上是一个正圆,那么光线就会透过这个圆形,射到下面的被遮罩层上,只会显示一个圆形的图形。如果遮罩层上什么都没有,那么光线就无法透到下面来,那么下面的被遮罩层什么也显示不出来。
之前一直疑惑当设置遮罩后,遮罩层并不显示自身的样式,例如我设置了遮罩层的strokeColor为红色时,显示的是被遮罩层,当设置为透明时被遮罩层也不显示了,具体透明是什么样的一个原理,暂且还没弄明白,这里根据上面的遮罩层的原理就认为设置透明则就是上面的什么都没有
---------------我是有底线的--------------------
作者:社会主义接班人
出处:http://www.cnblogs.com/5ishare/
本文版权归作者和博客园共有,欢迎转载,但未经作者同意必须保留此段声明,且在文章页面明显位置给出原文连接,否则保留追究法律责任的权利。
如果文中有什么错误,欢迎指出。以免更多的人被误导。
标签:image make 圆形 created tom 声明 enter cap cat
原文地址:http://www.cnblogs.com/NSong/p/6973389.html