标签:搭建配置 删掉 mysql sts junit 日志 alibaba lis ann
随着spring 越来越强大,用spring4来搭建框架也是很快速,问题是你是对spring了解有多深入。如果你是新手,那么在搭建的过程中可以遇到各种各样奇葩的问题。
SSM框架的搭建是作为我搭建APP开发框架的基础。
我将会分以下几点:
1) 配置文件如何配置
2) 如何java配置启动servlet
3) 一些搭建过程中的坑
=============================================================================
SSM框架的搭建配置方式有很多种,可具体分可以分为javaConfig配置,xml配置,或者xml文件与javaConf混合配置。其实用那种都行了,我个人搭建还是偏xml配置,不过现在的javaConfig也很成熟,也可以考虑,就是有一些坑,后面会讲到的;混合配置,用的情况也是蛮多的,分享中会涉及一点。
接下来,我主要是以java配置类做的配置:

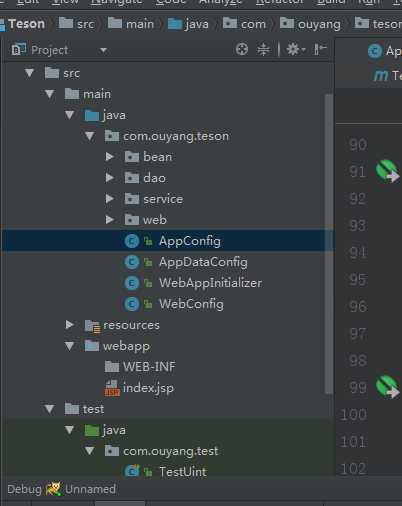
这是项目的结构 com.ouyang.teson目录下直接放置配置类:
1)AppConfig.java
package com.ouyang.teson;


import org.mybatis.spring.mapper.MapperScannerConfigurer;
import org.springframework.context.annotation.*;
import org.springframework.transaction.annotation.EnableTransactionManagement;
import org.springframework.web.servlet.config.annotation.EnableWebMvc;
import org.springframework.web.servlet.mvc.Controller;

/**
 * Created by ThinkPad on 2017/6/15.
 */

@Configuration
@EnableAspectJAutoProxy
@EnableTransactionManagement
@ComponentScan(basePackages = {"com.ouyang.teson"},
        excludeFilters={@ComponentScan.Filter(type=FilterType.ANNOTATION,value=EnableWebMvc.class)}
)
@Import(AppDataConfig.class)
//@PropertySource({"classpath:jdbc.properties"})
//@ImportSource("XXXX.xml")
/*@Configuration,用于表示这个类是一个配置类,用于配置Spring的相关信息
@EnableAspectJAutoProxy,启用切面自动代理,用于AOP
@EnableTransactionManagement,启用注解事务,即可以使用@Transactional注解来控制事务
@ComponentScan,组件扫描,在basePackages指定的目录下扫描被@Controller、@Service、@Component等注解注册的组件
@Import,引入指定的配置类,我们引入了Spring容器配置类和数据源事务配置类
@PropertySource,加载指定的配置文件,配置文件内容会加载入Environment中等待调用*/
public class AppConfig {

    @Bean
    public MapperScannerConfigurer mapperScannerConfigurer() {
        MapperScannerConfigurer mapperScannerConfigurer = new MapperScannerConfigurer();
        // 跟@MapperScan(basePackages = { "com.ouyang.teson.dao" }) 等同
        //如果通过web.xml 加载servlet的话,可能找不到映射对象 建议用注解
        mapperScannerConfigurer.setBasePackage("com.ouyang.teson.dao");
        mapperScannerConfigurer.setSqlSessionFactoryBeanName("sqlSessionFactory");
        return mapperScannerConfigurer;
    }

}
2) AppDataConfig.java 是导入的配置
package com.ouyang.teson;

import com.alibaba.druid.pool.DruidDataSource;
import com.ouyang.teson.bean.TestBean;
import org.apache.ibatis.session.SqlSessionFactory;
import org.mybatis.spring.SqlSessionFactoryBean;
import org.mybatis.spring.SqlSessionTemplate;
import org.mybatis.spring.annotation.MapperScan;
import org.mybatis.spring.mapper.MapperScannerConfigurer;
import org.springframework.beans.factory.annotation.Autowired;
import org.springframework.context.annotation.*;
import org.springframework.core.env.Environment;
import org.springframework.core.io.support.PathMatchingResourcePatternResolver;
import org.springframework.jdbc.datasource.DataSourceTransactionManager;
import org.springframework.transaction.annotation.EnableTransactionManagement;

import javax.sql.DataSource;
import java.io.IOException;

/**
 * Created by ThinkPad on 2017/6/15.
 */


@EnableAspectJAutoProxy
@EnableTransactionManagement
@PropertySource({"classpath:jdbc.properties"})
//@MapperScan(value={"/com/ouyang/teson/dao/*.xml"},basePackages = {"com.ouyang.teson.dao"})
public class AppDataConfig {

    @Autowired
    private Environment env;

    //设置阿里druid数据源
    @Bean(name="dataSource")
    public DataSource getDataSource() {
        DruidDataSource druidDataSource = new DruidDataSource();
        System.out.println("=============env============"+env.getProperty("jdbc.driverClassName"));
        druidDataSource.setDriverClassName(env.getProperty("jdbc.driverClassName"));
        druidDataSource.setUsername(env.getProperty("jdbc.username"));
        druidDataSource.setPassword(env.getProperty("jdbc.password"));
        druidDataSource.setUrl(env.getProperty("jdbc.url"));
        //连接超时时间
        druidDataSource.setMaxWait(10000);
        //最大存活时间
        //druidDataSource.setMaxActive(10000);
        // 配置间隔多久才进行一次检测,检测需要关闭的空闲连接,单位是毫秒
        druidDataSource.setTimeBetweenEvictionRunsMillis(60000);
        //连接池中的最小生存时间
        druidDataSource.setMinEvictableIdleTimeMillis(300000);
        //这里建议配置为TRUE,防止取到的连接不可用
        druidDataSource.setTestOnBorrow(true);
        druidDataSource.setTestOnReturn(false);
        //自动提交
        druidDataSource.setDefaultAutoCommit(true);
        druidDataSource.setPoolPreparedStatements(true);
        druidDataSource.setMaxPoolPreparedStatementPerConnectionSize(20);
        return  druidDataSource;
    }

    // 配置SqlSessionFactory对象
    public SqlSessionFactoryBean getSqSesionFactorys() throws IOException {
        SqlSessionFactoryBean sqlSessionFactoryBean =new SqlSessionFactoryBean();
        sqlSessionFactoryBean.setDataSource(getDataSource());
        // sqlSessionFactoryBean.setConfigLocation(new ClassPathResource("mybatis-config.xml")); // 这里可以通过mybatis-config.xml 来设置 typeAliasPackage和mapper。
        //这个setMapperLocations 必须把mapper文件放resources里面 不然获取文件
        //扫描mybatis配置文件的
        PathMatchingResourcePatternResolver resolver = new PathMatchingResourcePatternResolver();
        sqlSessionFactoryBean.setMapperLocations(resolver.getResources("classpath:mapper/*.xml"));
       /*  Resource[] mapperLocations = new Resource[] { new ClassPathResource("/com/ouyang/teson/mapper*//**//*.xml") };
        sqlSessionFactoryBean.setMapperLocations(mapperLocations);*//*
       *//* Resource resource =new ClassPathResource("mybatis.xml");
        sqlSessionFactoryBean.setConfigLocation(resource);*/
        //设置映射的bean类
        sqlSessionFactoryBean.setTypeAliasesPackage("com.ouyang.teson.bean");
        return sqlSessionFactoryBean;
    }


    @Bean(name = "sqlSessionFactory")
    public SqlSessionFactory sqlSessionFactory() throws Exception {
        SqlSessionFactoryBean factoryBean = getSqSesionFactorys();
        SqlSessionFactory sqlSessionFactory = factoryBean.getObject();
        sqlSessionFactory.getConfiguration().setMapUnderscoreToCamelCase(true);// 开启驼峰映射
        sqlSessionFactory.getConfiguration().setCacheEnabled(true);
        //sqlSessionFactory.getConfiguration().setLazyLoadingEnabled(true);
        sqlSessionFactory.getConfiguration().setAggressiveLazyLoading(false);
        return sqlSessionFactory;
    }

    @Bean(name = "transactionManager")
    public DataSourceTransactionManager dataSourceTransactionManager() {
        DataSourceTransactionManager dataSourceTransactionManager = new DataSourceTransactionManager();
        dataSourceTransactionManager.setDataSource(this.getDataSource());
        return dataSourceTransactionManager;
    }


    @Bean
    @Scope("prototype")
    public SqlSessionTemplate sqlSessionTemplate() throws Exception {
        SqlSessionTemplate template =new SqlSessionTemplate(sqlSessionFactory());
        return template;
    }


}
3)webConfig.java
package com.ouyang.teson;

import org.slf4j.Logger;
import org.slf4j.LoggerFactory;
import org.springframework.context.annotation.Bean;
import org.springframework.context.annotation.ComponentScan;
import org.springframework.context.annotation.Configuration;
import org.springframework.context.annotation.FilterType;
import org.springframework.web.servlet.ViewResolver;
import org.springframework.web.servlet.config.annotation.EnableWebMvc;
import org.springframework.web.servlet.config.annotation.ResourceHandlerRegistry;
import org.springframework.web.servlet.config.annotation.WebMvcConfigurerAdapter;
import org.springframework.web.servlet.mvc.Controller;
import org.springframework.web.servlet.view.InternalResourceViewResolver;

/**
 * Created by ThinkPad on 2017/6/15.
 */
@Configuration
@EnableWebMvc
@ComponentScan(basePackages = {"com.ouyang.teson"},useDefaultFilters = true)
public class WebConfig extends WebMvcConfigurerAdapter{

    private final static Logger logger = LoggerFactory.getLogger(WebConfig.class);

    public ViewResolver viewResolver() {
        InternalResourceViewResolver viewResolver = new InternalResourceViewResolver();
        viewResolver.setPrefix("/WEB-INF/views/jsp/function/");
        viewResolver.setSuffix(".jsp");
        return viewResolver;
    }

    //静态文件
    @Override
    public void addResourceHandlers(ResourceHandlerRegistry registry) {
        logger.info("addResourceHandlers");
        registry.addResourceHandler("/static/**").addResourceLocations("/WEB-INF/static/");
    }


}
SpringMvc也设置了@ComponentScan,也会去扫相应的包,useDefaultFilters = true 会自动过滤 @Component@Repository, @Service, or @Controller 一些重复的;
4) resources 配置目录下 主要是两个文件:1,jdbc.properties ;2,logback.xml
以下是logback.xml,还稍微比较乱,拿其他项目的配置,顺便改了一下
<?xml version="1.0" encoding="UTF-8"?>
<configuration>
    <property name="LOG_HOME" value="D:/logs2/" />
    <appender name="STDOUT" class="ch.qos.logback.core.ConsoleAppender">
        <encoder>
            <pattern>%d{yyyy-MM-dd HH:mm:ss.SSS} [%thread] %-5level [%logger{36}] - %msg%n
            </pattern>
        </encoder>
    </appender>
    <appender name="FILE"
        class="ch.qos.logback.core.rolling.RollingFileAppender">
        <file>${LOG_HOME}/dts_rpc_main.log</file>

        <rollingPolicy class="ch.qos.logback.core.rolling.TimeBasedRollingPolicy">
            <!-- rollover daily -->
            <fileNamePattern>${LOG_HOME}/logbak/dts_rpc_main-%d{yyyy-MM-dd}.%i.log.zip</fileNamePattern>
            <timeBasedFileNamingAndTriggeringPolicy
                class="ch.qos.logback.core.rolling.SizeAndTimeBasedFNATP">
                <!-- or whenever the file size reaches 300MB -->
                <maxFileSize>1000MB</maxFileSize>
            </timeBasedFileNamingAndTriggeringPolicy>
        </rollingPolicy>

        <!-- 日志输出格式 -->
        <encoder>
            <pattern>%d{yyyy-MM-dd HH:mm:ss.SSS} [%thread] %-5level %logger{36} - %msg%n  </pattern>
        </encoder>
    </appender>

    <logger name="com.ouyang.teson" level="INFO" additivity="false">
        <appender-ref ref="FILE" />
    </logger>

    <logger name="org.springframework" level="WARN" additivity="false">
        <appender-ref ref="STDOUT" />
    </logger>
    <logger name="org.springframework.boot" level="WARN" additivity="false">
        <appender-ref ref="STDOUT" />
    </logger>
    <logger name="org.mybatis" level="WARN" additivity="false">
        <appender-ref ref="STDOUT" />
    </logger>
    <logger name="org.apache" level="WARN" additivity="false">
        <appender-ref ref="STDOUT" />
    </logger>
    <logger name="com.ouyang" level="DEBUG" additivity="false">
        <appender-ref ref="STDOUT" />
    </logger>
    <logger name="com.alibaba" level="DEBUG" additivity="false">
        <appender-ref ref="STDOUT" />
    </logger>
    <root level="DEBUG">
        <appender-ref ref="STDOUT" />
    </root>
</configuration>
5) pom.xml
导入的包,都是当下最新的包
<project xmlns="http://maven.apache.org/POM/4.0.0" xmlns:xsi="http://www.w3.org/2001/XMLSchema-instance"
  xsi:schemaLocation="http://maven.apache.org/POM/4.0.0 http://maven.apache.org/maven-v4_0_0.xsd">
  <modelVersion>4.0.0</modelVersion>
  <groupId>com.ouyang</groupId>
  <artifactId>Teson</artifactId>
  <packaging>war</packaging>
  <version>1.0-SNAPSHOT</version>
  <name>Teson Maven Webapp</name>
  <url>http://maven.apache.org</url>

  <properties>
    <!-- spring版本号 -->
    <spring.version>4.3.9.RELEASE</spring.version>
    <!-- log4j日志文件管理包版本 -->
    <slf4j.version>1.6.6</slf4j.version>
    <log4j.version>1.2.12</log4j.version>
    <!-- mybatis版本号 -->
    <mybatis.version>3.4.4</mybatis.version>

  </properties>

  <dependencies>
    <dependency>
      <groupId>junit</groupId>
      <artifactId>junit</artifactId>
      <version>4.12</version>
      <scope>test</scope>
    </dependency>

    <!-- spring-core -->
    <dependency>
      <groupId>org.springframework</groupId>
      <artifactId>spring-core</artifactId>
      <version>${spring.version}</version>
    </dependency>
    <dependency>
      <groupId>org.springframework</groupId>
      <artifactId>spring-context</artifactId>
      <version>${spring.version}</version>
    </dependency>
    <dependency>
      <groupId>org.springframework</groupId>
      <artifactId>spring-test</artifactId>
      <version>${spring.version}</version>
    </dependency>
    <dependency>
      <groupId>org.springframework</groupId>
      <artifactId>spring-aop</artifactId>
      <version>${spring.version}</version>
    </dependency>
    <dependency>
      <groupId>org.springframework</groupId>
      <artifactId>spring-jdbc</artifactId>
      <version>${spring.version}</version>
    </dependency>
    <dependency>
      <groupId>org.springframework</groupId>
      <artifactId>spring-webmvc</artifactId>
      <version>${spring.version}</version>
    </dependency>

    <!-- AspectJ Runtime -->
    <dependency>
      <groupId>org.aspectj</groupId>
      <artifactId>aspectjrt</artifactId>
      <version>1.8.6</version>
    </dependency>
    <!-- AspectJ Weaver -->
    <dependency>
      <groupId>org.aspectj</groupId>
      <artifactId>aspectjweaver</artifactId>
      <version>1.8.6</version>
    </dependency>

    <!--  log 日志 -->
    <dependency>
      <groupId>org.slf4j</groupId>
      <artifactId>jcl-over-slf4j</artifactId>
      <version>1.7.21</version>
    </dependency>
    <dependency>
      <groupId>ch.qos.logback</groupId>
      <artifactId>logback-classic</artifactId>
      <version>1.1.7</version>
    </dependency>

    <!-- mybatis -->
    <dependency>
      <groupId>org.mybatis</groupId>
      <artifactId>mybatis</artifactId>
      <version>${mybatis.version}</version>
    </dependency>
    <dependency>
      <groupId>org.mybatis</groupId>
      <artifactId>mybatis-spring</artifactId>
      <version>1.3.1</version>
    </dependency>

    <!-- mysql驱动包 -->
    <dependency>
      <groupId>mysql</groupId>
      <artifactId>mysql-connector-java</artifactId>
      <version>5.1.29</version>
    </dependency>

    <!-- https://mvnrepository.com/artifact/com.alibaba/druid -->
    <dependency>
      <groupId>com.alibaba</groupId>
      <artifactId>druid</artifactId>
      <version>1.0.31</version>
    </dependency>

    <!-- https://mvnrepository.com/artifact/com.google.code.gson/gson -->
    <dependency>
      <groupId>com.google.code.gson</groupId>
      <artifactId>gson</artifactId>
      <version>2.8.0</version>
    </dependency>
    <dependency>
      <groupId>junit</groupId>
      <artifactId>junit</artifactId>
      <version>RELEASE</version>
    </dependency>

    <!-- https://mvnrepository.com/artifact/javax.servlet/javax.servlet-api -->
    <dependency>
      <groupId>javax.servlet</groupId>
      <artifactId>javax.servlet-api</artifactId>
      <version>3.1.0</version>
      <scope>provided</scope>
    </dependency>


  </dependencies>
  <build>
    <finalName>Teson</finalName>

    <!--<build>
      <finalName>app</finalName>
    </build>-->
    <resources>
      <resource>
        <directory>src/main/java</directory>
        <includes>
          <include>**/*.xml</include>
        </includes>
        <filtering>false</filtering>
      </resource>
    </resources>
    <plugins>
      <plugin>
        <groupId>org.apache.maven.plugins</groupId>
        <artifactId>maven-compiler-plugin</artifactId>
        <version>3.5.1</version>
        <configuration>
          <source>1.8</source>
          <target>1.8</target>
          <encoding>UTF-8</encoding>
        </configuration>
      </plugin>

      <!--- 为防止 没有web.xml 情况下打包报错 -->
      <plugin>
        <groupId>org.apache.maven.plugins</groupId>
        <artifactId>maven-war-plugin</artifactId>
        <version>2.2</version>
        <configuration>
          <failOnMissingWebXml>false</failOnMissingWebXml>
        </configuration>
      </plugin>
    </plugins>

  </build>
</project>
基本的配置就这样,有基础基本都能看得懂
接下来,要说说怎么启动web服务器了
1)方法1
在servlet3.0之后,启动servlet,在spring里是可以直接通过java配置类进行加载servlet的。
springmvc 提供一个类AbstractAnnotationConfigDispatcherServletInitializer,该类创建了DispatcherServlet和ContextLoaderListener:getServletConfigClasses()返回的配置类定义了Spring MVC应用容器中的beans;getRootConfigClasses()返回的配置类定义了Spring应用根容器中的beans。
Spring MVC容器是根容器的子容器,子容器可以看到根容器中定义的beans,反之不行。
注意:通过AbstractAnnotationConfigDispatcherServletInitializer配置DispatcherServlet仅仅是传统的web.xml文件方式的另一个可选项。尽管你也可以使用AbstractAnnotationConfigDispatcherServletInitializer的一个子类引入web.xml文件来配置,但这没有必要。
可以参考文章:https://segmentfault.com/a/1190000004343063?_ea=575820
所以你只要自定一个类继承AbstractAnnotationConfigDispatcherServletInitializer ,你可以删掉web.xml了
webAppInitalzer.java
package com.ouyang.teson;

import org.springframework.web.servlet.support.AbstractAnnotationConfigDispatcherServletInitializer;

/**
 * Created by ThinkPad on 2017/6/15.
 */
public class WebAppInitializer extends AbstractAnnotationConfigDispatcherServletInitializer {

    @Override
    protected Class<?>[] getRootConfigClasses() {
        return new Class[] { AppConfig.class };
    }

    @Override
    protected Class<?>[] getServletConfigClasses() {
        return new Class[] { WebConfig.class };
    }

    /**
     * identifies one or more paths that DispatcherServlet will be mapped to.<br>
     *  In this case, it’s mapped to /, indicating that it will be the application’s default servlet.<br>
     *   It will handle all requests coming into the application.
     */
    @Override
    protected String[] getServletMappings() {
        return new String[] { "/" };
    }

}
2) 方法2
你还是可以依然使用web.xml 来加载servlet,以下是web.xml的配置
<!DOCTYPE web-app PUBLIC
 "-//Sun Microsystems, Inc.//DTD Web Application 2.3//EN"
 "http://java.sun.com/dtd/web-app_2_3.dtd" >

<web-app>
 <context-param>
   <param-name>contextClass</param-name>
   <param-value>org.springframework.web.context.support.AnnotationConfigWebApplicationContext</param-value>
 </context-param>
  <context-param>
   <param-name>contextClassLocation</param-name>
   <param-value>com.ouyang.teson.AppConfig</param-value>
 </context-param>

    <listener>
        <listener-class>org.springframework.web.context.ContextLoaderListener</listener-class>
    </listener>
    <servlet>
        <servlet-name>springServlet</servlet-name>
        <servlet-class>org.springframework.web.servlet.DispatcherServlet</servlet-class>
        <init-param>
            <param-name>contextClass</param-name>
            <param-value>org.springframework.web.context.support.AnnotationConfigWebApplicationContext</param-value>
        </init-param>
        <init-param>
            <param-name>contextConfigLocations</param-name>
            <param-value>com.ouyang.teson.WebConfig</param-value>
        </init-param>

        <load-on-startup>1</load-on-startup>
    </servlet>

    <servlet-mapping>
        <servlet-name>springServlet</servlet-name>
        <url-pattern>/</url-pattern>
    </servlet-mapping>

  <display-name>Archetype Created Web Application</display-name>
</web-app>
1)@PropertiesSource 该注解主要是导入配置属性的,可是如果该配置类里面,如果有@bean的方法加载失败,则会直接报@PropertiesSource的属性找不到,而是定位到具体的@bean配置出现问题。
查看源码,确实很难debug代码到具体的问题,层次太深了。
2)同一个配置类,@bean的方法,在处理@bean时,是把配置加载到List集合,然后统一实例化,如果有@bean的方法是通过ContentServlet去获取bean的可能获取不到而直接报错。
ConfigurationClassParser.java 是直接加载配置类注解的主要逻辑处理,处理流程是先加载配置文件@PropertiesSource,然后处理 ComponentScans注解,加载文件,接着是处理@Import 和@importSource注解,调用processImports(configClass, sourceClass, getImports(sourceClass), true)进行处理,处理导入的配置类如果没有异常,就会把bean加载到serveltcontenx里,在主配置类就可以注入使用,如果注入不了,说明导入的配置类有问题,接着处理配置中@Bean的方法,接着processInterfaces(configClass, sourceClass)处理继承接口的默认方法。其实这个过程中,是有重复加载的,@bean的方法实例化的对象也是有重复的过程,具体怎么实现没有跟踪下去。 有时间可以自己去跟踪一下代码。
3) 还有一个坑,就是mybatis的配置,PathMatchingResourcePatternResolver resolver = new PathMatchingResourcePatternResolver();
sqlSessionFactoryBean.setMapperLocations(resolver.getResources("classpath:mapper/*.xml")); 这里配置到com.ouyang.teson.mapper 不起作用,原因是maven打包的时候不会把classpath下的xml打包进去,不过在resources下的配置文件是可以被打包进去的,所有必须把xml文件放到resources下面,才能在命名空间,映射到具体的sql。
建议:
1,配置的时候建议一步步来,不要一下配置得太多,而且一边配置,一边测试,那是最好的,避免配置太多无法一下子定位问题。
spring4+srpingmvc+mybatis基本框架(app框架搭建一)
标签:搭建配置 删掉 mysql sts junit 日志 alibaba lis ann
原文地址:http://www.cnblogs.com/minsons/p/7019166.html