标签:code parse images star pack art f11 long 过滤器
第一步:provider和customer中添加pom.xml完整依赖

<project xmlns="http://maven.apache.org/POM/4.0.0" xmlns:xsi="http://www.w3.org/2001/XMLSchema-instance"
  xsi:schemaLocation="http://maven.apache.org/POM/4.0.0 http://maven.apache.org/maven-v4_0_0.xsd">
  <modelVersion>4.0.0</modelVersion>
  <groupId>com.test</groupId>
  <artifactId>Provider</artifactId>
  <packaging>war</packaging>
  <version>0.0.1-SNAPSHOT</version>
  <name>Provider Maven Webapp</name>
  <url>http://maven.apache.org</url>
  <dependencies>
      <dependency>
        <groupId>javax.servlet</groupId>
        <artifactId>javax.servlet-api</artifactId>
        <version>3.1.0</version>
    </dependency>

    <!-- spring需要的jar包 -->
    <dependency>
        <groupId>org.springframework</groupId>
        <artifactId>spring-context</artifactId>
        <version>3.2.4.RELEASE</version>
        <type>jar</type>
    </dependency>

    <dependency>
        <groupId>org.springframework</groupId>
        <artifactId>spring-core</artifactId>
        <version>3.2.4.RELEASE</version>
        <type>jar</type>
    </dependency>

    <dependency>
        <groupId>org.springframework</groupId>
        <artifactId>spring-beans</artifactId>
        <version>3.2.4.RELEASE</version>
        <type>jar</type>
    </dependency>

    <dependency>
        <groupId>org.springframework</groupId>
        <artifactId>spring-webmvc</artifactId>
        <version>3.2.4.RELEASE</version>
        <type>jar</type>
    </dependency>

    <dependency>
        <groupId>org.springframework</groupId>
        <artifactId>spring-orm</artifactId>
        <version>3.2.4.RELEASE</version>
        <type>jar</type>
    </dependency>

    <!-- hibernate需要的jar包 -->
    <dependency>
        <groupId>org.hibernate</groupId>
        <artifactId>hibernate-validator</artifactId>
        <version>5.1.3.Final</version>
    </dependency>

    <dependency>
        <groupId>org.hibernate</groupId>
        <artifactId>hibernate-core</artifactId>
        <version>4.2.16.Final</version>
        <type>jar</type>
    </dependency>

    <!-- hibernate ehcache需要的jar包 -->
    <!-- <dependency>
        <groupId>org.hibernate</groupId>
        <artifactId>hibernate-ehcache</artifactId>
        <version>4.3.8.Final</version>
    </dependency>  -->

    <!-- 连接MySQL数据库需要的jar包 -->
    <dependency>
        <groupId>mysql</groupId>
        <artifactId>mysql-connector-java</artifactId>
        <version>5.1.34</version>
    </dependency>

    <!-- dbcp连接池需要的jar包 -->
    <dependency>
        <groupId>commons-dbcp</groupId>
        <artifactId>commons-dbcp</artifactId>
        <version>1.4</version>
    </dependency>

    <!-- jstl需要的jar包 -->
    <dependency>
        <groupId>jstl</groupId>
        <artifactId>jstl</artifactId>
        <version>1.2</version>
    </dependency>

    <!-- log4j需要的jar包 -->
    <dependency>
        <groupId>log4j</groupId>
        <artifactId>log4j</artifactId>
        <version>1.2.17</version>
    </dependency>

    <!-- 文件上传需要的jar包 -->
    <dependency>
        <groupId>commons-fileupload</groupId>
        <artifactId>commons-fileupload</artifactId>
        <version>1.2.1</version>
    </dependency>

    <dependency>
        <groupId>commons-io</groupId>
        <artifactId>commons-io</artifactId>
        <version>1.4</version>
    </dependency>

    <dependency>
        <groupId>javax.servlet.jsp</groupId>
        <artifactId>jsp-api</artifactId>
        <version>2.2</version>
        <type>jar</type>
    </dependency>

    <dependency>
        <groupId>javax.validation</groupId>
        <artifactId>validation-api</artifactId>
        <version>1.1.0.Final</version>
    </dependency>

    <dependency>
        <groupId>org.apache.ant</groupId>
        <artifactId>ant</artifactId>
        <version>1.7.0</version>
    </dependency>

    <dependency>
      <groupId>junit</groupId>
      <artifactId>junit</artifactId>
      <version>3.8.1</version>
      <scope>test</scope>
    </dependency>
  </dependencies>
  <build>
    <finalName>Provider</finalName>
    <plugins>
        <plugin>
            <groupId>org.apache.maven.plugins</groupId>
            <artifactId>maven-compiler-plugin</artifactId>
            <version>2.3.2</version>
            <configuration>
                <source>1.7</source>
                <target>1.7</target>
            </configuration>
        </plugin>
    </plugins>
  </build>
</project>
第二步:准备provider
1.修改pom.xml
2.修改web.xml
<?xml version="1.0" encoding="UTF-8"?>
<web-app xmlns:xsi="http://www.w3.org/2001/XMLSchema-instance"
    xmlns="http://java.sun.com/xml/ns/javaee"
    xsi:schemaLocation="http://java.sun.com/xml/ns/javaee http://java.sun.com/xml/ns/javaee/web-app_3_0.xsd"
    version="3.0">
    <display-name></display-name>

  <listener-class>
        org.springframework.web.context.ContextLoaderListener
    </listener-class>

    <servlet>
        <servlet-name>provider</servlet-name>
        <servlet-class>org.springframework.web.servlet.DispatcherServlet</servlet-class>
        <init-param>
            <param-name>contextConfigLocation</param-name>
            <param-value>
                classpath:applicationContext.xml,classpath:applicationContext-servlet.xml
            </param-value>
        </init-param>
        <load-on-startup>1</load-on-startup>
    </servlet>
    <servlet-mapping>
        <servlet-name>provider</servlet-name>
        <url-pattern>*.do</url-pattern>
    </servlet-mapping>

    <!-- 字符过滤器 -->
    <filter>
        <filter-name>Set Character Encoding</filter-name>
        <filter-class>org.springframework.web.filter.CharacterEncodingFilter</filter-class>
        <init-param>
            <param-name>encoding</param-name>
            <param-value>UTF-8</param-value>
        </init-param>
    </filter>
    <filter-mapping>
        <filter-name>Set Character Encoding</filter-name>
        <url-pattern>/*</url-pattern>
    </filter-mapping>


  <welcome-file-list>
    <welcome-file>index.jsp</welcome-file>
  </welcome-file-list>
</web-app>
3.Provider中添加服务接口
package com.zlg.test.provider;

import java.util.List;

/**
 * @Title: DemoService.java
 * @Package: com.zlg.test.provider
 * @Description: TODO
 * @author: zlg
 * @date: 2017年6月17日 下午8:17:06
 * @version: V1.0
 */
public interface DemoService {

    String sayHello(String name);

    public List getUsers();

}
4.Provider中添加服务接口实现类
package com.zlg.test.provider;

import java.util.ArrayList;
import java.util.List;

import com.zlg.test.po.User;

/**
 * @Title: DemoServiceImpl.java
 * @Package: com.zlg.test.provider
 * @Description: TODO
 * @author: zlg
 * @date: 2017年6月17日 下午8:21:26
 * @version: V1.0
 */
public class DemoServiceImpl implements DemoService {

    @Override
    public String sayHello(String name) {
        return "Hello, " + name + ". Welcome!";
    }

    @Override
    @SuppressWarnings("rawtypes")
    public List getUsers() {

        List<User> users = new ArrayList<User>(3);

        User user1 = new User(1, "张三");
        User user2 = new User(1, "李四");
        User user3 = new User(1, "麻子");

        users.add(user1);
        users.add(user2);
        users.add(user3);

        return null;
    }

}
5.添加applicationContext.xml文件
<?xml version="1.0" encoding="UTF-8"?>
<beans xmlns="http://www.springframework.org/schema/beans"
    xmlns:xsi="http://www.w3.org/2001/XMLSchema-instance" xmlns:dubbo="http://code.alibabatech.com/schema/dubbo"
    xsi:schemaLocation="http://www.springframework.org/schema/beans
        http://www.springframework.org/schema/beans/spring-beans.xsd
        http://code.alibabatech.com/schema/dubbo
        http://code.alibabatech.com/schema/dubbo/dubbo.xsd
        ">

    <!-- 具体的实现bean -->
    <bean id="demoService" class="com.zlg.test.provider.DemoServiceImpl" />

    <!-- 提供方应用信息,用于计算依赖关系 -->
    <dubbo:application name="xs_provider" />

    <!-- 使用multicast广播注册中心暴露服务地址 -->
    <!--<dubbo:registry address="multicast://224.5.6.7:1234" /> -->

    <!-- 使用zookeeper注册中心暴露服务地址 --即zookeeper的所在服务器ip地址和端口号 -->
    <dubbo:registry address="zookeeper://192.168.0.100:2181" />

    <!-- 用dubbo协议在20880端口暴露服务 -->
    <dubbo:protocol name="dubbo" port="20880" />

    <!-- 声明需要暴露的服务接口 -->
    <dubbo:service interface="com.zlg.test.provider.DemoService"
        ref="demoService" />

</beans>
6.添加测试类
package com.zlg.test.provider;

import java.io.IOException;

import org.springframework.context.support.ClassPathXmlApplicationContext;

/**
 * @Title: TestProvider.java
 * @Package: com.zlg.test.provider
 * @Description: TODO
 * @author: zlg
 * @date: 2017年6月17日 下午8:33:58
 * @version: V1.0
 */
public class TestProvider {

    public static void main(String[] args) throws IOException {
        ClassPathXmlApplicationContext context = new ClassPathXmlApplicationContext(
                new String[] { "applicationContext.xml" });
        context.start();
        System.in.read(); // 为保证服务一直开着,利用输入流的阻塞来模拟
    }
}
ctrl+f11运行测试类
此时会报错:
错误1:通配符的匹配很全面, 但无法找到元素 ‘dubbo:application‘ 的声明。
错误2:Caused by: org.xml.sax.SAXParseException; lineNumber: 9; columnNumber: 46; cvc-complex-type.2.4.c: 通配符的匹配很全面, 但无法找到元素 ‘dubbo:application‘ 的声明
解决方法:
a.Eclipse中补充dubbo.xsd
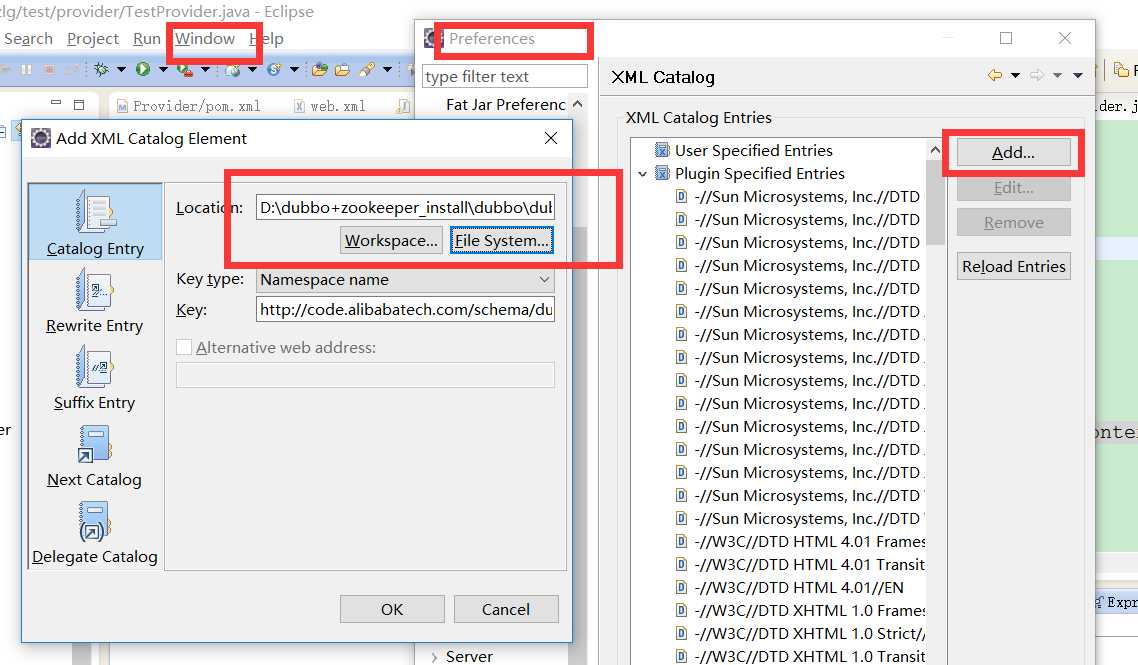
b.pom添加依赖
<dependency>
        <groupId>com.alibaba</groupId>
        <artifactId>dubbo</artifactId>
        <version>2.5.3</version>
        <exclusions>
            <exclusion>
                <groupId>org.springframework</groupId>
                <artifactId>spring</artifactId>
            </exclusion>
            <!-- <exclusion>
                <artifactId>netty</artifactId>
                <groupId>org.jboss.netty</groupId>
            </exclusion> -->
        </exclusions>
    </dependency>

    <dependency>
        <groupId>com.github.sgroschupf</groupId>
        <artifactId>zkclient</artifactId>
        <version>0.1</version>
    </dependency>
第三步:准备customer
1.修改pom.xml
2.添加applicationContext.xml
<?xml version="1.0" encoding="UTF-8"?>
<beans xmlns="http://www.springframework.org/schema/beans"
    xmlns:xsi="http://www.w3.org/2001/XMLSchema-instance" xmlns:dubbo="http://code.alibabatech.com/schema/dubbo"
    xsi:schemaLocation="http://www.springframework.org/schema/beans
        http://www.springframework.org/schema/beans/spring-beans.xsd
        http://code.alibabatech.com/schema/dubbo
        http://code.alibabatech.com/schema/dubbo/dubbo.xsd
        ">

    <!-- 消费方应用名,用于计算依赖关系,不是匹配条件,不要与提供方一样 -->
    <dubbo:application name="Customer" />

    <!-- 使用zookeeper注册中心暴露服务地址 -->
    <!-- <dubbo:registry address="multicast://224.5.6.7:1234" /> -->
    <dubbo:registry address="zookeeper://192.168.0.100:2181" />

    <!-- 生成远程服务代理,可以像使用本地bean一样使用demoService -->
    <dubbo:reference id="demoService"
        interface="com.zlg.test.provider.DemoService" />

</beans>
3.添加测试类:
package com.test.zlg.customer;

import java.util.List;

import org.springframework.context.support.ClassPathXmlApplicationContext;

import com.zlg.test.po.User;
import com.zlg.test.provider.DemoService;

/**
 * @Title: TestCustomer.java
 * @Package: com.test.zlg.customer
 * @Description: TODO
 * @author: zlg
 * @date: 2017年6月17日 下午9:23:51
 * @version: V1.0
 */
public class TestCustomer {

    public static void main(String[] args) throws Exception {
        ClassPathXmlApplicationContext context = new ClassPathXmlApplicationContext(
                new String[] { "applicationContext.xml" });
        context.start();

        DemoService demoService = (DemoService) context.getBean("demoService");
        String hello = demoService.sayHello("zlg");
        System.out.println(hello);

        List<User> list = (List<User>)demoService.getUsers();
        if (list != null && list.size() > 0) {
            for (int i = 0; i < list.size(); i++) {
                System.out.println("name:" + list.get(i).getName());
            }
        }
        System.in.read();
    }

}
第四步:联合测试(前提:将dubbo和zookeeper启动起来)
a.将provider工程加入到Tomcat容器中
b.启动tomcat,运行该项目
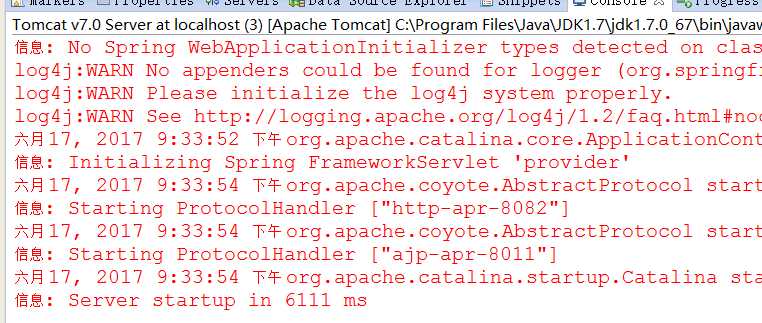
c.ctrl+f11运行customer工程中的TestCustomer.java文件,查看效果

补充:
a.po:user类,需要
implements Serializable
package com.zlg.test.po;

import java.io.Serializable;

/**
 * @Title: User.java
 * @Package: com.zlg.test.po
 * @Description: TODO
 * @author: zlg
 * @date: 2017年6月17日 下午8:24:03
 * @version: V1.0
 */
public class User implements Serializable{

    /**
     * Fields User.java
     */
    private static final long serialVersionUID = -2680605921068309009L;

    private int id;

    private String name;

    public User(int id, String name) {
        super();
        this.id = id;
        this.name = name;
    }

    public int getId() {
        return id;
    }

    public void setId(int id) {
        this.id = id;
    }

    public String getName() {
        return name;
    }

    public void setName(String name) {
        this.name = name;
    }


}
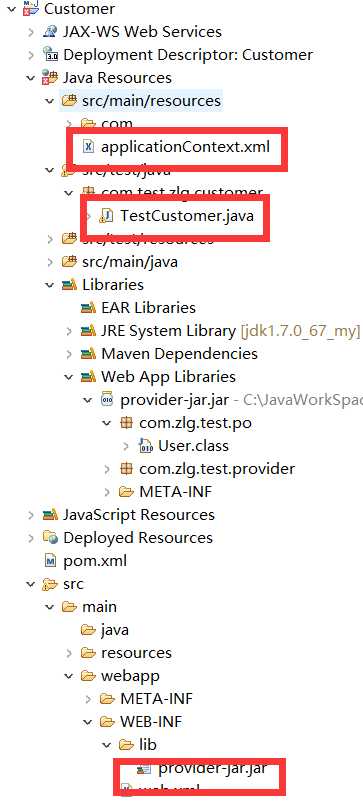
b.customer工程需要包含DemoService类和User类
方式1:将Provider工程中的User.java和DemoService.java 打成jar包,放入到Customer工程中。
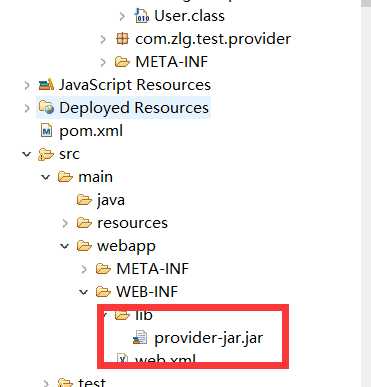
方式2:简历Maven module,抽离出common工程,将公共的Service接口和pojo放入到common工程中公用。
项目中推荐使用方式2
c.工程结构
provider:
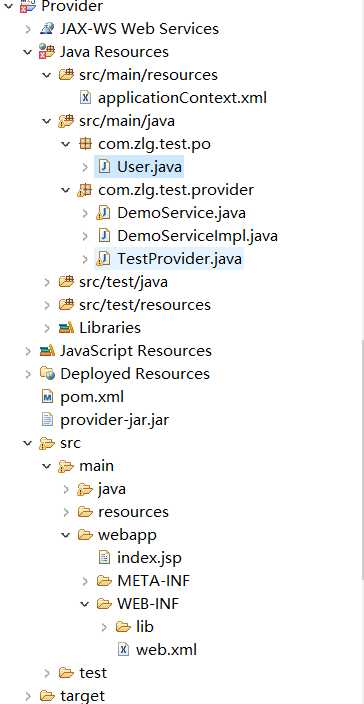
customer:
代码在gitHub上,如果需要可以留言给地址down代码。
【Dubbo】整合Dubbo+Zookeeper+SpringMVC(三)---构建服务提供者和消费者
标签:code parse images star pack art f11 long 过滤器
原文地址:http://www.cnblogs.com/flydkPocketMagic/p/7041463.html