标签:add 2016年 ext get .text rem alt 背景 pat
在实现瀑布流之前先来看看瀑布流的雏形(此方法的雏形 UICollectionView)
对于UICollectionView我们有几点注意事项
图(一)
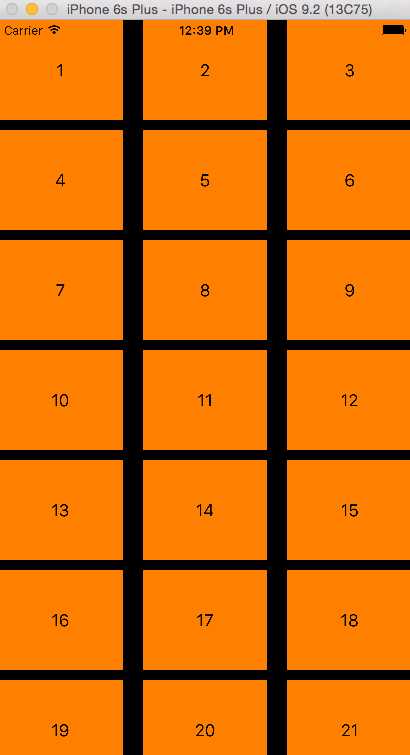
如图,模拟器上展示的是很多方格,但是值得注意的是他们是有规则的。
虽然看上去很整洁但是并不美观。
我们所说的要实现瀑布流就是要实现它的不整洁,但是规律(这里我说的是规律)
前面说了UIcollectionView的大部分操作在FlowLayout上,当然也包括格局部署。
为了实现瀑布流我们所要实现的便是改变他的格局部署。
下面是实现的代码部分(不提供demo了 很简单)
我在注释中简单介绍。
---

//
//  ViewController.m
//  CX-瀑布流UIcollectionView实现
//
//  Created by ma c on 16/4/8.
//  Copyright ? 2016年 bjsxt. All rights reserved.
//

#import "ViewController.h"
#import "CXCollectionViewCell.h"
#import "CXCollectionViewLayout.h"

static NSString * identifier = @"cellID";

@interface ViewController ()<UICollectionViewDataSource>
//所要展示的UICollectionView
@property (nonatomic, strong) UICollectionView * collectionView;

@end

@implementation ViewController

#pragma mark - <懒加载>
- (UICollectionView *)collectionView {
    if (!_collectionView) {
        //初始化我们自定义的flowLayout
        CXCollectionViewLayout * flowLayout = [[CXCollectionViewLayout alloc]init];
        //初始化collectionView
        _collectionView = [[UICollectionView alloc]initWithFrame:self.view.bounds collectionViewLayout:flowLayout];
        //设置数据源(collectionView的命根子)
        _collectionView.dataSource = self;
        //注册我们自定义的cell
        [_collectionView registerNib:[UINib nibWithNibName:NSStringFromClass([CXCollectionViewCell class]) bundle:nil] forCellWithReuseIdentifier:identifier];
    }
    return _collectionView;
}


#pragma mark - <life>

- (void)viewDidLoad {
    [super viewDidLoad];
    //在self.view上添加---
    [self.view addSubview:self.collectionView];
}
#pragma mark - <UICollectionViewDataSource>
//这里返回的是item的个数 返回100
- (NSInteger)collectionView:(UICollectionView *)collectionView numberOfItemsInSection:(NSInteger)section{

    return 100;
}
//这里返回的是cell 我们可以在这里进行一些简单的操作
-(UICollectionViewCell *)collectionView:(UICollectionView *)collectionView cellForItemAtIndexPath:(NSIndexPath *)indexPath{

    CXCollectionViewCell * cell = [collectionView dequeueReusableCellWithReuseIdentifier:identifier forIndexPath:indexPath];
    //为了瀑布流的实现细节我们添加的Label

    cell.label.text = [NSString stringWithFormat:@"%zd",indexPath.item];
    //cell的背景色
    cell.backgroundColor = [UIColor orangeColor];

    return cell;
}

@end
---
//
//  CXCollectionViewLayout.m
//  CX-瀑布流UIcollectionView实现
//
//  Created by ma c on 16/4/8.
//  Copyright ? 2016年 bjsxt. All rights reserved.
//

#import "CXCollectionViewLayout.h"

//瀑布流的列数
static NSInteger CXcolumnCount = 3;
//瀑布流的内边距
static UIEdgeInsets CXdefaultEdgeInsets = {20,15,10,15};
//cell的列间距
static NSInteger CXcolumnMagin = 10;
//cell的行间距
static NSInteger CXrowMagin = 10;

@interface CXCollectionViewLayout ()

//存放所有cell 的布局属性
@property (nonatomic, strong) NSMutableArray * CXattrsArray;
//缩放所有列的高度
@property (nonatomic, strong) NSMutableArray * CXcolumnHeights;

@end

@implementation CXCollectionViewLayout

#pragma mark - <懒加载>
- (NSMutableArray *)CXattrsArray{
    if (!_CXattrsArray) {
        _CXattrsArray = [NSMutableArray array];
    }
    return _CXattrsArray;
}

- (NSMutableArray *)CXcolumnHeights{
    if (!_CXcolumnHeights) {
        _CXcolumnHeights = [NSMutableArray array];
    }
    return _CXcolumnHeights;
}
#pragma mark - <准备布局>
//准备布局(布局前自动执行)
- (void) prepareLayout{
    //重写此方法一定要记得super
    [super prepareLayout];

    //在实际操作中我们的数据并不会固定不变的,因此我们每次布局前最好要清空之前存储的属性
    //清空存放所有列的高度
    //清空存放所有cell的不去属性
    [self.CXcolumnHeights removeAllObjects];
    [self.CXattrsArray removeAllObjects];
    //首先为第一行的cell附高度
    for (NSInteger i = 0; i < CXcolumnCount; i ++) {
        //数组里只能存放对象
        [self.CXcolumnHeights addObject:@(CXdefaultEdgeInsets.top)];
    }
    //下面开始创建每一个cell的布局属性 并且添加到存储cell布局属性的数组中
    //cell总个数 因为这里只要一个section
    NSInteger count = [self.collectionView numberOfItemsInSection:0];
    for (NSInteger i = 0; i < count; i ++) {
        // 创建位置 即indexPath
        NSIndexPath * indexPath = [NSIndexPath indexPathForItem:i inSection:0];
        //获取indexPath对应的cell布局属性
        UICollectionViewLayoutAttributes * attributes = [self layoutAttributesForItemAtIndexPath:indexPath];
        //把获取到的布局属性添加到数组中
        [self.CXattrsArray addObject:attributes];
    }
    //准备布局的工作到这里就结束了
}
//返回所有cell布局属性 及整体cell 的排布
- (NSArray<UICollectionViewLayoutAttributes *> *)layoutAttributesForElementsInRect:(CGRect)rect{
    return self.CXattrsArray;
}
//返回cell 的布局属性
- (UICollectionViewLayoutAttributes *)layoutAttributesForItemAtIndexPath:(NSIndexPath *)indexPath{
    //创建布局属性
    UICollectionViewLayoutAttributes * CXattributes = [UICollectionViewLayoutAttributes layoutAttributesForCellWithIndexPath:indexPath];

    //获取collectionView 的宽
    CGFloat collectionViewWidth = self.collectionView.frame.size.width;
    //下面的一部分是获取cell的frame(布局属性)
    CGFloat width;
    CGFloat height;
    CGFloat X;
    CGFloat Y;
    //获取width
    width = (collectionViewWidth - CXdefaultEdgeInsets.left - CXdefaultEdgeInsets.right - (CXcolumnCount - 1) * CXcolumnMagin) / CXcolumnCount;
    //获取height
    //在实际开发中heigh并不是真正的随机 而是根据数据来决定height 在这里展示初步的介绍其原理 因此采用大于100小于150的随机数
    height = 100 + arc4random_uniform(50);
    //获取X (瀑布流的实现重点就在cell的X,Y值获取)
    //设置一个列数的中间变量
    NSInteger tempColumn = 0;
    //设置高度小的中间变量 在这里我们把第0列的高度给他,这样可以减少循环次数,提高效率
    CGFloat minColumnHeight = [self.CXcolumnHeights[0] doubleValue];
    for (NSInteger i = 1; i < CXcolumnCount; i ++) {
        if (minColumnHeight > [self.CXcolumnHeights[i] doubleValue]) {
            minColumnHeight = [self.CXcolumnHeights[i] doubleValue];
            tempColumn = i;
        }
    }
    X = CXdefaultEdgeInsets.left + (width + CXcolumnMagin) * tempColumn;
    //获取Y
    Y = minColumnHeight;
    if (Y != CXdefaultEdgeInsets.top) {
        Y += CXrowMagin;
    }
    //设置cell的frame
    CXattributes.frame = CGRectMake(X, Y, width, height);
    //更新高度最矮的那列的高度
    self.CXcolumnHeights[tempColumn] = @(CGRectGetMaxY(CXattributes.frame));

    return CXattributes;
}
//返回collegeView的Content的大小
- (CGSize)collectionViewContentSize{
    //虽说返回的是大小,但是我们这里主要的是height
    CGFloat maxColumnHeight = [self.CXcolumnHeights[0] doubleValue];
    for (NSInteger i = 1; i < CXcolumnCount; i++) {

        CGFloat columnHeight = [self.CXcolumnHeights[i] doubleValue];

        if (maxColumnHeight < columnHeight) {
            maxColumnHeight = columnHeight;
        }
    }
    return CGSizeMake(0, maxColumnHeight + CXdefaultEdgeInsets.bottom);

}

@end
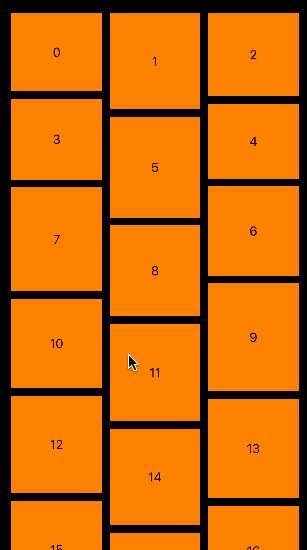
到此为止瀑布流的实现也就结束了。
在这里说明几点值得注意的地方。
标签:add 2016年 ext get .text rem alt 背景 pat
原文地址:http://www.cnblogs.com/wuyuxin/p/7045653.html