标签:安装过程 页面 bar alt package 显示 通过 ras available
首先我们先查看下centos的版本信息
#适用于所有的linux
lsb_release -a
#或者
cat /etc/redhat-release
#又或者
rpm -q centos-release
接下来我们先安装一台web服务器,因为是lanp,所以我们选用的是apache
yum install httpd
然后我们手动启动apache
#centos7 启动httpd
apachectl start
#centos6.5 启动httpd
/etc/init.d/httpd start 或者 service httpd start
既然web服务器搭好了是不是就代表着可以通过web进行访问了呢?是的,浏览器直接访问你的服务器ip地址,就会打开apache的默认页面。
接下来我们设置开机启动httpd服务
#centos7
systemctl enable httpd.service
接着我们安装php5,同样很简单,一条命令即可
(因为我这边有需要,所以我安装的是php5.5,如果没有特殊需求的话,直接去掉数字就好)
yum install php55
#centos7 安装好后重启apache
apachectl restart
如果php安装出错,我们更换掉rpm源就好,然后重新执行上面的代码
#CentOs 7.X rpm源(任选其一):
    rpm -Uvh https://mirror.webtatic.com/yum/el7/epel-release.rpm
    rpm -Uvh https://mirror.webtatic.com/yum/el7/webtatic-release.rpm
一般网上给出的资料都是
#yum install mysql
#yum install mysql-server
#yum install mysql-devel
安装mysql和mysql-devel都成功,但是安装mysql-server失败,如下:
[root@yl-web yl]# yum install mysql-server
Loaded plugins: fastestmirror
Loading mirror speeds from cached hostfile
 * base: mirrors.sina.cn
 * extras: mirrors.sina.cn
 * updates: mirrors.sina.cn
No package mysql-server available.
Error: Nothing to do
查资料发现是CentOS 7 版本将MySQL数据库软件从默认的程序列表中移除,用mariadb代替了。
MariaDB数据库管理系统是MySQL的一个分支,主要由开源社区在维护,采用GPL授权许可。开发这个分支的原因之一是:甲骨文公司收购了MySQL后,有将MySQL闭源的潜在风险,因此社区采用分支的方式来避开这个风险。MariaDB的目的是完全兼容MySQL,包括API和命令行,使之能轻松成为MySQL的代替品。
安装mariadb,大小59 M。
[root@yl-web yl]# yum install mariadb-server mariadb
mariadb数据库的相关命令是:
systemctl start mariadb #启动MariaDB
systemctl stop mariadb #停止MariaDB
systemctl restart mariadb #重启MariaDB
systemctl enable mariadb #设置开机启动
所以先启动数据库
[root@yl-web yl]# systemctl start mariadb
然后就可以正常使用mysql了
[root@yl-web yl]# mysql -u root -p
Enter password:
Welcome to the MariaDB monitor.  Commands end with ; or \g.
Your MariaDB connection id is 3
Server version: 5.5.41-MariaDB MariaDB Server

Copyright (c) 2000, 2014, Oracle, MariaDB Corporation Ab and others.

Type ‘help;‘ or ‘\h‘ for help. Type ‘\c‘ to clear the current input statement.

MariaDB [(none)]> show databases;
+--------------------+
| Database           |
+--------------------+
| information_schema |
| mysql              |
| performance_schema |
| test               |
+--------------------+
4 rows in set (0.00 sec)

MariaDB [(none)]>
安装mariadb后显示的也是 MariaDB [(none)]> ,可能看起来有点不习惯。下面是第二种方法。
# wget http://dev.mysql.com/get/mysql-community-release-el7-5.noarch.rpm
# rpm -ivh mysql-community-release-el7-5.noarch.rpm
# yum install mysql-community-server
安装成功后重启mysql服务。
# service mysqld restart
初次安装mysql,root账户没有密码。
[root@yl-web yl]# mysql -u root
Welcome to the MySQL monitor.  Commands end with ; or \g.
Your MySQL connection id is 3
Server version: 5.6.26 MySQL Community Server (GPL)

Copyright (c) 2000, 2015, Oracle and/or its affiliates. All rights reserved.

Oracle is a registered trademark of Oracle Corporation and/or its
affiliates. Other names may be trademarks of their respective
owners.

Type ‘help;‘ or ‘\h‘ for help. Type ‘\c‘ to clear the current input statement.

mysql> show databases;
+--------------------+
| Database           |
+--------------------+
| information_schema |
| mysql              |
| performance_schema |
| test               |
+--------------------+
4 rows in set (0.01 sec)

mysql>
设置密码
mysql> set password for ‘root‘@‘localhost‘ =password(‘password‘);
Query OK, 0 rows affected (0.00 sec)

mysql>
不需要重启数据库即可生效。
在mysql安装过程中如下内容:
Installed:
  mysql-community-client.x86_64 0:5.6.26-2.el7                mysql-community-devel.x86_64 0:5.6.26-2.el7
  mysql-community-libs.x86_64 0:5.6.26-2.el7                  mysql-community-server.x86_64 0:5.6.26-2.el7

Dependency Installed:
  mysql-community-common.x86_64 0:5.6.26-2.el7

Replaced:
  mariadb.x86_64 1:5.5.41-2.el7_0          mariadb-devel.x86_64 1:5.5.41-2.el7_0   mariadb-libs.x86_64 1:5.5.41-2.el7_0
  mariadb-server.x86_64 1:5.5.41-2.el7_0
所以安装完以后mariadb自动就被替换了,将不再生效。
[root@yl-web yl]# rpm -qa |grep mariadb
[root@yl-web yl]#
mysql配置文件为/etc/my.cnf
最后加上编码配置
[mysql]
default-character-set =utf8
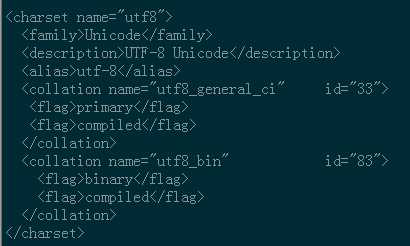
这里的字符编码必须和/usr/share/mysql/charsets/Index.xml中一致。

把在所有数据库的所有表的所有权限赋值给位于所有IP地址的root用户。
mysql> grant all privileges on *.* to root@‘%‘identified by ‘password‘;
如果是新用户而不是root,则要先新建用户
mysql>create user ‘username‘@‘%‘ identified by ‘password‘;
此时就可以进行远程连接了。
最后我们介绍下相关文件的默认安装路径
#apache主配置文件
/etc/httpd/conf/httpd.conf
#相关配置 比如vhost文件就可以创建在该目录下
/etc/httpd/conf.d/
#模块配置文件 比如你要开启rewrite模块,可能你就需要到这个目录下面做一些配置了
/etc/httpd/conf.modules.d/
#web可访问目录 网站根目录
/var/www/html
#apache日志文件目录
/var/log/httpd/
标签:安装过程 页面 bar alt package 显示 通过 ras available
原文地址:http://www.cnblogs.com/tyqing/p/7048168.html