标签:accept 是的 高级语言 __del__ 更新 soft 学校 迭代 []
上课第八天,打卡:
为什么坚持?想一想当初;
- 通过字符串去操作一个对象的属性,称之为反射;
- 示例1:
class Chinese:
    def __init__(self,name):
        self.name=name
p = Chinese(‘standby‘)      # 实例化一个对象
print(p)                    # 打印这个对象

---
<__main__.Chinese object at 0x0000000000B3A978>
- 示例2:
>>> l = list([1,2,3])       # 示例话一个对象(list 也是一个类)
>>> print(l)                # 打印这个对象,显然和示例1的对象结果不一样;显然是list类对这个对象l做了手脚
[1, 2, 3]
>>>
- 示例3:__str__ 函数必须有返回值,且必须返回字符串类型;
class Chinese:
    def __init__(self,name):
        self.name=name
    def __str__(self):      # 在示例1的基础上,重写 __str__ 函数,实现和示例2同样的效果;
        return self.name
p = Chinese(‘standby‘)
print(p)

---
standby
__setattr__,__delattr__,__getattr__    #  这些函数默认都是有的,自己可以重写; 本质都是直接操作 obj.__dict__

__setattr__      # 添加/修改属性会触发它的执行
__delattr__      # 删除属性的时候触发执行
__getattr__      # 只有在使用点调用属性且属性不存在的时候才会触发

obj.attr    ‘.‘    就会触发 __setattr__,__delattr__,__getattr__ 这些函数的执行
- 示例1:__setattr__ 和 __delattr__
 1 class Foo:
 2     def __init__(self,value):
 3         self.x = value        # 等价于 self.__dict__[‘x‘] = value
 4     def __setattr__(self, key, value):
 5         print(‘----> from setattr‘)
 6         # self.key=value      # 这就无限递归了!!!
 7         # self.__dict__[key]=value #应该使用它
 8         self.__dict__[key] = value     # 本质上: f.__dict__[‘x‘] = 100,即给f这个对象设置了属性值;
 9     def __getattr__(self, item):
10         print(‘++++> from getattr‘)
11     def __delattr__(self, item):
12         print(‘====> from delattr‘)
13         self.__dict__.pop(item)
14
15 f = Foo(100)          # 本质上就是在执行:Foo.__init__(f,100),然后执行里面的赋值语句:f.x = 100;设置了属性x的值,所以会自动调用 __setattr__函数
16 print(‘-------->>>‘)
17 print(f.__dict__)     # 查看对象f的属性字典
18 del f.x               # 删除f的x属性,这一步触发了 __delattr__函数,然后执行了 f.__dict__.pop(‘x‘)
19 print(f.__dict__)     # 查看删除后的属性字典
20 f.y = ‘hello‘         # 给对象 f 设置新的属性,触发了 __setattr__函数
21 f.z = 99              # 同上
22 print(f.__dict__)     # 在查看对象f的属性字典
23
24 ---结果:---
25 ----> from setattr
26 -------->>>
27 {‘x‘: 100}
28 ====> from delattr
29 {}
30 ----> from setattr
31 ----> from setattr
32 {‘z‘: 99, ‘y‘: ‘hello‘}
- 示例2:__getattr__
 1 class Foo:
 2     def __init__(self,value):
 3         self.x = value   # 等价于 self.__dict__[‘x‘] = value
 4     def __setattr__(self, key, value):
 5         print(‘----> from setattr‘)
 6         # self.key=value #这就无限递归了,你好好想想
 7         # self.__dict__[key]=value #应该使用它
 8         self.__dict__[key] = value
 9     def __getattr__(self, item):
10         print(‘++++> from getattr‘)
11     def __delattr__(self, item):
12         print(‘====> from delattr‘)
13         self.__dict__.pop(item)
14
15 f = Foo(100)
16 print(f.__dict__)     # 查看对象 f 的属性字典
17 num = f.y             # 调用对象f的y属性,实际上是没有这个属性,所以触发了 __getattr__ 函数的执行;
18
19 ---结果---
20 ----> from setattr
21 {‘x‘: 100}
22 ++++> from getattr
- 按照字典的 key-value 方式进行操作;
- 应用:把对对象属性操作的方法和字典类对象的操作统一起来,做一个统一的接口;
- 示例1:
1 class Foo:
2     def __init__(self,name):
3         self.name = name
4
5 f = Foo(‘standby‘)
6 print(f.name)
7 # print(f[‘name‘])  # 这么调用会报错:TypeError: ‘Foo‘ object is not subscriptable
- 示例2: __getitem__
 1 class Foo:
 2     def __init__(self,name):
 3         self.name = name
 4     def __getitem__(self, item):
 5         print(‘__getitem__ is called.‘)
 6         return self.__dict__[item]
 7 f = Foo(‘standby‘)
 8 print(f.name)        # 直接打印 standby
 9 print(f[‘name‘])     # 触发了 __getitem__ 函数的执行
10
11 ---
12 standby
13 __getitem__ is called.
14 standby
- 示例3:__setitem__ 和 __delitem__
 1 class Foo:
 2     def __init__(self,name,age):
 3         self.name = name
 4         self.age = age
 5     def __setitem__(self, key, value):
 6         print(‘__setitem__ is called.‘)
 7         self.__dict__[key] = value
 8     def __delitem__(self, key):
 9         print(‘__delitem__ is called.‘)
10         self.__dict__.pop(key)
11     def __delattr__(self, item):
12         print(‘__delattr__ is called.‘)
13         self.__dict__.pop(item)
14
15 f = Foo(‘standby‘,18)       # 实例化一个对象
16 print(f.__dict__)
17 f.name = ‘standby666‘       # 通过 ‘obj.attr‘ 的方式设置对象的name属性
18 print(f.__dict__)
19 f[‘name‘] = ‘liulixin‘      # 通过字典的方式设置对象的name属性,触发了 __setitem__ 函数的执行
20 print(f.__dict__)
21 del f.age                   # 触发了 __delattr__ 函数的执行
22 print(f.__dict__)
23 del f[‘name‘]               # 通过字典的形式删除属性,触发了 __delitem__函数的执行
24 print(f.__dict__)
25
26 ---
27 {‘name‘: ‘standby‘, ‘age‘: 18}
28 {‘name‘: ‘standby666‘, ‘age‘: 18}
29 __setitem__ is called.
30 {‘name‘: ‘liulixin‘, ‘age‘: 18}
31 __delattr__ is called.
32 {‘name‘: ‘liulixin‘}
33 __delitem__ is called.
34 {}
- 应用:做成统一接口
 1 # 不用 __setitem__ 的情况
 2 class Foo:
 3     def __init__(self,name):
 4         self.name = name
 5     def __setitem__(self, key, value):
 6         print(‘__setitem__ is called.‘)
 7         self.__dict__[key] = value
 8 f = Foo(‘standby‘)
 9
10 # 没有 __setitem__ 方法的话,就得这样写:
11 def func(obj,key,value):
12     if isinstance(obj,dict):
13         obj[key] = value
14     else:
15         setattr(obj,key,value)
16 print(f.__dict__)
17 func(f,‘name‘,‘liulixin‘)
18 print(f.__dict__)
19
20 ---
21 {‘name‘: ‘standby‘}
22 {‘name‘: ‘liulixin‘}
 1 # 用 __setitem__ 的情况
 2 class Foo:
 3     def __init__(self,name):
 4         self.name = name
 5     def __setitem__(self, key, value):
 6         print(‘__setitem__ is called.‘)
 7         self.__dict__[key] = value
 8 f = Foo(‘standby‘)
 9
10 # 有 __setitem__ 方法,就可以统一成如下接口:
11 def func(obj,key,value):
12     obj[key] = value
13 print(f.__dict__)
14 func(f,‘name‘,‘liulixin‘)
15 print(f.__dict__)
16
17 ---
18 {‘name‘: ‘standby‘}
19 __setitem__ is called.
20 {‘name‘: ‘liulixin‘}
- 利用类的继承和派生实现
python为大家提供了标准数据类型,以及丰富的内置方法;

其实在很多场景下我们都需要基于标准数据类型来定制我们自己的数据类型,新增/改写方法;

这就用到了我们刚学的继承/派生知识(其他的标准类型均可以通过下面的方式进行二次加工)
- 示例:列表类的继承与派生
 1 # 重写一个List类,继承了原来的 list类
 2 class List(list):
 3     def __init__(self,item,flag=False):
 4         super().__init__(item)
 5         self.flag = flag
 6     # 重写了list的 append函数,要去在append前判断元素类型,只有是str才可以append
 7     def append(self,item):
 8         if not isinstance(item,str):
 9             raise TypeError(‘%s must be str‘ % item)
10         # super().append(item)
11         super().append(item)
12     # 返回列表的中间元素
13     @property
14     def mid(self):
15         mid_index = len(self)//2
16         return self[mid_index]
17     # 清空列表,操作之前需要判断权限标识位:flag
18     def clear(self):
19         if not self.flag:
20             raise PermissionError(‘Permission Deny!‘)
21         super().clear()
22         self.flag = False
23
24 l = List([1,2,3,])
25 print(l)
26 # l.append(9)      # 报错:TypeError: 9 must be str
27 l.append(‘hello‘)  # 派生
28 print(l)
29 l.insert(0,7777)   # 继承原来list的insert方法
30 print(l)
31 print(l.mid)       # 调用property
32 # l.clear()        # 报错:PermissionError: Permission Deny!
33 l.flag = True
34 l.clear()          # 派生
35 print(l)
36
37 ---结果---
38 [1, 2, 3]
39 [1, 2, 3, ‘hello‘]
40 [7777, 1, 2, 3, ‘hello‘]
41 2
42 []
- 授权方式(函数)实现
授权是包装的一个特性, 包装一个类型通常是对已存在的类型的一些定制;

这种做法可以新建、修改或删除原有产品的功能,其它的则保持原样。

应用:针对某些功能不是类,例如 open(),是一个函数,而不是类:
    如果要定制自己的open()函数,就不能用继承的方式了;

授权的过程:
    即是所有更新的功能都是由新类的某部分来处理;
    但已存在的功能就授权给对象的默认属性;

实现授权的关键点就是覆盖__getattr__方法
- 示例:open函数的授权,关键在与 __getattr__函数的实现;
 1 import time
 2 class Open():
 3     def __init__(self,filepath,mode=‘r‘,encoding=‘utf-8‘):
 4         self.filepath = filepath
 5         self.mode = mode
 6         self.encoding = encoding
 7         # 本质上还是调用原来的 open()函数打开文件
 8         self.f = open(self.filepath,mode=self.mode,encoding=self.encoding)
 9     # 这里,我们重写了write函数,在写入的内容前加上了操作的时间
10     def write(self,msg):
11         t = time.strftime(‘%Y-%m-%d %X‘)
12         self.f.write(‘%s : %s‘ % (t,msg))
13     # 找不到 attr 就会执行 __getattr__函数
14     # 利用这个特性,拿到 self.f.item (read、close、seek...)
15     def __getattr__(self, item):
16         print(‘--->>> %s‘ % item)
17         return getattr(self.f,item)
18 obj = Open(r‘1.txt‘,mode=‘w+‘,encoding=‘utf-8‘)
19 obj.write(‘11111\n‘)
20 obj.write(‘aaa\n‘)
21 obj.write(‘+++1213\n‘)
22 obj.seek(0)                     # Open类里没有重写seek,read以及close函数,所以在通过 ‘obj.attr‘ 方式调用的时候,就会触发 __getattr__函数;
23 res = obj.read()                # getattr(self.f,item) 即调用了真是的open函数的句柄: obj.f.read()
24 print(res)
25 print(‘----------------->>>‘)
26 print(type(obj),obj)            # obj 是 Open类的对象
27 print(type(obj.f),obj.f)        # obj.f 才是文件句柄,即原来的open()的对象
28 obj.close()                     # obj.f.close()
29
30 ---结果---
31 --->>> seek
32 --->>> read
33 2017-06-20 22:48:06 : 11111
34 2017-06-20 22:48:06 : aaa
35 2017-06-20 22:48:06 : +++1213
36
37 ----------------->>>
38 <class ‘__main__.Open‘> <__main__.Open object at 0x00000000010824E0>
39 <class ‘_io.TextIOWrapper‘> <_io.TextIOWrapper name=‘1.txt‘ mode=‘w+‘ encoding=‘utf-8‘>
40 --->>> close
str函数或者print函数--->obj.__str__()

repr或者交互式解释器--->obj.__repr__()

如果__str__没有被定义,那么就会使用__repr__来代替输出

注意:这俩方法的返回值必须是字符串,否则抛出异常;
- __str__ 和 __repr__
- 改变对象的字符串显示;
- 示例1:没有定义 __str__,定义了 __repr__,则会用 __repr__来代替输出
 1 class School:
 2     def __init__(self,name,addr,type):
 3         self.name=name
 4         self.addr=addr
 5         self.type=type
 6     def __repr__(self):
 7         return ‘School(%s,%s)‘ %(self.name,self.addr)
 8 s1=School(‘Peking University‘,‘北京‘,‘公立‘)
 9 print(‘from repr: ‘,repr(s1))
10 print(‘from str: ‘,str(s1))
11 print(s1)
12
13 ---
14 from repr:  School(Peking University,北京)
15 from str:  School(Peking University,北京)
16 School(Peking University,北京)
- 示例2:__str__ 和 __repr__ 都定义了的情况
 1 class School:
 2     def __init__(self,name,addr,type):
 3         self.name=name
 4         self.addr=addr
 5         self.type=type
 6     def __repr__(self):
 7         return ‘School(%s,%s)‘ %(self.name,self.addr)
 8     def __str__(self):
 9         return ‘(%s,%s)‘ %(self.name,self.addr)
10
11 s1=School(‘Peking University‘,‘北京‘,‘公立‘)
12 print(‘from repr: ‘,repr(s1))   # 触发 __repr__
13 print(‘from str: ‘,str(s1))     # 触发 __str__
14 print(s1)                       # 触发 __str__
15
16 ---
17 from repr:  School(Peking University,北京)
18 from str:  (Peking University,北京)
19 (Peking University,北京)
- __format__
- 自定义格式化字符串;
 1 format_dict={
 2     ‘nat‘:‘{obj.name}-{obj.addr}-{obj.type}‘,#学校名-学校地址-学校类型
 3     ‘tna‘:‘{obj.type}:{obj.name}:{obj.addr}‘,#学校类型:学校名:学校地址
 4     ‘tan‘:‘{obj.type}/{obj.addr}/{obj.name}‘,#学校类型/学校地址/学校名
 5 }
 6 class School:
 7     def __init__(self,name,addr,type):
 8         self.name=name
 9         self.addr=addr
10         self.type=type
11     def __format__(self, format_spec):
12         if not format_spec or format_spec not in format_dict:
13             format_spec=‘nat‘
14         fmt=format_dict[format_spec]
15         return fmt.format(obj=self)
16 s1=School(‘Peking University‘,‘北京‘,‘公立‘)
17 print(format(s1,‘nat‘))
18 print(format(s1,‘tna‘))
19 print(format(s1,‘tan‘))
20 print(format(s1,‘asfdasdffd‘))
21
22 ---
23 Peking University-北京-公立
24 公立:Peking University:北京
25 公立/北京/Peking University
26 Peking University-北京-公立
重写 __next__ 和 __iter__ 实现迭代器协议

迭代器协议:必须具有 __next__ 和 __iter__

可迭代对象有 __iter__ 方法,执行__iter__方法得到的就是迭代器
- 示例:
 1 from collections import Iterator
 2 class Foo:
 3     def __init__(self,n,end):
 4         self.n = n
 5         self.end = end
 6     def __next__(self):
 7         if self.n >= self.end:
 8             raise StopIteration   # 因为for循环捕捉的就是StopIteration,所以需要在迭代到边界值的时候抛出这个异常;
 9         tmp = self.n
10         self.n += 1
11         return tmp
12     def __iter__(self):
13         return self
14 f = Foo(5,10)
15 print(isinstance(f,Iterator))     # 如果Foo类中不写 __iter__ 函数就不是迭代器
16 print(next(f))                    # next(f) 等价于 f.__next__()
17 print(next(f))
18 print(‘--->‘)
19 for item in f:                    # 会捕捉到 StopIteration 异常,如果不加限制会导致无限递归!!!
20     print(item)
21
22 ---结果---
23 True
24 5
25 6
26 --->
27 7
28 8
29 9
- 应用:斐波那契数列
class Fibonacci:
    def __init__(self):
        self._a = 0
        self._b = 1
    def __iter__(self):
        return self
    def __next__(self):
        self._a,self._b = self._b,self._a + self._b
        return self._a
fib = Fibonacci()
for i in fib:
    if i > 100:
        break
    print(‘%s ‘ % i, end=‘‘)

---结果---
1 1 2 3 5 8 13 21 34 55 89
- 当对象在内存中被释放时,自动触发执行;(关闭到跟对象有关的链接,做一些清理操作)
- 此方法一般无须定义,因为Python是一门高级语言,程序员在使用时无需关心内存的分配和释放,因为此工作都是交给Python解释器来执行;
- 所以,析构函数的调用是由解释器在进行垃圾回收时自动触发执行的;
class Foo:
    def __init__(self,name,age):
        self.name=name
        self.age=age
    def __del__(self): #析构方法
        print(‘执行了析构函数...‘)
obj=Foo(‘egon‘,18)
del obj.name
print(‘=============>‘)
del obj
print(‘=============>‘)

---结果---
=============>
执行了析构函数...
=============>
- 我们知道在操作文件对象的时候可以这么写:
with open(‘a.txt‘) as f:
    ‘代码块‘
- 上述叫做上下文管理协议,即with语句;
- 为了让一个对象兼容with语句,必须在这个对象的类中声明__enter__和__exit__方法;
- __exit__() 中的三个参数分别代表 异常类型,异常值和追溯信息, with语句中代码块出现异常,则with后的代码都无法执行;
- 示例1:
 1 class Foo:
 2     def __init__(self, name):
 3         self.name = name
 4     def __enter__(self):
 5         print(‘__enter__‘)
 6         return self
 7     def __exit__(self, exc_type, exc_val, exc_tb):
 8         print(‘__exit__‘)
 9 with Foo(‘standby‘) as x: # 出现 with语句,则对象的 __enter__函数被触发,返回值则赋给as声明的变量
10     print(x)
11     print(‘=>‘)
12     print(‘==>‘)
13     print(‘===>‘)         # with里的代码块执行完毕,则触发 __exit__函数执行
14
15 ---
16 __enter__
17 <__main__.Foo object at 0x00000000007334E0>
18 =>
19 ==>
20 ===>
21 __exit__
- 示例2: __exit__ 里不加 return True
 1 class Open:
 2     def __init__(self,name,mode=‘r‘,encoding=‘utf-8‘):
 3         self.name = name
 4         self.mode = mode
 5         self.encoding = encoding
 6         self.f = open(self.name,mode=self.mode,encoding=self.encoding)
 7     def __enter__(self):
 8         print(‘__enter__‘)
 9         return self.f
10     def __exit__(self, exc_type, exc_val, exc_tb):
11         print(‘__exit__‘)
12         print(exc_type)
13         print(exc_val)
14         print(exc_tb)
15         self.f.close()
16 with Open(‘666.txt‘,mode=‘w+‘) as f:
17     print(type(f),f)
18     1/0
19 print(‘The end.‘)        # 1/0 异常抛出, 导致 with后的代码没有执行;
20
21 ---
22 __enter__
23 <class ‘_io.TextIOWrapper‘> <_io.TextIOWrapper name=‘666.txt‘ mode=‘w+‘ encoding=‘utf-8‘>
24 __exit__
25 <class ‘ZeroDivisionError‘>
26 division by zero
27 <traceback object at 0x00000000010615C8>
28 Traceback (most recent call last):
29   File "D:/soft/work/Python_17/day08/blog.py", line 301, in <module>
30     1/0
31 ZeroDivisionError: division by zero
- 示例3: __exit__ 末尾有 return True
 1 class Open:
 2     def __init__(self,name,mode=‘r‘,encoding=‘utf-8‘):
 3         self.name = name
 4         self.mode = mode
 5         self.encoding = encoding
 6         self.f = open(self.name,mode=self.mode,encoding=self.encoding)
 7     def __enter__(self):
 8         print(‘__enter__‘)
 9         return self.f
10     def __exit__(self, exc_type, exc_val, exc_tb):
11         print(‘__exit__‘)
12         print(exc_type)
13         print(exc_val)
14         print(exc_tb)
15         self.f.close()
16         return True
17 with Open(‘666.txt‘,mode=‘w+‘) as f:   # Open(...) 触发 __init__的执行, with Open(...) 触发 __enter__的执行
18     print(type(f),f)
19     1/0                 # 1/0 抛出异常,但是由于 __exit__末尾 ‘return True‘,导致异常被清空了,所以后面的代码都可以照常执行;
20 print(‘The end.‘)
21
22 ---
23 __enter__
24 <class ‘_io.TextIOWrapper‘> <_io.TextIOWrapper name=‘666.txt‘ mode=‘w+‘ encoding=‘utf-8‘>
25 __exit__
26 <class ‘ZeroDivisionError‘>
27 division by zero
28 <traceback object at 0x00000000010925C8>
29 The end.
- 对象后面加括号,触发执行对象所属的类的 __call__方法执行(实现对象加括号,变成可调用的);
- 所有的可调用,到最后都要转化成函数(__call__)去运行;
- 构造方法的执行是由创建对象触发的,即:对象 = 类名() ;
- 而对于 __call__ 方法的执行是由对象后加括号触发的,即:对象() 或者 类()();
- 示例1:
 1 class Foo:
 2     def __init__(self):
 3         print(‘Foo.__init__ is called.‘)
 4         print(type(self),self)
 5     def __call__(self, *args, **kwargs):
 6         print(‘Foo.__call__ is called.‘)
 7         print(type(self), self)
 8
 9 print(‘--->>>‘)
10 Foo()                # 相当于实例化了一个对象
11 print(‘---+++‘)
12 Foo()()              # 1.Foo()得到一个对象obj    2.obj加括号执行(obj()),触发了__call__函数
13
14 ---
15 --->>>
16 Foo.__init__ is called.
17 <class ‘__main__.Foo‘> <__main__.Foo object at 0x000000000103A898>
18 ---+++
19 Foo.__init__ is called.
20 <class ‘__main__.Foo‘> <__main__.Foo object at 0x000000000103A898>
21 Foo.__call__ is called.
22 <class ‘__main__.Foo‘> <__main__.Foo object at 0x000000000103A898>
- 示例2:
 1 class Foo:
 2     def __init__(self):
 3         print(‘Foo.__init__ is called.‘)
 4         print(type(self),self)
 5     def __call__(self, *args, **kwargs):
 6         print(‘Foo.__call__ is called.‘)
 7         print(type(self), self)
 8
 9 obj = Foo()               # 执行 Foo.__init__(obj)
10 obj()                     # 执行 Foo.__call__(obj)
11 print(type(obj),obj)
12 print(type(Foo),Foo)
13
14 ---
15 Foo.__init__ is called.
16 <class ‘__main__.Foo‘> <__main__.Foo object at 0x00000000007CA978>
17 Foo.__call__ is called.
18 <class ‘__main__.Foo‘> <__main__.Foo object at 0x00000000007CA978>
19 <class ‘__main__.Foo‘> <__main__.Foo object at 0x00000000007CA978>
20 <class ‘type‘> <class ‘__main__.Foo‘>
- 示例3:
 1 class Foo:
 2     def __call__(self, *args, **kwargs):
 3         print(‘======>‘)
 4
 5 obj=Foo()                 # obj是Foo类实例化得到,是Foo类的对象
 6 print(‘++++++++‘)
 7 obj()                     # obj(),即 ‘对象+()‘ 执行的时候就是触发了其所属的类的 __call__方法的执行;
 8 print(type(Foo),Foo)
 9 print(type(obj),obj)
10
11 ---
12 ++++++++
13 ======>
14 <class ‘type‘> <class ‘__main__.Foo‘>
15 <class ‘__main__.Foo‘> <__main__.Foo object at 0x0000000000B0A940>
- 1.exec和eval介绍
- 2.创造类的两种方法
- 3.创建类相关的三个方法
- 1.__call__
- 2.__new__
- 3.__init__
- 4.元类(metaclass)
关于元类,就把握一个原则:

A() 找的就是产生A的那个类的 __call__方法

__call__() 做三件事:
  1.__new__ 造一个对象
  2.__init__ 初始化这个对象
  3.返回这个对象
更多细节参见:egon老师面向对象进阶
- 粘包产生原因
- socket收发消息的原理示意图:
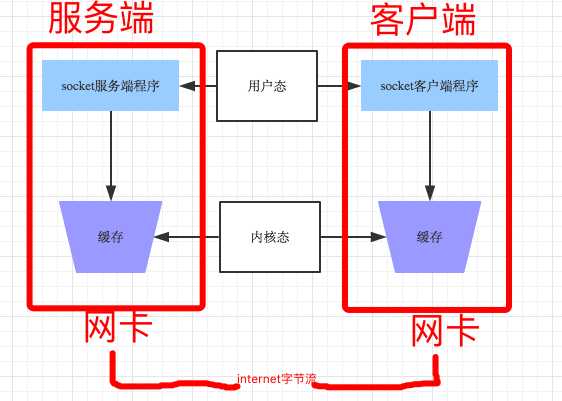
- 粘包原因
发送端可以是一K一K地发送数据,而接收端的应用程序可以两K两K地提走数据,当然也有可能一次提走3K或6K数据,或者一次只提走几个字节的数据;
也就是说,应用程序所看到的数据是一个整体,或说是一个流(stream),一条消息有多少字节对应用程序是不可见的,因此TCP协议是面向流的协议,这也是容易出现粘包问题的原因。

而UDP是面向消息的协议,每个UDP段都是一条消息,应用程序必须以消息为单位提取数据,不能一次提取任意字节的数据,这一点和TCP是很不同的。

怎样定义消息呢?可以认为对方一次性write/send的数据为一个消息,需要明白的是当对方send一条信息的时候,无论底层怎样分段分片,TCP协议层会把构成整条消息的数据段排序完成后才呈现在内核缓冲区。

例如基于tcp的套接字客户端往服务端上传文件,发送时文件内容是按照一段一段的字节流发送的,在接收方看了,根本不知道该文件的字节流从何处开始,在何处结束

所谓粘包问题主要还是因为接收方不知道消息之间的界限,不知道一次性提取多少字节的数据所造成的。
- 扩展
此外,发送方引起的粘包是由TCP协议本身造成的:
TCP为提高传输效率,发送方往往要收集到足够多的数据后才发送一个TCP段。
若连续几次需要send的数据都很少,通常TCP会根据优化算法把这些数据合成一个TCP段后一次发送出去,这样接收方就收到了粘包数据;


1.TCP(transport control protocol,传输控制协议)是面向连接的,面向流的,提供高可靠性服务。收发两端(客户端和服务器端)都要有一一成对的socket,
因此,发送端为了将多个发往接收端的包,更有效的发到对方,使用了优化方法(Nagle算法),将多次间隔较小且数据量小的数据,合并成一个大的数据块,然后进行封包。
这样,接收端,就难于分辨出来了,必须提供科学的拆包机制。 即面向流的通信是无消息保护边界的。

2.UDP(user datagram protocol,用户数据报协议)是无连接的,面向消息的,提供高效率服务,不会使用块的合并优化算法;
由于UDP支持的是一对多的模式,所以接收端的skbuff(套接字缓冲区)采用了链式结构来记录每一个到达的UDP包,在每个UDP包中就有了消息头(消息来源地址,端口等信息);
这样,对于接收端来说,就容易进行区分处理了。 即面向消息的通信是有消息保护边界的。

3.tcp是基于数据流的,于是收发的消息不能为空,这就需要在客户端和服务端都添加空消息的处理机制,防止程序卡住;
而udp是基于数据报的,即便是你输入的是空内容(直接回车),那也不是空消息,udp协议会帮你封装上消息头;
- 1.只有TCP有粘包现象,UDP永远不会粘包;
- 2.所谓粘包问题主要还是因为接收方不知道消息之间的界限,不知道一次性应该提取多少字节的数据所造成的;
- 3.TCP是面向连接的、面向流的;面向流的通信是无消息保护边界的;
- 4.UDP是无连接的、面向消息的;面向消息的通讯是有消息保护边界的;
- 两种情况下会产生粘包:
- 发送端需要等缓冲区满才发送出去,造成粘包(发送数据时间间隔很短,数据了很小,会合到一起,产生粘包);
- 接收方不及时接收缓冲区的包,造成多个包接收(客户端发送了一段数据,服务端只收了一小部分,服务端下次再收的时候还是从缓冲区拿上次遗留的数据,产生粘包);
- 粘包示例
- Server端
 1 #!/usr/bin/python3
 2 # -*- coding:utf-8 -*-
 3
 4 import time
 5 import socket
 6 import subprocess
 7 phone = socket.socket(socket.AF_INET,socket.SOCK_STREAM)
 8 # Address already in use
 9 phone.setsockopt(socket.SOL_SOCKET,socket.SO_REUSEADDR,1)
10 phone.bind((‘127.0.0.1‘,8090))
11 phone.listen(10)  # tcp 半连接池
12
13 while True:
14     print(‘Starting...‘)
15     conn,addr = phone.accept()
16     print(‘conn is %s‘ % conn)
17     print(‘addr is:‘, addr)
18
19     print(‘Ready to reveice msg...‘)
20     while True:
21         try:
22             cmd = conn.recv(1024)  # 写死每次取1024容易造成粘包现象
23             if not cmd: # for linux platform
24                 break
25             t = time.strftime(‘%Y-%m-%d %X‘)
26             print(‘Time: %s\tClient CMD: %s‘ %(t, cmd.decode(‘utf-8‘)))
27             res = subprocess.Popen(cmd.decode(‘utf-8‘),shell=True,
28                                    stdout=subprocess.PIPE,
29                                    stderr=subprocess.PIPE)
30             err = res.stderr.read()
31             if err:
32                 cmd_res = err                  # 如果执行出错,则返回错误信息
33             else:
34                 cmd_res = res.stdout.read()    # 否则返回执行的结果信息
35             conn.send(cmd_res)
36         except Exception as e:
37             print(‘Exception: %s‘ % e)
38             break
39     conn.close()
40 phone.close()
- Client端
 1 #!/usr/bin/python3
 2 # -*- coding:utf-8 -*-
 3
 4 import socket
 5
 6 phone = socket.socket(socket.AF_INET,socket.SOCK_STREAM)
 7
 8 phone.connect((‘127.0.0.1‘,8090))
 9 while True:
10     cmd = input(‘>>>:\t‘).strip()
11     if not cmd:
12         print(‘不允许空消息!‘)
13         continue
14     phone.send(cmd.encode(‘utf-8‘))
15     cmd_res = phone.recv(1024)           # 写死每次取1024容易造成粘包现象
16     print(‘%s Result:\n%s‘ % (cmd,cmd_res.decode(‘gbk‘)))
17
18 phone.close()
- 粘包解决办法
- Server端
 1 #!/usr/bin/python3
 2 # -*- coding:utf-8 -*-
 3
 4 import time
 5 import socket
 6 import subprocess
 7 import json
 8 import struct
 9
10 phone = socket.socket(socket.AF_INET,socket.SOCK_STREAM)
11 # Address already in use
12 phone.setsockopt(socket.SOL_SOCKET,socket.SO_REUSEADDR,1)
13 phone.bind((‘10.0.0.9‘,8080))
14 phone.listen(5)  # tcp 半连接池
15
16 while True:
17     print(‘Starting...‘)
18     conn,addr = phone.accept()
19     print(‘conn is %s‘ % conn)
20     print(‘addr is:‘, addr)
21     print(‘Ready to reveice msg...‘)
22     while True:
23         try:
24             cmd = conn.recv(1024)
25             if not cmd: # for linux platform
26                 break
27             t = time.strftime(‘%Y-%m-%d %X‘)
28             print(‘Time: %s\tClient CMD: %s‘ % (t, cmd.decode(‘utf-8‘)))
29             res = subprocess.Popen(cmd.decode(‘utf-8‘),shell=True,
30                                    stdout=subprocess.PIPE,
31                                    stderr=subprocess.PIPE)
32             cmd_res = res.stderr.read()
33             if not cmd_res:
34                 cmd_res = res.stdout.read()
35             # 自定义数据报头
36             head_dic = {‘filename‘: None, ‘hash‘: None, ‘total_size‘: len(cmd_res)}
37             head_json = json.dumps(head_dic)
38             head_byte = head_json.encode(‘utf-8‘)
39             # 先发送数据报头的大小
40             conn.send(struct.pack(‘i‘,len(head_byte)))
41             # 再发送数据报头
42             conn.send(head_byte)
43             # 最后发送真实的数据体
44             conn.send(cmd_res)
45         except Exception as e:
46             print(‘Exception: %s‘ % e)
47             break
48     conn.close()
49 phone.close()
- Client端
 1 #!/usr/bin/python3
 2 # -*- coding:utf-8 -*-
 3
 4 import socket
 5 import struct
 6 import json
 7
 8 phone = socket.socket(socket.AF_INET,socket.SOCK_STREAM)
 9 phone.connect((‘10.0.0.9‘,8080))
10
11 while True:
12     cmd = input(‘>>>:\t‘).strip()
13     if not cmd:
14         print(‘不允许空消息!‘)
15         continue
16     phone.send(cmd.encode(‘utf-8‘))
17     # cmd_res = phone.recv(1024)  # 写死1024会造成粘包现象
18     # 先收报头大小
19     head_struct = phone.recv(4)
20     head_len = struct.unpack(‘i‘,head_struct)[0]
21     # 再接收数据报头
22     head_byte = phone.recv(head_len)
23     head_json = head_byte.decode(‘utf-8‘)
24     head_dict = json.loads(head_json)
25     # 从head_dict中获取真实的数据的大小
26     total_size = head_dict[‘total_size‘]
27     # 不能一次都接收完,要每次接收一部分,分多次接收
28     reve_size = 0
29     data = b‘‘
30     while reve_size < total_size:
31         tmp = phone.recv(1024)
32         data += tmp
33         reve_size += len(tmp)
34     print(‘%s Result:\n%s‘ % (cmd,data.decode(‘gbk‘)))
35 phone.close()
- 不足:
经过在CentOS-6.6上测试存在几个问题:

1.在客户端执行查看大文件的时候会卡死(客户端+服务端),例如执行: cat /etc/services

2.不支持并发接收用户请求并处理
- 需要注意的几点:
1.需要关闭CentOS上的 getenforce

2.需要关闭iptables,或者插入一条过滤规则:
    iptables -I INPUT -s 10.0.0.0/8 -p tcp --dport 8080 -j ACCEPT

3.如果出现这个错误:OSError: [Errno 98] Address already in use
需要在 bind() 操作前加入一行代码:
    phone.setsockopt(socket.SOL_SOCKET,socket.SO_REUSEADDR,1)

4.在Linux平台上,针对用户的输入要进行非空判断(在客户端/服务端判断):
if not cmd: # for linux platform
    break
如果不判断会造成卡死状态

5.subprocess执行命令相关细节很重要!

6.struct.pack() 和 struct.unpack() 的使用很重要;

7.报文头字典的定义要合理
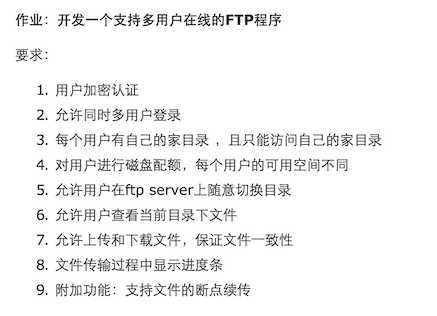
- ftp上传下载示例:
标签:accept 是的 高级语言 __del__ 更新 soft 学校 迭代 []
原文地址:http://www.cnblogs.com/standby/p/7045718.html