标签:-o restart 部分 enable 服务启动 emc efault eject line
上一篇博客我们在虚拟机上安装了centos7,接下来,就开始安装lnmp环境吧。
还是跟之前一样,进入命令行后,先使用su命令切换到root权限。
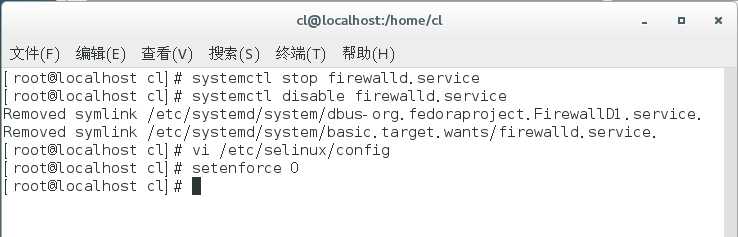
首先配置防火墙
CentOS 7.0默认使用的是firewall作为防火墙
1.关闭firewall:
    systemctl stop firewalld.service #停止firewall
    systemctl disable firewalld.service #禁止firewall开机启动
2.关闭SELINUX:
vi /etc/selinux/config
#SELINUX=enforcing #注释掉
SELINUX=disabled #增加
:wq! #保存退出
setenforce 0 #使配置立即生效
3.安装priorities与wget
yum install yum-priorities -y
yum -y install wget

1.安装mysql
下载mysql源安装包
wget http://dev.mysql.com/get/mysql57-community-release-el7-8.noarch.rpm
安装mysql源
yum localinstall mysql57-community-release-el7-8.noarch.rpm
检查MySQL源是否安装成功 ,注意命令里的点号。
yum repolist enabled | grep "mysql.-community."
安装mysql
yum install mysql-community-server
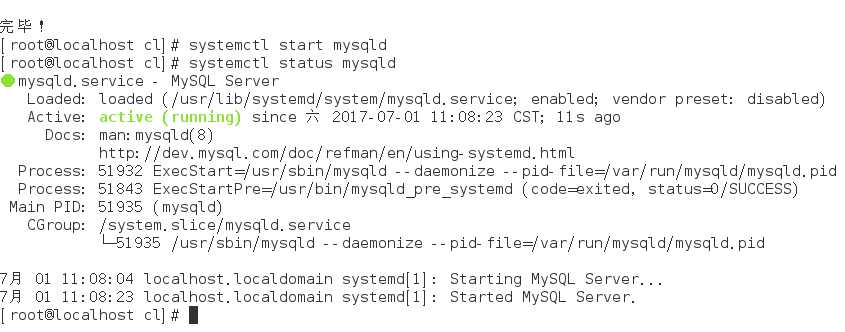
启动mysql服务,启动服务时可能会慢一些,因电脑配置各异。
systemctl start mysqld
查看MySQL的启动状态
systemctl status mysqld
开机启动
systemctl enable mysqld
systemctl daemon-reload
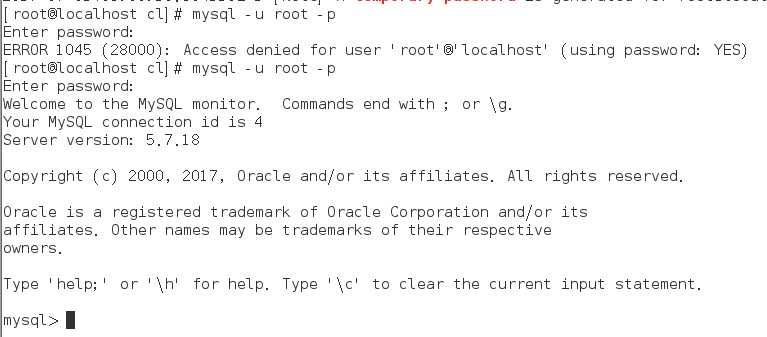
查看root本地登录密码(这条命令会查出mysql设置的默认随机密码,如下图,我的随机密码为t3E4woyyi=:Y)
grep ‘temporary password‘ /var/log/mysqld.log

通过随机密码登陆mysql(随机密码比较难辨认,多几次,我在登陆的时候就因为看错密码试了两次才成功)
mysql -u root -p
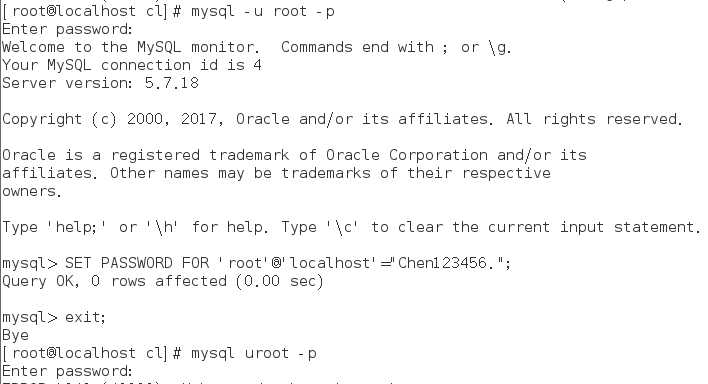
修改mysql登陆密码(注意不要漏掉分号,这是mysql的语句,修改完成后使用exit退出后再次登陆)
SET PASSWORD FOR ‘root‘@‘localhost‘="Chen123456.";
exit;
注意:mysql5.7默认安装了密码安全检查插件(validate_password),默认密码检查策略要求密码必须包含:大小写字母、数字和特殊符号,并且长度不能少于8位。否则会提示ERROR 1819 (HY000): Your password does not satisfy the current policy requirements错误,如下所示:
ALTER USER ‘root’@’localhost’ IDENTIFIED BY ‘MyNewPass4!’;
set password for ‘root’@’localhost’=password(‘MyNewPass4!’);
通过msyql环境变量可以查看密码策略的相关信息:
mysql> show variables like ‘%password%’;
如果上面的方式不能修改可以使用下面安全模式修改root:
关闭服务
systemctl stop mysqld.service
vi /etc/my.cnf
mysqld下面添加skip-grant-tables 保存退出启动服务
systemctl start mysqld.service
mysql -u root 不用密码直接回车
use mysql
update user set authentication_string=password(‘Root-123’) where User=’root’
and Host=’localhost’;
flush privileges;
exit;
vi /etc/my.cnf 把 skip-grant-tables 一句删除保存退出重启mysql服务
systemctl restart mysqld.service
再次登录即可
mysql -u root -pRoot-123
如果进行操作出现下面的提示:
You must reset your password using ALTER USER statement before executing this
statement.
就再设置一遍密码
set password = password(‘Root-123’);
开放3306端口(允许使用用户名root密码Root-123456从任何主机连接到mysql服务器)
mysql>grant all on root.* to root@‘%‘ identified by ‘vmroot!@#456VMROOT‘;
mysql>FLUSH PRIVILEGES;
mysql>exit;
开启防火墙mysql 3306端口的外部访问
firewall-cmd --zone=public --add-port=3306/tcp --permanent
firewall-cmd --reload
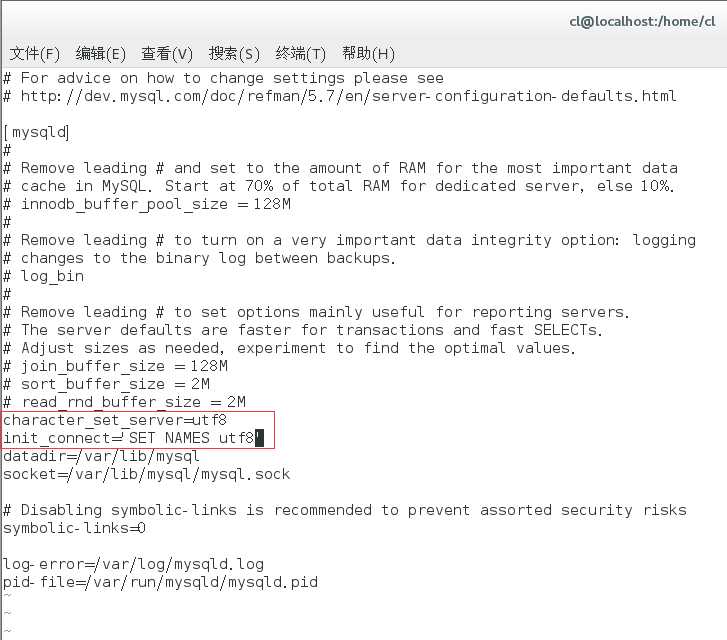
配置默认编码为utf8
vi /etc/my.cnf
修改/etc/my.cnf配置文件,在[mysqld]下添加编码配置,如下所示:
[mysqld]
character_set_server=utf8
init_connect=’SET NAMES utf8’
默认配置文件路径:
配置文件:/etc/my.cnf
日志文件:/var/log//var/log/mysqld.log
服务启动脚本:/usr/lib/systemd/system/mysqld.service
socket文件:/var/run/mysqld/mysqld.pid
如果想使用防火墙,建议使用以下方法配置:
关闭firewall:
systemctl stop firewalld.service #停止firewall
systemctl disable firewalld.service #禁止firewall开机启动
安装iptables防火墙:
yum install iptables-services #安装
sudo vi /etc/sysconfig/iptables #编辑防火墙配置文件
配置文件更改如下:
# Firewall configuration written by system-config-firewall
# Manual customization of this file is not recommended.
*filter
:INPUT ACCEPT [0:0]
:FORWARD ACCEPT [0:0]
:OUTPUT ACCEPT [0:0]
-A INPUT -m state --state ESTABLISHED,RELATED -j ACCEPT
-A INPUT -p icmp -j ACCEPT
-A INPUT -i lo -j ACCEPT
-A INPUT -m state --state NEW -m tcp -p tcp --dport 22 -j ACCEPT

//下面是编辑添加的部分
-A INPUT -m state --state NEW -m tcp -p tcp --dport 80 -j ACCEPT
-A INPUT -m state --state NEW -m tcp -p tcp --dport 3306 -j ACCEPT
//以上是编辑添加的部分

-A INPUT -j REJECT --reject-with icmp-host-prohibited
-A FORWARD -j REJECT --reject-with icmp-host-prohibited
COMMIT
然后输入:wq保存退出,在命令窗口输入以下命令使其生效:

systemctl restart iptables.service #最后重启防火墙使配置生效
systemctl enable iptables.service #设置防火墙开机启动
2、关闭SELINUX
命令行输入以下内容,打开selinux配置文件:
sudo vi /etc/selinux/config
修改内容如下
#SELINUX=enforcing #注释掉

#SELINUXTYPE=targeted #注释掉

SELINUX=disabled #增加
输入:wq! #保存退出,然后命令行输入以下内容,使其生效
setenforce 0 #使配置立即生效
2.安装PHP
yum默认安装的php版本较低,这次,我们准备安装php5.6版本,所以需要先安装epel库,然后安装php。
yum install epel-release
rpm -ivh http://rpms.famillecollet.com/enterprise/remi-release-7.rpm

yum install --enablerepo=remi --enablerepo=remi-php56 php php-opcache php-fpm php-devel php-mbstring php-mcrypt php-mysqlnd php-phpunit-PHPUnit php-pecl-xdebug php-pecl-xhprof
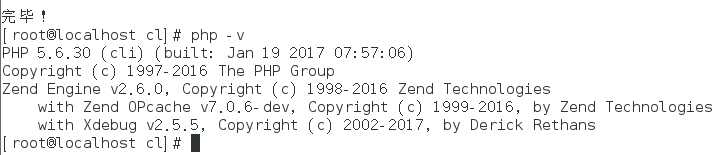
安装完成后键入php -v会显示出php的版本,代表我们php安装完成了。
php -v
3.安装nginx
wget http://nginx.org/packages/centos/7/noarch/RPMS/nginx-release-centos-7-0.el7.ngx.noarch.rpm
rpm -ivh nginx-release-centos-7-0.el7.ngx.noarch.rpm
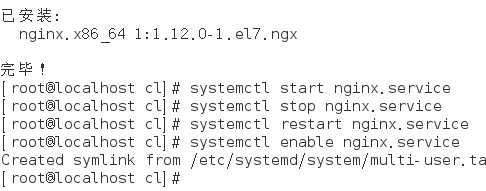
然后启动nginx
systemctl start nginx.service #启动nginx
systemctl stop nginx.service #停止
systemctl restart nginx.service #重启
systemctl enable nginx.service #设置开机启动
.更改nginx端口号(根据自己需求)
cd /etc/nginx/conf.d/ vim default.conf 把listen 80改成listen 81 然后重启nginx systemctl restart nginx.service #重启nginx
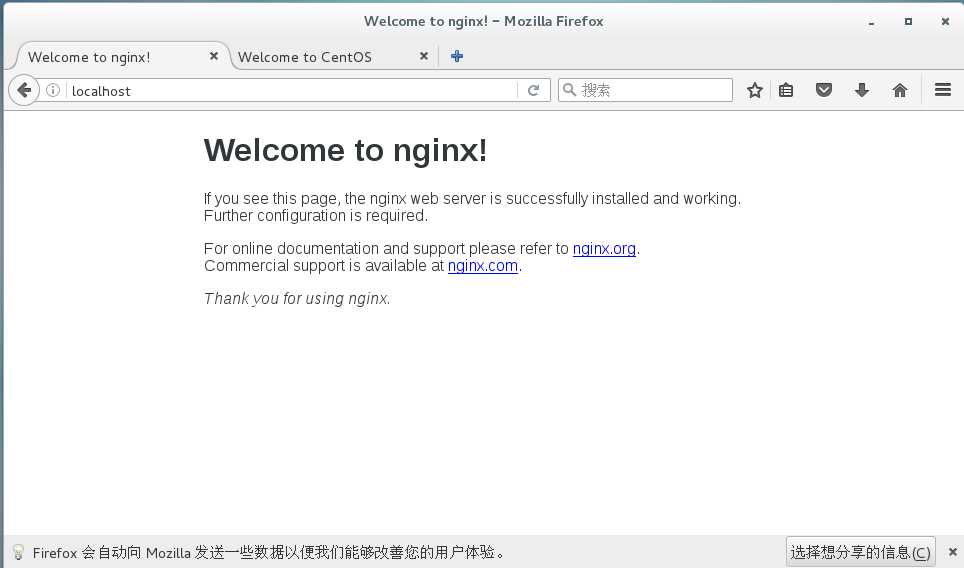
这时我们打开浏览器,访问localhost如果出现Welcome to nginx!那么nginx就安装成功了
nginx安装完成了,那么该配置php-fpm了。让nginx与php联动起来。
打开php-fpm配置文件
sudo vi /etc/php-fpm.d/www.conf
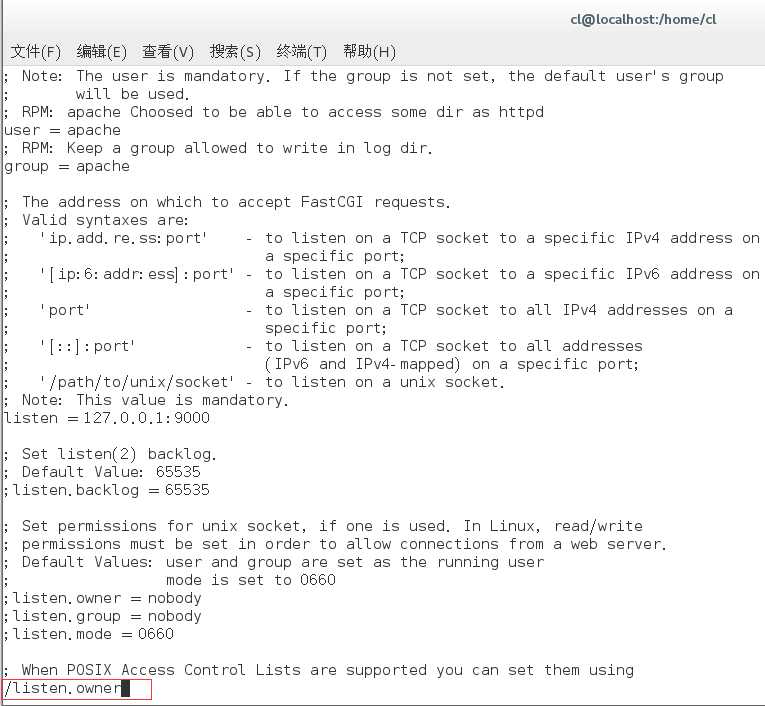
修改以下内容(这里查找配置项时,可以使用斜杠加要查找的关键字回车查找,如下图所示)
listen.owner = nginx
listen.group = nginx
listen.mode = 0666
最后,把三个参数修改完成后:wq退出然后重启php-fpm服务
sudo systemctl start php-fpm    #启动php-fpm
sudo systemctl enable php-fpm   #开机启动fpm
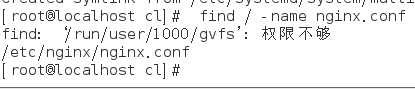
然后,我们来修改nginx的配置,先使用find命令查找配置文件位置,我的配置文件位置如下图
find / -name nginx.conf
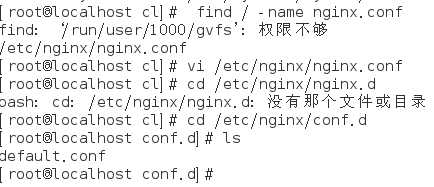
然后,使用vi 命令进入查看,在最后一行发现这个配置文件又引入了其他配置文件。
vi /etc/nginx/nginx.conf

再次进入这个目录发现配置文件如下图
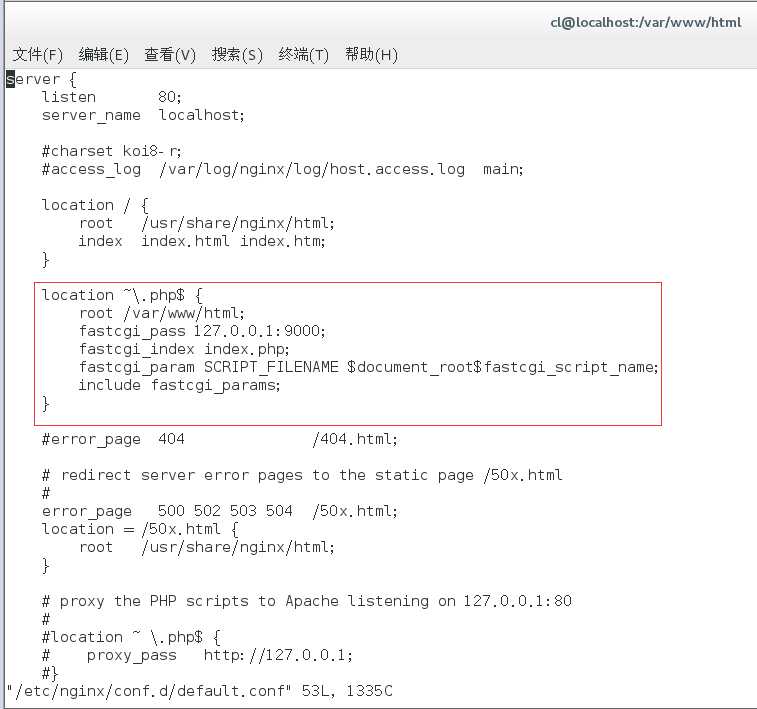
使用vi命令修改它
vi default.conf
在localhost下加上同级,如下图所示
location ~ \.php$ {
root /var/www/html; #指定php的根目录
fastcgi_pass 127.0.0.1:9000;#php-fpm的默认端口是9000
fastcgi_index index.php;
fastcgi_param SCRIPT_FILENAME $document_root$fastcgi_script_name;
include fastcgi_params;
}
修改保存之后,使用nginx -t命令确认格式无错误,后重启nginx。如下图所示
nginx -t
nginx -s reload
之后,在刚刚设置的php目录下,新建一个php文件用于测试。
在/var/www/html建立index.php
<?php
phpinfo();

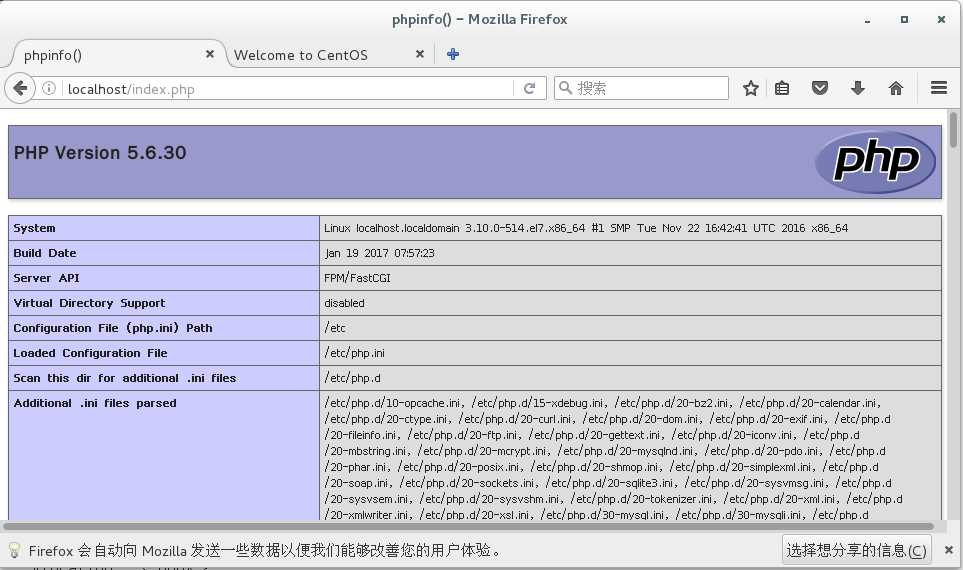
然后,我们访问localhsot/index.php如果看到以下画面,则说明我们的nginx php 已经关联上了。
至此,lnmp已经按装完成,这篇博客的篇幅已经够长了,下篇博客,我们再来安装phpmyadmin。
CentOS7 LNMP+phpmyadmin环境搭建(二、LNMP环境搭建)
标签:-o restart 部分 enable 服务启动 emc efault eject line
原文地址:http://www.cnblogs.com/wyycc/p/7102101.html