标签:messages framework 官网 做了 服务 完成 调用 客户 文件
本篇文章的demo基于spring官网入门案例。当然,我做了一些改变。
spring官网案例:http://projects.spring.io/spring-framework/
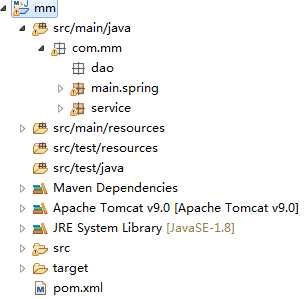
我的maven web项目结构如下:
在pom.xml中添加spring的依赖:
<dependency>
        <groupId>org.springframework</groupId>
        <artifactId>spring-context</artifactId>
        <version>4.3.9.RELEASE</version>
    </dependency>
接下来我们开始创建需要用到的类:
package com.mm.service;

public interface MessageService {
	String getMessage();
}
package com.mm.service.impl;

import com.mm.service.MessageService;

public class MessageServiceImpl implements MessageService{
	@Override
	public String getMessage() {
		return "hello mm";
	}
}
这里我不用spring配置文件形式的注入,于是,我新建了一个配置文件类
package com.mm.main.spring;

import org.springframework.context.annotation.Bean;
import org.springframework.context.annotation.ComponentScan;
import org.springframework.context.annotation.Configuration;
import com.mm.service.MessageService;
import com.mm.service.impl.MessageServiceImpl;

@Configuration
@ComponentScan(basePackages = "com.mm")
public class ApplicationConfig {
    @Bean
    MessageService messageService() {
        return new MessageServiceImpl();
    }
}
新建一个bean来调用服务
package com.mm.main.spring;

import org.springframework.beans.factory.annotation.Autowired;
import org.springframework.stereotype.Component;
import com.mm.service.MessageService;

@Component
public class MessagePrinter {
	@Autowired
	private MessageService messageService;
	public void printMessage() {
        System.out.println(this.messageService.getMessage());
    }
}
最后完成客户端的编写工作
package com.mm.main.spring;

import org.springframework.context.ApplicationContext;
import org.springframework.context.annotation.AnnotationConfigApplicationContext;

public class Client {
	public static void main(String[] args) {
		ApplicationContext context=new AnnotationConfigApplicationContext(ApplicationConfig.class);
		MessagePrinter messagePrinter=context.getBean(MessagePrinter.class);
		messagePrinter.printMessage();
	}
}
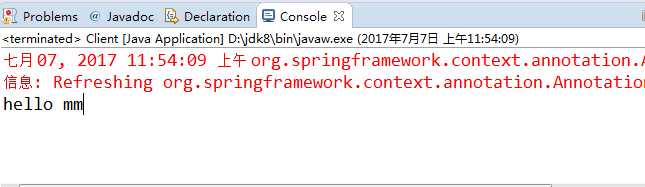
后台打印如下:
接下来我们用注解的方式注入,首先去掉配置文件类中的MessageService bean
@Configuration
@ComponentScan(basePackages = "com.mm")
public class ApplicationConfig {
//    @Bean
//    MessageService messageService() {
//        return new MessageServiceImpl();
//    }
}
为MessageServiceImpl添加注解
@Service//注解方式
public class MessageServiceImpl implements MessageService{
    @Override
    public String getMessage() {
        return "hello mm";
    }
}
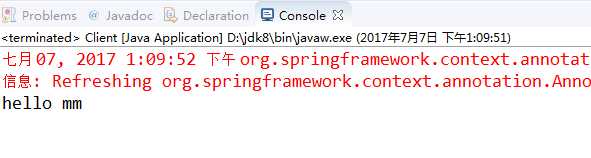
同样完成输出
标签:messages framework 官网 做了 服务 完成 调用 客户 文件
原文地址:http://www.cnblogs.com/guokeluren/p/7131685.html