标签:tco 知识库 ++ 支持 seda 管理 开发者 相关 事务管理
1.spring的模块划分, 各有什么特点?
Spring有七大功能模块,分别是Spring Core,AOP,ORM,DAO,MVC,WEB,Context。
1,Spring Core
Core模块是Spring的核心类库,Spring的所有功能都依赖于该类库,Core主要实现IOC功能,Sprign的所有功能都是借助IOC实现的。
2,AOP
AOP模块是Spring的AOP库,提供了AOP(拦截器)机制,并提供常用的拦截器,供用户自定义和配置。
3,ORM
Spring 的ORM模块提供对常用的ORM框架的管理和辅助支持,Spring支持常用的Hibernate,ibtas,jdao等框架的支持,Spring本身并不对ORM进行实现,仅对常见的ORM框架进行封装,并对其进行管理
4,DAO模块
Spring 提供对JDBC的支持,对JDBC进行封装,允许JDBC使用Spring资源,并能统一管理JDBC事物,并不对JDBC进行实现。
5,WEB模块
WEB模块提供对常见框架如Struts1,WEBWORK(Struts 2),JSF的支持,Spring能够管理这些框架,将Spring的资源注入给框架,也能在这些框架的前后插入拦截器。
6,Context模块
Context模块提供框架式的Bean访问方式,其他程序可以通过Context访问Spring的Bean资源,相当于资源注入。
7,MVC模块
WEB MVC模块为Spring提供了一套轻量级的MVC实现,在Spring的开发中,我们既可以用Struts也可以用Spring自己的MVC框架,相对于Struts,Spring自己的MVC框架更加简洁和方便。
2.springMVC的工作原理?
SpringMVC的工作原理图:
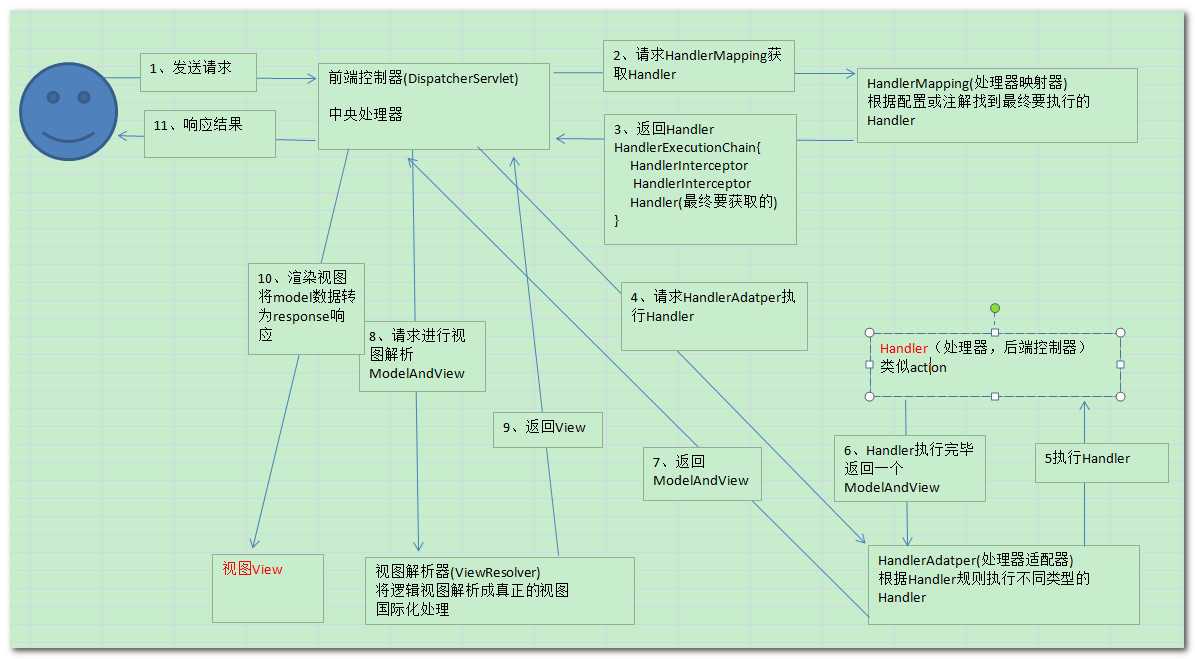
1、 用户发送请求至前端控制器DispatcherServlet。
2、 DispatcherServlet收到请求调用HandlerMapping处理器映射器。
3、 处理器映射器找到具体的处理器(可以根据xml配置、注解进行查找),生成处理器对象及处理器拦截器(如果有则生成)一并返回给DispatcherServlet。
4、 DispatcherServlet调用HandlerAdapter处理器适配器。
5、 HandlerAdapter经过适配调用具体的处理器(Controller,也叫后端控制器)。
6、 Controller执行完成返回ModelAndView。
7、 HandlerAdapter将controller执行结果ModelAndView返回给DispatcherServlet。
8、 DispatcherServlet将ModelAndView传给ViewReslover视图解析器。
9、 ViewReslover解析后返回具体View。
10、DispatcherServlet根据View进行渲染视图(即将模型数据填充至视图中)。
11、 DispatcherServlet响应用户。
以下组件通常使用框架提供实现:
DispatcherServlet:作为前端控制器,整个流程控制的中心,控制其它组件执行,统一调度,降低组件之间的耦合性,提高每个组件的扩展性。
HandlerMapping:通过扩展处理器映射器实现不同的映射方式,例如:配置文件方式,实现接口方式,注解方式等。
HandlAdapter:通过扩展处理器适配器,支持更多类型的处理器。
ViewResolver:通过扩展视图解析器,支持更多类型的视图解析,例如:jsp、freemarker、pdf、excel等。
组件:
1、前端控制器DispatcherServlet(不需要工程师开发),由框架提供
作用:接收请求,响应结果,相当于转发器,中央处理器。有了dispatcherServlet减少了其它组件之间的耦合度。
用户请求到达前端控制器,它就相当于mvc模式中的c,dispatcherServlet是整个流程控制的中心,由它调用其它组件处理用户的请求,dispatcherServlet的存在降低了组件之间的耦合性。
2、处理器映射器HandlerMapping(不需要工程师开发),由框架提供
作用:根据请求的url查找Handler
HandlerMapping负责根据用户请求找到Handler即处理器,springmvc提供了不同的映射器实现不同的映射方式,例如:配置文件方式,实现接口方式,注解方式等。
3、处理器适配器HandlerAdapter
作用:按照特定规则(HandlerAdapter要求的规则)去执行Handler
通过HandlerAdapter对处理器进行执行,这是适配器模式的应用,通过扩展适配器可以对更多类型的处理器进行执行。
4、处理器Handler(需要工程师开发)
注意:编写Handler时按照HandlerAdapter的要求去做,这样适配器才可以去正确执行Handler
Handler 是继DispatcherServlet前端控制器的后端控制器,在DispatcherServlet的控制下Handler对具体的用户请求进行处理。
由于Handler涉及到具体的用户业务请求,所以一般情况需要工程师根据业务需求开发Handler。
5、视图解析器View resolver(不需要工程师开发),由框架提供
作用:进行视图解析,根据逻辑视图名解析成真正的视图(view)
View Resolver负责将处理结果生成View视图,View Resolver首先根据逻辑视图名解析成物理视图名即具体的页面地址,再生成View视图对象,最后对View进行渲染将处理结果通过页面展示给用户。 springmvc框架提供了很多的View视图类型,包括:jstlView、freemarkerView、pdfView等。
一般情况下需要通过页面标签或页面模版技术将模型数据通过页面展示给用户,需要由工程师根据业务需求开发具体的页面。
6、视图View(需要工程师开发jsp...)
View是一个接口,实现类支持不同的View类型(jsp、freemarker、pdf...)
3.你使用过哪些spring的注解,各有什么作用?
@Controller
在类上面定义,表明该类为控制器,返回字符串与redirect:xxx
@RequestMapping
在类或方法上面使用此注解,设置URL访问地址。它有两个属性,value指定访问路径,method指定指定请求方式,请求方式在RequestMethod这个类中,全部以常量形式定义,它默认使用GET请求。
@RequestParam
指定Request请求参数,在方法参数中定义,相当于传统的request.getParameter()。
@PathVariable
获取URL访问路径变量,这是Spring MVC 3.0框架才加入的特性,基于RESTful风格的URL访问路径。
@ModelAttribute
全局式的方法,在一组URL访问路径中,每次都会执行,方法返回结果保存在module会话中。
@Service
在类上面定义,指定被注解的类是业务逻辑组件,如果不指定具体的Bean ID,则采用默认命名方式,即类名的首字母小写。之前在SSH2中,大象曾对Dao组件使用@Repository,本例只有业务层,所以就只用@Service注解。
@Autowired
IoC自动注入功能,替换以前的set写法,在SSH2中就已经开始使用了。
@Qualifier
对同一接口类有不同实现指定具体的实现类。
@ResponseBody
同样定义在方法上,Ajax调用声明,指定方法返回结果为Ajax回调函数结果。这是Spring MVC 3.0框架中增加的一个新特性。
@InitBinder
初始化数据绑定与类型转换,将传入的参数转换为自定义类型,或者对参数进行自定义处理。
4.BeanFactory和ApplicationContxt类的区别?
1、容器是spring的核心,使IoC管理所有和组件
2、spring的两种容器:a、BeanFactoy
b、ApplicationContext应用上下文
3、BeanFactory:BeanhFactory使用延迟加载所有的Bean,为了从BeanhFactory得到一个Bean,只要调用getBean()方法,就能获得Bean
4、ApplicationContext:a、提供文本信息解析,支持I18N
b、提供载入文件资源的通用方法
c、向注册为监听器的Bean发送事件
d、ApplicationContext接口扩展BeanFactory接口
e、ApplicationContext提供附加功能
5、ApplicationContext的三个实现类:a、ClassPathXmlApplication:把上下文文件当成类路径资源
b、FileSystemXmlApplication:从文件系统中的XML文件载入上下文定义信息
c、XmlWebApplicationContext:从Web系统中的XML文件载入上下文定义信息
作用:
1. BeanFactory负责读取bean配置文档,管理bean的加载,实例化,维护bean之间的依赖关系,负责bean的声明周期。
2. ApplicationContext除了提供上述BeanFactory所能提供的功能之外,还提供了更完整的框架功能:
a. 国际化支持
b. 资源访问:Resource rs = ctx. getResource(“classpath:config.properties”), “file:c:/config.properties”
c. 事件传递:通过实现ApplicationContextAware接口
3. 常用的获取ApplicationContext的方法:
FileSystemXmlApplicationContext:从文件系统或者url指定的xml配置文件创建,参数为配置文件名或文件名数组
ClassPathXmlApplicationContext:从classpath的xml配置文件创建,可以从jar包中读取配置文件
WebApplicationContextUtils:从web应用的根目录读取配置文件,需要先在web.xml中配置,可以配置监听器或者servlet来实现
<listener>
<listener-class>org.springframework.web.context.ContextLoaderListener</listener-class>
</listener>
<servlet>
<servlet-name>context</servlet-name>
<servlet-class>org.springframework.web.context.ContextLoaderServlet</servlet-class>
<load-on-startup>1</load-on-startup>
</servlet>
这两种方式都默认配置文件为web-inf/applicationContext.xml,也可使用context-param指定配置文件
<context-param>
<param-name>contextConfigLocation</param-name>
<param-value>/WEB-INF/myApplicationContext.xml</param-value>
</context-param>
5.解析spring的配置文件的方式有哪些? (ClassPathXmlApplicationContext)
在spring 框架中,它是怎样识别xml这个配置文件的呢?
这就要靠IoC容器的两个接口BeanFactory 和ApplicationContext:
BeanFactory (接口)
|--------XmlBeanFactory(实现类)
ApplicationContext (接口)
|-------- ClassPathXmlApplicationContext(实现类)
|---------FileSystemXmlApplicationContext(实现类)
|---------XmlWebApplicationContext(实现类)
BeanFactory是一个接口,Spring使用它来实例化、配置和管理对象,它里面有一个getBean()方法,只提供了spring最基础的特征,一般使用在低内存的情况下,如Applet。一般的spring项目用它的派生类ApplicationContext,这个类会自动解析我们配置的xml文件,然后根据配置的bean来new对象,将new好的对象放进一个Map中,键是bean的id,值就是new的对象。
1. 编译路径ClassPathXmlApplicationContext来加载xml文件(我们入门篇中的例子http://blog.csdn.net/shymi1991/article/details/48085955 )
这种方式xml文件必须在项目的build path里面,一般用classpath:作为前缀,也可以省略
1)/src目录下
ApplicationContext factory=new ClassPathXmlApplicationContext("classpath:appcontext.xml");
ApplicationContext factory=new ClassPathXmlApplicationContext("appcontext.xml");
2)/ src/conf 目录下的
ApplicationContext factory=new ClassPathXmlApplicationContext("conf/appcontext.xml");
3)同时加载多个xml文件
ApplicationContext factory=new ClassPathXmlApplicationContext(new String[] {"bean1.xml","bean2.xml"});
2.文件系统的路径
xml文件的绝对路径,一般用file:作为前缀,也可以省略
ApplicationContext factory=new FileSystemXmlApplicationContext("file:G:/Test/src/appcontext.xml");
ApplicationContext factory=new FileSystemXmlApplicationContext("G:/Test/src/appcontext.xml");
3. XmlWebApplicationContext是专为Web工程定制的
ServletContext servletContext = request.getSession().getServletContext();
ApplicationContext ctx = WebApplicationContextUtils.getWebApplicationContext(servletContext );
6.spring和jdbc的整合. dao
原理:将DataSource传给JdbcTemplate。
1. 导入数据库连接池的jar包和连接数据库的驱动包(这里使用的dbcp数据库连接池)
配置文件中注入dataSource
<?xml version="1.0" encoding="UTF-8"?>
<beans xmlns="http://www.springframework.org/schema/beans"
   xmlns:xsi="http://www.w3.org/2001/XMLSchema-instance"
   xsi:schemaLocation="http://www.springframework.org/schema/beans
   http://www.springframework.org/schema/beans/spring-beans-2.5.xsd">
<!--
    配置dbcp的数据库连接池
 -->
 <bean id="dataSource" class="org.apache.commons.dbcp.BasicDataSource">
    <property name="driverClassName" value="oracle.jdbc.OracleDriver"></property>
    <property name="url" value="jdbc:oracle:thin:@localhost:1521:xe"></property>
    <property name="username" value="scott"></property>
    <property name="password" value="tiger"></property>
 </bean>
</beans>
- 继承JDBCSupport,注入JdbcTemplate
XMl文件
<bean id="personDao" class="com.lzl.spring.jdbc.dao.impl.PersonDaoImpl">
     <property name="dataSource">
        <ref bean="dataSource"/>
     </property>
 </bean>
Java类
public class PersonDaoImpl extends JdbcDaoSupport implements PersonDao{

@Override
public void savePerson() {
    /**
     * "insert into emp(empno,ename,empjob,sal,deptno) values(123920,‘lzlh‘,‘programmer‘,10000,20)"
     */
    this.getJdbcTemplate().execute("insert into emp(empno,ename,empjob,sal,deptno) values(1111,‘lzlh‘,‘programmer‘,10000,20)");
}
}
- 在Dao层使用set/get方法注入JdbcTemplate类
Xml文件
<bean id="jdbcTemplate" class="org.springframework.jdbc.core.JdbcTemplate">
    <property name="dataSource">
        <ref bean="dataSource"/>
    </property>
 </bean>
 <bean id="personDao1" class="com.lzl.spring.jdbc.dao.impl.PersonDaoImpl1">
     <property name="jdbcTemplate">
        <ref bean="jdbcTemplate"/>
     </property>
 </bean>
Java文件
public class PersonDaoImpl1 implements PersonDao{
private JdbcTemplate jdbcTemplate;

public JdbcTemplate getJdbcTemplate() {
    return jdbcTemplate;
}

public void setJdbcTemplate(JdbcTemplate jdbcTemplate) {
    this.jdbcTemplate = jdbcTemplate;
}

@Override
public void savePerson() {
    /**
     * "insert into emp(empno,ename,empjob,sal,deptno) values(123920,‘lzlh‘,‘programmer‘,10000,20)"
     */
    this.getJdbcTemplate().execute("insert into emp(empno,ename,empjob,sal,deptno) values(122,‘lzlh‘,‘programm‘,10000,10)");
}
}
3.继承JdbcTemplate类,使用构造方法进行注入
Xml文件
<bean id="personDao2" class="com.lzl.spring.jdbc.dao.impl.PersonDaoImpl2">
    <constructor-arg index="0" ref="dataSource"></constructor-arg>
 </bean>
Java文件
public class PersonDaoImpl2 extends JdbcTemplate implements PersonDao{

public PersonDaoImpl2(DataSource dataSource) {
    super(dataSource);
}
@Override
public void savePerson() {
    this.execute("insert into emp(empno,ename,empjob,sal,deptno) values(883,‘lzlh‘,‘programm‘,10000,10)");
}
}
实现RowMapper接口
public class EmpRowMapping implements RowMapper<Emp>{

@Override
public Emp mapRow(ResultSet rs, int rowNum) throws SQLException {
    rs =null;
    if(rs==null){
        //这里得判断空
        throw new IllegalAnnotationException("结果集不能为空!");
    }
    @SuppressWarnings("unused")
    Emp emp = new Emp();
    emp.setEmpno(rs.getLong("empno"));
    emp.setEname(rs.getString("ename"));
    emp.setEmpJob(rs.getString("empjob"));
    emp.setSal(rs.getBigDecimal("sal"));
    emp.setDeptNo(rs.getLong("deptno"));
    System.out.println("==="+rowNum);
    return emp;
}
}
调用JdbcTemplate的query方法
@Override
public List<Emp> queryEmp() {
    List<Emp> list = this.query("select empno,ename,empjob,sal,deptno from emp", new EmpRowMapping());
    return list;
}
主要是在spring中配置关于事务的类。
事务管理配置过程
1. 数据库配置,配置数据库连接池(c3p0或者dbpc)
2. AOP配置,配置pointCut(切入点)和advisor通知。引入事务管理类(TransactionManager)
3. 事务配置,引入TransactionManager类,并注入DataSource类。
4. 事务方法管理, 声明目标方法中那些方法需要事务,那些不需要,以及处理机制
Xml文件
<?xml version="1.0" encoding="UTF-8"?>
<beans xmlns="http://www.springframework.org/schema/beans"
   xmlns:xsi="http://www.w3.org/2001/XMLSchema-instance"
   xmlns:aop="http://www.springframework.org/schema/aop"
   xmlns:context="http://www.springframework.org/schema/context"
   xmlns:tx="http://www.springframework.org/schema/tx"
   xsi:schemaLocation="http://www.springframework.org/schema/beans
       http://www.springframework.org/schema/beans/spring-beans-2.5.xsd
       http://www.springframework.org/schema/aop
       http://www.springframework.org/schema/aop/spring-aop-2.5.xsd
       http://www.springframework.org/schema/context
       http://www.springframework.org/schema/context/spring-context-2.5.xsd
       http://www.springframework.org/schema/tx
       http://www.springframework.org/schema/tx/spring-tx-2.5.xsd">
<!--
    配置dbcp的数据库连接池
 -->
 <bean id="dataSource" class="org.apache.commons.dbcp.BasicDataSource">
 <property name="driverClassName" value="oracle.jdbc.OracleDriver"></property>
    <property name="url" value="jdbc:oracle:thin:@localhost:1521:xe"></property>
    <property name="username" value="scott"></property>
    <property name="password" value="tiger"></property>
 </bean>

 <!-- spring事务管理 -->
 <!-- 引入事务管理类 -->
 <bean  id="transactionManager" class="org.springframework.jdbc.datasource.DataSourceTransactionManager">
    <property name="dataSource">
        <ref bean="dataSource"/>
    </property>
 </bean>
 <!-- 声明目标方法中那些方法需要事务,那些不需要 -->
 <tx:advice id="tx" transaction-manager="transactionManager">
    <tx:attributes>
    <!--
        name限定方法的名称
        isolation 隔离机制
        propagation 传播机制
        read-only 只读
     -->
        <tx:method name="save*" isolation="DEFAULT"
        propagation="REQUIRED" read-only="false"/>
    </tx:attributes>
 </tx:advice>
 <!-- 设置事务切面 -->
 <aop:config>
    <!--设置切入点  -->
    <aop:pointcut expression="execution(* com.lzl.spring.jdbc.dao.impl.transaction.EmpDaoImpl.*(..))" id="perform"/>
    <!-- 引入通知 -->
    <aop:advisor advice-ref="tx" pointcut-ref="perform"/>
 </aop:config>
 <!-- 引入bean -->
 <bean id="empDao" class="com.lzl.spring.jdbc.dao.impl.transaction.EmpDaoImpl">
    <property name="dataSource">
        <ref bean="dataSource"/>
    </property>
 </bean>
</beans>
7.spring和hibernate的整合
1、由IOC容器来管理Hibernate的SessionFactory
2、让Hibernate使用上Spring的声明式事务
整合前准备:
持久化类:

@Entity
public class Book
{
    private Integer id;
    private String bookName;
    private String isbn;
    private int price;
    private int stock;
    public Integer getId()
    {
        return id;
    }
    public void setId(Integer id)
    {
        this.id = id;
    }
    public String getBookName()
    {
        return bookName;
    }
    public void setBookName(String bookName)
    {
        this.bookName = bookName;
    }
    public String getIsbn()
    {
        return isbn;
    }
    public void setIsbn(String isbn)
    {
        this.isbn = isbn;
    }
    public int getPrice()
    {
        return price;
    }
    public void setPrice(int price)
    {
        this.price = price;
    }
    public int getStock()
    {
        return stock;
    }
    public void setStock(int stock)
    {
        this.stock = stock;
    }
    public Book(Integer id, String bookName, String isbn, int price, int stock)
    {
        super();
        this.id = id;
        this.bookName = bookName;
        this.isbn = isbn;
        this.price = price;
        this.stock = stock;
    }
}
Dao层:
public interface BookDao
{
    public String findBookById(int id);

    public void saveBook(Book book);
}
DaoImpl:
@Repository
public class BookDaoImpl implements BookDao
{
    @Autowired
    private SessionFactory sessionFactory;

    //获取和当前线程绑定的Seesion
    private Session getSession()
    {
        return sessionFactory.getCurrentSession();
    }
    public String findBookById(int id)
    {
        String hql="SELECT bookName from Book where id=?";
        Query query=getSession().createQuery(hql).setInteger(0, id);
        String str= query.uniqueResult().toString();
        return str;
    }
    public void saveBook(Book book)
    {
        getSession().save(book);
    }
}
Service层:
public interface BookService
{
    public String findBookById(int id);
    public void saveBook(Book book);
}
ServiceImpl:
@Service
public class BookServiceImpl implements BookService
{
    @Autowired
    private BookDao bookDao;
    public String findBookById(int id)
    {
        return bookDao.findBookById(id);
    }
    public void saveBook(Book book)
    {
        bookDao.saveBook(book);

    }
}
<?xml version="1.0" encoding="UTF-8"?>
<!DOCTYPE hibernate-configuration PUBLIC
        "-//Hibernate/Hibernate Configuration DTD 3.0//EN"
        "http://hibernate.sourceforge.net/hibernate-configuration-3.0.dtd">
<hibernate-configuration>
    <session-factory>
        <!-- 配置Hibernate的基本属性 -->
        <!-- 1.数据源配置到IOC容器中 -->
        <!-- 2.关联的.hbm.xml也在IOC容器配置SessionFactory实例 -->
        <!-- 3.配置Hibernate的基本属性:方言,SQL显示及格式化,生成数据表的策略以及二级缓存 -->
        <property name="hibernate.dialect">org.hibernate.dialect.MySQL5Dialect</property>
        <property name="hibernate.show_sql">true</property>
        <property name="hbm2ddl.auto">update</property>
    </session-factory>
</hibernate-configuration>
<?xml version="1.0"?>
<!DOCTYPE hibernate-mapping PUBLIC "-//Hibernate/Hibernate Mapping DTD 3.0//EN"
"http://hibernate.sourceforge.net/hibernate-mapping-3.0.dtd">
<!-- Generated 2016-3-15 16:30:05 by Hibernate Tools 3.4.0.CR1 -->
<hibernate-mapping>
    <class name="com.demo.ssm.po.Book" table="BOOK">
        <id name="id" type="java.lang.Integer">
            <column name="ID" />
            <generator class="native" />
        </id>
        <property name="bookName" type="java.lang.String">
            <column name="BOOK_NAME" />
        </property>
        <property name="isbn" type="java.lang.String">
            <column name="ISBN" />
        </property>
        <property name="price" type="int">
            <column name="PRICE" />
        </property>
        <property name="stock" type="int">
            <column name="STOCK" />
        </property>
    </class>
</hibernate-mapping>
<?xml version="1.0" encoding="UTF-8"?>
<beans xmlns="http://www.springframework.org/schema/beans"
    xmlns:xsi="http://www.w3.org/2001/XMLSchema-instance"
    xmlns:tx="http://www.springframework.org/schema/tx"
    xmlns:aop="http://www.springframework.org/schema/aop"
    xmlns:context="http://www.springframework.org/schema/context"
    xsi:schemaLocation="http://www.springframework.org/schema/beans http://www.springframework.org/schema/beans/spring-beans.xsd
        http://www.springframework.org/schema/context http://www.springframework.org/schema/context/spring-context-4.1.xsd
        http://www.springframework.org/schema/aop http://www.springframework.org/schema/aop/spring-aop-4.1.xsd
        http://www.springframework.org/schema/tx http://www.springframework.org/schema/tx/spring-tx-4.1.xsd">
    <context:component-scan base-package="com.demo.ssm"></context:component-scan>
    <bean id="dataSource" class="org.apache.commons.dbcp.BasicDataSource" destroy-method="close">
        <property name="driverClassName" value="com.mysql.jdbc.Driver" />
        <property name="url" value="jdbc:mysql://localhost/test" />
        <property name="username" value="root"></property>
        <property name="password" value="281889"></property>
    </bean>
    <bean id="sessionFactory" class="org.springframework.orm.hibernate4.LocalSessionFactoryBean" lazy-init="false">
        <!-- 注入datasource,给sessionfactoryBean内setdatasource提供数据源 -->
        <property name="dataSource" ref="dataSource" />
        <property name="configLocation" value="classpath:hibernate.cfg.xml"></property>
        <!-- //加载实体类的映射文件位置及名称 -->
        <property name="mappingLocations" value="classpath:com/demo/ssm/po/*.hbm.xml"></property>
    </bean>

    <!-- 配置Spring声明式事务 -->
    <bean id="transactionManager" class="org.springframework.orm.hibernate4.HibernateTransactionManager">
        <property name="sessionFactory" ref="sessionFactory"></property>
    </bean>
    <!-- 配置事务事务属性 -->
     <tx:advice id="txAdvice" transaction-manager="transactionManager">
        <tx:attributes>
            <tx:method name="get*" read-only="true"/>
            <tx:method name="*"/>
        </tx:attributes>
    </tx:advice>
    <!-- 配置事务切点,并把切点和事务属性关联起来 -->
    <aop:config>
        <aop:pointcut expression="execution(* com.demo.ssm.daoImpl.*.*(..))" id="txPointcut"/>
        <aop:advisor advice-ref="txAdvice" pointcut-ref="txPointcut"/>
    </aop:config>
</beans>
public class BookDaoImplTest
{
    private ApplicationContext context=null;
    private BookService bookService=null;

    {
         context= new ClassPathXmlApplicationContext("applicationContext.xml");
         bookService=context.getBean(BookService.class);
    }
    @Test
    public void test()
    {
        DataSource dataSource=(DataSource) context.getBean(DataSource.class);
        System.out.println(dataSource);
    }
    @Test
    public void test2()
    {
        String bookName=bookService.findBookById(1);
        System.out.println(bookName);
    }

    @Test
    public void test3()
    {
        bookService.saveBook(new Book(2, "android源码分析", "1002", 45, 10));
    }
}
8.spring和mybatis的整合;
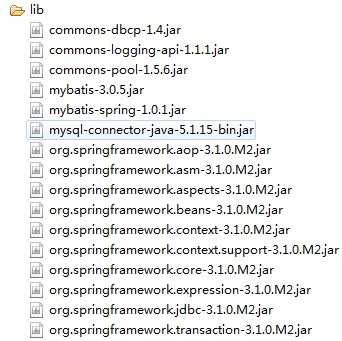
本文主要介绍了如何将mybatis和spring整合在一起使用,本人使用的是mybatis3.05 + spring3.1.0M2 ,使用dbcp作为数据库连接池。
1.编写数据访问接口(UserDao.Java)
package com.mybatis;
public interface UserDao {
    public int countAll();
}
2.编写数据访问接口映射文件(UserDaoMapper.xml)
<?xml version="1.0" encoding="UTF-8" ?>
<!DOCTYPE mapper PUBLIC "-//mybatis.org//DTD Mapper 3.0//EN" "http://mybatis.org/dtd/mybatis-3-mapper.dtd">
<mapper namespace="com.mybatis.UserDao">
    <select id="countAll" resultType="int">
        select count(*) c from user;
    </select>
</mapper>
3.编写mybatis配置文件(MyBatis-Configuration.xml)
<?xml version="1.0" encoding="UTF-8" ?>
<!DOCTYPE configuration PUBLIC "-//mybatis.org//DTD Config 3.0//EN"
"http://mybatis.org/dtd/mybatis-3-config.dtd">
<configuration>
    <mappers>
        <mapper resource="com/mybatis/UserDaoMapper.xml"/>
    </mappers>
</configuration>
4.编写服务层接口(UserService.java)
package com.mybatis;

public interface UserService {
    public int countAll();
}
5.编写服务层实现代码(UserServiceImpl.java)
package com.mybatis;

public class UserServiceImpl implements UserService {
    private UserDao userDao;

    public UserDao getUserDao() {
        return userDao;
    }
    public void setUserDao(UserDao userDao) {
        this.userDao = userDao;
    }

    public int countAll() {
        return this.userDao.countAll();
    }
}
6.编写spring配置文件(applicationContext.xml)
<?xml version="1.0" encoding="UTF-8"?>
<beans xmlns="http://www.springframework.org/schema/beans"
xmlns:xsi="http://www.w3.org/2001/XMLSchema-instance"
xsi:schemaLocation="http://www.springframework.org/schema/beans http://www.springframework.org/schema/beans/spring-beans-3.0.xsd">
<bean id="dataSource" class="org.apache.commons.dbcp.BasicDataSource">
<property name="driverClassName" value="com.mysql.jdbc.Driver"></property>
<property name="url" value="jdbc:mysql://localhost:3306/hlp?useUnicode=true&characterEncoding=UTF-8&zeroDateTimeBehavior=convertToNull"></property>
<property name="username" value="root"></property>
<property name="password" value="1234"></property>
<property name="maxActive" value="100"></property>
<property name="maxIdle" value="30"></property>
<property name="maxWait" value="500"></property>
<property name="defaultAutoCommit" value="true"></property>
</bean>
<bean id="sqlSessionFactory" class="org.mybatis.spring.SqlSessionFactoryBean">
<property name="configLocation" value="classpath:MyBatis-Configuration.xml"></property>
<property name="dataSource" ref="dataSource" />
</bean>
<bean id="userDao" class="org.mybatis.spring.mapper.MapperFactoryBean">
<property name="mapperInterface" value="com.mybatis.UserDao"></property>
<property name="sqlSessionFactory" ref="sqlSessionFactory"></property>
</bean>
<bean id="userService" class="com.mybatis.UserServiceImpl">
<property name="userDao" ref="userDao"></property>
</bean>
</beans>
7.测试代码(UserServiceTest.java)
package com.mybatis;

import org.junit.Test;
import org.springframework.context.ApplicationContext;
import org.springframework.context.support.ClassPathXmlApplicationContext;


public class UserServiceTest {

    @Test
    public void userServiceTest(){
        ApplicationContext context = new ClassPathXmlApplicationContext("applicationContext.xml");
        UserService userService = (UserService)context.getBean("userService");
        System.out.println(userService.countAll());
    }
}
附录:需要导入的库
另一种:
applicationContext.xml
AbstractDao
具体实例dao
数据访问接口映射文件
或者用resultMap
9.数据库连接池的工作原理
由上面的分析可以看出,问题的根源就在于对数据库连接资源的低效管理。我们知道,对于共享资源,有一个很著名的设计模式:资源池(resource pool)。该模式正是为了解决资源的频繁分配﹑释放所造成的问题。为解决上述问题,可以采用数据库连接池技术。数据库连接池的基本思想就是为数据库连接建立一个“缓冲池”。预先在缓冲池中放入一定数量的连接,当需要建立数据库连接时,只需从“缓冲池”中取出一个,使用完毕之后再放回去。我们可以通过设定连接池最大连接数来防止系统无尽的与数据库连接。更为重要的是我们可以通过连接池的管理机制监视数据库的连接的数量﹑使用情况,为系统开发﹑测试及性能调整提供依据。
我们自己尝试开发一个连接池,来为上面的查询业务提供数据库连接服务:
① 编写class 实现DataSource 接口
② 在class构造器一次性创建10个连接,将连接保存LinkedList中
③ 实现getConnection 从 LinkedList中返回一个连接
④ 提供将连接放回连接池中方法
1、连接池代码
2、使用连接池重构我们的用户查询函数
这就是数据库连接池的原理,它大大提供了数据库连接的利用率,减小了内存吞吐的开销。我们在开发过程中,就不需要再关心数据库连接的问题,自然有数据库连接池帮助我们处理,这回放心了吧。但连接池需要考虑的问题不仅仅如此,下面我们就看看还有哪些问题需要考虑。
三.连接池还要考虑更多的问题
1、并发问题
为了使连接管理服务具有最大的通用性,必须考虑多线程环境,即并发问题。这个问题相对比较好解决,因为java语言自身提供了对并发管理的支持,使用synchronized关键字即可确保线程是同步的。使用方法为直接在类方法前面加上synchronized关键字,如:
publicsynchronized connection getconnection()
2、多数据库服务器和多用户
对于大型的企业级应用,常常需要同时连接不同的数据库(如连接Oracle和sybase)。如何连接不同的数据库呢?我们采用的策略是:设计一个符合单例模式的连接池管理类,在连接池管理类的唯一实例被创建时读取一个资源文件,其中资源文件中存放着多个数据库的url地址等信息。根据资源文件提供的信息,创建多个连接池类的实例,每一个实例都是一个特定数据库的连接池。连接池管理类实例为每个连接池实例取一个名字,通过不同的名字来管理不同的连接池。
对于同一个数据库有多个用户使用不同的名称和密码访问的情况,也可以通过资源文件处理,即在资源文件中设置多个具有相同url地址,但具有不同用户名和密码的数据库连接信息。
3、事务处理
我们知道,事务具有原子性,此时要求对数据库的操作符合“all-all-nothing”原则即对于一组sql语句要么全做,要么全不做。
在java语言中,connection类本身提供了对事务的支持,可以通过设置connection的autocommit属性为false 然后显式的调用commit或rollback方法来实现。但要高效的进行connection复用,就必须提供相应的事务支持机制。可采用每一个事务独占一个连接来实现,这种方法可以大大降低事务管理的复杂性。
4、连接池的分配与释放
连接池的分配与释放,对系统的性能有很大的影响。合理的分配与释放,可以提高连接的复用度,从而降低建立新连接的开销,同时还可以加快用户的访问速度。
对于连接的管理可使用空闲池。即把已经创建但尚未分配出去的连接按创建时间存放到一个空闲池中。每当用户请求一个连接时,系统首先检查空闲池内有没有空闲连接。如果有就把建立时间最长(通过容器的顺序存放实现)的那个连接分配给他(实际是先做连接是否有效的判断,如果可用就分配给用户,如不可用就把这个连接从空闲池删掉,重新检测空闲池是否还有连接);如果没有则检查当前所开连接池是否达到连接池所允许的最大连接数(maxconn)如果没有达到,就新建一个连接,如果已经达到,就等待一定的时间(timeout)。如果在等待的时间内有连接被释放出来就可以把这个连接分配给等待的用户,如果等待时间超过预定时间timeout则返回空值(null)。系统对已经分配出去正在使用的连接只做计数,当使用完后再返还给空闲池。对于空闲连接的状态,可开辟专门的线程定时检测,这样会花费一定的系统开销,但可以保证较快的响应速度。也可采取不开辟专门线程,只是在分配前检测的方法。
5、连接池的配置与维护
连接池中到底应该放置多少连接,才能使系统的性能最佳?系统可采取设置最小连接数(minconn)和最大连接数(maxconn)来控制连接池中的连接。最小连接数是系统启动时连接池所创建的连接数。如果创建过多,则系统启动就慢,但创建后系统的响应速度会很快;如果创建过少,则系统启动的很快,响应起来却慢。这样,可以在开发时,设置较小的最小连接数,开发起来会快,而在系统实际使用时设置较大的,因为这样对访问客户来说速度会快些。最大连接数是连接池中允许连接的最大数目,具体设置多少,要看系统的访问量,可通过反复测试,找到最佳点。
如何确保连接池中的最小连接数呢?有动态和静态两种策略。动态即每隔一定时间就对连接池进行检测,如果发现连接数量小于最小连接数,则补充相应数量的新连接以保证连接池的正常运转。静态是发现空闲连接不够时再去检查。
四.实际开发中有成熟的开源连接池供我们使用
理解了连接池的原理就可以了,没有必要什么都从头写一遍,那样会花费很多时间,并且性能及稳定性也不一定满足要求。事实上,已经存在很多流行的性能优良的第三方数据库连接池jar包供我们使用。如:
1.Apache commons-dbcp 连接池
下载:http://commons.apache.org/proper/commons-dbcp/
2.c3p0 数据库连接池
下载:http://sourceforge.net/projects/c3p0/
10、谈谈spring的事务;
Spring事务的本质其实就是数据库对事务的支持,没有数据库的事务支持,spring是无法提供事务功能的。对于纯JDBC操作数据库,想要用到事务,可以按照以下步骤进行:
使用Spring的事务管理功能后,我们可以不再写步骤 2 和 4 的代码,而是由Spirng 自动完成。?那么Spring是如何在我们书写的 CRUD 之前和之后开启事务和关闭事务的呢?解决这个问题,也就可以从整体上理解Spring的事务管理实现原理了。下面简单地介绍下,注解方式为例子
所谓spring事务的传播属性,就是定义在存在多个事务同时存在的时候,spring应该如何处理这些事务的行为。这些属性在TransactionDefinition中定义,具体常量的解释见下表:
| 常量名称 | 常量解释 |
| PROPAGATION_REQUIRED | 支持当前事务,如果当前没有事务,就新建一个事务。这是最常见的选择,也是 Spring 默认的事务的传播。 |
| PROPAGATION_REQUIRES_NEW | 新建事务,如果当前存在事务,把当前事务挂起。新建的事务将和被挂起的事务没有任何关系,是两个独立的事务,外层事务失败回滚之后,不能回滚内层事务执行的结果,内层事务失败抛出异常,外层事务捕获,也可以不处理回滚操作 |
| PROPAGATION_SUPPORTS | 支持当前事务,如果当前没有事务,就以非事务方式执行。 |
| PROPAGATION_MANDATORY | 支持当前事务,如果当前没有事务,就抛出异常。 |
| PROPAGATION_NOT_SUPPORTED | 以非事务方式执行操作,如果当前存在事务,就把当前事务挂起。 |
| PROPAGATION_NEVER | 以非事务方式执行,如果当前存在事务,则抛出异常。 |
| PROPAGATION_NESTED |
如果一个活动的事务存在,则运行在一个嵌套的事务中。如果没有活动事务,则按REQUIRED属性执行。它使用了一个单独的事务,这个事务拥有多个可以回滚的保存点。内部事务的回滚不会对外部事务造成影响。它只对DataSourceTransactionManager事务管理器起效。 |
| 隔离级别 | 隔离级别的值 | 导致的问题 |
| Read-Uncommitted | 0 | 导致脏读 |
| Read-Committed | 1 | 避免脏读,允许不可重复读和幻读 |
| Repeatable-Read | 2 | 避免脏读,不可重复读,允许幻读 |
| Serializable | 3 | 串行化读,事务只能一个一个执行,避免了脏读、不可重复读、幻读。执行效率慢,使用时慎重 |
脏读:一事务对数据进行了增删改,但未提交,另一事务可以读取到未提交的数据。如果第一个事务这时候回滚了,那么第二个事务就读到了脏数据。
不可重复读:一个事务中发生了两次读操作,第一次读操作和第二次操作之间,另外一个事务对数据进行了修改,这时候两次读取的数据是不一致的。
幻读:第一个事务对一定范围的数据进行批量修改,第二个事务在这个范围增加一条数据,这时候第一个事务就会丢失对新增数据的修改。
总结:
隔离级别越高,越能保证数据的完整性和一致性,但是对并发性能的影响也越大。
大多数的数据库默认隔离级别为 Read Commited,比如 SqlServer、Oracle
少数数据库默认隔离级别为:Repeatable Read 比如: MySQL InnoDB
| 常量 | 解释 |
| ISOLATION_DEFAULT | 这是个 PlatfromTransactionManager 默认的隔离级别,使用数据库默认的事务隔离级别。另外四个与 JDBC 的隔离级别相对应。 |
| ISOLATION_READ_UNCOMMITTED | 这是事务最低的隔离级别,它充许另外一个事务可以看到这个事务未提交的数据。这种隔离级别会产生脏读,不可重复读和幻像读。 |
| ISOLATION_READ_COMMITTED | 保证一个事务修改的数据提交后才能被另外一个事务读取。另外一个事务不能读取该事务未提交的数据。 |
| ISOLATION_REPEATABLE_READ | 这种事务隔离级别可以防止脏读,不可重复读。但是可能出现幻像读。 |
| ISOLATION_SERIALIZABLE | 这是花费最高代价但是最可靠的事务隔离级别。事务被处理为顺序执行。 |
通过上面的理论知识的铺垫,我们大致知道了数据库事务和spring事务的一些属性和特点,接下来我们通过分析一些嵌套事务的场景,来深入理解spring事务传播的机制。
假设外层事务 Service A 的 Method A() 调用 内层Service B 的 Method B()
PROPAGATION_REQUIRED(spring 默认)
如果ServiceB.methodB() 的事务级别定义为 PROPAGATION_REQUIRED,那么执行 ServiceA.methodA() 的时候spring已经起了事务,这时调用 ServiceB.methodB(),ServiceB.methodB() 看到自己已经运行在 ServiceA.methodA() 的事务内部,就不再起新的事务。
假如 ServiceB.methodB() 运行的时候发现自己没有在事务中,他就会为自己分配一个事务。
这样,在 ServiceA.methodA() 或者在 ServiceB.methodB() 内的任何地方出现异常,事务都会被回滚。
PROPAGATION_REQUIRES_NEW
比如我们设计 ServiceA.methodA() 的事务级别为 PROPAGATION_REQUIRED,ServiceB.methodB() 的事务级别为 PROPAGATION_REQUIRES_NEW。
那么当执行到 ServiceB.methodB() 的时候,ServiceA.methodA() 所在的事务就会挂起,ServiceB.methodB() 会起一个新的事务,等待 ServiceB.methodB() 的事务完成以后,它才继续执行。
他与 PROPAGATION_REQUIRED 的事务区别在于事务的回滚程度了。因为 ServiceB.methodB() 是新起一个事务,那么就是存在两个不同的事务。如果 ServiceB.methodB() 已经提交,那么 ServiceA.methodA() 失败回滚,ServiceB.methodB() 是不会回滚的。如果 ServiceB.methodB() 失败回滚,如果他抛出的异常被 ServiceA.methodA() 捕获,ServiceA.methodA() 事务仍然可能提交(主要看B抛出的异常是不是A会回滚的异常)。
PROPAGATION_SUPPORTS
假设ServiceB.methodB() 的事务级别为 PROPAGATION_SUPPORTS,那么当执行到ServiceB.methodB()时,如果发现ServiceA.methodA()已经开启了一个事务,则加入当前的事务,如果发现ServiceA.methodA()没有开启事务,则自己也不开启事务。这种时候,内部方法的事务性完全依赖于最外层的事务。
PROPAGATION_NESTED
现在的情况就变得比较复杂了, ServiceB.methodB() 的事务属性被配置为 PROPAGATION_NESTED, 此时两者之间又将如何协作呢? ?ServiceB#methodB 如果 rollback, 那么内部事务(即 ServiceB#methodB) 将回滚到它执行前的 SavePoint 而外部事务(即 ServiceA#methodA) 可以有以下两种处理方式:
a、捕获异常,执行异常分支逻辑
void methodA() {

        try {

            ServiceB.methodB();

        } catch (SomeException) {

            // 执行其他业务, 如 ServiceC.methodC();

        }

    }
这种方式也是嵌套事务最有价值的地方, 它起到了分支执行的效果, 如果 ServiceB.methodB 失败, 那么执行 ServiceC.methodC(), 而 ServiceB.methodB 已经回滚到它执行之前的 SavePoint, 所以不会产生脏数据(相当于此方法从未执行过), 这种特性可以用在某些特殊的业务中, 而 PROPAGATION_REQUIRED 和 PROPAGATION_REQUIRES_NEW 都没有办法做到这一点。
b、 外部事务回滚/提交 代码不做任何修改, 那么如果内部事务(ServiceB#methodB) rollback, 那么首先 ServiceB.methodB 回滚到它执行之前的 SavePoint(在任何情况下都会如此), 外部事务(即 ServiceA#methodA) 将根据具体的配置决定自己是 commit 还是 rollback
另外三种事务传播属性基本用不到,在此不做分析。
对于项目中需要使用到事务的地方,我建议开发者还是使用spring的TransactionCallback接口来实现事务,不要盲目使用spring事务注解,如果一定要使用注解,那么一定要对spring事务的传播机制和隔离级别有个详细的了解,否则很可能发生意想不到的效果。
11、声明式事务的特点及传播属性。
声明式事务配置
配置SessionFactory 配置事务管理器,事务的传播特性,那些类那些方法使用事务
编写业务逻辑方法
继承HibernateDaoSupport类,
使用HibernateTemplate来持久化,HibernateTemplate是Hibernate session的封装
默认的回滚是RuntimeException(包括继承RuntimeException的子类),普通异常不回滚
在编写业务逻辑方法时,最好将异常一直往上抛出,在呈现层处理(struts)
spring的事务需要设置到业务方法上(事务边界定义到Facade类上),不要添加到Dao上了解事务的几种传播特性
PROPAGATION_REQUIRED: 如果存在一个事务,则支持当前事务。如果没有事务则开启
PROPAGATION_SUPPORTS: 如果存在一个事务,支持当前事务。如果没有事务,则非事务的执行
PROPAGATION_MANDATORY: 如果已经存在一个事务,支持当前事务。如果没有一个活动的事务,则抛出异常。
PROPAGATION_REQUIRES_NEW: 总是开启一个新的事务。如果一个事务已经存在,则将这个存在的事务挂起。
PROPAGATION_NOT_SUPPORTED: 总是非事务地执行,并挂起任何存在的事务。
PROPAGATION_NEVER: 总是非事务地执行,如果存在一个活动事务,则抛出异常
PROPAGATION_NESTED:如果一个活动的事务存在,则运行在一个嵌套的事务中如果没有活动事务则按TransactionDefinition.PROPAGATION_REQUIRED 属性执行Spring事务的隔离级别
ISOLATION_DEFAULT:这是一个PlatfromTransactionManager默认的隔离级别,使用数据库默认的事务隔离级别另外四个与JDBC的隔离级别相对应
ISOLATION_READ_UNCOMMITTED:这是事务最低的隔离级别,它充许令外一个事务可以看到这个事务未提交的数据。这种隔离级别会产生脏读,不可重复读和幻像读。
ISOLATION_READ_COMMITTED:保证一个事务修改的数据提交后才能被另外一个事务读取。另外一个事务不能读取该事务未提交的数据
ISOLATION_REPEATABLE_READ:这种事务隔离级别可以防止脏读,不可重复读。但是可能出现幻像读。它除了保证一个事务不能读取另一个事务未提交的数
据外,还保证了避免下面的情况产生(不可重复读)
ISOLATION_SERIALIZABLE 这是花费最高代价但是最可靠的事务隔离级别。事务被处理为顺序执行。除了防止脏读,不可重复读外,还避免了幻像读。
Java代码
<?xml version="1.0" encoding="UTF-8"?>
<beans xmlns="http://www.springframework.org/schema/beans"
xmlns:xsi="http://www.w3.org/2001/XMLSchema-instance"
xmlns:aop="http://www.springframework.org/schema/aop"
xmlns:tx="http://www.springframework.org/schema/tx"
xsi:schemaLocation="http://www.springframework.org/schema/beans
http://www.springframework.org/schema/beans/spring-beans-2.0.xsd
http://www.springframework.org/schema/aop
http://www.springframework.org/schema/aop/spring-aop-2.0.xsd
http://www.springframework.org/schema/tx
http://www.springframework.org/schema/tx/spring-tx-2.0.xsd">
<!--
配置
SessionFactory -->
<bean
id="sessionFactory"
class="org.springframework.orm.hibernate3.LocalSessionFactoryBean">
<property
name="configLocation" value="classpath:hibernate.cfg.xml"/>
</bean>
<!--
配置事务管理器
-->
<bean
id="transactionMgr"
class="org.springframework.orm.hibernate3.HibernateTransactionManager">
<property name="sessionFactory">
<ref bean="sessionFactory"/>
</property>
</bean>
<!--
配置事务传播特性
-->
<tx:advice id="txAdvice" transaction-manager="transactionMgr">
<tx:attributes>
<tx:method name="add*" propagation="REQUIRED"/>
<tx:method name="del*" propagation="REQUIRED"/>
<tx:method name="update*" propagation="REQUIRED"/>
<tx:method name="*" read-only="true"/>
</tx:attributes>
</tx:advice>
<!--
那些类使用事务
-->
<aop:config>
<aop:pointcut id="point-cut" expression="execution(* com.wlh.spring.manager.*.*(..))"/>
<aop:advisor advice-ref="txAdvice" pointcut-ref="point-cut"/>
</aop:config>
</beans>
标签:tco 知识库 ++ 支持 seda 管理 开发者 相关 事务管理
原文地址:http://www.cnblogs.com/ziranfengwei/p/7136993.html