标签:xxx stack dom ota add this com 分享 目录
1、mongodb在mac上的安装
1 export MONGO_HOME=/Users/enniu1/Desktop/zjg/mongodb-osx-x86_64-3.2.6
2 export PATH=$PATH:$MONGO_HOME/bin
注意两个错:
参考:https://docs.mongodb.org/manual/tutorial/install-mongodb-on-os-x/
2、代码(4个部分)
2.1、com.xxx.firstboot.domain.Custome

package com.xxx.firstboot.domain;

import org.springframework.data.annotation.Id;

/**
 * 测试mongodb
 */
public class Customer {
    /**
     * cid:该字段用于mongodb的"_id"索引
     * 1、需要@Id注解
     * 2、取名无所谓,反正在mongodb中最后都会转化为"_id"
     * 3、定义为String类型,如果定义为Integer可能索引只会是0,会出现key重复导致数据库插不进去的情况;
     * 4、该类型也是MongoRepository泛型中主键的ID
     */
    @Id
    private String cid;
    private String firstname;
    private String secondname;

    public String getCid() {
        return cid;
    }

    public void setCid(String cid) {
        this.cid = cid;
    }

    public String getFirstname() {
        return firstname;
    }

    public void setFirstname(String firstname) {
        this.firstname = firstname;
    }

    public String getSecondname() {
        return secondname;
    }

    public void setSecondname(String secondname) {
        this.secondname = secondname;
    }

}
说明:生成的colletion(类似于MySQL中的表)就是domain类的简单类名,eg.customer。
注意:
2.2、com.xxx.firstboot.mongo.CustomerRepository
package com.xxx.firstboot.mongo;

import java.util.List;

import org.springframework.data.mongodb.repository.MongoRepository;

import com.xxx.firstboot.domain.Customer;

/**
 * MongoRepository<Customer, Integer>
 * 第一个参数:T 操作的vo
 * 第二个参数:ID T的主键类型
 * 作用:该接口实现了CRUD方法
 *
 * 注意:
 * 1、由于boot使用了spring-data-mongodb,所以我们不需要写该接口的实现,
 *   当我们运行程序的时候,spring-data-mongodb会动态创建
 * 2、findBySecondname命名是有讲究的,Secondname(是Customer的属性)若改为lastname就会报找不到属性lastname的错误
 */
public interface CustomerRepository extends MongoRepository<Customer, String> {
    public Customer findByFirstname(String firstname);
    public List<Customer> findBySecondname(String secondname);
}
说明:该接口就是我们的业务接口。
注意:
2.3、com.xxx.firstboot.web.CustomerController
package com.xxx.firstboot.web;

import java.util.List;

import org.springframework.beans.factory.annotation.Autowired;
import org.springframework.web.bind.annotation.RequestMapping;
import org.springframework.web.bind.annotation.RequestMethod;
import org.springframework.web.bind.annotation.RequestParam;
import org.springframework.web.bind.annotation.RestController;

import com.xxx.firstboot.domain.Customer;
import com.xxx.firstboot.mongo.CustomerRepository;

import io.swagger.annotations.Api;
import io.swagger.annotations.ApiOperation;

@RestController
@RequestMapping("/customer")
@Api("customer相关的API,用于测试mongodb")
public class CustomerController {

    @Autowired
    private CustomerRepository customerRepository;

    @ApiOperation("增加一个Customer")
    @RequestMapping(value = "/addCustomer", method = RequestMethod.GET)
    public Customer addCustomer(@RequestParam("firstname") String firstname,
                                @RequestParam("secondname") String secondname) {
        Customer customer = new Customer();
        customer.setFirstname(firstname);
        customer.setSecondname(secondname);
        return customerRepository.save(customer);
    }

    @ApiOperation("获取所有的Customer")
    @RequestMapping(value = "/getAllCustomer", method = RequestMethod.GET)
    public List<Customer> getAllCustomer() {
        return customerRepository.findAll();
    }

    @ApiOperation("根据firstname获取Customer")
    @RequestMapping(value = "/getCustomerByFirstname", method = RequestMethod.GET)
    public Customer getCustomerByFirstname(@RequestParam("firstname") String firstname) {
        return customerRepository.findByFirstname(firstname);
    }

    @ApiOperation("根据secondname获取多个Customer")
    @RequestMapping(value = "/getCustomerBySecondname", method = RequestMethod.GET)
    public List<Customer> getCustomerBySecondname(@RequestParam("secondname") String secondname) {
        return customerRepository.findBySecondname(secondname);
    }

    @ApiOperation("根据id删除Customer")
    @RequestMapping(value = "/deleteCustomerById", method = RequestMethod.GET)
    public boolean deleteCustomerById(@RequestParam("cid") String cid) {
        customerRepository.delete(cid);
        return true;
    }
}
说明:直接注入我们自己的业务接口,然后进行相应的操作即可。
此时,就可以进行测试了。只是此时使用的都是mongodb的默认信息。
2.4、application.properties
1 #mongodb note:mongo3.x will not use host and port,only use uri
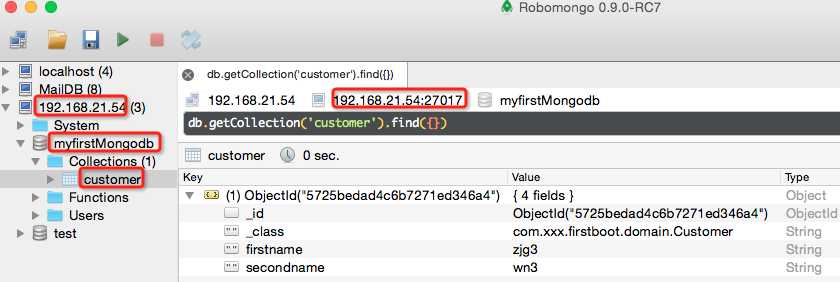
2 spring.data.mongodb.host=192.168.21.54
3 spring.data.mongodb.port=27017
4 spring.data.mongodb.uri=mongodb://192.168.21.54:27017/myfirstMongodb
说明:如果需要指定host、port、数据库,需要在application.properties文件中配置以上信息。
注意:
3、测试
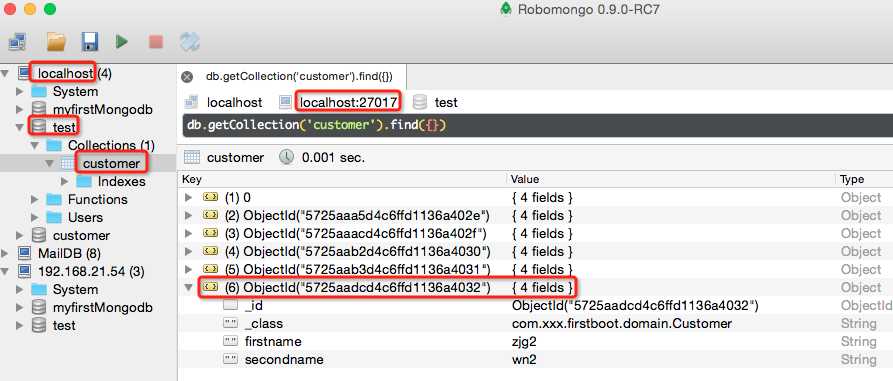
启动应用,启动mongo服务进程,打开swagger,使用robomongo或者mongobooster客户端观察mongodb存储情况。
没有在application.properties中设置属性。
设置属性后,
参考:
https://spring.io/guides/gs/accessing-data-mongodb/ 其中的例子就是对sample代码的解释
http://www.jianshu.com/p/e59cd2dc5274 关于mongodb主键
https://docs.spring.io/spring-boot/docs/current/reference/html/boot-features-nosql.html 关于mongo2.x与3.x对host、port、uri配置的支持。
http://blog.didispace.com/springbootmongodb/ 主键为Long uri用户名、密码配置
第十一章 springboot + mongodb(简单查询)
标签:xxx stack dom ota add this com 分享 目录
原文地址:http://www.cnblogs.com/sunny3096/p/7160034.html
