标签:开发 daemonize tab tar cli get instance 持久化 frame
一、Redis是一个开源的使用ANSI C语言编写、支持网络、可基于内存亦可持久化的日志型、Key-Value数据库,并提供多种语言的API。
从2010年3月15日起,Redis的开发工作由VMware主持。从2013年5月开始,Redis的开发由Pivotal赞助。
目前:相信很多人都知道redis的应用和普遍性吧,因为它的灵活性,让我们在使用的时候就更加得心应手了。
这里介绍spring-data-redis的基本用法,这里需要依赖包jedis的支持
二、redis的部署
1、具体的部署配置查看:http://www.cnblogs.com/ll409546297/p/6993778.html
2、这里需要注意几个地方(主要是配置redis.conf)
1)因为我是守护线程启动,后台自启。需要修改daemonize 为yes
daemonize yes

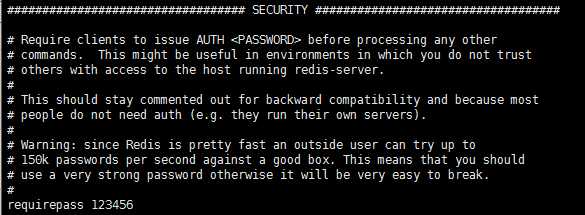
2)因为缓存服务器,一般都是外部服务器,在使用的时候需要设置密码和注释掉bind 127.0.0.1。不然在使用的时候会抛出pool 和 password异常
密码设置:requirepass 123456 (找到相关注解解除,并修改密码)

注释掉bind 127.0.0.1

3、基本测试一下就可以了(可以重启测试一下)

4、这里redis的部署基本完成了。
三、pom.xml(导包)
   <dependency>
      <groupId>org.springframework.data</groupId>
      <artifactId>spring-data-redis</artifactId>
      <version>1.8.4.RELEASE</version>
    </dependency>
    <dependency>
      <groupId>redis.clients</groupId>
      <artifactId>jedis</artifactId>
      <version>2.9.0</version>
    </dependency>
四、配置spring-redis.xml
<?xml version="1.0" encoding="UTF-8"?>
<beans xmlns="http://www.springframework.org/schema/beans"
    xmlns:xsi="http://www.w3.org/2001/XMLSchema-instance"
    xmlns:context="http://www.springframework.org/schema/context"
    xmlns:jdbc="http://www.springframework.org/schema/jdbc"
    xmlns:jee="http://www.springframework.org/schema/jee"
    xmlns:tx="http://www.springframework.org/schema/tx"
    xmlns:aop="http://www.springframework.org/schema/aop"
    xmlns:mvc="http://www.springframework.org/schema/mvc"
    xmlns:util="http://www.springframework.org/schema/util"
    xmlns:jpa="http://www.springframework.org/schema/data/jpa"
    xsi:schemaLocation="
        http://www.springframework.org/schema/beans http://www.springframework.org/schema/beans/spring-beans-4.3.xsd
        http://www.springframework.org/schema/context http://www.springframework.org/schema/context/spring-context-4.3.xsd
        http://www.springframework.org/schema/jdbc http://www.springframework.org/schema/jdbc/spring-jdbc-4.3.xsd
        http://www.springframework.org/schema/jee http://www.springframework.org/schema/jee/spring-jee-4.3.xsd
        http://www.springframework.org/schema/tx http://www.springframework.org/schema/tx/spring-tx-4.3.xsd
        http://www.springframework.org/schema/data/jpa http://www.springframework.org/schema/data/jpa/spring-jpa-1.0.xsd
        http://www.springframework.org/schema/aop http://www.springframework.org/schema/aop/spring-aop-4.3.xsd
        http://www.springframework.org/schema/mvc http://www.springframework.org/schema/mvc/spring-mvc-4.3.xsd
        http://www.springframework.org/schema/util http://www.springframework.org/schema/util/spring-util-4.3.xsd">

   <!-- 配置连接池 -->
   <bean id="jedisPoolConfig" class="redis.clients.jedis.JedisPoolConfig">
           <property name="maxTotal" value="10"></property>
        <property name="maxIdle" value="10"></property>
        <property name="minIdle" value="2"></property>
        <property name="maxWaitMillis" value="15000"></property>
        <property name="minEvictableIdleTimeMillis" value="300000"></property>
        <property name="numTestsPerEvictionRun" value="3"></property>
        <property name="timeBetweenEvictionRunsMillis" value="60000"></property>
        <property name="testOnBorrow" value="true"></property>
        <property name="testOnReturn" value="true"></property>
        <property name="testWhileIdle" value="true"></property>
   </bean>
   <!-- 连接工厂 -->
   <bean id="jedisConnFactory" class="org.springframework.data.redis.connection.jedis.JedisConnectionFactory">
           <property name="hostName" value="192.168.5.100"/>
           <property name="port" value="6379"/>
           <property name="password" value="123456"/>
           <property name="usePool" value="true"/>
           <property name="poolConfig" ref="jedisPoolConfig"/>
   </bean>
   <!-- 用于数据交互 -->
   <bean id="redisTemplate" class="org.springframework.data.redis.core.RedisTemplate">
           <property name="connectionFactory" ref="jedisConnFactory"/>
   </bean>
</beans>
五、测试
     JedisShardInfo  jedisShardInfo = new JedisShardInfo("192.168.5.100", 6379);
        jedisShardInfo.setPassword("123456");//密码认证
        Jedis jedis = new Jedis(jedisShardInfo);
        jedis.set("fucking", "fucking");
        System.out.println(jedis.get("fucking"));
六、使用
@Autowired
private RedisTemplate<String, String> redisTemplate;

redisTemplate.opsForValue().set("test", "test");
String obj = redisTemplate.opsForValue().get("test");
System.out.println(obj);
注意:这里注入不一定只有一个,可以是不同类型
标签:开发 daemonize tab tar cli get instance 持久化 frame
原文地址:http://www.cnblogs.com/ll409546297/p/7203427.html