标签:png type 浏览器 修改 序列 输出 attribute 访问 err
jservlet规范包括三个技术点:servlet ;listener ;filter;监听器就是监听某个对象的的状态变化的组件。监听器的相关概念事件源:
按照被监听的对象划分:ServletRequest域 ;HttpSession域 ;ServletContext域。按照监听的内容分:监听域对象的创建与销毁的; 监听域对象的属性变化的。

监听ServletContext域的创建与销毁的监听器,Servlet域的生命周期:在服务器启动创建,服务器关闭时销毁;监听器的编写步骤:
1、监听的方法:
2、配置文件:

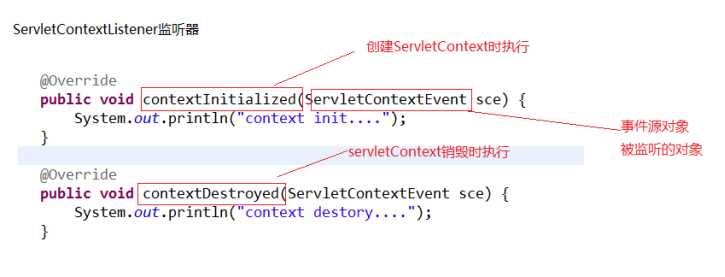
ServletContextListener监听器的主要作用:
例子:MyServletContextListener.java
package com.itheima.create;

import java.text.ParseException;
import java.text.SimpleDateFormat;
import java.util.Date;
import java.util.Timer;
import java.util.TimerTask;

import javax.servlet.ServletContext;
import javax.servlet.ServletContextEvent;
import javax.servlet.ServletContextListener;

public class MyServletContextListener implements ServletContextListener{

    @Override
    //监听context域对象的创建
    public void contextInitialized(ServletContextEvent sce) {
        //就是被监听的对象---ServletContext
        //ServletContext servletContext = sce.getServletContext();
        //getSource就是被监听的对象  是通用的方法
        //ServletContext source = (ServletContext) sce.getSource();
        //System.out.println("context创建了....");

        //开启一个计息任务调度----每天晚上12点 计息一次
        //Timer timer = new Timer();
        //task:任务  firstTime:第一次执行时间  period:间隔执行时间
        //timer.scheduleAtFixedRate(task, firstTime, period);
        /*timer.scheduleAtFixedRate(new TimerTask() {
            @Override
            public void run() {
                System.out.println("银行计息了.....");
            }
        } , new Date(), 5000);*/


        //修改成银行真实计息业务
        //1、起始时间: 定义成晚上12点
        //2、间隔时间:24小时
        /*SimpleDateFormat format = new SimpleDateFormat("yyyy-MM-dd hh:mm:ss");
        //String currentTime = "2016-08-19 00:00:00";
        String currentTime = "2016-08-18 09:34:00";
        Date parse = null;
        try {
            parse = format.parse(currentTime);
        } catch (ParseException e) {
            e.printStackTrace();
        }

        timer.scheduleAtFixedRate(new TimerTask() {
            @Override
            public void run() {
                System.out.println("银行计息了.....");
            }
        } , parse, 24*60*60*1000);*/

    }

    //监听context域对象的销毁
    @Override
    public void contextDestroyed(ServletContextEvent sce) {
        System.out.println("context销毁了....");

    }

}
web.xml
<listener>
    <listener-class>com.itheima.attribute.MyServletContextAttributeListener</listener-class>
</listener>
监听Httpsession域的创建与销毁的监听器。HttpSession对象的生命周期:第一次调用request.getSession时创建;销毁有以下几种情况(服务器关闭、session过期、 手动销毁)
1、HttpSessionListener的方法
package listener;

import javax.servlet.http.HttpSessionEvent;
import javax.servlet.http.HttpSessionListener;

/**
 * Created by yang on 2017/7/27.
 */
public class listenerDemo implements HttpSessionListener {
    @Override
    public void sessionCreated(HttpSessionEvent httpSessionEvent) {
        System.out.println("session创建"+httpSessionEvent.getSession().getId());
    }

    @Override
    public void sessionDestroyed(HttpSessionEvent httpSessionEvent) {
        System.out.println("session销毁");
    }
}
web.xml:
    <listener>
        <listener-class>listener.listenerDemo</listener-class>
    </listener>
创建session代码:
package session;

import cn.dsna.util.images.ValidateCode;

import javax.servlet.ServletException;
import javax.servlet.http.HttpServlet;
import javax.servlet.http.HttpServletRequest;
import javax.servlet.http.HttpServletResponse;
import java.io.IOException;

/**
 * Created by yang on 2017/7/24.
 */
public class SessionDemo extends HttpServlet {
    @Override
    protected void doGet(HttpServletRequest req, HttpServletResponse resp) throws ServletException, IOException {
        doPost(req, resp);
    }

    @Override
    protected void doPost(HttpServletRequest request, HttpServletResponse resp) throws ServletException, IOException {
//1 生成验证码
        ValidateCode code = new ValidateCode(200, 80, 4, 100);
//2 将验证码保存到session中
        System.out.println(code.getCode());
        request.getSession().setAttribute("code", code.getCode());
//3 将验证码图片输出到 浏览器
        resp.setContentType("image/jpeg");
        code.write(resp.getOutputStream());
    }
}
当创建session时,监听器中的代码将执行。
监听ServletRequest域创建与销毁的监听器。ServletRequest的生命周期:每一次请求都会创建request,请求结束则销毁。
1、ServletRequestListener的方法
package listener;

import javax.servlet.ServletRequestEvent;
import javax.servlet.ServletRequestListener;

/**
 * Created by yang on 2017/7/27.
 */
public class RequestListenerDemo implements ServletRequestListener {
    @Override
    public void requestDestroyed(ServletRequestEvent servletRequestEvent) {
        System.out.println("request被销毁了");
    }

    @Override
    public void requestInitialized(ServletRequestEvent servletRequestEvent) {
        System.out.println("request被创建了");
    }
}
web.xml
 <listener>
        <listener-class>listener.RequestListenerDemo</listener-class>
    </listener>
只要客户端发起请求,监听器中的代码就会被执行。
setAttribute(name,value)
getAttribute(name)
removeAttribute(name):触发删除属性的监听器的方法
package listener;


import javax.servlet.ServletContextAttributeEvent;
import javax.servlet.ServletContextAttributeListener;

/**
 * Created by yang on 2017/7/27.
 */
public class ServletContextAttrDemo implements ServletContextAttributeListener {
    @Override
    public void attributeAdded(ServletContextAttributeEvent scab) {
        //放到域中的属性
        System.out.println(scab.getName());//放到域中的name
        System.out.println(scab.getValue());//放到域中的value
    }

    @Override
    public void attributeRemoved(ServletContextAttributeEvent scab) {
        System.out.println(scab.getName());//删除的域中的name
        System.out.println(scab.getValue());//删除的域中的value
    }

    @Override
    public void attributeReplaced(ServletContextAttributeEvent scab) {
        System.out.println(scab.getName());//获得修改前的name
        System.out.println(scab.getValue());//获得修改前的value
    }
}
web.xml
    <listener>
        <listener-class>listener.ServletContextAttrDemo</listener-class>
    </listener>
测试代码:
package listener;

import javax.servlet.ServletContext;
import javax.servlet.ServletException;
import javax.servlet.http.HttpServlet;
import javax.servlet.http.HttpServletRequest;
import javax.servlet.http.HttpServletResponse;
import java.io.IOException;

/**
 * Created by yang on 2017/7/27.
 */
public class ListenerTest extends HttpServlet{
    @Override
    protected void doGet(HttpServletRequest req, HttpServletResponse resp) throws ServletException, IOException {
        ServletContext context=getServletContext();
        context.setAttribute("aaa","bbb");
        context.setAttribute("aaa","ccc");
        context.removeAttribute("aaa");
        doPost(req, resp);
    }

    @Override
    protected void doPost(HttpServletRequest req, HttpServletResponse resp) throws ServletException, IOException {

    }
}
HttpSessionAttributeListener监听器(同上)
ServletRequestAriibuteListenr监听器(同上)
将要被绑定到session中的对象有几种状态
对象感知监听器不用在web.xml中配置。
面试题:当用户很对时,怎样对服务器进行优化?
package listener;

import javax.servlet.http.HttpSessionBindingEvent;
import javax.servlet.http.HttpSessionBindingListener;

public class Person implements HttpSessionBindingListener{

    private String id;
    private String name;
    public String getId() {
        return id;
    }
    public void setId(String id) {
        this.id = id;
    }
    public String getName() {
        return name;
    }
    public void setName(String name) {
        this.name = name;
    }

    @Override
    //绑定的方法
    public void valueBound(HttpSessionBindingEvent event) {
        System.out.println("person被绑定了");
    }
    @Override
    //解绑方法
    public void valueUnbound(HttpSessionBindingEvent event) {
        System.out.println("person被解绑了");
    }
}
测试类:
package listener;

import java.io.IOException;
import javax.servlet.ServletException;
import javax.servlet.http.HttpServlet;
import javax.servlet.http.HttpServletRequest;
import javax.servlet.http.HttpServletResponse;
import javax.servlet.http.HttpSession;

public class TestPersonBindingServlet extends HttpServlet {

    protected void doGet(HttpServletRequest request, HttpServletResponse response)
            throws ServletException, IOException {

        HttpSession session = request.getSession();

        //将person对象绑到session中
        Person p = new Person();
        p.setId("100");
        p.setName("zhangsanfeng");
        session.setAttribute("person", p);
        //将person对象从session中解绑
        session.removeAttribute("person");
    }

    protected void doPost(HttpServletRequest request, HttpServletResponse response)
            throws ServletException, IOException {
        doGet(request, response);
    }
}
package listener;

import java.io.Serializable;

import javax.servlet.http.HttpSessionActivationListener;
import javax.servlet.http.HttpSessionEvent;

public class Customer implements HttpSessionActivationListener,Serializable{

    private String id;
    private String name;

    public String getId() {
        return id;
    }
    public void setId(String id) {
        this.id = id;
    }
    public String getName() {
        return name;
    }
    public void setName(String name) {
        this.name = name;
    }


    @Override
    //钝化
    public void sessionWillPassivate(HttpSessionEvent se) {
        System.out.println("customer被钝化了");
    }
    @Override
    //活化
    public void sessionDidActivate(HttpSessionEvent se) {
        System.out.println("customer被活化了");
    }

}
测试钝化类:
package listener;

import java.io.IOException;
import javax.servlet.ServletException;
import javax.servlet.http.HttpServlet;
import javax.servlet.http.HttpServletRequest;
import javax.servlet.http.HttpServletResponse;
import javax.servlet.http.HttpSession;

public class TestCustomerActiveServlet extends HttpServlet {

    protected void doGet(HttpServletRequest request, HttpServletResponse response)
            throws ServletException, IOException {

        HttpSession session = request.getSession();

        //将customer放到session中
        Customer customer =new Customer();
        customer.setId("200");
        customer.setName("lucy");
        session.setAttribute("customer", customer);
        System.out.println("customer被放到session域中了");


    }

    protected void doPost(HttpServletRequest request, HttpServletResponse response)
            throws ServletException, IOException {
        doGet(request, response);
    }
}
当访问TestCustomerActiveServlet 之后,停止服务器,就会被钝化,钝化的文件存在tomcat的work文件加下。
活化类:
package listener;

import java.io.IOException;
import javax.servlet.ServletException;
import javax.servlet.http.HttpServlet;
import javax.servlet.http.HttpServletRequest;
import javax.servlet.http.HttpServletResponse;
import javax.servlet.http.HttpSession;

public class TestCustomerActiveServlet2 extends HttpServlet {

    protected void doGet(HttpServletRequest request, HttpServletResponse response)
            throws ServletException, IOException {

        //从session域中获得customer
        HttpSession session = request.getSession();
        Customer customer = (Customer) session.getAttribute("customer");

        System.out.println(customer.getName());

    }

    protected void doPost(HttpServletRequest request, HttpServletResponse response)
            throws ServletException, IOException {
        doGet(request, response);
    }
}
服务器再次启动,访问TestCustomerActiveServlet2之后,就会被活化。可以通过配置文件,指定对象钝化时间(对象多长时间不用被钝化)
在META-INF下创建一个context.xml
<?xml version="1.0" encoding="UTF-8"?>
<Context>
    <!-- maxIdleSwap:session中的对象多长时间(分钟)不使用就钝化 -->
    <!-- directory:钝化后的对象的文件写到磁盘的哪个目录下 配置钝化的对象文件在 work/catalina/localhost/钝化文件 -->
    <Manager className="org.apache.catalina.session.PersistentManager" maxIdleSwap="1">
        <Store className="org.apache.catalina.session.FileStore" directory="itheima32" />
    </Manager>
</Context>
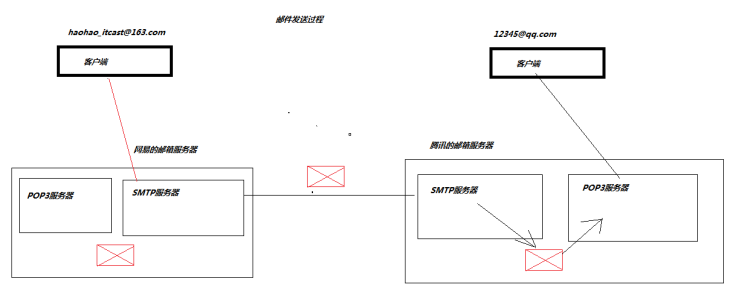
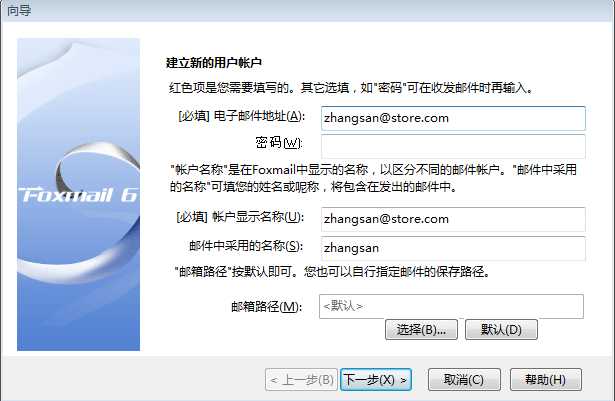
邮件的客户端:可以只安装在电脑上的也可以是网页形式的;邮件服务器:起到邮件的接受与推送的作用
邮件发送的协议:
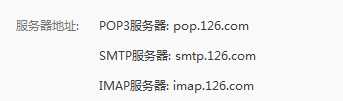
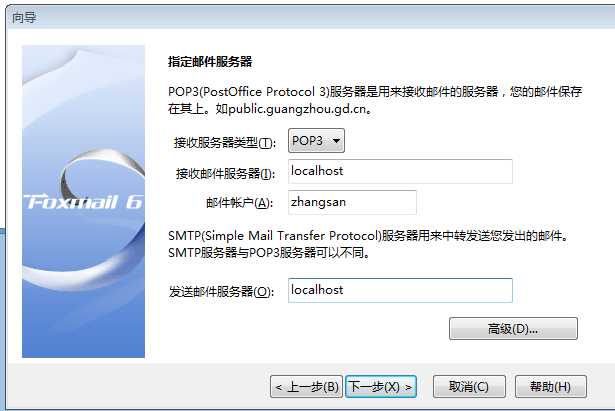
协议:就是数据传输的约束。接受邮件的协议:POP3 IMAP;发送邮件的协议:SMTP
邮箱的发送过程
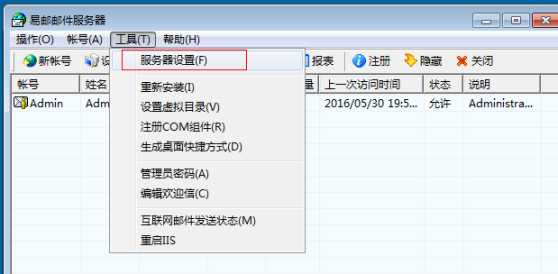
邮箱服务器的安装
双击邮箱服务器软件

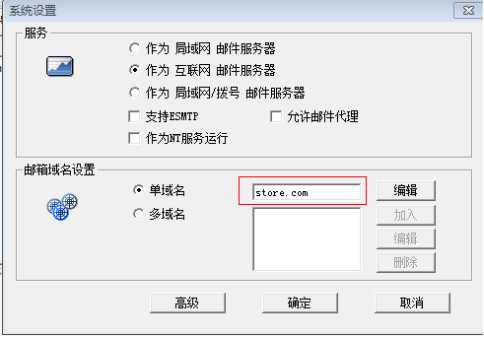
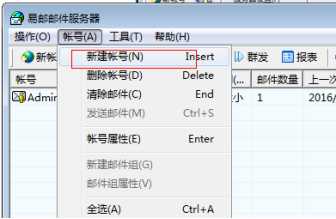
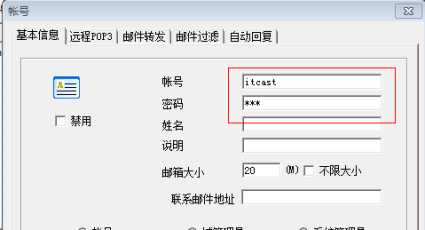
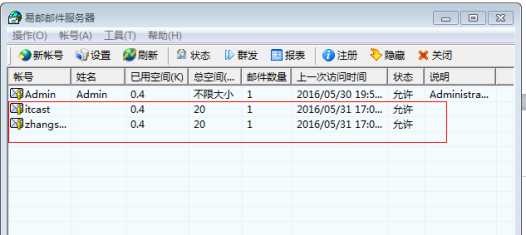
对邮箱服务器进行配置
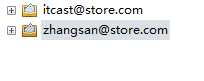
邮箱客户端的安装

邮件发送代码
package com.itheima.mail;

import java.util.Properties;

import javax.mail.Authenticator;
import javax.mail.Message;
import javax.mail.MessagingException;
import javax.mail.PasswordAuthentication;
import javax.mail.Session;
import javax.mail.Transport;
import javax.mail.internet.AddressException;
import javax.mail.internet.InternetAddress;
import javax.mail.internet.MimeMessage;
import javax.mail.internet.MimeMessage.RecipientType;

public class MailUtils {

    //email:邮件发给谁  subject:主题  emailMsg:邮件的内容
    public static void sendMail(String email, String subject, String emailMsg)
            throws AddressException, MessagingException {

        // 1.创建一个程序与邮件服务器会话对象 Session
        Properties props = new Properties();
        props.setProperty("mail.transport.protocol", "SMTP");//发邮件的协议
        props.setProperty("mail.host", "localhost");//发送邮件的服务器地址
        props.setProperty("mail.smtp.auth", "true");// 指定验证为true

        // 创建验证器
        Authenticator auth = new Authenticator() {
            public PasswordAuthentication getPasswordAuthentication() {
                return new PasswordAuthentication("tom", "12345");//发邮件的账号的验证
            }
        };

        Session session = Session.getInstance(props, auth);

        // 2.创建一个Message,它相当于是邮件内容
        Message message = new MimeMessage(session);

        message.setFrom(new InternetAddress("tom@itheima32.com")); // 设置发送者

        message.setRecipient(RecipientType.TO, new InternetAddress(email)); // 设置发送方式与接收者

        message.setSubject(subject);//邮件的主题

        message.setContent(emailMsg, "text/html;charset=utf-8");

        // 3.创建 Transport用于将邮件发送
        Transport.send(message);
    }
}
测试代码:
package com.itheima.mail;

import javax.mail.MessagingException;
import javax.mail.internet.AddressException;

public class SendMailTest {

    public static void main(String[] args) throws AddressException, MessagingException {

        MailUtils.sendMail("lucy@itheima32.com", "测试邮件","这是一封测试邮件");
    }

}
标签:png type 浏览器 修改 序列 输出 attribute 访问 err
原文地址:http://www.cnblogs.com/ginb/p/7247955.html