标签:pyhon over instance nal flow generator 种类 translate ges
本章内容:
| 创建类和对象 |
面向对象编程是一种编程方式,此编程方式的落地需要使用 “类” 和 “对象” 来实现,所以,面向对象编程其实就是对 “类” 和 “对象” 的使用。
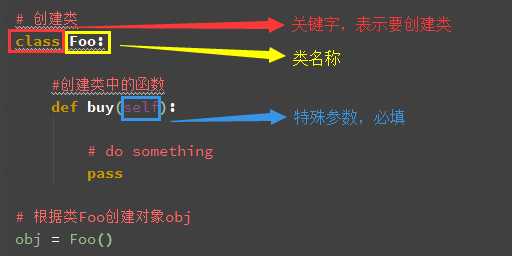
类就是一个模板,模板里可以包含多个函数,函数里实现一些功能
对象则是根据模板创建的实例,通过实例对象可以执行类中的函数
|
1
2
3
4
5
6
7
8
9
10
11
12
13
|
# 创建类class Foo: def buy(self): print("This is buy.") def Hello(self, name): print("This is hello.") # 根据类Foo创建对象objobj = Foo()obj.buy() #执行Bar方法obj.Hello(‘nick‘) #执行Hello方法 |
类和对象在内存中是如何保存的?
类以及类中的方法在内存中只有一份,而根据类创建的每一个对象都在内存中需要存一份,大致如下图:
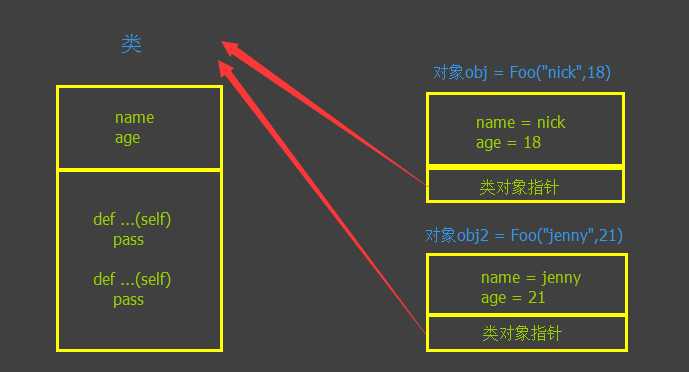
如上图所示,根据类创建对象时,对象中除了封装 name 和 age 的值之外,还会保存一个类对象指针,该值指向当前对象的类。
当通过 obj1 执行方法时,过程如下:
注:Java和C#来说只支持面向对象编程,而python比较灵活即支持面向对象编程也支持函数式编程
| 面向对象三大特性 |
面向对象的三大特性是指:封装、继承和多态。
一、封装
封装,顾名思义就是将内容封装到某个地方,以后再去调用被封装在某处的内容。
所以,在使用面向对象的封装特性时,需要:
1、将内容封装到某处
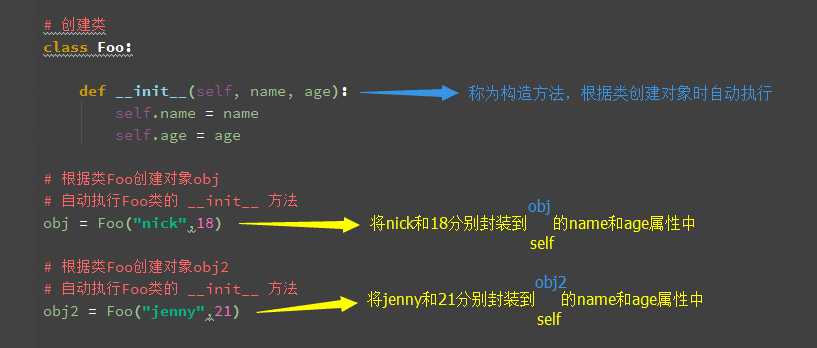
self 是一个形式参数,当执行 obj = Foo(‘nick‘, 18 ) 时,self 等于 obj
当执行 obj2 = Foo(‘jenny‘, 21 ) 时,self 等于 obj2
2、从某处调用被封装的内容
调用被封装的内容时,有两种情况:
|
1
2
3
4
5
6
7
8
9
10
11
12
13
|
class Foo: def __init__(self, name, age): self.name = name self.age = age obj = Foo(‘nick‘, 18)print obj.name # 直接调用obj对象的name属性print obj.age # 直接调用obj对象的age属性 obj2 = Foo(‘jenny‘, 21)print obj2.name # 直接调用obj2对象的name属性print obj2.age # 直接调用obj2对象的age属性 |
|
1
2
3
4
5
6
7
8
9
10
11
12
13
14
15
|
class Foo: def __init__(self, name, age): self.name = name self.age = age def detail(self): print self.name print self.age obj = Foo(‘nick‘, 18)obj.detail() # Python默认会将obj传给self参数,即:obj.detail(obj),所以,此时方法内部的 self = obj,即:self.name 是 nick ;self.age 是 18 obj2 = Foo(‘jenny‘, 21)obj2.detail() # Python默认会将obj2传给self参数,即:obj1.detail(obj2),所以,此时方法内部的 self = obj2,即:self.name 是 jenny ; self.age 是 21 |
|
1
2
3
4
5
6
7
8
9
10
11
12
13
14
15
16
17
18
19
20
21
22
23
24
25
26
27
28
29
30
31
32
33
34
35
36
37
38
39
40
|
#封装#非主流方式class Foo: def fetch(self): print(self.nick) def add(self): print(self.jenny)obj = Foo()obj.nick = "Nick_cool"obj.fetch()# obj2 = Foo()obj.nick = "Nick_cool_2"obj.fetch()obj1 = Foo()obj1.jenny = "Jenny_nice"obj1.add()#封装class Foo: def __init__(self,bk): """ 构造方法 """ #析构方法在垃圾回收是解释器自己调用 self.name = bk self.job = "pythoner" # obj.job = "pythoner" self.age = 18 # obj.age = 18 def fetch(self): print(self.name) print(self.age) print(self.job)obj = Foo("nick")obj.fetch() |
综上所述,对于面向对象的封装来说,其实就是使用构造方法将内容封装到 对象 中,然后通过对象直接或者self间接获取被封装的内容。
二、继承
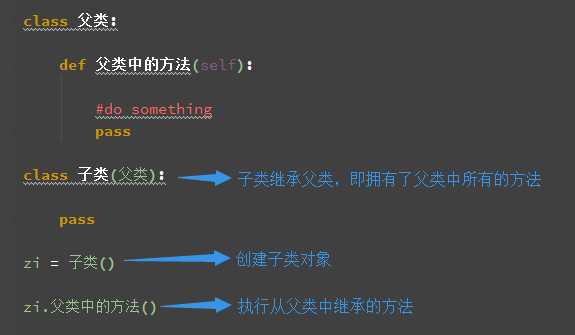
对于面向对象的继承来说,其实就是将多个类共有的方法提取到父类中,子类仅需继承父类而不必一一实现每个方法。
注:除了子类和父类的称谓,你可能看到过 派生类 和 基类 ,他们与子类和父类只是叫法不同而已。
|
1
2
3
4
5
6
7
8
9
10
11
12
13
14
15
16
17
18
19
20
21
|
# 继承# 基类class Animals: def __init__(self,name): self.name = name def eat(self): print(self.name,"吃")# 派生类class dog(Animals): def tell(self): print("汪星人")dog = dog("啊黄")dog.tell()dog.eat() |
继承 __init__
派生类默认不继承基类__init__,需要用super声明
|
1
2
3
4
5
6
7
8
9
10
11
12
|
class A: def __init__(self): self.name = "nick"class B(A): def __init__(self): self.age = 18 super(B, self).__init__() #super首先找到B的父类A,然后把类B的对象self转换为类A的对象,然后“被转换”的类A对象调用自己的__init__函数 # A.__init__(self) #指定运行A中__init__,不推荐obj = B()print(obj.__dict__) |
多继承:
Python的类可以继承多个类,Java和C#中则只能继承一个类
Python3的类继承多个类的寻找方法的方式,Python 3中没有经典类、新式类之分
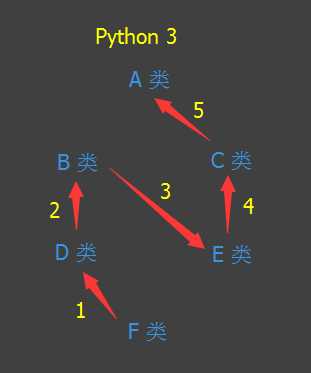
|
1
2
3
4
5
6
7
8
9
10
11
12
13
14
15
16
17
18
19
20
21
22
23
24
25
26
27
28
|
# 多继承class A: def f1(self): print("A")class B(A): def f(self): print("B")class C(A): def f(self): print("C")class D(B): def f(self): print("D")class E(C): def f1(self): print("E")class F(D,E): def f(self): print("F")f1 = F()f1.f1() |
Python2的类如果继承了多个类,那么其寻找方法的方式有两种,分别是:深度优先和广度优先
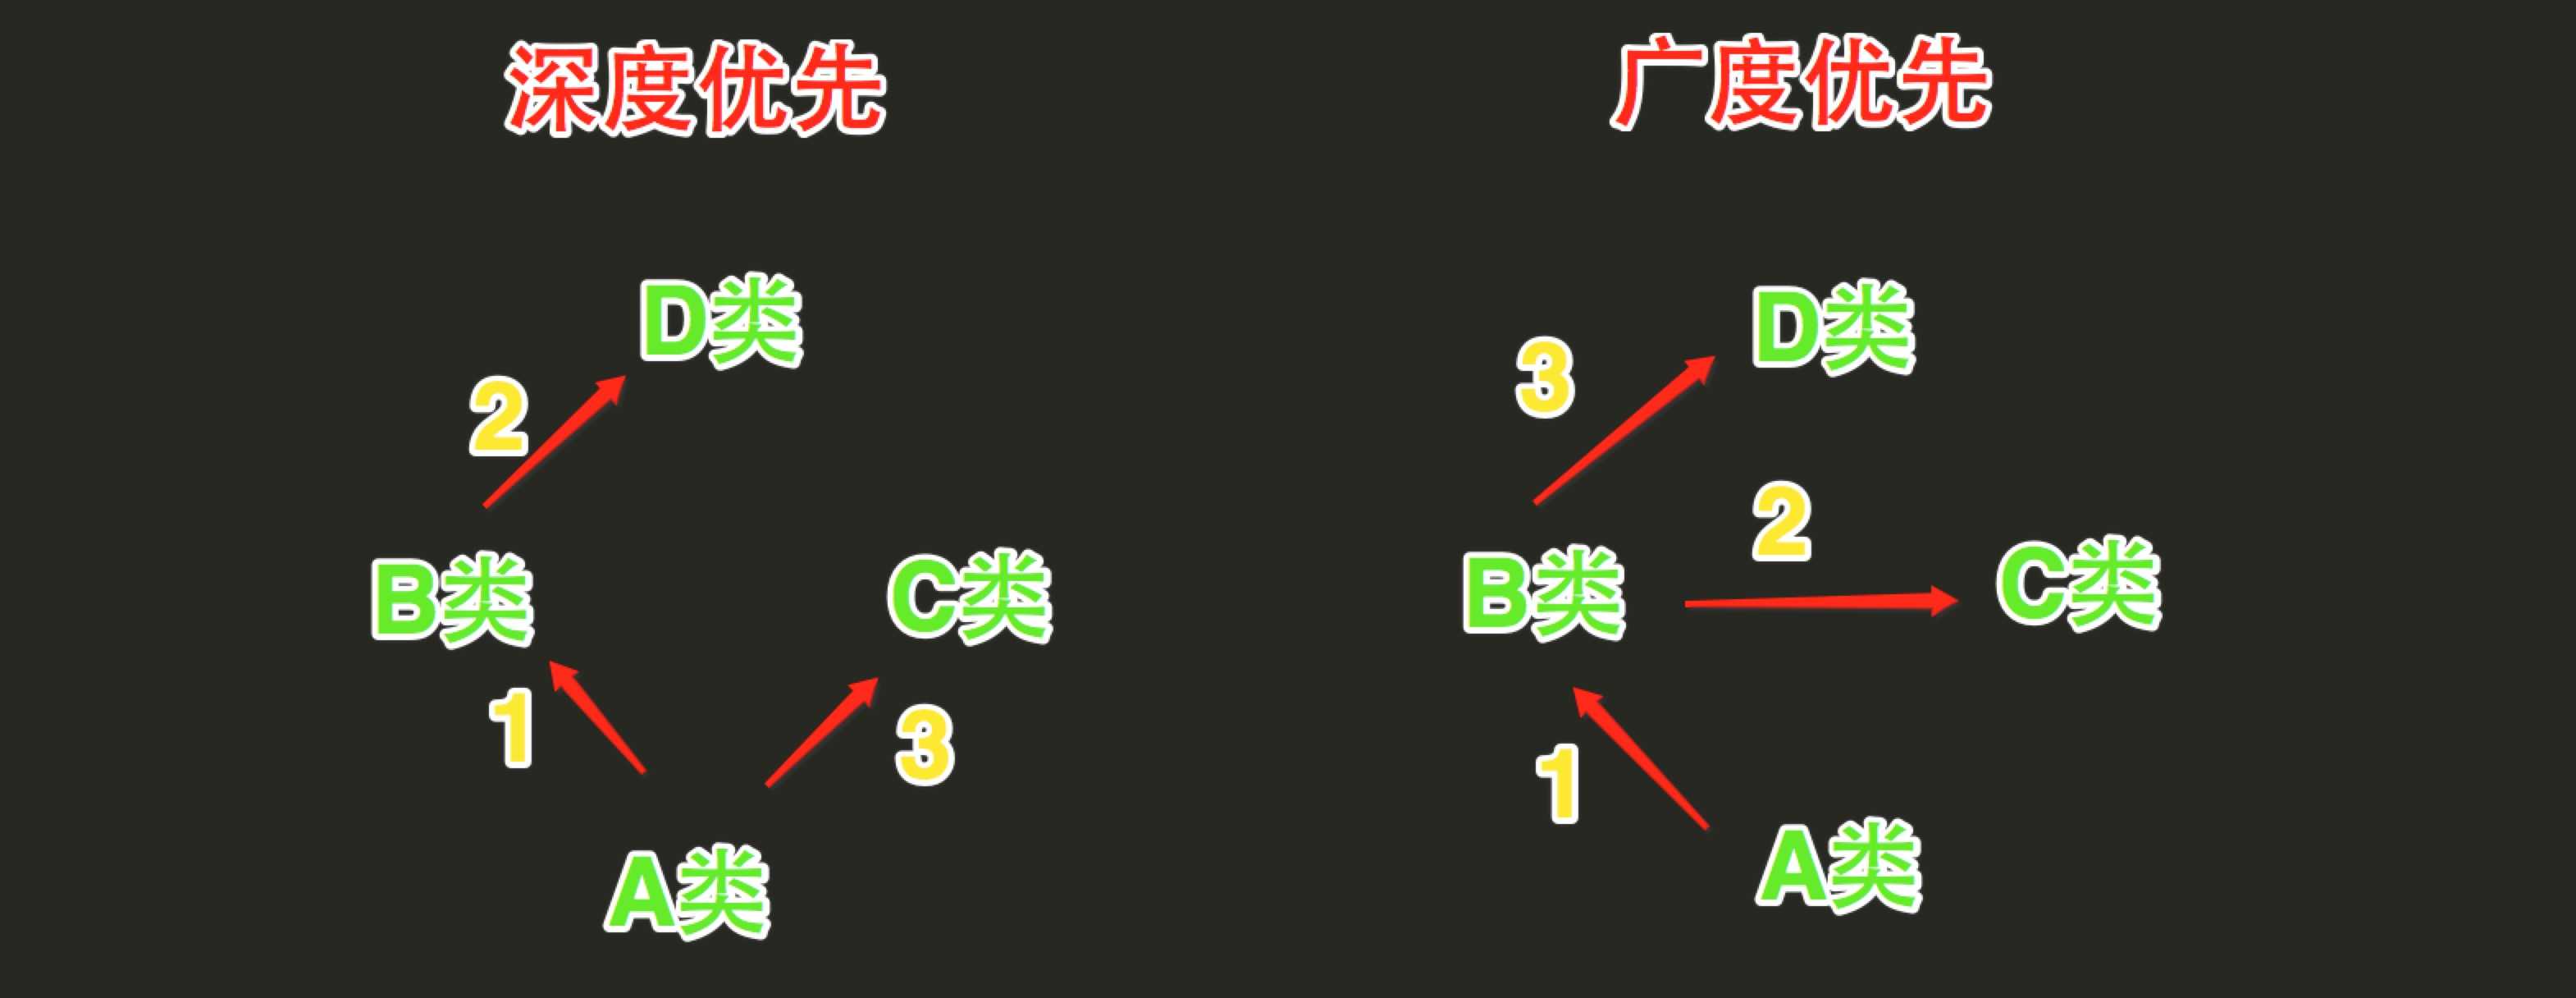
经典类和新式类,从字面上可以看出一个老一个新,新的必然包含了跟多的功能,也是之后推荐的写法,从写法上区分的话,如果 当前类或者父类继承了object类,那么该类便是新式类,否则便是经典类。


class D:

    def bar(self):
        print ‘D.bar‘


class C(D):

    def bar(self):
        print ‘C.bar‘


class B(D):

    def bar(self):
        print ‘B.bar‘


class A(B, C):

    def bar(self):
        print ‘A.bar‘

a = A()
# 执行bar方法时
# 首先去A类中查找,如果A类中没有,则继续去B类中找,如果B类中么有,则继续去D类中找,如果D类中么有,则继续去C类中找,如果还是未找到,则报错
# 所以,查找顺序:A --> B --> D --> C
# 在上述查找bar方法的过程中,一旦找到,则寻找过程立即中断,便不会再继续找了
a.bar()

class D(object):

    def bar(self):
        print ‘D.bar‘


class C(D):

    def bar(self):
        print ‘C.bar‘


class B(D):

    def bar(self):
        print ‘B.bar‘


class A(B, C):

    def bar(self):
        print ‘A.bar‘

a = A()
# 执行bar方法时
# 首先去A类中查找,如果A类中没有,则继续去B类中找,如果B类中么有,则继续去C类中找,如果C类中么有,则继续去D类中找,如果还是未找到,则报错
# 所以,查找顺序:A --> B --> C --> D
# 在上述查找bar方法的过程中,一旦找到,则寻找过程立即中断,便不会再继续找了
a.bar()
经典类:首先去A类中查找,如果A类中没有,则继续去B类中找,如果B类中么有,则继续去D类中找,如果D类中么有,则继续去C类中找,如果还是未找到,则报错
新式类:首先去A类中查找,如果A类中没有,则继续去B类中找,如果B类中么有,则继续去C类中找,如果C类中么有,则继续去D类中找,如果还是未找到,则报错
注意:在上述查找过程中,一旦找到,则寻找过程立即中断,便不会再继续找了
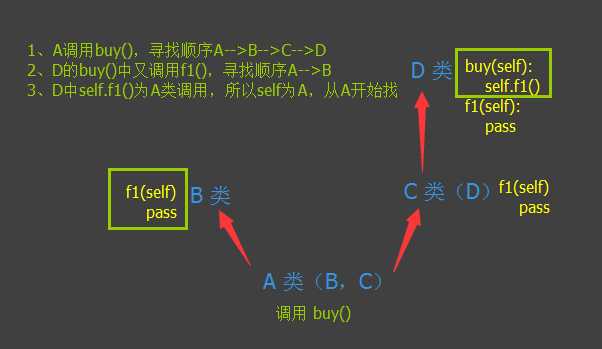
函数方法里调用函数方法执行顺序
|
1
2
3
4
5
6
7
8
9
10
11
12
13
14
15
16
17
18
19
20
21
22
23
24
25
|
# 函数方法里调用函数方法执行顺序class D: def buy(self): self.f1() #调用 f1() def f1(self): print("This is D f1.")class C(D): def f1(self): print("This is C f1.")class B: def f1(self): print("This is B f1.")class A(B, C): passobj = A()obj.buy() |
三、多态

class F1:
    pass


class S1(F1):

    def show(self):
        print ‘S1.show‘


class S2(F1):

    def show(self):
        print ‘S2.show‘


# 由于在Java或C#中定义函数参数时,必须指定参数的类型
# 为了让Func函数既可以执行S1对象的show方法,又可以执行S2对象的show方法,所以,定义了一个S1和S2类的父类
# 而实际传入的参数是:S1对象和S2对象

def Func(F1 obj):
    """Func函数需要接收一个F1类型或者F1子类的类型"""

    print obj.show()

s1_obj = S1()
Func(s1_obj) # 在Func函数中传入S1类的对象 s1_obj,执行 S1 的show方法,结果:S1.show

s2_obj = S2()
Func(s2_obj) # 在Func函数中传入Ss类的对象 ss_obj,执行 Ss 的show方法,结果:S2.show

class F1:
    pass


class S1(F1):

    def show(self):
        print ‘S1.show‘


class S2(F1):

    def show(self):
        print ‘S2.show‘

def Func(obj):
    print obj.show()

s1_obj = S1()
Func(s1_obj)

s2_obj = S2()
Func(s2_obj)

class Animal:
    def __init__(self, name):    # Constructor of the class
        self.name = name
    def talk(self):              # Abstract method, defined by convention only
        raise NotImplementedError("Subclass must implement abstract method")

class Cat(Animal):
    def talk(self):
        return ‘Meow!‘

class Dog(Animal):
    def talk(self):
        return ‘Woof! Woof!‘

animals = [Cat(‘Missy‘),
           Dog(‘Lassie‘)]

for animal in animals:
    print animal.name + ‘: ‘ + animal.talk()
类的方法 |
类的成员可以分为三大类:字段、方法和属性。
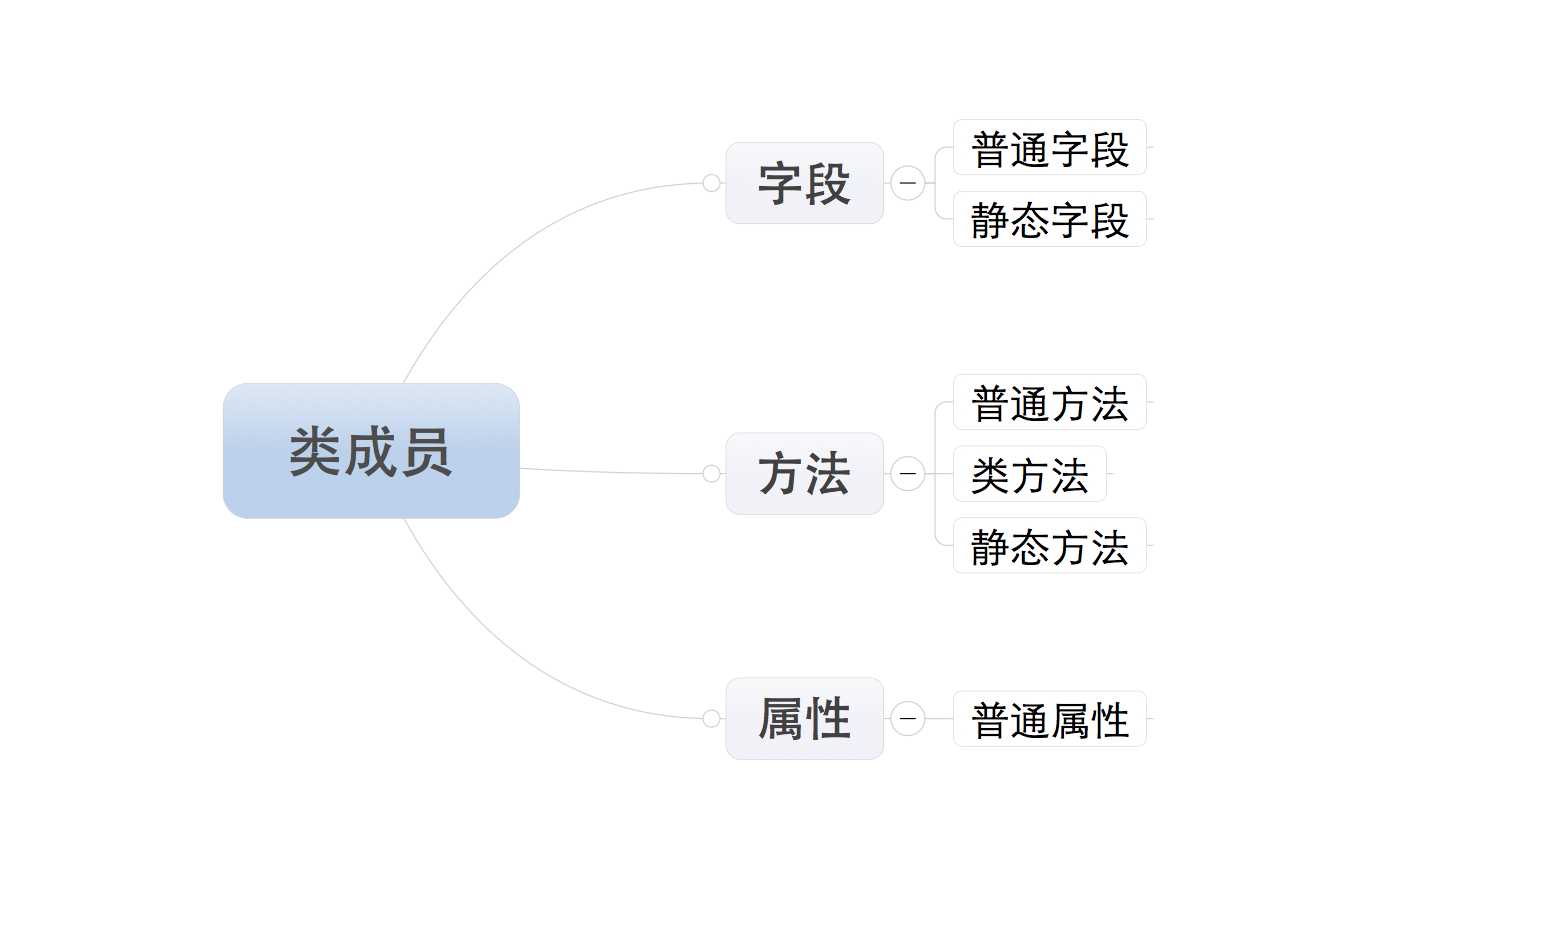
注:所有成员中,只有普通字段的内容保存对象中,即:根据此类创建了多少对象,在内存中就有多少个普通字段。而其他的成员,则都是保存在类中,即:无论对象的多少,在内存中只创建一份。
一、字段
字段包括:普通字段和静态字段,他们在定义和使用中有所区别,而最本质的区别是内存中保存的位置不同,
|
1
2
3
4
5
6
7
8
9
10
11
12
13
14
15
|
class Foo: # 静态字段 country = "China" def __init__(self, name): # 普通字段 self.name = name# 直接访问静态字段Foo.country# 直接访问普通字段obj = Foo("山西") |
由上述代码可以看出【普通字段需要通过对象来访问】【静态字段通过类访问】,在使用上可以看出普通字段和静态字段的归属是不同的。
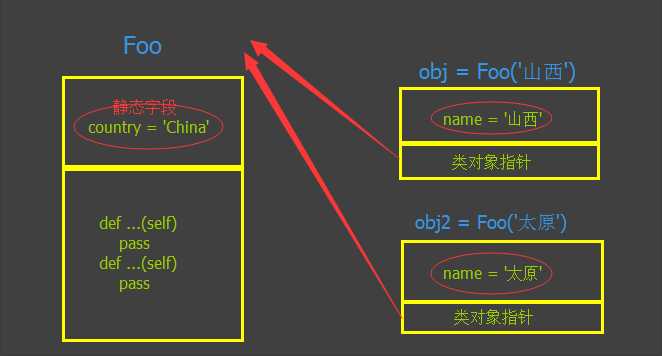
应用场景: 通过类创建对象时,如果每个对象都具有相同的字段,那么就使用静态字段
方法包括:普通方法、静态方法和类方法,三种方法在内存中都归属于类,区别在于调用方式不同。
|
1
2
3
4
5
6
7
8
9
10
11
12
13
14
15
16
17
18
19
20
21
22
23
24
25
26
27
28
29
|
class Foo: #静态方法 @staticmethod def xo(arg1, arg2): #无默认参数,可不传参数,可传任意参数 print("xo") #类方法 @classmethod def xxoo(cls): #定义类方法,至少有一个cls参数 print(cls) #普通方法,类中 def show(self): #定义普通方法,至少有一个self参数 print("show")# 调用静态方法Foo.xo(1,2)# 调用类方法Foo.xxoo()# 调用普通方法obj = Foo:obj.show() |
相同点:对于所有的方法而言,均属于类(非对象)中,所以,在内存中也只保存一份。
不同点:方法调用者不同、调用方法时自动传入的参数不同。
属性的基本使用
由属性的定义和调用要注意一下几点:
注意:属性存在意义是:访问属性时可以制造出和访问字段完全相同的假象
属性由方法变种而来,如果Python中没有属性,方法完全可以代替其功能。
|
1
2
3
4
5
6
7
8
9
10
11
12
13
14
15
16
17
18
19
20
21
22
23
24
25
26
27
|
class Foo: def __init__(self, name): self.name = name # 属性,将方法伪造成一种字段 @property def end(self): return self.name # 修改end值 @end.setter def end(self, new_name): self.name = new_nameobj = Foo("nick")# 调用属性,不需要加括号result2 = obj.endprint(result2)# 调用修改end.setter属性(自动将jenny传入当参数new_name)obj.end = "jenny"result3 = obj.endprint(result3) |
属性的两种定义方式
属性的定义有两种方式:
装饰器方式:在类的普通方法上应用@property装饰器
|
我们知道Python中的类有经典类和新式类,新式类的属性比经典类的属性丰富。( 如果类继object,那么该类是新式类 ) 
# ############### 定义 ############### class Goods: @property def price(self): return "nick" # ############### 调用 ############### obj = Goods() result = obj.price # 自动执行 @property 修饰的 price 方法,并获取方法的返回值 新式类,具有三种@property装饰器 
# ############### 定义 ############### class Goods(object): @property def price(self): print ‘@property‘ @price.setter def price(self, value): print ‘@price.setter‘ @price.deleter def price(self): print ‘@price.deleter‘ # ############### 调用 ############### obj = Goods() obj.price # 自动执行 @property 修饰的 price 方法,并获取方法的返回值 obj.price = 123 # 自动执行 @price.setter 修饰的 price 方法,并将 123 赋值给方法的参数 del obj.price # 自动执行 @price.deleter 修饰的 price 方法 注:经典类中的属性只有一种访问方式,其对应被 @property 修饰的方法 由于新式类中具有三种访问方式,我们可以根据他们几个属性的访问特点,分别将三个方法定义为对同一个属性:获取、修改、删除 
class Goods(object): def __init__(self): # 原价 self.original_price = 100 # 折扣 self.discount = 0.8 @property def price(self): # 实际价格 = 原价 * 折扣 new_price = self.original_price * self.discount return new_price @price.setter def price(self, value): self.original_price = value @price.deltter def price(self, value): del self.original_price obj = Goods() obj.price # 获取商品价格 obj.price = 200 # 修改商品原价 del obj.price # 删除商品原价 |
静态字段方式,创建值为property对象的静态字段
所以,定义属性共有两种方式,分别是【装饰器】和【静态字段】,而【装饰器】方式针对经典类和新式类又有所不同。
|
当使用静态字段的方式创建属性时,经典类和新式类无区别 
class Foo: def get_bar(self): return ‘nick‘ BAR = property(get_bar) obj = Foo() reuslt = obj.BAR # 自动调用get_bar方法,并获取方法的返回值 print reuslt property的构造方法中有个四个参数

class Foo: def get_bar(self): return ‘nick‘ # *必须两个参数 def set_bar(self, value): return ‘set value‘ + value def del_bar(self): return ‘nick‘ BAR = property(get_bar, set_bar, del_bar, ‘description...‘) obj = Foo() obj.BAR # 自动调用第一个参数中定义的方法:get_bar obj.BAR = "jenny" # 自动调用第二个参数中定义的方法:set_bar方法,并将“jenny”当作参数传入 del Foo.BAR # 自动调用第三个参数中定义的方法:del_bar方法 obj.BAR.__doc__ # 自动获取第四个参数中设置的值:description... 由于静态字段方式创建属性具有三种访问方式,我们可以根据他们几个属性的访问特点,分别将三个方法定义为对同一个属性:获取、修改、删除 
class Goods(object): def __init__(self): # 原价 self.original_price = 100 # 折扣 self.discount = 0.8 def get_price(self): # 实际价格 = 原价 * 折扣 new_price = self.original_price * self.discount return new_price def set_price(self, value): self.original_price = value def del_price(self, value): del self.original_price PRICE = property(get_price, set_price, del_price, ‘价格属性描述...‘) obj = Goods() obj.PRICE # 获取商品价格 obj.PRICE = 200 # 修改商品原价 del obj.PRICE # 删除商品原价 |
类成员的修饰符 |
每一个类的成员都有两种形式:
私有成员和公有成员的定义不同:私有成员命名时,前两个字符是下划线。(特殊成员除外,例如:__init__、__call__、__dict__等)
|
1
2
3
4
5
6
7
8
|
class Foo: xo = "xo" #公有字段 __ox = "ox" #私有字段 def __init__(self): self.name = "nick" #公有字段 self.__name2 = "nick" #私有字段 |
私有成员和公有成员的访问限制不同:
静态字段

class C:

    name = "公有静态字段"

    def func(self):
        print C.name

class D(C):

    def show(self):
        print C.name


C.name         # 类访问

obj = C()
obj.func()     # 类内部可以访问

obj_son = D()
obj_son.show() # 派生类中可以访问

class C:

    __name = "公有静态字段"

    def func(self):
        print C.__name

class D(C):

    def show(self):
        print C.__name


C.__name       # 类访问            ==> 错误

obj = C()
obj.func()     # 类内部可以访问     ==> 正确

obj_son = D()
obj_son.show() # 派生类中可以访问   ==> 错误
普通字段

class C:

    def __init__(self):
        self.foo = "公有字段"

    def func(self):
        print self.foo  # 类内部访问

class D(C):

    def show(self):
        print self.foo # 派生类中访问

obj = C()

obj.foo     # 通过对象访问
obj.func()  # 类内部访问

obj_son = D();
obj_son.show()  # 派生类中访问

class C:

    def __init__(self):
        self.__foo = "私有字段"

    def func(self):
        print self.foo  # 类内部访问

class D(C):

    def show(self):
        print self.foo # 派生类中访问

obj = C()

obj.__foo     # 通过对象访问    ==> 错误
obj.func()  # 类内部访问        ==> 正确

obj_son = D();
obj_son.show()  # 派生类中访问  ==> 错误
方法、属性的访问于上述方式相似,即:私有成员只能在类内部使用
ps:如果想要强制访问私有字段,可以通过 【对象._类名__私有字段明 】访问(如:obj._C__foo),不建议强制访问私有成员。
类的特殊成员 |
成员名前如果有两个下划线,则表示该成员是私有成员,私有成员只能由类内部调用。
表示类的描述信息

class Foo:
    """ 描述类信息 """

    def func(self):
        pass

print Foo.__doc__
#输出:类的描述信息
__module__ 表示当前操作的对象在那个模块
__class__ 表示当前操作的对象的类是什么

#!/usr/bin/env python
# -*- coding:utf-8 -*-

class C:

    def __init__(self):
        self.name = ‘nick‘

from lib.aa import C

obj = C()
print obj.__module__  # 输出 lib.aa,即:输出模块
print obj.__class__      # 输出 lib.aa.C,即:输出类
构造方法,通过类创建对象时,自动触发执行。

class Foo:

    def __init__(self, name):
        self.name = name
        self.age = 18


obj = Foo(‘nick‘)     # 自动执行类中的 __init__ 方法
析构方法,当对象在内存中被释放时,自动触发执行。
注:此方法一般无须定义,因为Python是一门高级语言,程序员在使用时无需关心内存的分配和释放,因为此工作都是交给Python解释器来执行,所以,析构函数的调用是由解释器在进行垃圾回收时自动触发执行的。

class Foo:

    def __del__(self):
        pass
对象后面加括号,触发执行。
注:构造方法的执行是由创建对象触发的,即:对象 = 类名() ;而对于 __call__ 方法的执行是由对象后加括号触发的,即:对象() 或者 类()()

# __call__
class Foo:

    def __init__(self):
        print("This is init")

    def __call__(self, *args, **kwargs):
        print("This is call")
        return "CC"

obj = Foo()    # 执行 __init__
obj()              # 执行 __call__

result = Foo()()   # 执行 __call__
print(result)
类或对象中的所有成员

class Province:

    country = ‘China‘

    def __init__(self, name, count):
        self.name = name
        self.count = count

    def func(self, *args, **kwargs):
        print ‘func‘

# 获取类的成员,即:静态字段、方法、
print Province.__dict__
# 输出:{‘country‘: ‘China‘, ‘__module__‘: ‘__main__‘, ‘func‘: <function func at 0x10be30f50>, ‘__init__‘: <function __init__ at 0x10be30ed8>, ‘__doc__‘: None}

obj1 = Province(‘shangxi‘,10000)
print obj1.__dict__
# 获取 对象obj1 的成员
# 输出:{‘count‘: 10000, ‘name‘: ‘shangxi‘}

obj2 = Province(‘shangdong‘, 3888)
print obj2.__dict__
# 获取 对象obj1 的成员
# 输出:{‘count‘: 3888, ‘name‘: ‘shangdong‘}
如果一个类中定义了__str__方法,那么在打印对象时,默认输出该方法的返回值。

class Foo:

    def __str__(self):
        return ‘nick‘


obj = Foo()
print obj
# 输出:nick
用于索引操作,如字典。以上分别表示获取、设置、删除数据

class Foo:

    def __getitem__(self, item):
        print(item)

    def __setitem__(self, key, value):
        print(key, value)

    def __delitem__(self, key):
        print(key)

obj = Foo()

obj["nick"]                     # 自动触发执行 __getitem__
obj["nick"] = "jenny"     # 自动触发执行 __setitem__
del obj["nick"]                # 自动触发执行 __delitem__
该三个方法用于分片操作,如:列表

class Foo(object):

    def __getslice__(self, i, j):
        print ‘__getslice__‘,i,j

    def __setslice__(self, i, j, sequence):
        print ‘__setslice__‘,i,j

    def __delslice__(self, i, j):
        print ‘__delslice__‘,i,j

obj = Foo()

obj[-1:1]                   # 自动触发执行 __getslice__
obj[0:1] = [11,22,33,44]    # 自动触发执行 __setslice__
del obj[0:2]                # 自动触发执行 __delslice__
用于迭代器,之所以列表、字典、元组可以进行for循环,是因为类型内部定义了 __iter__

#!/usr/bin/env python
# -*- coding:utf-8 -*-

class Foo(object):

    def __init__(self, sq):
        self.sq = sq

    def __iter__(self):
        return iter(self.sq)

obj = Foo([11,22,33,44])

for i in obj:
    print i

#!/usr/bin/env python
# -*- coding:utf-8 -*-

obj = iter([11,22,33,44])

while True:
    val = obj.next()
    print val
在解析父类的__init__时,定义解析顺序的是子类的__mro__属性,内容为一个存储要解析类顺序的元组。

class A(object):
    def __init__(self):
        print ‘    -> Enter A‘
        print ‘    <- Leave A‘

class B(A):
    def __init(self):
        print ‘    -> Enter B‘
        # A.__init__(self)
        super(B, self).__init__()
        print ‘    <- Leave B‘

class C(A):
    def __init__(self):
        print "    -> Enter C"
        # A.__init__(self)
        super(C, self).__init__()
        print "    <- Leave C"

class D(B, C):
    def __init__(self):
        print "    -> Enter D"
        # B.__init__(self)
        # C.__init__(self)
        super(D, self).__init__()
        print "    <- Leave D"

if __name__ == "__main__":
    d = D()
    print "MRO:", [x.__name__ for x in D.__mro__]
    print type(D.__mro__)


执行以上代码,得到的输出为:

-> Enter D
-> Enter C
-> Enter A
<- Leave A
<- Leave C
<- Leave D
MRO: [‘D‘, ‘B‘, ‘C‘, ‘A‘, ‘object‘]
<type ‘tuple‘>
__slot__定义类中可以被外界访问的属性。
当父类中定义了__slot__时,不能向父类中添加属性。如果子类中没有定义__slot__,则子类不受父类__slot__定义的限制。
如果父类与子类中都定义了__slot__,则邮箱的结果为父类与子类__slot__的合集。
阅读以下代码:
|
1
2
3
4
5
6
|
class Foo(object): def __init__(self): pass obj = Foo() # obj是通过Foo类实例化的对象 |
上述代码中,obj 是通过 Foo 类实例化的对象,其实,不仅 obj 是一个对象,Foo类本身也是一个对象,因为在Python中一切事物都是对象。
如果按照一切事物都是对象的理论:obj对象是通过执行Foo类的构造方法创建,那么Foo类对象应该也是通过执行某个类的 构造方法 创建。
|
1
2
|
print type(obj) # 输出:<class ‘__main__.Foo‘> 表示,obj 对象由Foo类创建print type(Foo) # 输出:<type ‘type‘> 表示,Foo类对象由 type 类创建 |
所以,obj对象是Foo类的一个实例,Foo类对象是 type 类的一个实例,即:Foo类对象 是通过type类的构造方法创建。
那么,创建类就可以有两种方式:
1> 普通方式
|
1
2
3
4
|
class Foo(object): def func(self): print ‘hello word‘ |
2> 特殊方式(type类的构造函数)
|
1
2
3
4
5
6
7
|
def func(self): print ‘hello word‘ Foo = type(‘Foo‘,(object,), {‘func‘: func})#type第一个参数:类名#type第二个参数:当前类的基类#type第三个参数:类的成员 |
==》 类 是由 type 类实例化产生
那么问题来了,类默认是由 type 类实例化产生,type类中如何实现的创建类?类又是如何创建对象?
答:类中有一个属性 __metaclass__,其用来表示该类由 谁 来实例化创建,所以,我们可以为 __metaclass__ 设置一个type类的派生类,从而查看 类 创建的过程。
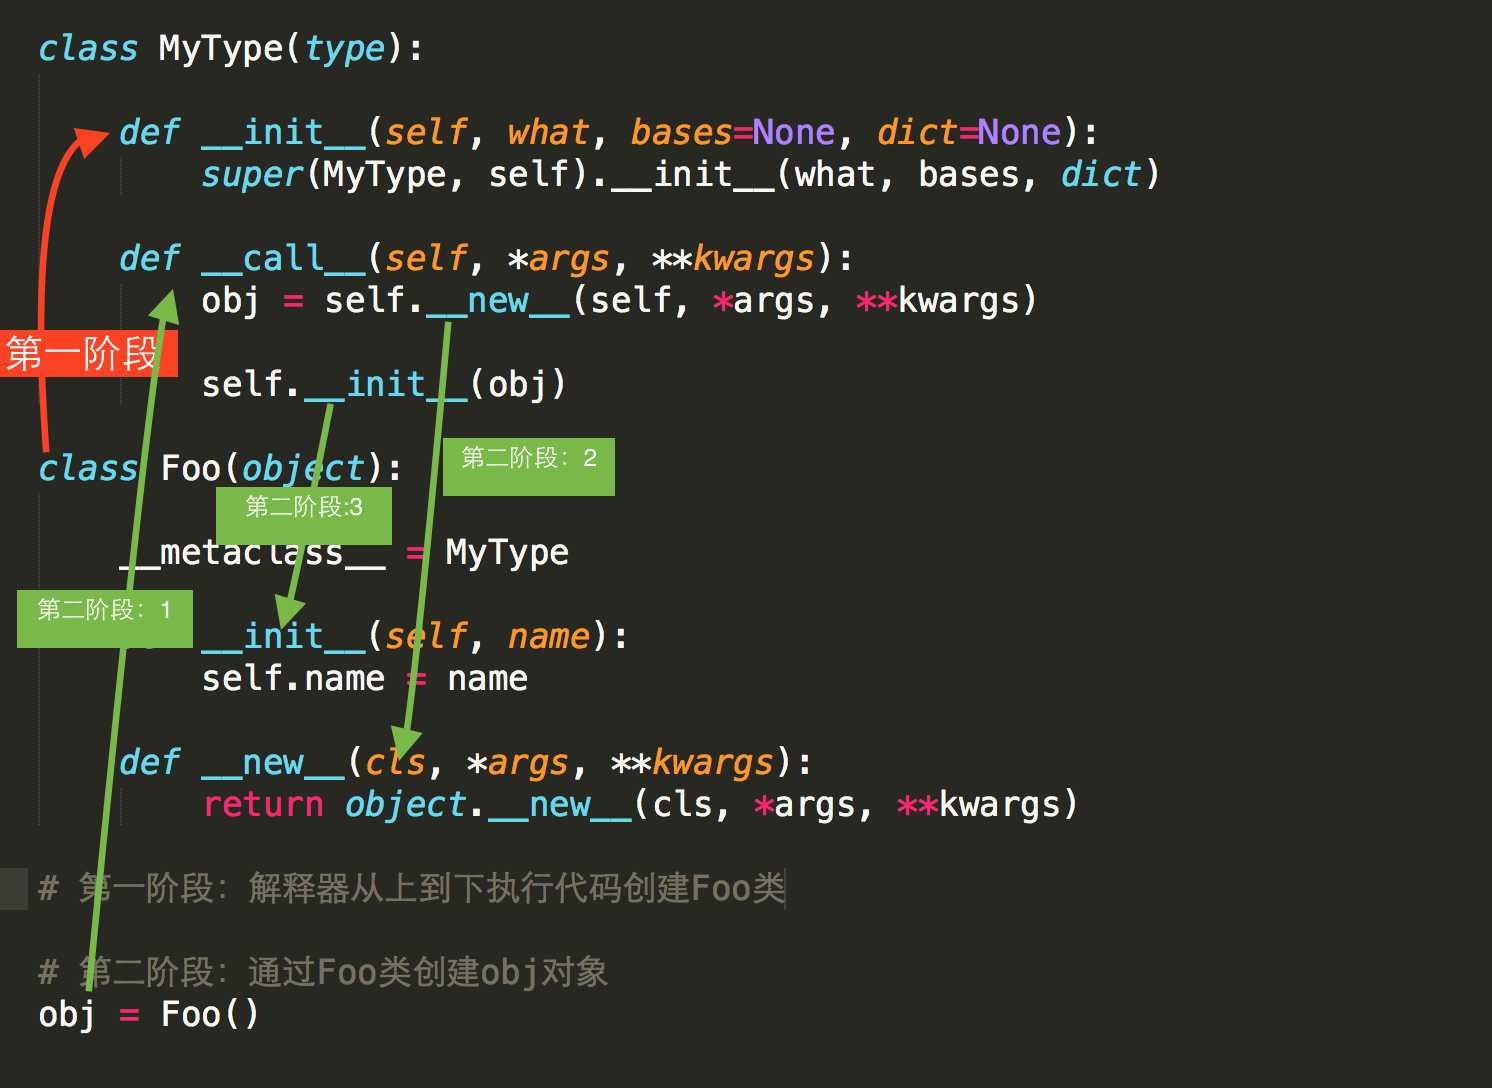

class MyType(type):

    def __init__(self, what, bases=None, dict=None):
        super(MyType, self).__init__(what, bases, dict)

    def __call__(self, *args, **kwargs):
        obj = self.__new__(self, *args, **kwargs)

        self.__init__(obj)

class Foo(object):

    __metaclass__ = MyType

    def __init__(self, name):
        self.name = name

    def __new__(cls, *args, **kwargs):
        return object.__new__(cls, *args, **kwargs)

# 第一阶段:解释器从上到下执行代码创建Foo类
# 第二阶段:通过Foo类创建obj对象
obj = Foo()
isinstance(obj, cls) & issubclass(sub, super) |
isinstance(obj, cls)
检查是否obj是否是类 cls 的对象
|
1
2
3
4
5
6
|
class Foo(object): pass obj = Foo() isinstance(obj, Foo) |
issubclass(sub, super)
检查sub类是否是 super 类的派生类
|
1
2
3
4
5
6
7
|
class Foo(object): pass class Bar(Foo): pass issubclass(Bar, Foo) |
异常处理 |
1、异常简介
在编程过程中为了增加友好性,在程序出现bug时一般不会将错误信息显示给用户,而是现实一个提示的页面,通俗来说就是不让用户看见大黄页!!!
|
1
2
3
4
|
try: passexcept Exception,ex: pass |
python中的异常种类非常多,每个异常专门用于处理某一项异常!!!
AttributeError          试图访问一个对象没有的树形,比如foo.x,但是foo没有属性x
IOError                 输入/输出异常;基本上是无法打开文件
ImportError             无法引入模块或包;基本上是路径问题或名称错误
IndentationError        语法错误(的子类) ;代码没有正确对齐
IndexError              下标索引超出序列边界,比如当x只有三个元素,却试图访问x[5]
KeyError                试图访问字典里不存在的键
KeyboardInterrupt       Ctrl+C被按下
NameError               使用一个还未被赋予对象的变量
SyntaxError             Python代码非法,代码不能编译(个人认为这是语法错误,写错了)
TypeError               传入对象类型与要求的不符合
UnboundLocalError       试图访问一个还未被设置的局部变量,基本上是由于另有一个同名的全局变量,导致你以为正在访问它
ValueError              传入一个调用者不期望的值,即使值的类型是正确的

ArithmeticError
AssertionError
AttributeError
BaseException
BufferError
BytesWarning
DeprecationWarning
EnvironmentError
EOFError
Exception
FloatingPointError
FutureWarning
GeneratorExit
ImportError
ImportWarning
IndentationError
IndexError
IOError
KeyboardInterrupt
KeyError
LookupError
MemoryError
NameError
NotImplementedError
OSError
OverflowError
PendingDeprecationWarning
ReferenceError
RuntimeError
RuntimeWarning
StandardError
StopIteration
SyntaxError
SyntaxWarning
SystemError
SystemExit
TabError
TypeError
UnboundLocalError
UnicodeDecodeError
UnicodeEncodeError
UnicodeError
UnicodeTranslateError
UnicodeWarning
UserWarning
ValueError
Warning
ZeroDivisionError
异常类只能用来处理指定的异常情况,如果非指定异常则无法处理。
|
1
2
3
4
5
6
7
8
9
10
11
12
13
|
# 未捕获到异常,程序直接报错 s1 = ‘hello‘try: int(s1)except IndexError as e: print eexcept (KeyError, ValueError) as e: print e # 万能异常except Exception,e: print e |
|
1
2
3
4
5
6
7
8
9
10
11
12
|
try: # 主代码块 passexcept KeyError,e: # 异常时,执行该块 passelse: # 主代码块成功执行完,执行该块 passfinally: # 无论异常与否,最终执行该块 pass |
|
1
2
3
4
|
try: raise Exception(‘错误了。。。‘)except Exception,e: print e |
|
1
2
3
4
5
6
7
8
9
10
11
12
|
class NickException(Exception): def __init__(self, msg): self.message = msg def __str__(self): return self.message try: raise NickException(‘我的异常‘)except NickException,e: print e |
|
1
2
3
4
5
6
|
# assert 条件# 条件成立则pass,条件不成立则报错 assert 1 == 1 assert 1 == 2 |
反射 |
python中的反射功能是由以下四个内置函数提供:hasattr、getattr、setattr、delattr,改四个函数分别用于对对象内部执行:检查是否含有某成员、获取成员、设置成员、删除成员。
|
1
2
3
4
5
6
7
8
9
10
11
12
13
14
15
16
17
18
19
20
21
22
23
24
25
26
27
28
29
30
31
32
33
34
35
36
37
38
39
40
41
42
43
44
45
46
47
48
|
# commons.py 文件name = "nick"def f1(): return "This is f1."def f2(): return "This is f2."def nb(): return "This is niubily."# index.py 文件import commons#根据字符串的形式去某个模块中寻找东西target_func = getattr(commons,"f1") # 找函数result = target_func()print(result)target_func = getattr(commons,"name") # 找全局变量print(target_func)target_func = getattr(commons,"age",None) # 找不到返回Noneprint(target_func)#根据字符串的形式去某个模块中判断东西是否存在tarhas_func = hasattr(commons,"f5") # 找函数print("before:",tarhas_func)# tarhas_func = hasattr(commons,"name") # 找全局变量# print(tarhas_func)#根据字符串的形式去某个模块中设置东西setattr(commons,"f5","lambda x: return \"This is new func.\"") # 设置一个函数setattr(commons,"age",18) # 设置全局变量tarhas_func = hasattr(commons,"f5") # 检查函数是否存在print("after:",tarhas_func)#根据字符串的形式去某个模块中删除东西delattr(commons,"f5") # 删除一个函数tarhas_func = hasattr(commons,"f5") # 检查函数是否存在print("end:",tarhas_func) |

# 通过字符串的形式,导入模块。起个别名 ccas。

comm = input("Please:")
ccas = __import__(comm)
ccas.f1()

# 需要做拼接导入时后加 fromlist=True(否则只导入lib)
ccas = __import__("lib."+comm, fromlist=True)

##### 路由系统 #####

# 输入 模块名/函数名  (例如:commons/nb)
url = input("Please input you want url:")

target_module, target_func = url.split("/")

#m = __import__("lib."+target_module,fromlist=True)
m = __import__(target_module)

if hasattr(m,target_func):
    target_func = getattr(m,target_func)
    result = target_func()
    print(result)
else:
    print("Sorry,it‘s 404 not found.")
单例模式 |
单例模式存在的目的是保证当前内存中仅存在单个实例,避免内存浪费!!!
(程序如果并发量大的话,内存里就会存在非常多功能上一模一样的对象。存在这些对象肯定会消耗内存,对于这些功能相同的对象可以在内存中仅创建一个,需要时都去调用)
|
1
2
3
4
5
6
7
8
9
10
11
12
13
14
15
16
17
18
19
20
21
22
23
24
25
26
27
28
29
30
31
32
33
|
# 单例模式class Foo: __n = None def __init__(self): self.name = "nick" self.age = 18 self.job = "pythoner" @staticmethod def dl(): if Foo.__n: return Foo.__n else: Foo.__n = Foo() return Foo.__n# 创建对象时不能再直接使用:obj = Foo(),而应该调用特殊的方法:obj = Foo.dl() 。f1 = Foo.dl()print(f1)f2 =Foo.dl()print(f2)f3 =Foo.dl()print(f3)# 运行结果<__main__.Foo object at 0x0000000001142390><__main__.Foo object at 0x0000000001142390><__main__.Foo object at 0x0000000001142390> |
装饰器方式单例模式
|
1
2
3
4
5
6
7
8
9
10
11
12
13
14
15
16
17
18
19
20
21
22
23
24
|
# 装饰器方式单例模式def singleton(argv): dic = {} def s(*args, **kwargs): if argv not in dic: dic[argv] = argv(*args, **kwargs) return dic[argv] else: return dic[argv] return s# 类上加单例装饰器@singletonclass Foo: pass@singletonclass Foo2: pass |
标签:pyhon over instance nal flow generator 种类 translate ges
原文地址:http://www.cnblogs.com/chenyangqit/p/7259782.html