标签:运行时 books service 成员变量 span context bsp expected 引用
spring
①Spring是一个开源框架
③Spring是一个IOC(DI)和AOP容器框架。
④Spring的优良特性
[1]非侵入式:基于Spring开发的应用中的对象可以不依赖于Spring的API
[2]依赖注入:DI——Dependency Injection,反转控制(IOC)最经典的实现。
[3]面向切面编程:Aspect Oriented Programming——AOP
[4]容器:Spring是一个容器,因为它包含并且管理应用对象的生命周期
[5]组件化:Spring实现了使用简单的组件配置组合成一个复杂的应用。在 Spring 中可以使用XML和Java注解组合这些对象。
[6]一站式:在IOC和AOP的基础上可以整合各种企业应用的开源框架和优秀的第三方类库(实际上Spring 自身也提供了表述层的SpringMVC和持久层的Spring JDBC)。
⑥Spring模块
1 安装Spring插件
①插件包:springsource-tool-suite-3.4.0.RELEASE-e4.3.1-updatesite.zip
②操作步骤:参照《参考资料:Spring插件安装图解.pptx》
2 搭建Spring运行时环境
①加入JAR包
[1]Spring自身JAR包:spring-framework-4.0.0.RELEASE\libs目录下
spring-beans-4.0.0.RELEASE.jar
spring-context-4.0.0.RELEASE.jar
spring-core-4.0.0.RELEASE.jar
spring-expression-4.0.0.RELEASE.jar
[2]commons-logging-1.1.1.jar
②根据需要创建Spring配置文件
    /**
     * 细节:IOC容器中所有的组件默认是单例的;
     * 1、组件的创建对象是容器创建的;
     * 2、注册的组件,是在容器创建完全完成之前容器帮我们就创建好了;
     * 3、容器中创建的对象都是单例模式;多次获取都是获取之前创建好的对象;
     * 4、如果按照id获取,不存在,会抛出异常;
     * org.springframework.beans.factory.
     * NoSuchBeanDefinitionException:
     * No bean named ‘person02‘ is defined
     *
     * 5、如果按照类型,这个类型的组件在容器中有多个,抛异常
     * org.springframework.beans.factory.
     * NoUniqueBeanDefinitionException:
     * No qualifying bean of type [com.atguigu.bean.Person]
     * is defined: expected single matching bean but found 2:
     * person01,person02
     *
     * 6、property是利用set方法赋值的,如果没有set方法也就坏了;
     *
     */
    @Test
    public void test() {
        //1、实验1:通过IOC容器创建对象,并为属性赋值★
        //1、从容器中获取刚才注册的组件;
        //1)、根据配置文件获取到容器对象
        ApplicationContext ioc = new ClassPathXmlApplicationContext("beans.xml");
        System.out.println("容器创建完成.....");
        //2)、从容器中获取组件即可,按照组件的id获取
        System.out.println("获取bean之前");
        Person bean = (Person) ioc.getBean("person01");
        System.out.println("获取bean之后");


        Person bean2 = (Person) ioc.getBean("person01");
        //3)、容器帮我们创建好了对象
        System.out.println(bean == bean2);


//        Person bean3 = (Person) ioc.getBean("person02");
//        System.out.println(bean3);

        //实验2:根据bean的类型从IOC容器中获取bean的实例★
        Person person = ioc.getBean(Person.class);
        System.out.println("按照类型的:"+person);
    }
实验:
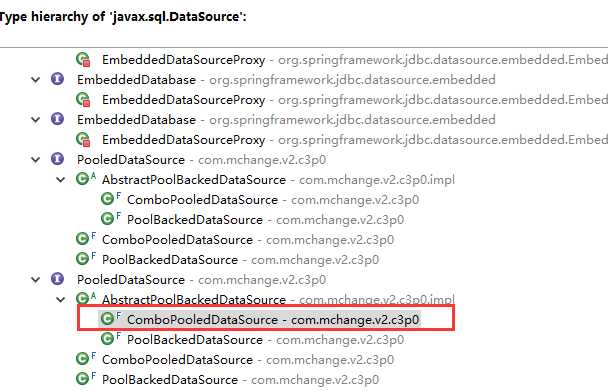
spring容器管理数据库连接池
<?xml version="1.0" encoding="UTF-8"?>
<beans xmlns="http://www.springframework.org/schema/beans"
    xmlns:xsi="http://www.w3.org/2001/XMLSchema-instance"
    xsi:schemaLocation="http://www.springframework.org/schema/beans http://www.springframework.org/schema/beans/spring-beans.xsd">
    <!-- 引用外部属性文件
    ioc容器中配置的所有组件,默认都是单实例 ,spring容器管理数据库连接池
    c3p0-0.9.1.2.jar
    mysql-connector-java-5.1.7-bin.jar
    -->
    <bean id="dataSource" class="com.mchange.v2.c3p0.ComboPooledDataSource">
        <property name="user" value="root"></property>
        <property name="password" value="537423Ab"></property>
        <property name="driverClass" value="com.mysql.jdbc.Driver"></property>
        <property name="jdbcUrl" value="jdbc:mysql://localhost:3306/bookstore"></property>
    </bean>

</beans>
test
public class test {
    //将IOC容器本身实例化
    ApplicationContext ioc = new ClassPathXmlApplicationContext("bean.xml");
    @Test
    public void test() throws SQLException {
       //1、按照类型获取
        //它会获得这个类型下的所有实现或者子类的对象
        //ComboPooledDataSource是DataSource的实现
        //确保只有一个DataSource配置在xml中
        DataSource bean = ioc.getBean(DataSource.class);
        Connection connection = bean.getConnection();
        System.out.println(connection);
    }

}
/ComboPooledDataSource是DataSource的实现类
实验:配置外部属性文件*****
1.1 引用外部属性文件
当bean的配置信息逐渐增多时,查找和修改一些bean的配置信息就变得愈加困难。这时可以将一部分信息提取到bean配置文件的外部,以properties格式的属性文件保存起来,同时在bean的配置文件中引用properties属性文件中的内容,从而实现一部分属性值在发生变化时仅修改properties属性文件即可。这种技术多用于连接数据库的基本信息的配置。
①直接配置
|
<!-- 直接配置 --> <bean id="dataSource" class="com.mchange.v2.c3p0.ComboPooledDataSource"> <property name="user" value="root"/> <property name="password" value="root"/> <property name="jdbcUrl" value="jdbc:mysql:///test"/> <property name="driverClass" value="com.mysql.jdbc.Driver"/> </bean> |
②创建properties属性文件
|
prop.userName=root prop.password=root prop.url=jdbc:mysql:///test prop.driverClass=com.mysql.jdbc.Driver |
③引入context名称空间
④指定properties属性文件的位置
|
<!-- 指定properties属性文件的位置 --> <!-- classpath:xxx 表示属性文件位于类路径下 --> <context:property-placeholder location="classpath:jdbc.properties"/> |
⑤从properties属性文件中引入属性值
|
<!-- 从properties属性文件中引入属性值 --> <bean id="dataSource" class="com.mchange.v2.c3p0.ComboPooledDataSource"> <property name="user" value="${prop.userName}"/> <property name="password" value="${prop.password}"/> <property name="jdbcUrl" value="${prop.url}"/> <property name="driverClass" value="${prop.driverClass}"/> </bean> |
/**
     * 实验18:使用@Autowired注解实现根据类型实现自动装配★
     * 原理:
     * 1、先按照类型进行匹配:匹配上就赋值;
     *         按照类型找不到:(报错)
     *             org.springframework.beans.factory.BeanCreationException:
     *             Error creating bean with name ‘bookServlet‘:
     *             Injection of autowired dependencies failed;
     *     Caused by: org.springframework.beans.factory.
     *             NoSuchBeanDefinitionException:
     *             No qualifying bean of type
     *             [com.atguigu.service.BookService]
     *             found for dependency:
     *             expected at least 1 bean which qualifies as autowire candidate for this dependency.
     *
     *         2、如果按照类型找到多个:(如一个接口下有多个实现)
     *             1)、属性名作为id继续去ioc容器中查找找到既赋值;
     *                 找id为bookService的对象;
     *             2)、找到就装配上
     *             3)、找不到:报错
     * org.springframework.beans.factory.BeanCreationException:
     * Caused by: org.springframework.beans.factory.BeanCreationException:
     * Could not autowire field:
     * private com.atguigu.service.BookService com.atguigu.servlet.BookServlet.bookServiceImpl001;
     * Caused by: org.springframework.beans.factory.NoUniqueBeanDefinitionException:
     * No qualifying bean of type [com.atguigu.service.BookService] is defined:
     * expected single matching bean but found 2:
     * bookService,bookServiceImpl
     *
     *
     *
     * 3、各种找不到情况;
     *
     * 使用@Autowired自动赋值
     * 如果找到多个属性名会作为id继续查找;可以指定别用属性名做id了
     * @Qualifier("bookServiceImpl")指定新的id作为去容器中查找的依据
     *
     * @Autowired  的效果,一定要装配上。赋值不上就报错
     *
     * 实验22:@Autowired注解的required属性指定某个属性允许不被设置
     * @Autowired(required=false)能装上就装,不行就算了;
1 泛型依赖注入
1.1 简介
Spring 4.x中可以为子类注入子类对应的泛型类型的成员变量的引用。
1.2 实现
[1]组件基类
|
BaseRepository |
|
public class BaseRepository<T> {
public void save() { System.out.println("Saved by BaseRepository"); }
} |
|
BaseService |
|
public class BaseService<T> {
@Autowired private BaseRepository<T> repository;
public void add() { repository.save(); }
} |
[2]组件实体类
|
UserRepository |
|
@Repository public class UserRepository extends BaseRepository<User>{
public void save() { System.out.println("Saved by UserRepository"); }
} |
|
UserService |
|
@Service public class UserService extends BaseService<User>{
} |
[3]模型实体类
|
User |
|
public class User {
} |
[4]测试
|
ApplicationContext ioc = new ClassPathXmlApplicationContext("di.xml");
UserService us = (UserService) ioc.getBean("userService");
us.add(); |
|
执行结果 |
|
Saved by UserRepository |
1、BaseService没有在ioc容器;
但BaseService是UserService基类,BaseService的属性UserService可以共享
2、Autowired并没有在其他Service组件的属性中,怎么就注入成功了?(属性继承)
3、怎么知道UserRepository .add()?
根据泛型注入的类型属性映射到UserRepository。
标签:运行时 books service 成员变量 span context bsp expected 引用
原文地址:http://www.cnblogs.com/limingxian537423/p/7255418.html