标签:get menu 参数 scroll confirm 规范 back object pos
文档对象模型(Document Object Model,DOM)是一种用于HTML和XML文档的编程接口。它给文档提供了一种结构化的表示方法,可以改变文档的内容和呈现方式。我们最为关心的是,DOM把网页和脚本以及其他编程语言联系了起来。DOM属于浏览器,而不是JavaScript语言规范里规定的核心内容。
一、查找元素
1.直接查找
var obj0 = document.getElementById(‘SomeId‘);               根据ID获取一个标签
var obj1 = document.getElementsByName(‘SomeId‘);            根据name属性获取标签集合
var obj2 = document.getElementsByClassName(‘SomeId‘);       根据class属性获取标签集合
var obj3 = document.getElementsByTagName(‘SomeId‘);         根据标签名获取标签集合
2.间接查找
parentNode          // 父节点
childNodes          // 所有子节点
firstChild          // 第一个子节点
lastChild           // 最后一个子节点
nextSibling         // 下一个兄弟节点
previousSibling     // 上一个兄弟节点

parentElement           // 父节点标签元素
children                // 所有子标签
firstElementChild       // 第一个子标签元素
lastElementChild        // 最后一个子标签元素
nextElementtSibling     // 下一个兄弟标签元素
previousElementSibling  // 上一个兄弟标签元素
二、操作
1.内容
innerText   文本
outerText
innerHTML   HTML内容
innerHTML
value       值
2.属性
attributes                // 获取所有标签属性
setAttribute(key,value)   // 设置标签属性
getAttribute(key)         // 获取指定标签属性

/*
var atr = document.createAttribute("class");
atr.nodeValue="democlass";
document.getElementById(‘n1‘).setAttributeNode(atr);
*/
3.class操作
className                // 获取所有类名
classList.remove(cls)    // 删除指定类
classList.add(cls)       // 添加类
4.标签操作
a.创建标签
// 方式一
var tag = document.createElement(‘a‘)
tag.innerText = "wupeiqi"
tag.className = "c1"
tag.href = "http://www.cnblogs.com/wupeiqi"

// 方式二
var tag = "<a class=‘c1‘ href=‘http://www.cnblogs.com/wupeiqi‘>wupeiqi</a>"
b.操作标签
// 方式一
var obj = "<input type=‘text‘ />";
xxx.insertAdjacentHTML("beforeEnd",obj);
xxx.insertAdjacentElement(‘afterBegin‘,document.createElement(‘p‘))

//注意:第一个参数只能是‘beforeBegin‘、 ‘afterBegin‘、 ‘beforeEnd‘、 ‘afterEnd‘

// 方式二
var tag = document.createElement(‘a‘)
xxx.appendChild(tag)
xxx.insertBefore(tag,xxx[1])
5.样式操作
var obj = document.getElementById(‘i1‘)

obj.style.fontSize = "32px";
obj.style.backgroundColor = "red";

<input onfocus="Focus(this);" onblur="Blur(this);" id="search" value="请输入关键字" style="color: gray;" />

    <script>
        function Focus(ths){
            ths.style.color = "black";
            if(ths.value == ‘请输入关键字‘ || ths.value.trim() == ""){

                ths.value = "";
            }
        }

        function Blur(ths){
            if(ths.value.trim() == ""){
                ths.value = ‘请输入关键字‘;
                ths.style.color = ‘gray‘;
            }else{
                ths.style.color = "black";
            }
        }
    </script>
6.位置操作
总文档高度
document.documentElement.offsetHeight

当前文档占屏幕高度
document.documentElement.clientHeight

自身高度
tag.offsetHeight

距离上级定位高度
tag.offsetTop

父定位标签
tag.offsetParent

滚动高度
tag.scrollTop

/*
    clientHeight -> 可见区域:height + padding
    clientTop    -> border高度
    offsetHeight -> 可见区域:height + padding + border
    offsetTop    -> 上级定位标签的高度
    scrollHeight -> 全文高:height + padding
    scrollTop    -> 滚动高度
    特别的:
        document.documentElement代指文档根节点
*/

<!DOCTYPE html>
<html>
<head lang="en">
    <meta charset="UTF-8">
    <title></title>
</head>
<body style="margin: 0;">
    <div style="height: 900px;">

    </div>
    <div style="padding: 10px;">
        <div id="i1" style="height:190px;padding: 2px;border: 1px solid red;margin: 8px;">
                <p>asdf</p>
                <p>asdf</p>
                <p>asdf</p>
                <p>asdf</p>
                <p>asdf</p>
        </div>
    </div>

    <script>
        var i1 = document.getElementById(‘i1‘);

        console.log(i1.clientHeight); // 可见区域:height + padding
        console.log(i1.clientTop);    // border高度
        console.log(‘=====‘);
        console.log(i1.offsetHeight); // 可见区域:height + padding + border
        console.log(i1.offsetTop);    // 上级定位标签的高度
        console.log(‘=====‘);
        console.log(i1.scrollHeight);   //全文高:height + padding
        console.log(i1.scrollTop);      // 滚动高度
        console.log(‘=====‘);

    </script>
</body>
</html>

<!DOCTYPE html>
<html>
<head lang="en">
    <meta charset="UTF-8">
    <title></title>
</head>
<style>

    body{
        margin: 0px;
    }
    img {
        border: 0;
    }
    ul{
        padding: 0;
        margin: 0;
        list-style: none;
    }
    .clearfix:after {
        content: ".";
        display: block;
        height: 0;
        clear: both;
        visibility: hidden;
    }

    .wrap{
        width: 980px;
        margin: 0 auto;
    }

    .pg-header{
        background-color: #303a40;
        -webkit-box-shadow: 0 2px 5px rgba(0,0,0,.2);
        -moz-box-shadow: 0 2px 5px rgba(0,0,0,.2);
        box-shadow: 0 2px 5px rgba(0,0,0,.2);
    }
    .pg-header .logo{
        float: left;
        padding:5px 10px 5px 0px;
    }
    .pg-header .logo img{
        vertical-align: middle;
        width: 110px;
        height: 40px;

    }
    .pg-header .nav{
        line-height: 50px;
    }
    .pg-header .nav ul li{
        float: left;
    }
    .pg-header .nav ul li a{
        display: block;
        color: #ccc;
        padding: 0 20px;
        text-decoration: none;
        font-size: 14px;
    }
    .pg-header .nav ul li a:hover{
        color: #fff;
        background-color: #425a66;
    }
    .pg-body{

    }
    .pg-body .catalog{
        position: absolute;
        top:60px;
        width: 200px;
        background-color: #fafafa;
        bottom: 0px;
    }
    .pg-body .catalog.fixed{
        position: fixed;
        top:10px;
    }

    .pg-body .catalog .catalog-item.active{
        color: #fff;
        background-color: #425a66;
    }

    .pg-body .content{
        position: absolute;
        top:60px;
        width: 700px;
        margin-left: 210px;
        background-color: #fafafa;
        overflow: auto;
    }
    .pg-body .content .section{
        height: 500px;
    }
</style>
<body onscroll="ScrollEvent();">
<div class="pg-header">
    <div class="wrap clearfix">
        <div class="logo">
            <a href="#">
                <img src="http://core.pc.lietou-static.com/revs/images/common/logo_7012c4a4.pn">
            </a>
        </div>
        <div class="nav">
            <ul>
                <li>
                    <a  href="#">首页</a>
                </li>
                <li>
                    <a  href="#">功能一</a>
                </li>
                <li>
                    <a  href="#">功能二</a>
                </li>
            </ul>
        </div>

    </div>
</div>
<div class="pg-body">
    <div class="wrap">
        <div class="catalog">
            <div class="catalog-item" auto-to="function1"><a>第1张</a></div>
            <div class="catalog-item" auto-to="function2"><a>第2张</a></div>
            <div class="catalog-item" auto-to="function3"><a>第3张</a></div>
        </div>
        <div class="content">
            <div menu="function1" class="section">
                <h1>第一章</h1>
            </div>
            <div menu="function2" class="section">
                <h1>第二章</h1>
            </div>
            <div menu="function3" class="section">
                <h1>第三章</h1>
            </div>
        </div>
    </div>

</div>
    <script>
        function ScrollEvent(){
            var bodyScrollTop = document.body.scrollTop;
            if(bodyScrollTop>50){
                document.getElementsByClassName(‘catalog‘)[0].classList.add(‘fixed‘);
            }else{
                document.getElementsByClassName(‘catalog‘)[0].classList.remove(‘fixed‘);
            }

        }
    </script>
</body>
</html>
 Demo-滚动菜单
 Demo-滚动高度
7.提交表单
document.geElementById(‘form‘).submit()
8.其他操作
console.log                 输出框
alert                       弹出框
confirm                     确认框

// URL和刷新
location.href               获取URL
location.href = "url"       重定向
location.reload()           重新加载

// 定时器
setInterval                 多次定时器
clearInterval               清除多次定时器
setTimeout                  单次定时器
clearTimeout                清除单次定时器
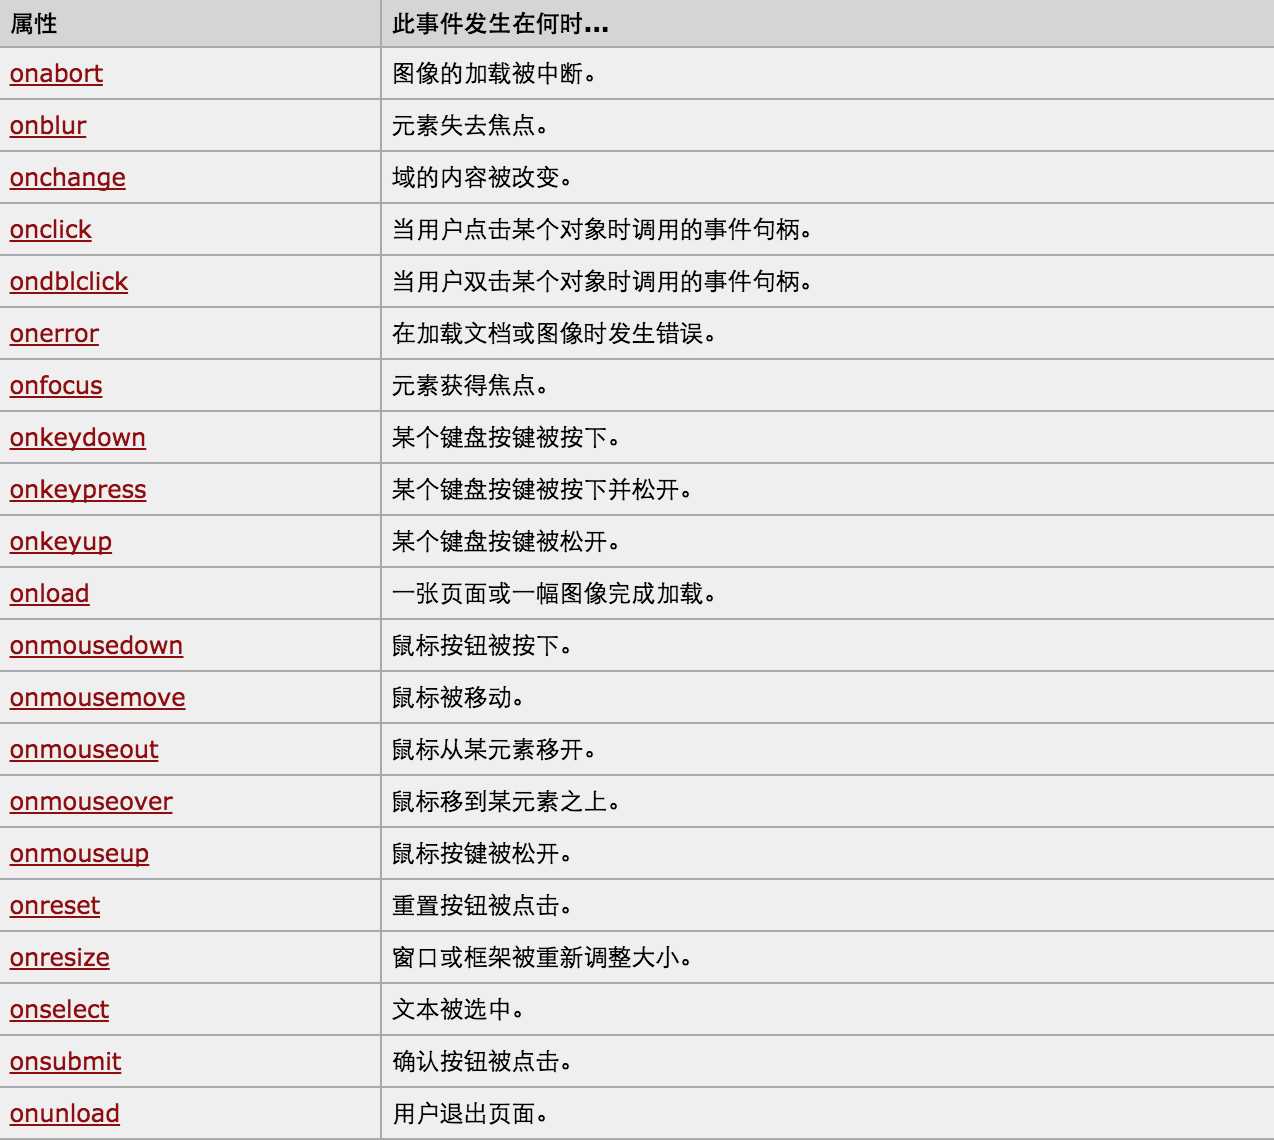
三、事件

对于事件需要注意的要点:
this标签是当前正在操作的标签,event封装了当前事件的内容。
标签:get menu 参数 scroll confirm 规范 back object pos
原文地址:http://www.cnblogs.com/wuwen19940508/p/7270100.html