标签:技术分享 命令 pre hello received 发送 images 接受 技术
1,简介
pip install pika
3.示例测试
实例的内容就是从send.py发送消息到rabbitmq,receive.py从rabbitmq接收send.py发送的信息。

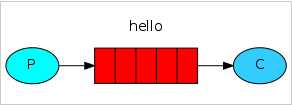
P表示produce,生产者的意思,也可以称为发送者,实例中表现为send.py;
C表示consumer,消费者的意思,也可以称为接收者,实例中表现为receive.py;
中间红色的表示队列的意思,实例中表现为hello队列。
send.py
 1 #!/usr/bin/env python3
 2 # -*- coding: utf-8 -*-
 3
 4 import pika
 5 import random
 6
 7 # 新建连接
 8 hostname = ‘192.168.1.133‘
 9 # 安装Rabbitmq时guest的密码为nova
10 # credentials = pika.PlainCredentials(‘guest‘, ‘nova‘)
11 # parameters = pika.ConnectionParameters(hostname,credentials)
12 parameters = pika.ConnectionParameters(hostname)
13 connection = pika.BlockingConnection(parameters)
14
15 # 在连接上创建一个频道
16 channel = connection.channel()
17 # 声明一个队列,生产者和消费者都要声明一个相同的队列,用来防止万一某一方挂了,另一方能正常运行
18 channel.queue_declare(queue=‘hello‘)
19
20 number = random.randint(1, 1000)
21 body = ‘hello world:%s‘ % number
22 # 交换机; 队列名,写明将消息发往哪个队列; 消息内容
23 channel.basic_publish(exchange=‘‘, routing_key=‘hello‘, body=body)
24 print " [x] Sent %s" % body
25 connection.close()
receive.py
 1 #!/usr/bin/env python3
 2 # -*- coding: utf-8 -*-
 3
 4 import pika
 5
 6 hostname = ‘192.168.1.133‘
 7 #credentials = pika.PlainCredentials(‘guest‘, ‘nova‘)
 8 parameters = pika.ConnectionParameters(hostname)
 9 connection = pika.BlockingConnection(parameters)
10
11 # 在连接上创建一个频道
12 channel = connection.channel()
13 channel.queue_declare(queue=‘hello‘)
14
15 print ‘ [*] Waiting for messages. To exit press CTRL+C‘
16
17 def callback(ch, method, properties, body):
18     print " [x] Received %r" % (body,)
19
20 # 告诉rabbitmq使用callback来接收信息
21 channel.basic_consume(callback, queue=‘hello‘, no_ack=True)
22
23 # 开始接收信息,并进入阻塞状态,队列里有信息才会调用callback进行处理,按ctrl+c退出
24 channel.start_consuming()
我们先运行send.py发送消息:

再运行receive.py接收消息:

标签:技术分享 命令 pre hello received 发送 images 接受 技术
原文地址:http://www.cnblogs.com/jfl-xx/p/7324285.html