标签:url charset pass alt eth 正则 name 模板 ext
路由映射模块,主要完成url与views视图函数的映射。当一个url请求到来时,会按照这个模块中的url地址从上到下进行匹配,如果匹配成功,将执行映射试图中的函数;反之将返回404错误。
urlpatterns = [] #里面存放一条条的路由映射关系。
url(正则表达式, 映射函数,参数[可选],别名[可选])
常规正则匹配
from django.conf.urls import url
from django.contrib import admin
from testfile import views

urlpatterns = [
    url(r‘^admin/‘, admin.site.urls),   #系统生成的映射
   url(r‘^$/’,index)         # 匹配首页                     #注意里面的任意一条映射匹配成功,后面的则不在匹配
    url(r‘^articles/2003/$‘, views.special_case_2003),                         #表示articles/2003/这个路径映射views模块的special_case_2003函数
    url(r‘^articles/([0-9]{4})/$‘, views.year_archive),                        #表示2003可以是0-9的任意4个数字
    url(r‘^articles/([0-9]{4})/([0-9]{2})/$‘, views.month_archive),            #表示匹配二级目录
    url(r‘^articles/([0-9]{4})/([0-9]{2})/([0-9]+)/$‘, views.article_detail),  #表示匹配三级目录
]
注意:上面匹配都加了小括号,这些括号里面的值会当作参数传递到后面的函数中,也就是,views.special_case_2003中.....
路径命名
from django.conf.urls import url
from django.contrib import admin
from testfile import views

urlpatterns = [
    url(r‘^admin/‘, admin.site.urls),   #系统生成的映射
    url(r‘^(?P<year>articles/2003)/$‘, views.month_views),    #表示articles/2003/这个路径映射views模块的month_views函数
如果给路径命名了,那么对应的视图函数中,必须按照该命名作为形参。
别名
urlpatterns = [
    url(r‘^admin/‘, admin.site.urls),   #系统生成的映射
    url(r‘^reg/$‘, views.month_views,name=‘register‘)
而在访问的静态文件中,
<!DOCTYPE html>
<html lang="en">
<head>
    <meta charset="UTF-8">
    <meta http-equiv="x-ua-compatible" content="IE=edge">
    <meta name="viewport" content="width=device-width, initial-scale=1">
    <title>Title</title>

</head>
<body>
  <form method=‘post‘ action=‘{% register %}‘>xxxx</form>
</body>
</html>
当我们后端的路径发生变化时,前端的页面不用改变任何代码,都能够正常访问。
如果一个网站很多,有很多app应用,那么就需要很多路由分发。如果将所有的路由分发都放在urlconf文件下,這样会使得文件不易于管理,为此,我们可以给每一个app都创建一个urls.py文件,然后再urlconf中的urlpatterns中将该urls.py文件包含进来就行了。
from django.conf.urls import include, url # 导入全局url
urlpatterns = [
    url(r‘^blog‘, include(‘blog.urls‘)),   #将访问路径以bug开头的路径分发到app1下的urls.py模块里进行路由映射
]
这样在我们blog-app中的url中,存放所有关于blog的url分发工作。
urlpatterns = [
    url(r‘^2004/$‘, year_2004),
    url(r‘^(\d{4})/$‘, year_query),
    url(r‘^(\d{4})/(\d{2})$‘, year_query),
    url(r‘^(?P<year>\d{4})/(?P<month>\d{2})$‘, year_query),
]
这样我们访问网站应该是:http://localhost:8080/blog/2012/3 前面都得带上app的名称
request.path   # 获取访问文件路径

request.method属性 #获取请求中使用的HTTP方式(POST/GET)

request.GET  #  获取HTTP GET方式请求传参(字典类型)

request.POST #       包含所有HTTP POST参数的类字典对象

request.COOKIES  #包含所有cookies的标准Python字典对象;keys和values都是字符串。

request.FILES  #包含所有上传文件的类字典对象

request.user  # 是一个django.contrib.auth.models.User对象,代表当前登陆的用户

request.session # 唯一可读写的属性,代表当前会话的字典对象
from django.shortcuts import render,HttpResponse

def special(request):
    print(request.path)
   print(requst.method)
    return render(request,‘index.html‘)
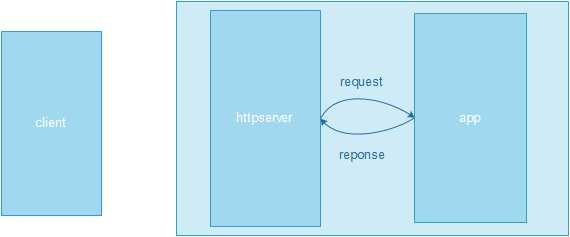
对于HttpRequest请求对象来说,是由django自动创建的,但是,HttpResponse响应对象就必须我们自己创建。每个view请求处理方法必须返回一个HttpResponse响应对象。HttpResponse类在django.http.HttpResponse。
from django.shortcuts import render

def test(request):
    return render(request,‘index.html‘)   #向用户显示一个html页面
下面为render官方源码,可以看出render最后也是返回了一个HttpResponse给webserver
def render(request, template_name, context=None, content_type=None, status=None, using=None):
    """
    Returns a HttpResponse whose content is filled with the result of calling
    django.template.loader.render_to_string() with the passed arguments.
    """
    content = loader.render_to_string(template_name, context, request, using=using)
    return HttpResponse(content, content_type, status)
细说render:
render方法主要是将从服务器提取的数据,填充到模板中,然后将渲染后的html静态文件返回给浏览器。这里一定要注意:render渲染的是模板,下面我们看看什么叫作模板:
<!DOCTYPE html>
<html lang="en">
<head>
    <meta charset="UTF-8">
    <meta http-equiv="x-ua-compatible" content="IE=edge">
    <meta name="viewport" content="width=device-width, initial-scale=1">
    <title>Title</title>
    <style>
        li,ul,ol{  list-style: none;  }
        a{ text-decoration: none; }
    </style>
</head>
<body>
<ul>
    {% for book in list %}
        <li><a href="{{book.id}}">{{ book.btitle }}</a></li>
    {% endfor %}
</ul>
</body>
</html>
上面{%%}之间包括的就是我们要从数据库取出的数据,进行填充。对于这样一个没有填充数据的html文件,浏览器是不能进行渲染的,所以,对于上述{%%}之间的内容先要被render进行渲染之后,才能发送给浏览器。总结一句话就是,render方法作用就是-----填坑。
关于render如何填坑,下面举个例子:

<!DOCTYPE html>
<html lang="en">
<head>
    <meta charset="UTF-8">
    <meta http-equiv="x-ua-compatible" content="IE=edge">
    <meta name="viewport" content="width=device-width, initial-scale=1">
    <title>Title</title>
    <style>
        li,ul,ol{  list-style: none;  }
        a{ text-decoration: none; }
    </style>
</head>
<body>
<ul>
    {% for book in list %}
        <li><a href="{{book.id}}">{{ book.btitle }}</a></li>
    {% endfor %}

</ul>
</body>
</html>
def show(request, id):
    book = BookInfo.objects.get(pk=id) #从数据库中取出对应id的数据
    herolist = book.heroinfo_set.all()
    context = {‘list‘: herolist} # 将数据保存在list
    return render(request, ‘booktest/show.html‘, context) #通过render进行模板渲染
2.render_to_response(‘html文件和路径‘)方法,将指定页面渲染后返回给浏览器
from django.shortcuts import render

def test(request):
    return render_to_reponse(request,‘index.html‘)   #向用户显示一个html页面
下面为render_to_reponse源码:
def render_to_response(template_name, context=None, content_type=None, status=None, using=None):
    """
    Returns a HttpResponse whose content is filled with the result of calling
    django.template.loader.render_to_string() with the passed arguments.
    """
    content = loader.render_to_string(template_name, context, using=using)
    return HttpResponse(content, content_type, status)
3.redirect(‘跳转路径和名称‘)方法,页面跳转
from django.shortcuts import render,render_to_response,redirect
def test(request):
  return redirect(‘http://www.jxiou.com/‘) #跳转页面
注意:render与redirect两点区别:
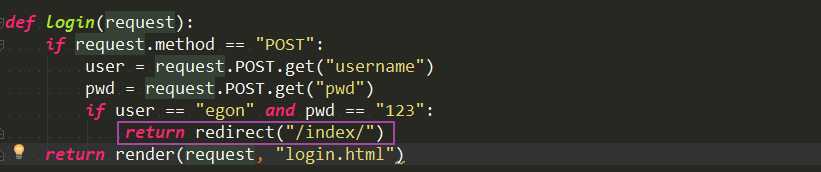
我们来模拟一个登陆网页,当我登陆成功后,跳转到另一个页面,分别用render与redirect来试试。
总结两者区别:
第一,render返回一个登陆成功后的页面,刷新该页面将回复到跳转前页面。而redirect则不会
第二,render返回一个登陆成功页面,不会经过url路由分发系统,也就是说,不会执行跳转后url的试图函数。这样,返回的页面渲染不成功;而redirect是跳转到指定页面,当登陆成功后,会在url路由系统进行匹配,如果有存在的映射函数,就会执行对应的映射函数。
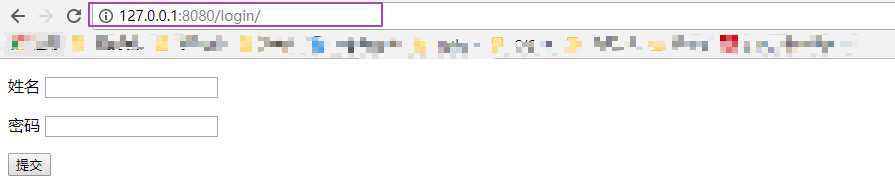
我们在网页访问login地址,注意地址栏的变化,
当我们输入正确登陆账号和密码后,跳转到另外一个页面地址: 
当我们刷新后,这个页面保持不变。而且内容正常显示
现在,我们换成render,返回同样的页面试试: 
观察到区别了没有,我们登陆成功后,页面的地址并没有变,而且模板也没有进行渲染。
标签:url charset pass alt eth 正则 name 模板 ext
原文地址:http://www.cnblogs.com/vipchenwei/p/7413197.html
