标签:blog http os io 使用 java ar strong for
总结下这周帮助客户解决报表生成操作的mysql 驱动的使用上的一些问题,与解决方案。由于生成报表逻辑要从数据库读取大量数据并在内存中加工处理后在
生成大量的汇总数据然后写入到数据库。基本流程是 读取->处理->写入。
1 读取操作开始遇到的问题是当sql查询数据量比较大时候基本读不出来。开始以为是server端处理太慢。但是在控制台是可以立即返回数据的。于是在应用
这边抓包,发现也是发送sql后立即有数据返回。但是执行ResultSet的next方法确实阻塞的。查文档翻代码原来mysql驱动默认的行为是需要把整个结果全部读取到
内存中才开始允许应用读取结果。显然与期望的行为不一致,期望的行为是流的方式读取,当结果从myql服务端返回后立即还是读取处理。这样应用就不需要大量内存
来存储这个结果集。正确的流式读取方式代码示例:
PreparedStatement ps = connection.prepareStatement("select .. from ..",
            ResultSet.TYPE_FORWARD_ONLY, ResultSet.CONCUR_READ_ONLY);
//forward only read only也是mysql 驱动的默认值,所以不指定也是可以的 比如: PreparedStatement ps = connection.prepareStatement("select .. from ..");
ps.setFetchSize(Integer.MIN_VALUE); //也可以修改jdbc url通过defaultFetchSize参数来设置,这样默认所以的返回结果都是通过流方式读取.
ResultSet rs = ps.executeQuery();

while (rs.next()) {
  System.out.println(rs.getString("fieldName"));
}
代码分析:下面是mysql判断是否开启流式读取结果的方法,有三个条件forward-only,read-only,fatch size是Integer.MIN_VALUE
/**
 * We only stream result sets when they are forward-only, read-only, and the
 * fetch size has been set to Integer.MIN_VALUE
 *
 * @return true if this result set should be streamed row at-a-time, rather
 * than read all at once.
 */
protected boolean createStreamingResultSet() {
    try {
        synchronized(checkClosed().getConnectionMutex()) {
            return ((this.resultSetType == java.sql.ResultSet.TYPE_FORWARD_ONLY)
                 && (this.resultSetConcurrency == java.sql.ResultSet.CONCUR_READ_ONLY) && (this.fetchSize == Integer.MIN_VALUE));
        }
    } catch (SQLException e) {
        // we can‘t break the interface, having this be no-op in case of error is ok

        return false;
    }
}
2 批量写入问题。开始时应用程序是一条一条的执行insert来写入报表结果。写入也是比较慢的。主要原因是单条写入时候需要应用于db之间大量的
请求响应交互。每个请求都是一个独立的事务提交。这样网络延迟大的情况下多次请求会有大量的时间消耗的网络延迟上。第二个是由于每个事务db都会
有刷新磁盘操作写事务日志,保证事务的持久性。由于每个事务只是写入一条数据 所以磁盘io利用率不高,因为对于磁盘io是按块来的,所以连续写入大量数据效率
更好。所以必须改成批量插入的方式,减少请求数与事务数。下面是批量插入的例子:还有jdbc连接串必须加下rewriteBatchedStatements=true
int batchSize = 1000;
PreparedStatement ps = connection.prepareStatement("insert into tb1 (c1,c2,c3...) values (?,?,?...)");

for (int i = 0; i < list.size(); i++) {

    ps.setXXX(list.get(i).getC1());
    ps.setYYY(list.get(i).getC2());
    ps.setZZZ(list.get(i).getC3());

    ps.addBatch();

    if ((i + 1) % batchSize == 0) {
        ps.executeBatch();
    }
}

if (list.size() % batchSize != 0) {
    ps.executeBatch();
}
上面代码示例是每1000条数据发送一次请求。mysql驱动内部在应用端会把多次addBatch()的参数合并成一条multi value的insert语句发送给db去执行
比如insert into tb1(c1,c2,c3) values (v1,v2,v3),(v4,v5,v6),(v7,v8,v9)...
这样可以比每条一个insert 明显少很多请求。减少了网络延迟消耗时间与磁盘io时间,从而提高了tps。
。
代码分析: 从代码可以看出,
1 rewriteBatchedStatements=true,insert是参数化语句且不是insert ... select 或者 insert... on duplicate key update with an id=last_insert_id(...)的话会执行
executeBatchedInserts,也就是muti value的方式
2 rewriteBatchedStatements=true 语句是都是参数化(没有addbatch(sql)方式加入的)的而且mysql server版本在4.1以上 语句超过三条,则执行executePreparedBatchAsMultiStatement
就是将多个语句通过;分隔一次提交多条sql。比如 "insert into tb1(c1,c2,c3) values (v1,v2,v3);insert into tb1(c1,c2,c3) values (v1,v2,v3)..."
3 其余的执行executeBatchSerially,也就是还是一条条处理
public void addBatch(String sql)throws SQLException {
    synchronized(checkClosed().getConnectionMutex()) {
        this.batchHasPlainStatements = true;

        super.addBatch(sql);
    }
}

public int[] executeBatch()throws SQLException {
    //...
    if (!this.batchHasPlainStatements
         && this.connection.getRewriteBatchedStatements()) {

        if (canRewriteAsMultiValueInsertAtSqlLevel()) {
            return executeBatchedInserts(batchTimeout);
        }

        if (this.connection.versionMeetsMinimum(4, 1, 0)
             && !this.batchHasPlainStatements
             && this.batchedArgs != null
             && this.batchedArgs.size() > 3 /* cost of option setting rt-wise */
        )
        {
            return executePreparedBatchAsMultiStatement(batchTimeout);
        }
    }

    return executeBatchSerially(batchTimeout);
    //.....
}
executeBatchedInserts相比executePreparedBatchAsMultiStatement的方式传输效率更好,因为一次请求只重复一次前面的insert table (c1,c2,c3)
mysql server 对请求报文的最大长度有限制,如果batch size 太大造成请求报文超过最大限制,mysql 驱动会内部按最大报文限制查分成多个报文。所以要真正减少提交次数
还要检查下mysql server的max_allowed_packet 否则batch size 再大也没用.
mysql> show VARIABLES like ‘%max_allowed_packet%‘;
+--------------------+-----------+
| Variable_name | Value |
+--------------------+-----------+
| max_allowed_packet | 167772160 |
+--------------------+-----------+
1 row in set (0.00 sec)
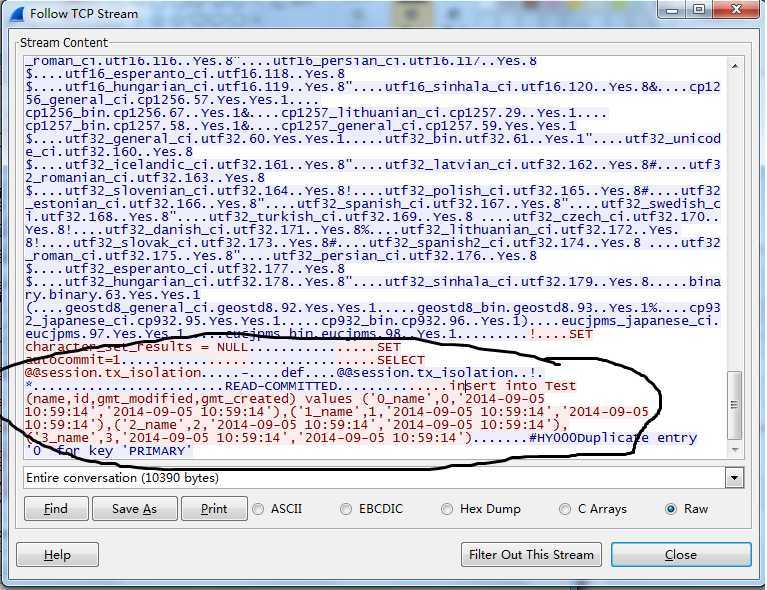
要想验证mysql 发送了正确的sql 有两种方式
1 抓包,下图是wireshark在 应用端抓包mysql的报文

2 另一个办法是在mysql server端开启general log 可以查看mysql收到的所有sql
3 在jdbc url上加上参数traceProtocol=true
性能测试对比
import java.sql.Connection;
import java.sql.PreparedStatement;
import java.sql.SQLException;

import com.alibaba.druid.pool.DruidDataSource;

public class BatchInsert {

    public static void main(String[] args) throws SQLException {

        int batchSize = 1000;
        int insertCount = 1000;

        testDefault(batchSize, insertCount);

        testRewriteBatchedStatements(batchSize,insertCount);

    }

    private static void testDefault(int batchSize, int insertCount) throws SQLException {

        long start = System.currentTimeMillis();

        doBatchedInsert(batchSize, insertCount,"");

        long end = System.currentTimeMillis();

        System.out.println("default:" + (end -start) + "ms");
    }


    private static void testRewriteBatchedStatements(int batchSize, int insertCount) throws SQLException {

        long start = System.currentTimeMillis();

        doBatchedInsert(batchSize, insertCount, "rewriteBatchedStatements=true");

        long end = System.currentTimeMillis();

        System.out.println("rewriteBatchedStatements:" + (end -start) + "ms");
    }


    private static void doBatchedInsert(int batchSize, int insertCount, String mysqlProperties) throws SQLException {
        DruidDataSource dataSource = new DruidDataSource();
        dataSource.setUrl("jdbc:mysql://ip:3306/test?" + mysqlProperties);
        dataSource.setUsername("name");
        dataSource.setPassword("password");

        dataSource.init();

        Connection connection = dataSource.getConnection();

        PreparedStatement preparedStatement = connection.prepareStatement("insert into Test (name,gmt_created,gmt_modified) values (?,now(),now())");

        for (int i = 0; i < insertCount; i++) {
            preparedStatement.setString(1, i+" ");
            preparedStatement.addBatch();
            if((i+1) % batchSize == 0) {
                preparedStatement.executeBatch();
            }
        }
        preparedStatement.executeBatch();

        connection.close();

        dataSource.close();
    }

}
网络环境ping测试延迟是35ms ,测试结果:
default:75525ms
rewriteBatchedStatements:914ms
标签:blog http os io 使用 java ar strong for
原文地址:http://www.cnblogs.com/xhan/p/3958521.html