标签:mon class moudle ges universal tag critical tuple join
一、模块
1.模块简介
模块是一个包含所有你定义的函数和变量的文件,其后缀名是.py。模块可以被别的程序引入,以使用该模块中的函数等功能。这也是使用python标准库的方法。
类似于函数式编程和面向过程编程,函数式编程则完成一个功能,其他代码用来调用即可,提供了代码的重用性和代码间的耦合。而对于一个复杂的功能来,可能需要多个函数才能完成(函数又可以在不同的.py文件中),n个 .py 文件组成的代码集合就称为模块。
2.模块的引入
在Python中用关键字import来引入某个模块,比如要引用模块math,就可以在文件最开始的地方用import math来引入。在调用math模块中的函数时,必须这样引用:
|
1
2
3
4
|
模块名.函数名
例:
import math
import sys
|
有时候我们只需要用到模块中的某个函数,只需要引入该函数即可,此时可以通过语句
from 模块名 import 函数名1,函数名2....
例:
|
1
2
3
4
5
6
7
|
import module
from module.xx.xx import xx
from module.xx.xx import xx as rename
from module.xx.xx import *
|
模块分为三种:
3.模块的安装
(1)yum install 模块名
(2)apt-get
(3)pip安装 参考使用(点击)
(4)源码安装
|
1
2
3
4
5
6
|
需要编译环境:yum install python-devel gcc
下载源码包:wget http:
解压:tar -xvf xxx.tar
进入:cd xxx
编译:python setup.py build
安装:python setup.py install
|
二、自定义模块
1.在Python中,每个Python文件都可以作为一个模块,模块的名字就是文件的名字。
例:
写一个模块(模块文件要和代码文件在同一目录下)
|
1
2
3
4
5
6
7
8
9
10
|
#vim moudle_test.py
#写入如下代码
#!/usr/bin/env python3
print (‘自定义 moudle‘)
#调用
#vim test.py
#!/usr/bin/env python3
#导入自定义模块
import moudle_test
#执行test.py
|
2.模块文件为单独文件夹 ,文件夹和代码在同一目录下
__init__

导入模块其实就是告诉Python解释器去解释那个py文件
3.sys.path添加目录
如果sys.path路径列表没有你想要的路径,可以通过 sys.path.append(‘路径‘) 添加。
通过os模块可以获取各种目录,例如:
三、内置模块
1.os模块 提供系统级别的操作
os.getcwd() 获取当前工作目录,即当前python脚本工作的目录路径
|
1
2
3
|
>>> os.getcwd()
‘/root‘
>>>
|
os.chdir("目录名") 改变当前脚本工作目录;相当于linux下cd命令
|
1
2
3
4
|
>>> os.chdir(‘/usr/local‘)
>>> os.getcwd()
‘/usr/local‘
>>>
|
os.curdir 返回当前目录: (‘.‘)
os.pardir 获取当前目录的父目录字符串名:(‘..‘)
os.makedirs(‘目录1/目录2‘) 可生成多层递归目录(相当于linux下mkdir -p)
|
1
2
|
>>> os.makedirs(‘/python/moudle/‘)
# ll /python/moudle/
|
os.removedirs(‘目录‘) 若目录为空,则删除,并递归到上一级目录,如若也为空,则删除,依此类推
|
1
2
3
|
>>> os.removedirs(‘/python/moudle‘)
#a目录中除了有一个b目录外,再没有其它的目录和文件。
#b目录中必须是一个空目录。 如果想实现类似rm -rf的功能可以使用shutil模块
|
os.mkdir(‘目录‘) 生成单级目录;相当于shell中mkdir 目录
os.rmdir(‘目录‘) 删除单级空目录,若目录不为空则无法删除,报错;相当于shell中rmdir
|
1
2
3
4
5
|
>>> os.rmdir(‘/python‘)
>>> os.rmdir(‘/python‘)
Traceback (most recent call last):
File "<stdin>", line 1, in <module>
FileNotFoundError: [Errno 2] No such file or directory: ‘/python‘
|
os.listdir(‘目录‘) 列出指定目录下的所有文件和子目录,包括隐藏文件,并以列表方式打印
|
1
2
|
>>> os.listdir(‘/root‘)
[‘.Xauthority‘, ‘yaoyao@192.168.42.51‘, ‘.py.swp‘, ‘.ssh‘, ‘in.sh‘, ‘1‘, ‘IPy-0.81.tar.gz‘, ‘Dockerssh‘, ‘id_rsa.pub‘, ‘psutil-2.0.0.tar.gz‘, ‘.python_history‘, ‘.bashrc‘, ‘ansible‘, ‘.bash_history‘, ‘.vim‘, ‘IPy-0.81‘, ‘.pip‘, ‘.profile‘, ‘.ansible‘, ‘python‘, ‘.dockercfg‘, ‘Docker‘, ‘util-linux-2.27‘, ‘.viminfo‘, ‘util-linux-2.27.tar.gz‘, ‘ubuntu_14.04.tar‘, ‘__pycache__‘, ‘psutil-2.0.0‘, ‘xx.py‘, ‘ip.py‘, ‘DockerNginx‘, ‘.cache‘, ‘dict_shop.py‘]
|
os.remove()删除一个文件
|
1
|
>>> os.remove(‘/root/xx.py‘)
|
os.rename("原名","新名") 重命名文件/目录
|
1
2
3
4
5
|
>>> os.listdir(‘/python‘)
[‘oldtouch‘]
>>> os.rename(‘oldtouch‘,‘newtouch‘)
>>> os.listdir(‘/python‘)
[‘newtouch‘]
|
os.stat(‘path/filename‘) 获取文件/目录信息
|
1
2
|
>>> os.stat(‘newtouch‘)
os.stat_result(st_mode=33188, st_ino=1048593, st_dev=51713, st_nlink=1, st_uid=0, st_gid=0, st_size=0, st_atime=1453442450, st_mtime=1453442450, st_ctime=1453442500)
|
os.sep 输出操作系统特定的路径分隔符,win下为"\\",Linux下为"/"
os.linesep 输出当前平台使用的行终止符,win下为"\t\n",Linux下为"\n"
os.pathsep 输出用于分割文件路径的字符串
os.name 输出字符串指示当前使用平台。win->‘nt‘; Linux->‘posix‘
os.system("pwd") 运行shell命令,直接显示
|
1
2
3
|
>>> os.system(‘pwd‘)
/python
0
|
os.environ
|
1
2
|
>>> os.environ
environ({‘_‘: ‘/usr/bin/python3‘, ‘SSH_CONNECTION‘: 省略n个字符
|
os模块其他语法:
|
1
2
3
4
5
6
7
8
9
10
11
12
|
os.path模块主要用于文件的属性获取,
os.path.abspath(path) 返回path规范化的
os.path.split(path) 将path分割成目录和文件名二元组返回
os.path.dirname(path) 返回path的目录。其实就是os.path.split(path)的第一个元素
os.path.basename(path) 返回path最后的文件名。如何path以/或\结尾,那么就会返回空值。即os.path.split(path)的第二个元素
os.path.exists(path) 如果path存在,返回True;如果path不存在,返回False
os.path.isabs(path) 如果path是绝对路径,返回True
os.path.isfile(path) 如果path是一个存在的文件,返回True。否则返回False
os.path.isdir(path) 如果path是一个存在的目录,则返回True。否则返回False
os.path.join(path1[, path2[, ...]]) 将多个路径组合后返回,第一个绝对路径之前的参数将被忽略
os.path.getatime(path) 返回path所指向的文件或者目录的最后存取时间
os.path.getmtime(path) 返回path所指向的文件或者目录的最后修改时间
|
2、sys模块 用于提供对解释器相关的操作
|
1
2
3
4
5
6
7
8
9
10
11
12
13
14
15
16
17
18
19
20
21
22
23
24
25
26
27
28
29
30
31
32
33
34
35
36
37
38
|
sys.argv 命令行参数List,第一个元素是程序本身路径
sys.modules 返回系统导入的模块字段,key是模块名,value是模块
sys.exit(n) 退出程序,正常退出时exit(0)
sys.version 获取Python解释程序的版本信息
sys.maxint 最大的Int值
sys.path 返回模块的搜索路径,初始化时使用PYTHONPATH环境变量的值
sys.platform 返回操作系统平台名称
sys.stdout.write(‘please:‘)
val = sys.stdin.readline()[:-1]
sys.modules.keys() 返回所有已经导入的模块名
sys.modules.values() 返回所有已经导入的模块
sys.exc_info() 获取当前正在处理的异常类,exc_type、exc_value、exc_traceback当前处理的异常详细信息
sys.exit(n) 退出程序,正常退出时exit(0)
sys.hexversion 获取Python解释程序的版本值,16进制格式如:0x020403F0
sys.version 获取Python解释程序的
sys.api_version 解释器的C的API版本
sys.version_info
‘final’表示最终,也有’candidate’表示候选,serial表示版本级别,是否有后继的发行
sys.displayhook(value) 如果value非空,这个函数会把他输出到sys.stdout,并且将他保存进__builtin__._.指在python的交互式解释器里,’_’ 代表上次你输入得到的结果,hook是钩子的意思,将上次的结果钩过来
sys.getdefaultencoding() 返回当前你所用的默认的字符编码格式
sys.getfilesystemencoding() 返回将Unicode文件名转换成系统文件名的编码的名字
sys.setdefaultencoding(name)用来设置当前默认的字符编码,如果name和任何一个可用的编码都不匹配,抛出 LookupError,这个函数只会被site模块的sitecustomize使用,一旦别site模块使用了,他会从sys模块移除
sys.builtin_module_names Python解释器导入的模块列表
sys.executable Python解释程序路径
sys.getwindowsversion() 获取Windows的版本
sys.copyright 记录python版权相关的东西
sys.byteorder 本地字节规则的指示器,big-endian平台的值是’big’,little-endian平台的值是’little’
sys.exc_clear() 用来清除当前线程所出现的当前的或最近的错误信息
sys.exec_prefix 返回平台独立的python文件安装的位置
sys.stderr 错误输出
sys.stdin 标准输入
sys.stdout 标准输出
sys.platform 返回操作系统平台名称
sys.path 返回模块的搜索路径,初始化时使用PYTHONPATH环境变量的值
sys.maxunicode 最大的Unicode值
sys.maxint 最大的Int值
sys.version 获取Python解释程序的版本信息
sys.hexversion 获取Python解释程序的版本值,16进制格式如:0x020403F0
|
3.hashlib模块
Python的hashlib提供了常见的摘要算法,如MD5,SHA1等等。
什么是摘要算法呢?摘要算法又称哈希算法、散列算法。它通过一个函数,把任意长度的数据转换为一个长度固定的数据串(通常用16进制的字符串表示)用于加密相关的操作,代替了md5模块和sha模块,主要提供 SHA1, SHA224, SHA256, SHA384, SHA512 ,MD5 算法
1)MD5算法
|
1
2
3
4
5
|
>>> import hashlib
>>> hash = hashlib.md5()
>>> hash.update(‘liuyao199539‘.encode(‘utf-8‘))
>>> hash.hexdigest()
‘69ce9b5f54ba01b6d31256596e3fbb5c‘
|
1.首先从python直接导入hashlib模块
2.调用hashlib里的md5()生成一个md5 hash对象
3.生成hash对象后,就可以用update方法对字符串进行md5加密的更新处理
4.继续调用update方法会在前面加密的基础上更新加密
5.在3.x几的版本上update里面需要加.encode(‘utf-8‘),而2.x的版本不需要
2)sha1算法
|
1
2
3
4
5
|
>>> import hashlib
>>> sha_1 = hashlib.sha1()
>>> sha_1.update(‘liuyao‘.encode(‘utf-8‘))
>>> sha_1.hexdigest()
‘dd34a806b733f6d02244f39bcc1af87819fcaa82‘
|
3)sha256算法
|
1
2
3
4
5
|
>>> import hashlib
>>> sha_256 = hashlib.sha256()
>>> sha_256.update(‘liuyao‘.encode(‘utf-8‘))
>>> sha_256.hexdigest()
‘5ad988b8fa43131f33f4bb867207eac4a1fcf56ff529110e2d93f2cc7cfab038‘
|
4)sha384算法
|
1
2
3
4
5
|
>>> import hashlib
>>> sha_384 = hashlib.sha384()
>>> sha_384.update(‘liuyao‘.encode(‘utf-8‘))
>>> sha_384.hexdigest()
‘03ca6dcd5f83276b96020f3227d8ebce4eebb85de716f37b38bd9ca3922520efc67db8efa34eba09bd01752b0313dba3‘
|
5)sha512算法
|
1
2
3
4
5
|
>>> import hashlib
>>> sha_512 = hashlib.sha512()
>>> sha_512.update(‘liuyao‘.encode(‘utf-8‘))
>>> sha_512.hexdigest()
‘65cac3a90932e7e033a59294d27bfc09d9e47790c31698ecbfdd5857ff63b7342d0e438a1c996b5925047195932bc5b0a6611b9f2292a2f41e3ea950c4c4952b‘
|
6)对加密算法中添加自定义key再来做加密,防止被撞库破解
|
1
2
3
4
|
>>> md5_key = hashlib.md5(‘jwhfjsdjbwehjfgb‘.encode(‘utf--8‘))
>>> md5_key.update(‘liuyao‘.encode(‘utf-8‘))
>>> md5_key.hexdigest()
‘609b558ec8d8e795deec3a94f578b020‘
|
注: hmac 模块,它内部对我们创建 key 和 内容 再进行处理然后再加密
|
1
2
3
4
|
import hmac
hm = hmac.new(‘liuyao‘.encode(‘utf-8‘))
hm.update(‘hellowo‘.encode(‘utf-8‘))
print (hm.hexdigest())
|
4.configparser模块(在2.x版本为:ConfigParser)
用于对特定的配置文件进行操作
配置文件的格式是: []包含的叫section, section 下有option=value这样的键值
用法:
读取配置方法
|
1
2
3
4
5
6
|
-read(filename) 直接读取ini文件内容
-sections() 得到所有的section,并以列表的形式返回
-options(section) 得到该section的所有option
-items(section) 得到该section的所有键值对
-get(section,option) 得到section中option的值,返回为string类型
-getint(section,option) 得到section中option的值,返回为int类型
|
写入配置方法
|
1
2
|
-add_section(section) 添加一个新的section
-set( section, option, value) 对section中的option进行设置
|
需要调用write将内容写入配置文件。
案例:
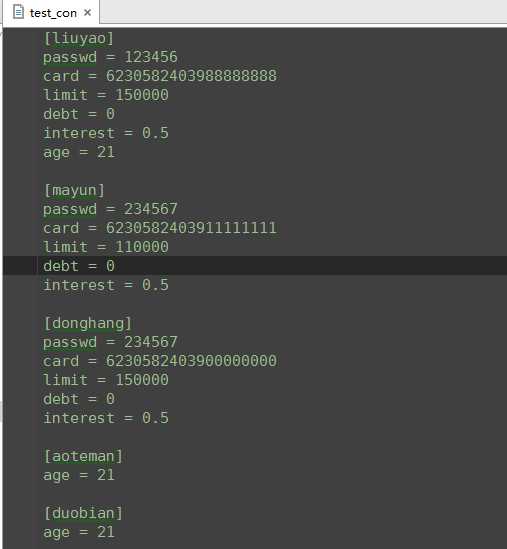
测试配置文件:
[liuyao]
passwd = 123456
card = 6230582403988888888
limit = 150000
debt = 0
interest = 0.5
[mayun]
passwd = 234567
card = 6230582403911111111
limit = 150000
debt = 0
interest = 0.5
[donghang]
passwd = 234567
card = 6230582403900000000
limit = 150000
debt = 0
interest = 0.5
方法:
#!/usr/bin/env python
import configparser
#生成config对象
config = configparser.ConfigParser()
#用config对象读取配置文件
config.read(‘test_con‘)
#以列表形式返回所有的section
sections = config.sections()
print (‘sections‘,sections)
#得到指定section的所有option
options = config.options("liuyao")
print (‘options‘,options)
#得到指定section的所有键值对
kvs = config.items("liuyao")
print (‘kvs‘,kvs)
#指定section,option读取值
str_val = config.get("liuyao", "card")
int_val = config.getint("liuyao", "limit")
print (‘liuyao 的 card‘,str_val)
print (‘liuyao 的 limit‘,int_val)
#修改写入配置文件
#更新指定section,option的值
config.set("mayun", "limit", "110000")
int_val = config.getint("mayun", "limit")
print (‘mayun 的 limit‘,int_val)
#写入指定section增加新option和值
config.set("liuyao", "age", "21")
int_val = config.getint("liuyao", "age")
print (‘liuyao 的 age‘,int_val)
#增加新的section
config.add_section(‘duobian‘)
config.set(‘duobian‘, ‘age‘, ‘21‘)
#写回配置文件
config.write(open("test_con",‘w‘)
输出结果:
|
1
2
3
4
5
6
7
|
sections [‘liuyao‘, ‘mayun‘, ‘donghang‘, ‘aoteman‘]
options [‘passwd‘, ‘card‘, ‘limit‘, ‘debt‘, ‘interest‘, ‘age‘]
kvs [(‘passwd‘, ‘123456‘), (‘card‘, ‘6230582403988888888‘), (‘limit‘, ‘150000‘), (‘debt‘, ‘0‘), (‘interest‘, ‘0.5‘), (‘age‘, ‘21‘)]
liuyao 的 card 6230582403988888888
liuyao 的 limit 150000
mayun 的 limit 110000
liuyao 的 age 21
|
配置文件:

5.Subprocess模块
subprocess最早是在2.4版本中引入的。
subprocess模块用来生成子进程,并可以通过管道连接它们的输入/输出/错误,以及获得它们的返回值。
它用来代替多个旧模块和函数:
os.system
os.spawn*
os.popen*
popen2.*
commands.*
运行python的时候,我们都是在创建并运行一个进程。像Linux进程那样,一个进程可以fork一个子进程,并让这个子进程exec另外一个程序。在Python中,我们通过标准库中的subprocess包来fork一个子进程,并运行一个外部的程序。subprocess包中定义有数个创建子进程的函数,这些函数分别以不同的方式创建子进程,所以我们可以根据需要来从中选取一个使用。另外subprocess还提供了一些管理标准流(standard stream)和管道(pipe)的工具,从而在进程间使用文本通信。
使用:
1)call
执行命令,返回状态码 shell = True ,允许 shell 命令是字符串形式
|
1
2
3
4
5
6
7
8
9
10
|
>>> import subprocess
>>> ret = subprocess.call([‘ls‘,‘-l‘],shell=False)
total 201056
-rw-r--r-- 1 root root 22 Jan 15 11:55 1
drwxr-xr-x 5 root root 4096 Jan 8 16:33 ansible
-rw-r--r-- 1 root root 6830 Jan 15 09:41 dict_shop.py
drwxr-xr-x 4 root root 4096 Jan 13 16:05 Docker
drwxr-xr-x 2 root root 4096 Dec 22 14:53 DockerNginx
drwxr-xr-x 2 root root 4096 Jan 21 17:30 Dockerssh
-rw-r--r-- 1 root root 396 Dec 25 17:30 id_rsa.pub
|
2)check_call
执行命令,如果执行状态码是 0 ,则返回0,否则抛异常
|
1
2
3
4
5
6
7
8
|
>>> subprocess.check_call(["ls", "-l"])
total 201056
-rw-r--r-- 1 root root 22 Jan 15 11:55 1
drwxr-xr-x 5 root root 4096 Jan 8 16:33 ansible
-rw-r--r-- 1 root root 6830 Jan 15 09:41 dict_shop.py
>>> subprocess.check_call("exit 1", shell=True)
Traceback (most recent call last):
File "<stdin>", line 1, in <module>
|
3.check_output
执行命令,如果状态码是 0 ,则返回执行结果,否则抛异常
|
1
2
|
subprocess.check_output(["echo", "Hello World!"])
subprocess.check_output("exit 1", shell=True)
|
4.subprocess.Popen(...)
用于执行复杂的系统命令
参数:
-
args:shell命令,可以是字符串或者序列类型(如:list,元组)
-
bufsize:指定缓冲。0 无缓冲,1 行缓冲,其他 缓冲区大小,负值 系统缓冲
-
stdin, stdout, stderr:分别表示程序的标准输入、输出、错误句柄
-
preexec_fn:只在Unix平台下有效,用于指定一个可执行对象(callable object),它将在子进程运行之前被调用
-
close_sfs:在windows平台下,如果close_fds被设置为True,则新创建的子进程将不会继承父进程的输入、输出、错误管道。
所以不能将close_fds设置为True同时重定向子进程的标准输入、输出与错误(stdin, stdout, stderr)。
-
shell:同上
-
cwd:用于设置子进程的当前目录
-
env:用于指定子进程的环境变量。如果env = None,子进程的环境变量将从父进程中继承。
-
universal_newlines:不同系统的换行符不同,True -> 同意使用 \n
-
startupinfo与createionflags只在windows下有效
将被传递给底层的CreateProcess()函数,用于设置子进程的一些属性,如:主窗口的外观,进程的优先级等等
例:
|
1
2
3
|
import subprocess
res = subprocess.Popen(["mkdir","sub"])
res2 = subprocess.Popen("mkdir sub_1", shell=True)
|

终端输入的命令分为两种:
-
输入即可得到输出,如:ifconfig
-
输入进行某环境,依赖再输入,如:python
|
1
|
>>> obj = subprocess.Popen("mkdir cwd", shell=True, cwd=‘/home/‘,)
|

|
1
2
3
4
5
6
7
8
9
10
11
12
13
14
15
16
|
import subprocess
obj = subprocess.Popen(["python"], stdin=subprocess.PIPE, stdout=subprocess.PIPE, stderr=subprocess.PIPE)
obj.stdin.write(‘print 1 \n ‘)
obj.stdin.write(‘print 2 \n ‘)
obj.stdin.write(‘print 3 \n ‘)
obj.stdin.write(‘print 4 \n ‘)
obj.stdin.close()
cmd_out = obj.stdout.read()
obj.stdout.close()
cmd_error = obj.stderr.read()
obj.stderr.close()
print cmd_out
print cmd_error
|
|
1
2
3
4
5
6
7
8
9
10
|
import subprocess
obj = subprocess.Popen(["python"], stdin=subprocess.PIPE, stdout=subprocess.PIPE, stderr=subprocess.PIPE)
obj.stdin.write(‘print 1 \n ‘)
obj.stdin.write(‘print 2 \n ‘)
obj.stdin.write(‘print 3 \n ‘)
obj.stdin.write(‘print 4 \n ‘)
out_error_list = obj.communicate()
print out_error_list
|
|
1
2
3
4
5
|
import subprocess
obj = subprocess.Popen(["python"], stdin=subprocess.PIPE, stdout=subprocess.PIPE, stderr=subprocess.PIPE)
out_error_list = obj.communicate(‘print "hello"‘)
print out_error_list
|
7.时间模块
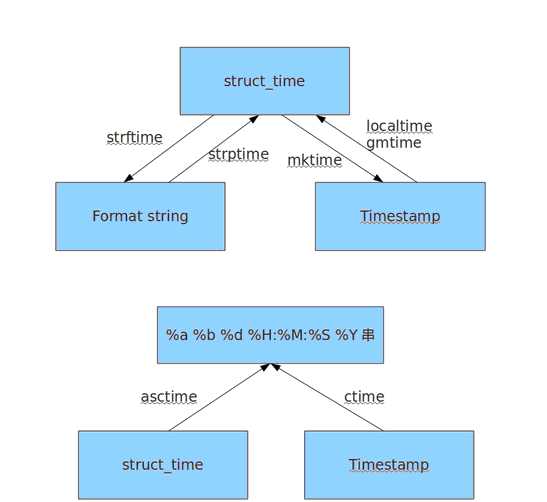
1)time模块
time.time()函数返回从1970年1月1日以来的秒数,这是一个浮点数
|
1
2
3
|
>>> import time
>>> time.time()
1453684281.110071
|
|
1
2
3
4
5
6
7
8
9
10
11
|
print(time.clock()) #返回处理器时间,3.3开始已废弃
print(time.process_time()) #返回处理器时间,3.3开始已废弃
print(time.time()) #返回当前系统时间戳
print(time.ctime()) #输出Tue Jan 26 18:23:48 2016 ,当前系统时间
print(time.ctime(time.time()-86640)) #将时间戳转为字符串格式
print(time.gmtime(time.time()-86640)) #将时间戳转换成struct_time格式
print(time.localtime(time.time()-86640)) #将时间戳转换成struct_time格式,但返回 的本地时间
print(time.mktime(time.localtime())) #与time.localtime()功能相反,将struct_time格式转回成时间戳格式
#time.sleep(4) #sleep
print(time.strftime("%Y-%m-%d %H:%M:%S",time.gmtime()) ) #将struct_time格式转成指定的字符串格式
print(time.strptime("2016-01-28","%Y-%m-%d") ) #将字符串格式转换成struct_time格式
|
2)datetime模块
|
1
2
3
4
5
6
7
8
9
10
11
12
13
14
15
|
print(datetime.date.today())
print(datetime.date.fromtimestamp(time.time()-864400) )
current_time = datetime.datetime.now()
print(current_time)
print(current_time.timetuple())
print(current_time.replace(2014,9,12))
str_to_date = datetime.datetime.strptime("21/11/06 16:30", "%d/%m/%y %H:%M")
new_date = datetime.datetime.now() + datetime.timedelta(days=10)
new_date = datetime.datetime.now() + datetime.timedelta(days=-10)
new_date = datetime.datetime.now() + datetime.timedelta(hours=-10)
new_date = datetime.datetime.now() + datetime.timedelta(seconds=120)
print(new_date)
|


8.Logging日志模块
1、简单日志打印
|
1
2
3
4
5
6
7
8
|
import logging
logging.debug(‘[debug 日志]‘)
logging.info(‘[info 日志]‘)
logging.warning(‘[warning 日志]‘)
logging.error(‘[error 日志]‘)
logging.critical(‘[critical 日志]‘)
|
输出:
|
1
2
3
|
WARNING:root:[warning 日志]
ERROR:root:[error 日志]
CRITICAL:root:[critical 日志]
|
可见,默认情况下python的logging模块将日志打印到了标准输出中,且只显示了大于等于WARNING级别的日志,
这说明默认的日志级别设置为WARNING(日志级别等级CRITICAL > ERROR > WARNING > INFO > DEBUG > NOTSET)
默认的日志格式为:
日志级别:Logger名称:用户输出消息。
2.灵活配置日志级别,日志格式,输出位置
|
1
2
3
4
5
6
7
8
9
10
11
|
logging.basicConfig(level=logging.DEBUG,
format=‘%(asctime)s %(filename)s[line:%(lineno)d] %(levelname)s %(message)s‘,
datefmt=‘%a, %d %b %Y %H:%M:%S‘,
filename=‘log.log‘,
filemode=‘w‘)
logging.debug(‘debug message‘)
logging.info(‘info message‘)
logging.warning(‘warning message‘)
logging.error(‘error message‘)
logging.critical(‘critical message‘)
|
日志文件:

在logging.basicConfig()函数中可通过具体参数来更改logging模块默认行为,可用参数有
filename: 用指定的文件名创建FiledHandler(后边会具体讲解handler的概念),这样日志会被存储在指定的文件中。
filemode: 文件打开方式,在指定了filename时使用这个参数,默认值为“a”还可指定为“w”。
format: 指定handler使用的日志显示格式。
datefmt: 指定日期时间格式。(datefmt=‘%a, %d %b %Y %H:%M:%S‘,%p)
level: 设置rootlogger(后边会讲解具体概念)的日志级别
stream: 用指定的stream创建StreamHandler。可以指定输出到sys.stderr,sys.stdout或者文件,默认为sys.stderr。
若同时列出了filename和stream两个参数,则stream参数会被忽略。
format参数中可能用到的格式化串:
%(name)s Logger的名字
%(levelno)s 数字形式的日志级别
%(levelname)s 文本形式的日志级别
%(pathname)s 调用日志输出函数的模块的完整路径名,可能没有
%(filename)s 调用日志输出函数的模块的文件名
%(module)s 调用日志输出函数的模块名
%(funcName)s 调用日志输出函数的函数名
%(lineno)d 调用日志输出函数的语句所在的代码行
%(created)f 当前时间,用UNIX标准的表示时间的浮 点数表示
%(relativeCreated)d 输出日志信息时的,自Logger创建以 来的毫秒数
%(asctime)s 字符串形式的当前时间。默认格式是 “2003-07-08 16:49:45,896”。逗号后面的是毫秒
%(thread)d 线程ID。可能没有
%(threadName)s 线程名。可能没有
%(process)d 进程ID。可能没有
%(message)s 用户输出的消息
3.Logger,Handler,Formatter,Filter的概念
logging.basicConfig()(用默认日志格式(Formatter)为日志系统建立一个默认的流处理器(StreamHandler),
设置基础配置(如日志级别等)并加到root logger(根Logger)中)这几个logging模块级别的函数,
另外还有一个模块级别的函数是logging.getLogger([name])(返回一个logger对象,如果没有指定名字将返回root logger)
1).logging库提供了多个组件:Logger、Handler、Filter、Formatter。
Logger 对象提供应用程序可直接使用的接口,
Handler 发送日志到适当的目的地,
Filter 提供了过滤日志信息的方法,
Formatter 指定日志显示格式。
# 创建一个logger
logger = logging.getLogger()
#创建一个带用户名的logger
logger1 = logging.getLogger(‘liuyao‘)
#设置一个日志级别
logger.setLevel(logging.INFO)
logger1.setLevel(logging.INFO)
#创建一个handler,用于写入日志文件
fh = logging.FileHandler(‘log.log‘)
# 再创建一个handler,用于输出到控制台
ch = logging.StreamHandler()
# 定义handler的输出格式formatter
formatter = logging.Formatter(‘%(asctime)s - %(name)s - %(levelname)s - %(message)s‘)
fh.setFormatter(formatter)
ch.setFormatter(formatter)
# 给logger添加handler
#logger.addFilter(filter)
logger.addHandler(fh)
logger.addHandler(ch)
# 给logger1添加handler
#logger1.addFilter(filter)
logger1.addHandler(fh)
logger1.addHandler(ch)
#给logger添加日志
logger.info(‘logger info message‘)
logger1.info(‘logger1 info message‘)
输出:
|
1
2
3
|
2016-02-03 21:11:38,739 - root - INFO - logger info message
2016-02-03 21:11:38,740 - liuyao - INFO - logger1 info message
2016-02-03 21:11:38,740 - liuyao - INFO - logger1 info message
|
对于等级:
|
1
2
3
4
5
6
7
8
|
CRITICAL = 50
FATAL = CRITICAL
ERROR = 40
WARNING = 30
WARN = WARNING
INFO = 20
DEBUG = 10
NOTSET = 0
|
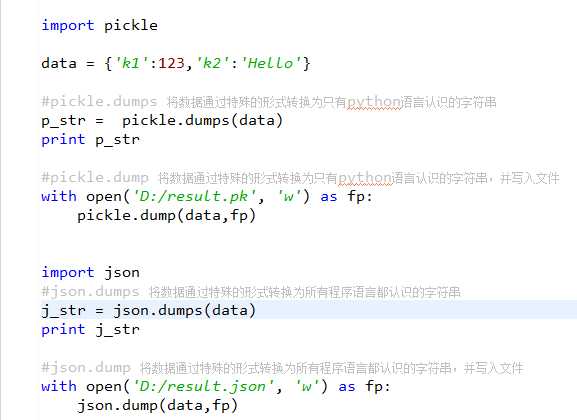
9.json 和 pickle 模块
用于序列化的两个模块
Json模块提供了四个功能:dumps、dump、loads、load
pickle模块提供了四个功能:dumps、dump、loads、load

1.Json模块
四个功能:dumps、dump、loads、load
1).dumps
|
1
2
3
4
5
6
7
|
name = {‘liuyao‘:‘["age",12]‘,
‘yaoyai‘:‘["age",21]‘}
print(name)
print(type(name))
a = json.dumps(name)
print(a)
print(type(a))
|
输出:
|
1
2
3
4
|
{‘yaoyai‘: ‘["age",21]‘, ‘liuyao‘: ‘["age",12]‘}
<class ‘dict‘>
{"yaoyai": "[\"age\",21]", "liuyao": "[\"age\",12]"}
<class ‘str‘>
|
2)
10.shelve 模块
shelve模块是一个简单的k,v将内存数据通过文件持久化的模块,可以持久化任何pickle可支持的python数据格式
|
1
2
3
4
5
6
7
8
9
10
11
12
13
14
15
16
17
18
|
import shelve
d = shelve.open(‘shelve_test‘)
class Test(object):
def __init__(self,n):
self.n = n
t = Test(123)
t2 = Test(123334)
name = ["alex","rain","test"]
d["test"] = name
d["t1"] = t
d["t2"] = t2
d.close()
|
10、random模块
random模块是专门用来生成随机数的
1).random.random
random.random()用于生成一个0到1的随机符点数: 0 <= n < 1.0
例:
|
1
2
3
4
5
|
import random
>>> print(random.random)
<built-in method random of Random object at 0x10d2c18>
>>> print(random.random())
0.2822925070315372
|
2)random.uniform
random.uniform的函数原型为:random.uniform(a, b),用于生成一个指定范围内的随机符点数,两个参数其中一个是上限,一个是下限。如果a > b,则生成的随机数n: a <= n <= b。如果 a <b, 则 b <= n <= a。
例:
|
1
2
3
4
5
6
7
|
>>> random.uniform(5,10)
5.39403122881387
>>> random.uniform(10,10)
10.0
>>> random.uniform(10,5)
8.647718450387307
>>>
|
3)random.randint
random.randint()的函数原型为:random.randint(a, b),用于生成一个指定范围内的整数。其中参数a是下限,参数b是上限,生成的随机数n: a <= n <= b,下限必须小于上限.
例:
|
1
2
3
4
5
6
|
>>> random.randint(10,20)
20
>>> random.randint(10,20)
14
>>> random.randint(10,20)
10
|
4)random.randrange
random.randrange的函数原型为:random.randrange([start], stop[, step]),从指定范围内,按指定基数递增的集合中 获取一个随机数。如:random.randrange(10, 100, 2),结果相当于从[10, 12, 14, 16, ... 96, 98]序列中获取一个随机数。random.randrange(10, 100, 2)在结果上与 random.choice(range(10, 100, 2) 等效。
例:
|
1
2
3
4
|
>>> random.randrange(1,37,2)
17
>>> random.randrange(1,37)
28
|
5)random.choice
random.choice从序列中获取一个随机元素。其函数原型为:random.choice(sequence)。参数sequence表示一个有序类型。这里要说明 一下:sequence在python不是一种特定的类型,而是泛指一系列的类型。list, tuple, 字符串都属于sequence。有关sequence可以查看python手册数据模型这一章。
例:
|
1
2
3
4
|
>>> random.choice(‘liuyao‘)
‘l‘
>>> random.choice(‘liuyao‘)
‘u‘
|
6)random.shuffle
random.shuffle的函数原型为:random.shuffle(x[, random]),用于将一个列表中的元素打乱。如:
例:
|
1
2
3
4
|
>>> p = ["Python", "is","simple", "and so on..."]
>>> random.shuffle(p)
>>> print (p)
[‘Python‘, ‘and so on...‘, ‘simple‘, ‘is‘]
|
7)random.sample
random.sample的函数原型为:random.sample(sequence, k),从指定序列中随机获取指定长度的片断。sample函数不会修改原有序列。
|
1
2
3
4
5
6
|
>>> li = [1,2,3,4,5,6,7,8,9,10]
>>> slice = random.sample(li,5)
>>> print (slice)
[3, 10, 5, 6, 8]
>>> print (li)
[1, 2, 3, 4, 5, 6, 7, 8, 9, 10]
|
随机验证码实例:
|
1
2
3
4
5
6
7
8
9
10
|
import random
checkcode = ‘‘
for i in range(4):
current = random.randrange(0,4)
if current != i:
temp = chr(random.randint(65,90))
else:
temp = random.randint(0,9)
checkcode += str(temp)
print (checkcode)
|
四、开源模块
开源模块为第三方模块,是广大python爱好者,开发者,为了实现某些功能封装的模块
1:paramiko模块
paramiko是一个用于做远程控制的模块,使用该模块可以对远程服务器进行命令或文件操作,值得一说的是,fabric和ansible内部的远程管理就是使用的paramiko来现实。
下载安装:
|
1
2
3
4
5
6
7
8
9
10
11
12
13
14
15
16
17
18
19
20
|
wget http://files.cnblogs.com/files/wupeiqi/pycrypto-2.6.1.tar.gz
tar -xvf pycrypto-2.6.1.tar.gz
cd pycrypto-2.6.1
python setup.py build
python setup.py install
wget http://files.cnblogs.com/files/wupeiqi/paramiko-1.10.1.tar.gz
tar -xvf paramiko-1.10.1.tar.gz
cd paramiko-1.10.1
python setup.py build
python setup.py install
>>>import paramiko
|
python 模块学习
标签:mon class moudle ges universal tag critical tuple join
原文地址:http://www.cnblogs.com/sunshine-1/p/7440047.html


