标签:start alt centos5 centos7.x default root def 80端口 repo
本文主要介绍,简单的搭建lnmp环境,自己的环境,自己做主
准备要求:全新的liunx环境,本文用的是centerOS6.0
废话不多说,直接看步骤:
1、开启nginx80端口和mysql3306端口
vim /etc/sysconfig/iptables
可以看到原先就已经开启了两个端口
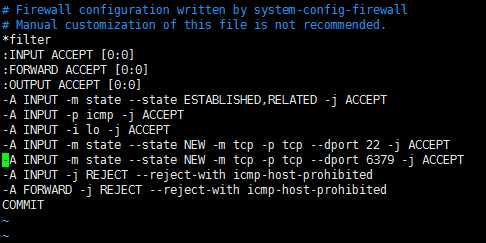
所以仿这里继续添加端口
加入如下代码:
-A INPUT -m state --state NEW -m tcp -p tcp --dport 80 -j ACCEPT
-A INPUT -m state --state NEW -m tcp -p tcp --dport 3306 -j ACCEPT
:wq保存退出,重启防火墙
/etc/init.d/iptables restart
2、关闭SELINUX
vim /etc/selinux/config
注释掉里面的所有代码,添加如下代码:
SELINUX=disabled
:wq保存退出,重启系统
shutdown -r now
SElinux是Linux安全加强工具,是一种安全子系统,它能控制程序只能访问特定文件
3、安装第三方yum源
安装下载工具
yum install wget
wget www.atomicorp.com/installers/atomic
安装过程需要一定的时间,请耐心等待,安装完成继续往下走
sh ./atomic
然后执行下下面这个代码:
echo $?
如输出0,说明成功
更新yum源
yum check-update
4、安装nginx
删除系统自带的软件包
yum remove httpd* php* mysql*
安装nginx
yum install -y nginx
安装需要一定的时间,请耐心等待
安装完成后,设置nginx开机自动启动
chkconfig nginx on
启动nginx服务
service nginx start
5、安装php
配置安装包源,根据自己的centOS版本,下载php包源
centos5.X
rpm -Uvh http://mirror.webtatic.com/yum/el5/latest.rpm
centos6.X
rpm -Uvh http://mirror.webtatic.com/yum/el6/latest.rpm
centos7.X
rpm -Uvh https://mirror.webtatic.com/yum/el7/epel-release.rpm
rpm -Uvh https://mirror.webtatic.com/yum/el7/webtatic-release.rpm
如果想删除上面安装包,重新安装
rpm -qa | grep webstatic
rpm -e [上面搜索到的包即可]
执行安装(这里安装的是php5.6版本,如果想安装php5.5或者5.4版本的,直接把下面的56w换成55w或者54w)
yum -y install php56w.x86_64
yum -y --enablerepo=webtatic install php56w-devel
安装php扩展包
yum -y install php56w-gd.x86_64 php56w-ldap.x86_64 php56w-mbstring.x86_64 php56w-mcrypt.x86_64 php56w-mysql.x86_64 php56w-pdo.x86_64 php56w-opcache.x86_64
安装php fpm
yum -y install php56w-fpm
设置php-fpm开机启动
chkconfig php-fpm on
启动php-fpm
/etc/init.d/php-fpm start
6、安装mysql
yum install -y mysql mysql-server
安装需要一定的时间,请耐心等待
安装完成后,启动mysql
/etc/init.d/mysqld start
设置为开机启动
chkconfig mysqld on
拷贝配置文件(/etc目录下面默认有my.cnf,直接覆盖就行)
cp /usr/sgare/mysql/my-medium.cnf /etc/my.cnf
设置root密码
mysql_secure_installation
重启mysql
/etc/init.d/mysqld restart
mysql启动
/etc/init.d/mysqld start
mysql停止
/etc/init.d/mysqld stop
7、配置nginx
cd /etc/nginx/conf.d
mv default.conf default.conf.bak
vim default.conf
添加如下内容:
server{
listen 80;
server_name _;
index index.php index.html index.htm;
root /home/html/www;
location ~ .*\.(php|php5)?$
{
#fastcgi_pass unix:/tmp/php-cgi.sock;
fastcgi_pass 127.0.0.1:9000;
fastcgi_index index.php;
include fastcgi.conf;
}
location / {
try_files $uri $uri/ /index.php?$query_string;
}
}
说明:这里把web根目录放在/home/html/www,所以要进/home新建目录
mkdir /home/html/www
配置php-fpm
vi /etc/php-fpm.d/www.conf
修改用户名为nginx
user = nginx
修改组为nginx
group = nginx
8、开始测试
vi /home/html/www/index.php
添加如下代码:
<?php
echo phpinfo();
?>
:wq保存退出
设置权限
chown nginx.nginx /home/html/www -R
重启nginx
service nginx restart
重启php-fpm
service php-fpm restart
然后在客户端浏览器地址栏输入服务器ip地址,如192.168.179.10/index.php
出现配置信息,说明搭建成功
9、注释:
本操作步骤都是在刚安装的centos6.0系统下进行的,所以一路流程下来,并没有什么出错,安装的php的版本为5.6,php扩展也是装了简单的必须用的,如gd库,pdo库,mysql扩展。
如大家在本流程中出现一些报错之类的,欢迎留言,大家一起探讨!!
转载请注明:http://www.cnblogs.com/ttsqx
标签:start alt centos5 centos7.x default root def 80端口 repo
原文地址:http://www.cnblogs.com/ttsqx/p/7541786.html