标签:创建 无法 常见 static exce roi except edit 服务端
Android中的接口回调技术有很多应用的场景,最常见的:Activity(人机交互的端口)的UI界面中定义了Button,点击该Button时,执行某个逻辑。
下面参见上述执行的模型,讲述James对Android接口回调技术的理解(结合前人的知识和自己的实践)。
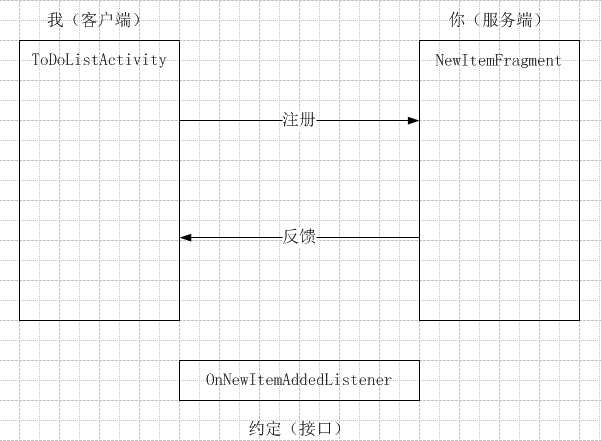
使用一个比喻很形象地说明:客户端有个疑问打电话请教服务端,但服务端无法现场给出解答,相互之间约定:服务端一旦有答案,使用电话的方式反馈给客户端。
以上有三个主体:客户端、服务端和接口(方式)。
接口回调的原理框图说明:

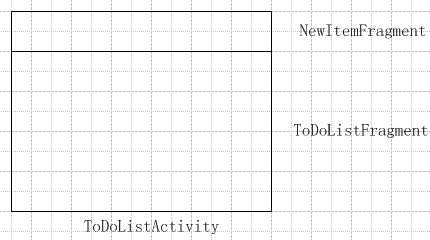
Demo界面如下:

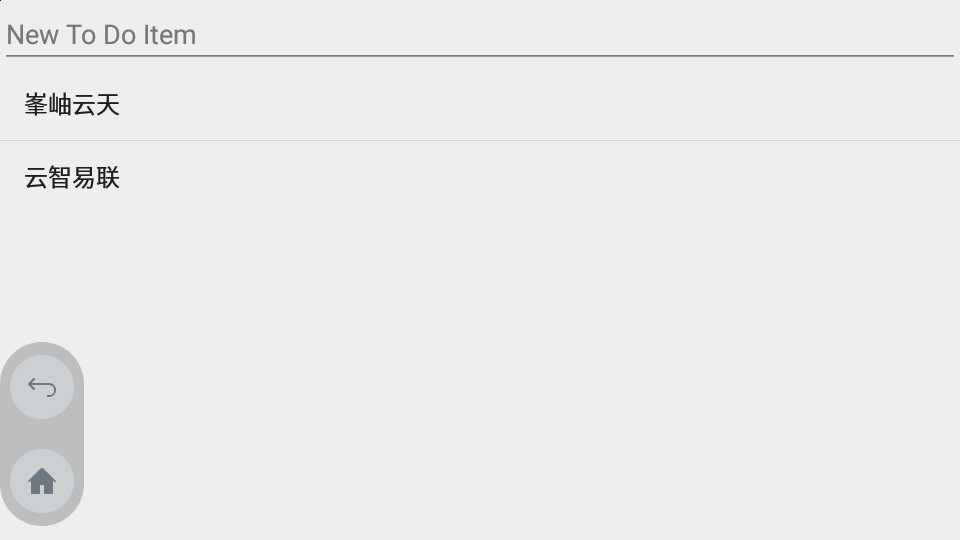
实际效果如下:

其中ToDoListActivity的布局XML文件设计为:使用fragment标签填充。
<LinearLayout xmlns:android="http://schemas.android.com/apk/res/android"
    xmlns:tools="http://schemas.android.com/tools"
    android:layout_width="match_parent"
    android:layout_height="match_parent"
    android:orientation="vertical"
    tools:context="com.demo.ToDoListActivity" >
    <fragment
        android:id="@+id/fragment_new_item"
        android:name="com.demo.NewItemFragment"
        android:layout_width="match_parent"
        android:layout_height="wrap_content" />
    <fragment
        android:id="@+id/fragment_todo_list"
        android:name="com.demo.ToDoListFragment"
        android:layout_width="match_parent"
        android:layout_height="wrap_content" />
</LinearLayout>
Demo源代码:
package com.demo;
import android.app.Activity;
import android.app.Fragment;
import android.os.Bundle;
import android.text.TextUtils;
import android.view.KeyEvent;
import android.view.LayoutInflater;
import android.view.View;
import android.view.View.OnKeyListener;
import android.view.ViewGroup;
import android.widget.EditText;
/**
 * <功能描述> 为New Item定义的Fragment
 *
 * @author Administrator
 */
public class NewItemFragment extends Fragment {
    private static final String TAG = NewItemFragment.class.getSimpleName();
    /**
     * <功能描述> 步骤1:创建指定的接口
     *
     * @author Administrator
     */
    public interface OnNewItemAddedListener {
        // 步骤2:创建接口中的相关方法
        public void onNewItemAdded(String newItem);
    }

    // 步骤3:声明回调接口的对象,接口类对象
    private OnNewItemAddedListener onNewItemAddedListener;

    @Override
    public void onAttach(Activity activity) {
        super.onAttach(activity);
        try {
            // 步骤4:获取父Activity,为声明的接口对象赋值
            onNewItemAddedListener = (OnNewItemAddedListener) getActivity();
        } catch (Exception e) {
            throw new ClassCastException(activity.toString()
                    + " must implement OnNewItemAddedListener");
        }
    }

    @Override
    public View onCreateView(LayoutInflater inflater, ViewGroup container,
            Bundle savedInstanceState) {
        // 创建或填充Fragment的UI,并返回View对象
        View contentView = inflater.inflate(R.layout.new_item_fragment,
                container, false);
        final EditText etContent = (EditText) contentView
                .findViewById(R.id.et_content);
        etContent.setOnKeyListener(new OnKeyListener() {
            @Override
            public boolean onKey(View v, int keyCode, KeyEvent event) {
                if (event.getAction() == KeyEvent.ACTION_DOWN) {
                    LogUtil.d(TAG, "KeyEvent.ACTION_DOWN");
                    if ((keyCode == KeyEvent.KEYCODE_DPAD_CENTER)
                            || (keyCode == KeyEvent.KEYCODE_ENTER)) {
                        LogUtil.d(TAG, "KeyEvent.KEYCODE_ENTER");
                        if (!TextUtils.isEmpty(etContent.getText().toString())) {
                            LogUtil.d(TAG, "content:>"
                                    + etContent.getText().toString() + "<");
                            String content = etContent.getText().toString();
                            // 步骤5:创建某种场景,使用该接口回调方法
                            onNewItemAddedListener.onNewItemAdded(content);
                            etContent.setText("");
                            return true;
                        }
                    }
                }
                return false;
            }
        });
        return contentView;
    }
}
用户和界面UI交互的Activity源代码:
package com.demo;
import android.app.Activity;
import android.app.FragmentManager;
import android.os.Bundle;
import android.widget.ArrayAdapter;
import com.demo.NewItemFragment.OnNewItemAddedListener;
import java.util.ArrayList;
/**
 * <功能描述> 步骤6:在其他类中使用,并实现该接口
 *
 * @author Administrator
 */
public class ToDoListActivity extends Activity implements
        OnNewItemAddedListener {
    private static final String TAG = ToDoListActivity.class.getSimpleName();
    private ArrayList<String> mTodoItem;
    private ArrayAdapter<String> mArrayAdapter;

    @Override
    protected void onCreate(Bundle savedInstanceState) {
        super.onCreate(savedInstanceState);
        initView();
        initData();
        // 获取FragmentManager实例,获取xml文件中的fragment
        FragmentManager fragmentManager = getFragmentManager();
        ToDoListFragment todoListFragment = (ToDoListFragment) fragmentManager
                .findFragmentById(R.id.fragment_todo_list);
        todoListFragment.setListAdapter(mArrayAdapter);
    }
    private void initView() {
        setContentView(R.layout.main);
    }
    private void initData() {
        mTodoItem = new ArrayList<String>();
        mArrayAdapter = new ArrayAdapter<String>(this,
                android.R.layout.simple_list_item_1, mTodoItem);
    }
    @Override
    protected void onResume() {
        super.onResume();
        LogUtil.d(TAG, "onResume...");
    }
    @Override
    public void onNewItemAdded(String newItem) {
        // 步骤7:实现该接口,并使用其中的功能
        mTodoItem.add(0, newItem);
        mArrayAdapter.notifyDataSetChanged();
    }
}
上述Demo的ToDoListActivity实现了自定义的NewItemFragment中的接口OnNewItemAddedListener,也就需要实现该接口中的抽象方法。通过下述方法:
// 步骤4:获取父Activity,为声明的接口对象赋值
onNewItemAddedListener = (OnNewItemAddedListener) getActivity();
将ToDoListActivity实例传递到了NewItemFragment中,也就是能够执行ToDoListActivity实例中的onNewItemAdded()方法,而这个方法由ToDoListActivity覆写了(实际执行的是覆写后的方法和逻辑)。
Android中接口回调技术总结:
Android接口回调方法总共需要执行以下7个步骤:
1. 创建指定的接口类,并创建接口中的相关方法;
2. 在某个类(一般是服务端)中声明接口对象(创建该接口类对象),即需要在该类中使用该接口;
3. 在使用到该接口对象的场景(一般也是服务端)中为该接口类对象赋值(也就是服务端一般都会实例化接口对象,使用客户端的该接口实例初始化);
5. 在该场景中(一般服务端中)使用接口回调中的方法(接口的方法);
6. 上述步骤4中的赋值对象(客户端传递的实例对象,方法有多种:new接口实例或者客户端实现该接口)需要实现该接口;
7. 上述步骤6中的类(客户端),覆写接口中的方法;
文章出自:http://www.cnblogs.com/CVstyle/p/6216913.html
标签:创建 无法 常见 static exce roi except edit 服务端
原文地址:http://www.cnblogs.com/zly1022/p/7560174.html