标签:core action ret goback 不为 升级 enables test wss
原文:Win10 UWP开发系列:实现Master/Detail布局在开发XX新闻的过程中,UI部分使用了Master/Detail(大纲/细节)布局样式。Win10系统中的邮件App就是这种样式,左侧一个列表,右侧是详情页面。关于这种 样式的说明可参看MSDN文档:https://msdn.microsoft.com/zh-cn/library/windows/apps/xaml/dn997765.aspx
样式如下:

在微软官方的Sample里,有这种样式的代码示例,下载地址:https://github.com/Microsoft/Windows-universal-samples/tree/master/Samples/XamlMasterDetail
这个例子可以拿来直接用。处理这种布局,主要是需要处理在PC/Mobile不同屏幕宽度下的具体显示内容,可以使用VisualState来实现不同状态的切换。
为了将WP8.1版本的项目快速升级到UWP版本,我没有使用官方示例的方式,而是在MainPage里放了两个Frame,在左侧的Frame里放一个列表Page,右侧Frame里放一个详情Page,这样之前的页面的UI和ViewModel都可以原封不动的拿过来,只需要单独处理VisualState的切换就可以了。
下面以一个简单的例子来说一下是如何实现的。最近关于Win10 UWP的内容写了不少,都是在开发的过程中,把能单独拿出来的部分再重新做一遍demo,所以如果大家有兴趣的话可以照着动手敲一遍,自己实现出来才会理解的更深入。
首先新建一个MVVM-Sidekick项目,命名为MasterDetailDemo。
添加Models目录,新建一个NewsItem:
public class NewsItem
{
public int Id { get; set; }
public DateTime DateCreated { get; set; }
public string Title { get; set; }
public string Text { get; set; }
}
新建一个ItemsDataSource类,用于模拟数据,可以返回一些数据。具体代码看Demo里的。
private static List<NewsItem> _items = new List<NewsItem>()

{

new NewsItem()
{}……
}

public static IList<NewsItem> GetAllItems()
{
return _items;
}

public static NewsItem GetItemById(int id)
{
return _items[id];
}
在MainPage中放置一个Grid控件,分为两列,左侧和右侧分别放两个Frame控件:
<Grid x:Name="gridMain" >
    <Grid.ColumnDefinitions>
        <ColumnDefinition Width="*" />
        <ColumnDefinition Width="0" />
    </Grid.ColumnDefinitions>
    <Frame x:Name="masterFrame" Grid.Column="0" mvvm:StageManager.Beacon="masterFrame" x:FieldModifier="public"/>
    <Frame x:Name="detailFrame" HorizontalAlignment="Stretch" Grid.Column="1" mvvm:StageManager.Beacon="detailFrame" x:FieldModifier="public">
    </Frame>
</Grid>
然后添加两个页面,MasterPage和DetailPage。
MasterPage中放置一个ListView控件,调用刚才的ItemsDataSource类,把数据绑定到ListView上,这个就不用详述了吧。还要给ListView设置项模板。这部分代码就不贴了。
现在让MainPage页面载入时,左侧的Frame自动显示MasterPage。
打开MainPage_Model.cs文件,取消对OnBindedViewLoad方法的注释,修改为以下代码:
protected override async Task OnBindedViewLoad(MVVMSidekick.Views.IView view)
{
    await base.OnBindedViewLoad(view);
    await StageManager["masterFrame"].Show(new MasterPage_Model());

}
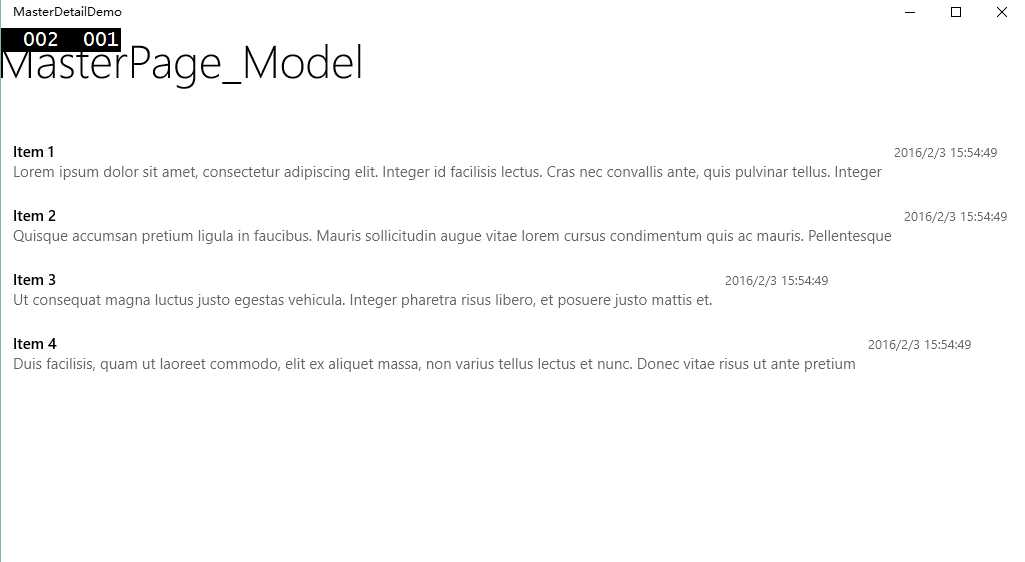
好了,现在当MainPage页面加载完成后,名为masterFrame的Frame会显示MasterPage的内容,像下面这样:
然后要实现点击项的时候,要在右侧的Frame里显示DetailPage。
打开MasterPage.xaml,在头部引入以下几个命名空间:
xmlns:Interactivity="using:Microsoft.Xaml.Interactivity"
xmlns:Core="using:Microsoft.Xaml.Interactions.Core"
xmlns:Behaviors="using:MVVMSidekick.Behaviors"
然后修改项模板,使用SendToEventRouterAction,这个东东在以前的Blog里说过,在项模板的Grid里添加以下代码:
<Interactivity:Interaction.Behaviors>
    <Core:EventTriggerBehavior EventName="Tapped">
        <Behaviors:SendToEventRouterAction EventRoutingName="NewsItemTapped" EventData="{Binding}" IsEventFiringToAllBaseClassesChannels="True" />
    </Core:EventTriggerBehavior>
</Interactivity:Interaction.Behaviors>
在MainPage加载的时候,注册NewsItemTapped事件,来处理点击事件。打开MainPage_Model.cs文件,在最后添加一个RegisterCommand方法:
private void RegisterCommand()
{
     MVVMSidekick.EventRouting.EventRouter.Instance.GetEventChannel<Object>()
.Where(x => x.EventName == "NewsItemTapped")
.Subscribe(
e =>
    {
        NewsItem item = e.EventData as NewsItem;
        await StageManager["detailFrame"].Show(new DetailPage_Model(item));
    }
    ).DisposeWith(this);
}
别忘了在Loaded事件里调用这个方法:
protected override async Task OnBindedViewLoad(MVVMSidekick.Views.IView view)
{
    this.RegisterCommand();
    await base.OnBindedViewLoad(view);
    await StageManager["masterFrame"].Show(new MasterPage_Model());
}
因为DetailPage_Model还没有可接收参数的构造函数,所以需要在DetailPage_Model里加两个构造函数,一个是无参的,一个是可接收参数的,同时还需要加一个可绑定的属性,用来显示内容:
public DetailPage_Model()
{ }


public DetailPage_Model(NewsItem item)
{
    CurrentNewsItem = item;
}


public NewsItem CurrentNewsItem
{
get { return _CurrentNewsItemLocator(this).Value; }
set { _CurrentNewsItemLocator(this).SetValueAndTryNotify(value); }
}

#region Property NewsItem CurrentNewsItem Setup

protected Property<NewsItem> _CurrentNewsItem = new Property<NewsItem> { LocatorFunc = _CurrentNewsItemLocator };

static Func<BindableBase, ValueContainer<NewsItem>> _CurrentNewsItemLocator = RegisterContainerLocator<NewsItem>("CurrentNewsItem", model => model.Initialize("CurrentNewsItem", ref model._CurrentNewsItem, ref _CurrentNewsItemLocator, _CurrentNewsItemDefaultValueFactory));

static Func<NewsItem> _CurrentNewsItemDefaultValueFactory = () => { return default(NewsItem); };

#endregion
这样在DetailPage里就可以接收到点击的是哪个NewsItem了,再绑定到界面上,我就随便放了个TextBlock:
<StackPanel x:Name="RootPanel" Grid.Row="1">
<TextBlock
Margin="8,0"
Style="{ThemeResource TitleTextBlockStyle}"
HorizontalAlignment="Left"
Text="{Binding CurrentNewsItem.Title}" />
<TextBlock
Margin="12,8"
HorizontalAlignment="Left"
MaxWidth="560"
Style="{ThemeResource BodyTextBlockStyle}"
Text="{Binding CurrentNewsItem.Text}"
EntranceNavigationTransitionInfo.IsTargetElement="True" />
</StackPanel>
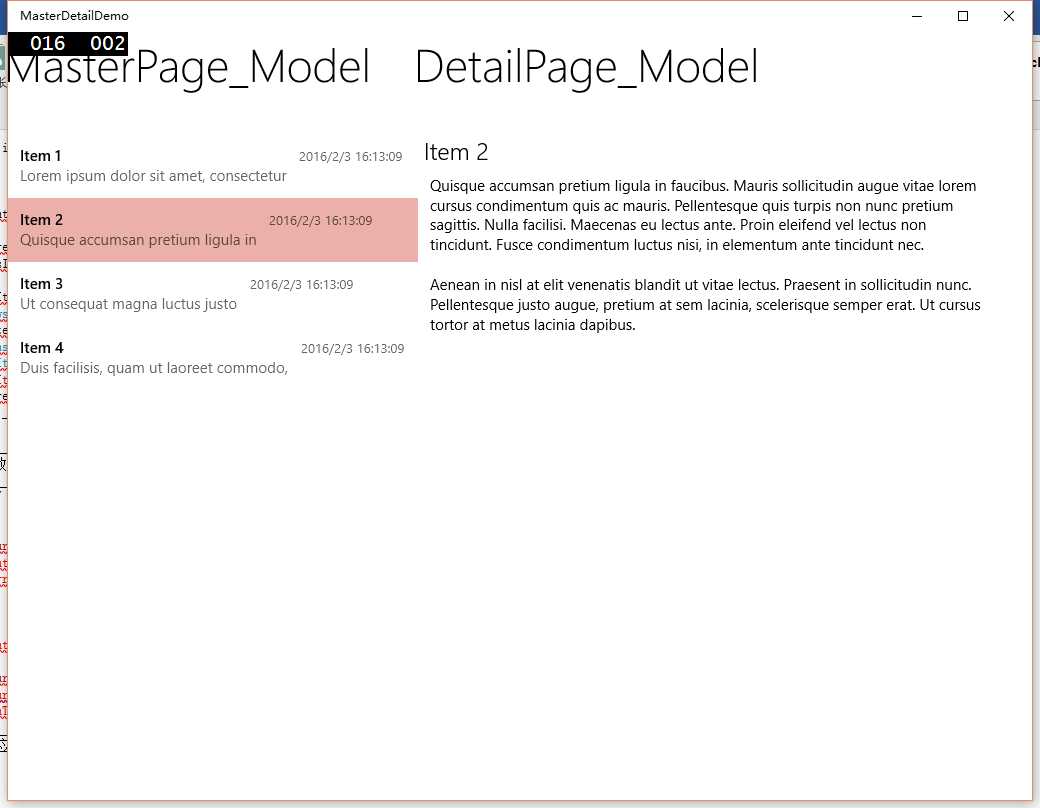
运行一下看看,怎么点了没反应呢,原来在MainPage的Grid里,第一列就把宽度占满了,第二列无法显示了,来给两个列设置个宽度吧,第一列设置为2*,第二列设置为3*:
现在可以显示了:
但是,这只是第一步,接下来需要处理在不同屏幕宽度下的适配问题,我们可以打开UWP版的邮件,拖动窗口缩放大小,观察页面内容变化,可以得出以下特性:
在PC上:
1、当宽度大于一定宽度时,Master和Detail是可以同时显示的,在刚打开程序没有点击邮件的时候,右侧的Detail实际上显示了一个空页面(有背景图片);
当逐步缩小宽度时,又分为两种情况:
2、如果Detail页为空页面时,缩小到一定宽度后,窗口只显示Master页面;
3、如果Detail页不为空,即显示邮件正文的时候,缩小到一定宽度后,窗口只显示Detail页面;
在Mobile上:
程序打开时,显示Master页面,相当于2;
点击邮件后,显示Detail页面,相当于3;
这样我们可以得出,不管是PC还是Mobile,需要处理三种状态的切换,我命名为:
NarrowAndBlankDetail
NarrowAndNoBlankDetail
Wide
通过处理这三种状态的切换,就可以实现类似邮件UWP版的效果了。有些同学可能会问,为什么不直接使用自带的AdaptiveTrigger呢,主要是这个AdaptiveTrigger只能根据宽度来设置,而目前的需求还需要根据Detail页面是否为空来处理,所以需要自定义一个Trigger了。
邮件UWP默认载入的时候有一个空页面,所以还需要添加一个BlankPage,这个页面相当于一个空页面,里面可以随便放点什么东西,比如背景图片啊,logo啊,或者广告什么的,Trigger会根据Detail页面是否显示这个BlankPage来进行处理。
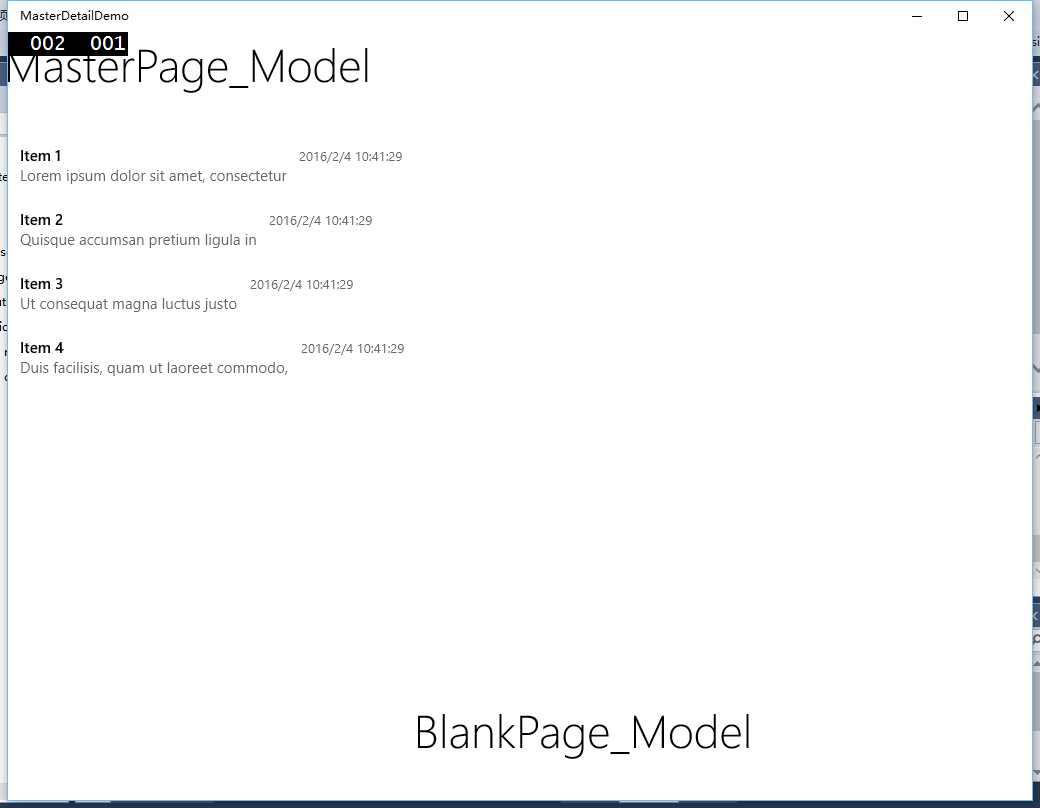
先让MainPage载入时,默认左侧加载MasterPage,右侧加载BlankPage:
protected override async Task OnBindedViewLoad(MVVMSidekick.Views.IView view)
{
    this.RegisterCommand();
    await base.OnBindedViewLoad(view);
    StageManager["detailFrame"].Show(new BlankPage_Model());
    await StageManager["masterFrame"].Show(new MasterPage_Model());
}
好,运行效果是这样:

现在来处理状态切换。关于StateTrigger,国外已经有人写了一个项目,实现了多种Trigger,见:
https://github.com/dotMorten/WindowsStateTriggers
使用介绍见:http://www.sharpgis.net/post/2015/03/24/Using-Custom-Visual-State-Triggers
这个项目实现了n个实用的Trigger,但好可惜没有能满足我的要求的,还是自己动手吧。我参考了他的代码,继承了他的接口ITriggerValue,继承此接口的话可以用在CompositeStateTrigger里,为了方便以后使用按照这个接口来吧。
说一下主要的代码实现思路。
首先要定义一个枚举:
public enum MasterDetailState
{
/// <summary>
/// narrow and a blank detail page
/// </summary>
NarrowAndBlankDetail,

/// <summary>
/// narrow and detail page is not blank
/// </summary>
NarrowAndNoBlankDetail,

/// <summary>
/// wide
/// </summary>
Wide
}
页面宽度的变化,通过订阅ApplicationView.GetForCurrentView().VisibleBoundsChanged事件来处理,如果宽度大于720时如何,小于720时如何。当然这个720也可以传递属性进来,我懒得弄就写死在里面了。
同时,还需要一个DetailContent属性,这个属性需要绑定到第二个Frame的Content上,这样Trigger可以知道当前是不是BlankPage,通过以下代码来判断:
MVVMPage detailPage = (MVVMSidekick.Views.MVVMPage)DetailContent;
if (detailPage != null)
{
if (detailPage.BaseUri.ToString() == "ms-appx:///BlankPage.xaml")
{
System.Diagnostics.Debug.WriteLine("触发NarrowAndBlankDetail模式");
//CommonContext.Instance.CurrentBackRequestedHandlerType = BackRequestedHandlerType.MasterPage;
return MasterDetailState.NarrowAndBlankDetail;
}
else
{
System.Diagnostics.Debug.WriteLine("触发NarrowAndNoBlankDetail模式");
//CommonContext.Instance.CurrentBackRequestedHandlerType = BackRequestedHandlerType.DetailPage;
return MasterDetailState.NarrowAndNoBlankDetail;
}
}
全部代码如下:

public class MasterDetailStateTrigger : StateTriggerBase, ITriggerValue

{


public MasterDetailStateTrigger()

{

if (!Windows.ApplicationModel.DesignMode.DesignModeEnabled)

{


var weakEvent =

new WeakEventListener<MasterDetailStateTrigger, ApplicationView, object>(this)

{

OnEventAction = (instance, source, eventArgs) => MasterDetailStatetateTrigger_MasterDetailStateChanged(source, eventArgs),

OnDetachAction = (instance, weakEventListener) => ApplicationView.GetForCurrentView().VisibleBoundsChanged -= weakEventListener.OnEvent

};

ApplicationView.GetForCurrentView().VisibleBoundsChanged += weakEvent.OnEvent;


}

}


private void MasterDetailStatetateTrigger_MasterDetailStateChanged(ApplicationView sender, object args)

{

UpdateTrigger();

}


private void UpdateTrigger()

{

IsActive = GetMasterDetailState() == MasterDetailState;


}


public MasterDetailState MasterDetailState

{

get { return (MasterDetailState)GetValue(MasterDetailStateProperty); }

set { SetValue(MasterDetailStateProperty, value); }

}


// Using a DependencyProperty as the backing store for MasterDetailState. This enables animation, styling, binding, etc...

public static readonly DependencyProperty MasterDetailStateProperty =

DependencyProperty.Register("MasterDetailState", typeof(MasterDetailState), typeof(MasterDetailStateTrigger), new PropertyMetadata(MasterDetailState.Wide, OnMasterDetailStatePropertyChanged));


private static void OnMasterDetailStatePropertyChanged(DependencyObject d, DependencyPropertyChangedEventArgs e)

{


var obj = (MasterDetailStateTrigger)d;

if (!Windows.ApplicationModel.DesignMode.DesignModeEnabled)

{

obj.UpdateTrigger();

}

}


public object DetailContent

{

get { return (object)GetValue(DetailContentProperty); }

set { SetValue(DetailContentProperty, value); }

}


// Using a DependencyProperty as the backing store for DetailContent. This enables animation, styling, binding, etc...

public static readonly DependencyProperty DetailContentProperty =

DependencyProperty.Register("DetailContent", typeof(object), typeof(MasterDetailStateTrigger), new PropertyMetadata(null, new PropertyChangedCallback(OnValuePropertyChanged)));


private static void OnValuePropertyChanged(DependencyObject d, DependencyPropertyChangedEventArgs e)

{

var obj = (MasterDetailStateTrigger)d;

obj.UpdateTrigger();

}


internal MasterDetailState GetMasterDetailState()

{

System.Diagnostics.Debug.WriteLine("DetailContent为空:" + (DetailContent == null).ToString());

//第一种 窄屏模式 DetailFrame为空

if (Window.Current.Bounds.Width < 720)

{

System.Diagnostics.Debug.WriteLine("VisibleBounds.Width:" + ApplicationView.GetForCurrentView().VisibleBounds.Width.ToString());

System.Diagnostics.Debug.WriteLine("Window.Current.Bounds:" + Window.Current.Bounds.Width.ToString());

MVVMPage detailPage = (MVVMSidekick.Views.MVVMPage)DetailContent;

if (detailPage != null)

{

if (detailPage.BaseUri.ToString() == "ms-appx:///BlankPage.xaml")

{

System.Diagnostics.Debug.WriteLine("触发NarrowAndBlankDetail模式");

return MasterDetailState.NarrowAndBlankDetail;

}

else

{

System.Diagnostics.Debug.WriteLine("触发NarrowAndNoBlankDetail模式");

return MasterDetailState.NarrowAndNoBlankDetail;

}

}

else

{

return MasterDetailState.NarrowAndBlankDetail;

}

}

else

{

System.Diagnostics.Debug.WriteLine("触发Wide模式");

return MasterDetailState.Wide;

}

}


#region ITriggerValue


private bool m_IsActive;


/// <summary>

/// Gets a value indicating whether this trigger is active.

/// </summary>

/// <value><c>true</c> if this trigger is active; otherwise, <c>false</c>.</value>

public bool IsActive

{

get { return m_IsActive; }

private set

{

if (m_IsActive != value)

{

m_IsActive = value;

base.SetActive(value);

if (IsActiveChanged != null)

IsActiveChanged(this, EventArgs.Empty);

}

}

}


/// <summary>

/// Occurs when the <see cref="IsActive" /> property has changed.

/// </summary>

public event EventHandler IsActiveChanged;


#endregion ITriggerValue


}


public enum MasterDetailState

{

/// <summary>

/// narrow and a blank detail page

/// </summary>

NarrowAndBlankDetail,

/// <summary>

/// narrow and detail page is not blank

/// </summary>

NarrowAndNoBlankDetail,

/// <summary>

/// wide

/// </summary>

Wide

}
我在代码里输出了一些信息,调试的时候可以观察各种状态是在什么时候切换的。
然后在MainPage.xaml里 应用这个StateTrigger,首先,要在MainPage的ViewModel里添加一个object,用于绑定DetailFrame的内容:
/// <summary>
/// detailFrame的内容
/// </summary>
public object DetailContent
{
get { return _DetailContentLocator(this).Value; }
set { _DetailContentLocator(this).SetValueAndTryNotify(value); }
}

#region Property object DetailContent Setup

protected Property<object> _DetailContent = new Property<object> { LocatorFunc = _DetailContentLocator };

static Func<BindableBase, ValueContainer<object>> _DetailContentLocator = RegisterContainerLocator<object>("DetailContent", model => model.Initialize("DetailContent", ref model._DetailContent, ref _DetailContentLocator, _DetailContentDefaultValueFactory));

static Func<object> _DetailContentDefaultValueFactory = () => default(object);

#endregion
MainPage.xaml里的第二个Frame的Content绑定到这个DetailContent上:
<Frame x:Name="detailFrame" Content="{Binding DetailContent,Mode=TwoWay}" HorizontalAlignment="Stretch" Grid.Column="1" mvvm:StageManager.Beacon="detailFrame" x:FieldModifier="public">
注意Mode要设置为TwoWay,这样才可以让Trigger知道DetaiFrame的内容。在MainPage.xaml的根Grid里添加以下Trigger:
<VisualStateManager.VisualStateGroups>
    <VisualStateGroup>
        <VisualState x:Name="NarrowAndBlankDetail">
            <VisualState.StateTriggers>
                <triggers:MasterDetailStateTrigger MasterDetailState="NarrowAndBlankDetail" DetailContent="{Binding DetailContent}" />
            </VisualState.StateTriggers>
        <VisualState.Setters>
            <Setter Target="gridMain.ColumnDefinitions[0].Width" Value="*" />
            <Setter Target="gridMain.ColumnDefinitions[1].Width" Value="0" />
        </VisualState.Setters>
    </VisualState>
    <VisualState x:Name="NarrowAndNoBlankDetail">
        <VisualState.StateTriggers>
            <triggers:MasterDetailStateTrigger MasterDetailState="NarrowAndNoBlankDetail" DetailContent="{Binding DetailContent}" />
           </VisualState.StateTriggers>
        <VisualState.Setters>
            <Setter Target="gridMain.ColumnDefinitions[0].Width" Value="0" />
            <Setter Target="gridMain.ColumnDefinitions[1].Width" Value="*" />
        </VisualState.Setters>
        </VisualState>
        <VisualState x:Name="Wide">
            <VisualState.StateTriggers>
                <triggers:MasterDetailStateTrigger MasterDetailState="Wide" DetailContent="{Binding DetailContent}" />
            </VisualState.StateTriggers>
        <VisualState.Setters>
            <Setter Target="gridMain.ColumnDefinitions[0].Width" Value="2*" />
            <Setter Target="gridMain.ColumnDefinitions[1].Width" Value="3*" />
        </VisualState.Setters>
        </VisualState>
    </VisualStateGroup>
</VisualStateManager.VisualStateGroups>
还要把默认的gridMain的两列的宽度默认值分别改为*和0:
<Grid x:Name="gridMain" >
    <Grid.RenderTransform>
        <CompositeTransform />
    </Grid.RenderTransform>
    <Grid.ColumnDefinitions>
        <ColumnDefinition Width="*" />
        <ColumnDefinition Width="0" />
    </Grid.ColumnDefinitions>
    <Frame x:Name="masterFrame" Grid.Column="0" mvvm:StageManager.Beacon="masterFrame" x:FieldModifier="public"/>
    <Frame x:Name="detailFrame" Content="{Binding DetailContent,Mode=TwoWay}" HorizontalAlignment="Stretch" Grid.Column="1" mvvm:StageManager.Beacon="detailFrame" x:FieldModifier="public">
</Frame>

</Grid>
Trigger的意义很清楚了,Setter会根据不同的状态去设置gridMain两列的宽度来控制MasterPage和DetailPage的显示和隐藏:
当刚开始进入程序,左侧显示列表,右侧显示BlankPage,这时候如果宽度大于720,两个页面正常展示,如果页面宽度小于720,则只显示列表页;
如果页面宽度大于720的时候,点击列表,右侧正常显示详情;
如果页面宽度小于720,点击列表,列表会隐藏,只显示详情;
基本达到了文章开头提出的目的。
当在手机上运行的时候,就会发现当点击列表显示DetailPage后,再按返回键直接退出程序了。因为还没有处理返回键事件。PC上也一样,程序左上角应该有个返回按钮。下面来处理返回事件。
基本思路是,点击返回后,应该先判断DetailPage是否可GoBack,如果可以就GoBack,直到返回最开始的BlankPage为止,这样StateTrigger会自动触发NarrowAndBlankDetail状态,显示MasterPage。
返回是处理SystemNavigationManager.GetForCurrentView().BackRequested这个事件,打开MainPage.xaml.cs文件,在OnNavigatedTo里订阅这个事件:
protected override void OnNavigatedTo(NavigationEventArgs e)
{
    SystemNavigationManager.GetForCurrentView().BackRequested += CurrentView_BackRequested;
        //SystemNavigationManager.GetForCurrentView().AppViewBackButtonVisibility = AppViewBackButtonVisibility.Visible;
    base.OnNavigatedTo(e);
}


protected override void OnNavigatedFrom(NavigationEventArgs e)
{
    SystemNavigationManager.GetForCurrentView().BackRequested -= CurrentView_BackRequested;
    base.OnNavigatedFrom(e);
}


private void CurrentView_BackRequested(object sender, BackRequestedEventArgs e)
{
    //判断DetailPage能否GoBack,如果可以GoBack则GoBack 显示BlankPage
    //其次判断MasterPage能否GoBack,如果可以GoBack则GoBack
    //如果不能GoBack,则提示是否退出
    if     (StrongTypeViewModel.StageManager["detailFrame"].CanGoBack)
    {
        e.Handled = true;
        StrongTypeViewModel.StageManager["detailFrame"].Frame.GoBack();
    }
    else if (StrongTypeViewModel.StageManager["masterFrame"].CanGoBack)
    {
        e.Handled = true;
        StrongTypeViewModel.StageManager["masterFrame"].Frame.GoBack();
    }
    else
    {
        //TODO 隐藏回退键 提示退出
        SystemNavigationManager.GetForCurrentView().AppViewBackButtonVisibility = AppViewBackButtonVisibility.Collapsed;
    }
}
用户点击返回键的时候,首先看DetailPage能否GoBack,再看MasterPage能否GoBack,当没有可GoBack的时候就把返回键隐藏。
在PC上的返回键默认是隐藏的,还需要在导航到详情页的时候将其展示出来,修改MainPage_Model.cs文件里的RegisterCommand方法:
private void RegisterCommand()
{
MVVMSidekick.EventRouting.EventRouter.Instance.GetEventChannel<Object>()
.Where(x => x.EventName == "NewsItemTapped")
.Subscribe(
async e =>
{
NewsItem item = e.EventData as NewsItem;
SystemNavigationManager.GetForCurrentView().AppViewBackButtonVisibility = AppViewBackButtonVisibility.Visible;
await StageManager["detailFrame"].Show(new DetailPage_Model(item));
}
).DisposeWith(this);
}
现在运行一下,PC上也可以返回了。当第一次打开的时候,是这样 的:
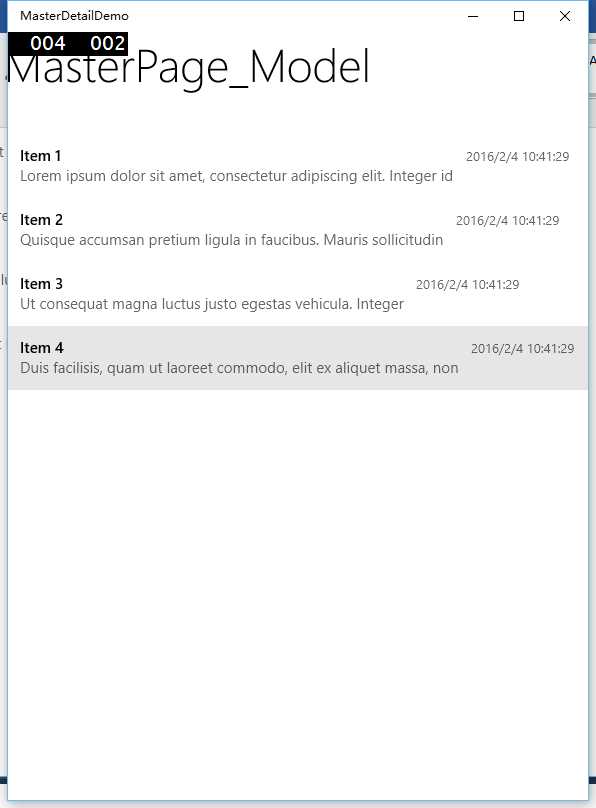
如果拖动窗口缩小,则只会显示MasterPage:
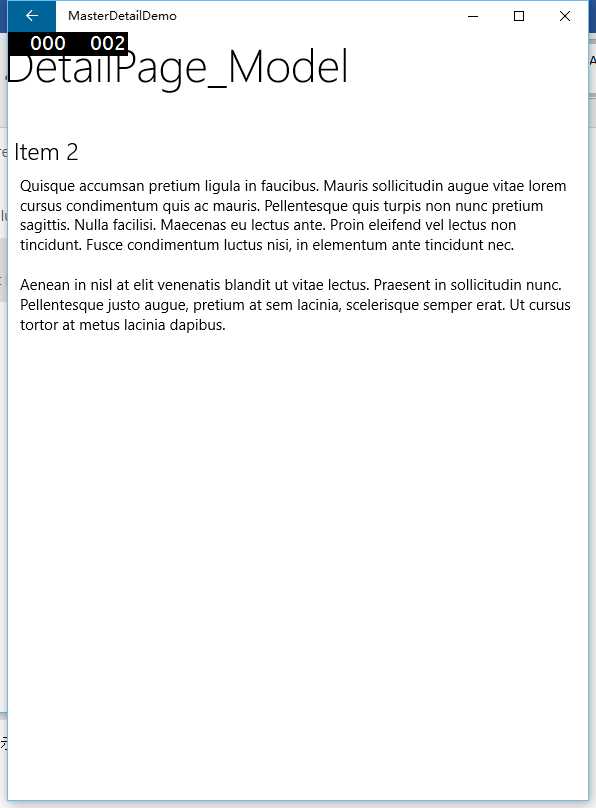
当点击列表项时,会只显示DetailPage:
点击左上角返回键,又只显示MasterPage了。
具体切换动画我不会截图,大家可以下载demo自己试试。
我们还可以做的更美观一点。UWP默认的Page切换是有动画效果的,但这里因为只使用StateTrigger设置了Grid的列宽,当从DetailPage返回MasterPage的时候MasterPage一下子就显示出来了,感觉有点生硬。现在给切换加一个动画。
在NarrowAndBlankDetail的VisualState里,添加一段StoryBoard:
<Storyboard >
    <DoubleAnimation Storyboard.TargetName="gridMain" Storyboard.TargetProperty="Opacity" From="0" To="1" Duration="0:0:0.6">
        <DoubleAnimation.EasingFunction>
            <CircleEase EasingMode="EaseOut" />
        </DoubleAnimation.EasingFunction>
    </DoubleAnimation>
    <DoubleAnimation Storyboard.TargetName="gridMain" Storyboard.TargetProperty="(UIElement.RenderTransform).(CompositeTransform.TranslateX)" From="-100" To="0" Duration="0:0:0.3">
        <DoubleAnimation.EasingFunction>
            <CircleEase EasingMode="EaseOut" />
        </DoubleAnimation.EasingFunction>
    </DoubleAnimation>
</Storyboard>
设置透明度从0到1,同时有一个移动的效果。注意这里的StoryBoard.TargetProperty的写法,详细说明可以参考MSDN文档:
https://msdn.microsoft.com/zh-cn/library/windows/apps/jj569302.aspx
再次吐槽一下MSDN文档真是太难找了。版本太多。
在<VisualStateManager.VisualStateGroups>里添加Transitions:
<VisualStateGroup.Transitions>
    <VisualTransition From="NarrowAndNoBlankDetail" To="NarrowAndBlankDetail" ></VisualTransition>
</VisualStateGroup.Transitions>
同时要在gridMain里添加以下代码:
<Grid.RenderTransform>
    <CompositeTransform />
</Grid.RenderTransform>
不然动画无法起作用。
现在运行一下看看,返回的时候MasterPage也是从左侧渐变滑入的,效果好了不少。
这种方式基本可以把WP8.1的代码直接拿过来用,页面改动不大。如果您有更好的实现方式,欢迎留言讨论。
这篇基本就写到这里了。最近WP圈一片哀嚎,很多无奈的事情。但作为普通个人开发者来说,抱怨也没用,能做多少就做多少吧,总好过只吐槽。行动的意义永远大于口头空讲。
本文得到了礼物说开发者郑大神的鼎力支持。希望大家下载他的礼物说,做的非常漂亮。
预祝大家新春快乐!
最后给出demo下载:链接:http://pan.baidu.com/s/1hqQTbEW 密码:ilar
Win10 UWP开发系列:实现Master/Detail布局
标签:core action ret goback 不为 升级 enables test wss
原文地址:http://www.cnblogs.com/lonelyxmas/p/7567175.html
