标签:amp image exp physics als 试验 win 位置 center
Draw grid on the terrain in Unity
Jan 23, 2015

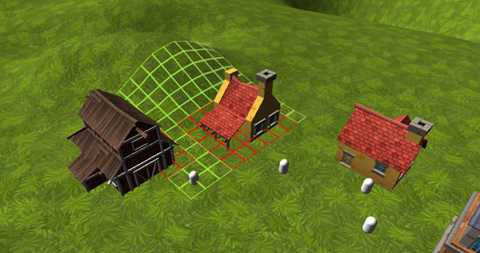
Drawing grid on the terrain is used in lot of game genres – RTS, Simulation, Tower defense, etc. It can be done very easily in Unity.
Here is some very simple extensible solution with following features:
Respect terrain height Option to have different texture in different parts (eg. to distinguish free and taken cells) Configurable (you can resize grid in editor or real-time and set cell size)
在许多游戏类型的RTS、仿真、塔防御等游戏中都使用了绘图网格,可以很容易地在Unity中完成。
下面是一些非常简单的可扩展的解决方案,具有以下特性:
根据地形高度选项在不同的部分有不同的纹理 (例如. 区分free 和 taken cells)可配置 (可在编辑器或 real-time 中调整网格大小并设置单元格尺寸)
代码:
using UnityEngine;
using System.Collections;
using System.Collections.Generic;
public class TerrainGrid : MonoBehaviour {
public float cellSize = 1;
public int gridWidth = 10;
public int gridHeight = 10;
public float yOffset = 0.5f;
public Material cellMaterialValid;
public Material cellMaterialInvalid;
private GameObject[] _cells;
private float[] _heights;
void Start() {
_cells = new GameObject[gridHeight * gridWidth];
_heights = new float[(gridHeight + 1) * (gridWidth + 1)];
for (int z = 0; z < gridHeight; z++) {
for (int x = 0; x < gridWidth; x++) {
_cells[z * gridWidth + x] = CreateChild();
}
}
}
void Update () {
UpdateSize();
UpdatePosition();
UpdateHeights();
UpdateCells();
}
GameObject CreateChild() {
GameObject go = new GameObject();
go.name = "Grid Cell";
go.transform.parent = transform;
go.transform.localPosition = Vector3.zero;
go.AddComponent<MeshRenderer>();
go.AddComponent<MeshFilter>().mesh = CreateMesh();
return go;
}
void UpdateSize() {
int newSize = gridHeight * gridWidth;
int oldSize = _cells.Length;
if (newSize == oldSize)
return;
GameObject[] oldCells = _cells;
_cells = new GameObject[newSize];
if (newSize < oldSize) {
for (int i = 0; i < newSize; i++) {
_cells[i] = oldCells[i];
}
for (int i = newSize; i < oldSize; i++) {
Destroy(oldCells[i]);
}
}
else if (newSize > oldSize) {
for (int i = 0; i < oldSize; i++) {
_cells[i] = oldCells[i];
}
for (int i = oldSize; i < newSize; i++) {
_cells[i] = CreateChild();
}
}
_heights = new float[(gridHeight + 1) * (gridWidth + 1)];
}
void UpdatePosition() {
RaycastHit hitInfo;
Ray ray = Camera.main.ScreenPointToRay(Input.mousePosition);
Physics.Raycast(ray, out hitInfo, Mathf.Infinity, LayerMask.GetMask("Terrain"));
Vector3 position = hitInfo.point;
position.x -= hitInfo.point.x % cellSize + gridWidth * cellSize / 2;
position.z -= hitInfo.point.z % cellSize + gridHeight * cellSize / 2;
position.y = 0;
transform.position = position;
}
void UpdateHeights() {
RaycastHit hitInfo;
Vector3 origin;
for (int z = 0; z < gridHeight + 1; z++) {
for (int x = 0; x < gridWidth + 1; x++) {
origin = new Vector3(x * cellSize, 200, z * cellSize);
Physics.Raycast(transform.TransformPoint(origin), Vector3.down, out hitInfo, Mathf.Infinity, LayerMask.GetMask("Terrain"));
_heights[z * (gridWidth + 1) + x] = hitInfo.point.y;
}
}
}
void UpdateCells() {
for (int z = 0; z < gridHeight; z++) {
for (int x = 0; x < gridWidth; x++) {
GameObject cell = _cells[z * gridWidth + x];
MeshRenderer meshRenderer = cell.GetComponent<MeshRenderer>();
MeshFilter meshFilter = cell.GetComponent<MeshFilter>();
meshRenderer.material = IsCellValid(x, z) ? cellMaterialValid : cellMaterialInvalid;
UpdateMesh(meshFilter.mesh, x, z);
}
}
}
bool IsCellValid(int x, int z) {
RaycastHit hitInfo;
Vector3 origin = new Vector3(x * cellSize + cellSize/2, 200, z * cellSize + cellSize/2);
Physics.Raycast(transform.TransformPoint(origin), Vector3.down, out hitInfo, Mathf.Infinity, LayerMask.GetMask("Buildings"));
return hitInfo.collider == null;
}
Mesh CreateMesh() {
Mesh mesh = new Mesh();
mesh.name = "Grid Cell";
mesh.vertices = new Vector3[] { Vector3.zero, Vector3.zero, Vector3.zero, Vector3.zero };
mesh.triangles = new int[] { 0, 1, 2, 2, 1, 3 };
mesh.normals = new Vector3[] { Vector3.up, Vector3.up, Vector3.up, Vector3.up };
mesh.uv = new Vector2[] { new Vector2(1, 1), new Vector2(1, 0), new Vector2(0, 1), new Vector2(0, 0) };
return mesh;
}
void UpdateMesh(Mesh mesh, int x, int z) {
mesh.vertices = new Vector3[] {
MeshVertex(x, z),
MeshVertex(x, z + 1),
MeshVertex(x + 1, z),
MeshVertex(x + 1, z + 1),
};
}
Vector3 MeshVertex(int x, int z) {
return new Vector3(x * cellSize, _heights[z * (gridWidth + 1) + x] + yOffset, z * cellSize);
}
}
Because we want to have different kind of cells we have two options – one is using separate game object for every cell and second option is using one game object containing mesh with lot of submeshes. I chose first option because of simplicity and flexibility.
因为我们想要有不同种类的格子, 我们有两个选择-一个是为每个格子使用单独的游戏对象和第二个选项是使用一个包涵网格的游戏对象, 其中含有大量的网格集合。我选择的第一个选项, 因为简单和灵活性。
For every cell we create corresponding mesh. In example above you can see that it‘s very simple square mesh from just 2 triangles (line 131). Y coordinate of each square‘s vertex is calculated by doing raycast on the terrain (precalculated for every cell in UpdateHeights method every frame) and adding yOffset value. For better result you can experiment with square mesh with much more triangles (eg. 24).
对于每个单元格, 我们创建相应的网格。在上面的例子中, 你可以看到, 它是非常简单的正方形网格从2个三角形 (131 行)。每个正方形顶点的 Y 坐标是通过在地形上进行 raycast (每帧调用UpdateHeights 对于每个单元格) 和增加 yOffset 值来计算的。为更好的结果, 你可以试验的正方形网格更多的三角形 (例如 24)。
To every mesh of the cell we assign material based on IsCellValid method which is doing raycast through the center of the cell and checking "Buildings" layer for some colliders, if there is any the cellMaterialInvalid is used (red in screenshot), otherwise cellMaterialValid is used (green).
对单元格的每个网格我们分配材料基于 IsCellValid 方法,这个方法是通过方格中心并且检查 "Buildings" 层数,做 raycast 为有些碰撞, 如果有任何 cellMaterialInvalid 使用 (截图的中红色), 否则cellMaterialValid 使用 (绿色)。
Number of cells are managed in UpdateSize method which is checking for size changes and doing corresponding action – adding new or deleting cells.
In method UpdatePosition the grid is moved so it‘s center is always under mouse cursor.
This is just an example and for real use you will probably have to modify position and resizing behaviour.
单元格的数量在 UpdateSize 方法中进行管理, 它正在检查大小更改并执行相应操作–添加新或删除单元格。
在方法 UpdatePosition 中, 网格被移动, 因此它的中心总是在鼠标光标下面。
这只是一个例子, 对于实际使用, 您可能需要修改位置和调整行为。
原文地址 <http://rene.klacan.sk/unity3d/games/2015/01/23/draw-grid-on-the-terrain-in-unity/>
标签:amp image exp physics als 试验 win 位置 center
原文地址:http://www.cnblogs.com/workhai/p/7571674.html