标签:部分 头部 test ash har 协议 utf8 空间 stat
先进行前端的训练测试,在测试之前首先先写一个socket程序用来做服务端,页面下一章会提到,在这里我用的自己本机的8081端口做的服务端,代码如下:
import socket

def main():

    sock = socket.socket(socket.AF_INET, socket.SOCK_STREAM)
    sock.bind((‘localhost‘,8081))
    sock.listen(5)

    while True:
        print("server is working.....")
        conn, address = sock.accept()

        request = conn.recv(1024)
        with open ("test.html","r",encoding=‘utf-8‘)as read_f:
            conn.sendall(bytes("HTTP/1.1 201 OK\r\n\r\n%s"%read_f.read(),"utf8"))
        conn.close()

if __name__ == ‘__main__‘:

    main()
很简单的代码,上面的代码写了个循环,sock.bind后面接的localhost表示本机ip,8081表示端口.
重点介绍下前端的html文件,首先可以新建一个新的html文件,它会默认的有一些代码:
<!DOCTYPE html>
<html lang="en">
<head>
    <meta charset="UTF-8">
    <title>Title</title>
</head>
<body>

</body>
</html>
这些默认代码含义如下所示:
通常写css的时候在body处写主体页面,在head处可以定义类。
下面介绍几种常用标签:
<hn>: n的取值范围是1~6; 从大到小. 用来表示标题.

<p>: 段落标签. 包裹的内容被换行.并且也上下内容之间有一行空白.

<b> <strong>: 加粗标签.

<strike>: 为文字加上一条中线.

<em>: 文字变成斜体.

<sup>和<sub>: 上角标 和 下角表.

<br>:换行.

<hr>:水平线
块级标签:一个标签占用一行的叫块级标签,反过来就是内联标签
div标签是常用的块级标签。
比如本周的作业,在head处的定义:
<!DOCTYPE html>
<html lang="en">
<head>
    <meta charset="UTF-8">
    <title>Title</title>
    <style>
     .dingyi{
            width: 500px;
            height: 30px;
            background: #ccd;
            float: left;
            text-align:center
        }
     .dingyi2{
            width: 500px;
            height: 30px;
            background: #ccd;
            float: right;
            text-align:center
        }
     .dingyi3{
            width: 500px;
            height: 500px;
            border-color: #ccd;
            float: right;
            text-align:center
        }
     .dingyi4{
            width: 1400px;
            height:700px;
            border: 1px solid #e1e1e1;
            <!--border-radius: 15%;-->
            padding-left: 200px;
            float: center;
            margin-left:220px;
       }
     .dingyi5{
            width: 800px;
            height:600px;
            border-right: 1px dashed #e1e1e2;
            padding-left: 100px;
            float: left;
            margin-left: 50px;
            margin-top: 50px;
       }
     .dingyi6{
            width: 300px;
            height:600px;
            <!--border: 1px solid #e1e1e2;-->
            padding-left: 100px;
            float: right;
            margin-top: 50px;
       }
     </style>
</head>
head定义完成后就可以定义body了:
<body>
    <div style="height: 37px;background-color:#ccd">
        <div class="dingyi" style="margin-top:7px">
            <a href="https://www.baidu.com" style="height: 30px">*收藏本站</a>
        </div>
        <div class="dingyi2" style="margin-top:7px">
            <a href="http://www.baidu.com" style="height: 30px">登录</a>
            <a href="http://www.baidu.com" style="height: 30px">免费注册</a>
            <a href="http://www.baidu.com" style="height: 30px">我的订单</a>
            <a href="http://www.baidu.com" style="height: 30px">VIP会员俱乐部</a>
        </div>
    </div>
    <div>
        <img src="https://ss3.bdstatic.com/70cFv8Sh_Q1YnxGkpoWK1HF6hhy/it/u=508710356,2971756153&fm=27&gp=0.jpg" style="height:100px;width:150px;margin-left:200px">
    </div>
    <!--<div style="height: 1000px">-->
    <div class="dingyi4">
        <div class="dingyi5">
            <h1>注册新用户</h1>
            <h3 style="margin-left: 20px">*用户名:<input type="text" name="username"></h3>
            <h3 style="margin-left: 20px">*手机号:<input type="text" name="phone_number"></h3>
            <h3>*登录密码:<input type="text" name="password"></h3>
            <h3>*确认密码:<input type="text" name="password2"></h3>
            <h3 style="margin-left: 20px">*验证码:<input type="text" name="yanzhengma"></h3>
            <p><input type="radio" >我已阅读并同意 <a href=""><<用户注册协议>></a></p>
            <p><input type="submit" value="同意以上协议并注册" style="background:red; margin-left: 70px "></p>
        </div>
        <div class="dingyi6">
            <div>我已经注册,现在就 <a href="">登录</a></div>
            <div><img src="https://timgsa.baidu.com/timg?image&quality=80&size=b9999_10000&sec=1506061552313&di=953a3881c5dfc92c9644a10b19a3859d&imgtype=0&src=http%3A%2F%2Fimg2.tiandaoedu.com%2Fwww%2Fueditor%2Fnet%2Fupload%2F2016-01-30%2Fc0f1f525-f618-41f3-88cd-cff99ff95f95.jpg" style="height:150px;width:200px;margin-top:30px"></img></div>
        </div>

    </div>
</body>
</html>
前端开发有个重要思想,盒子模型:
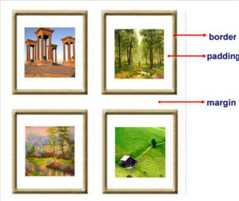
解释如下:
通过以上代码就可以得到一个相应的页面:
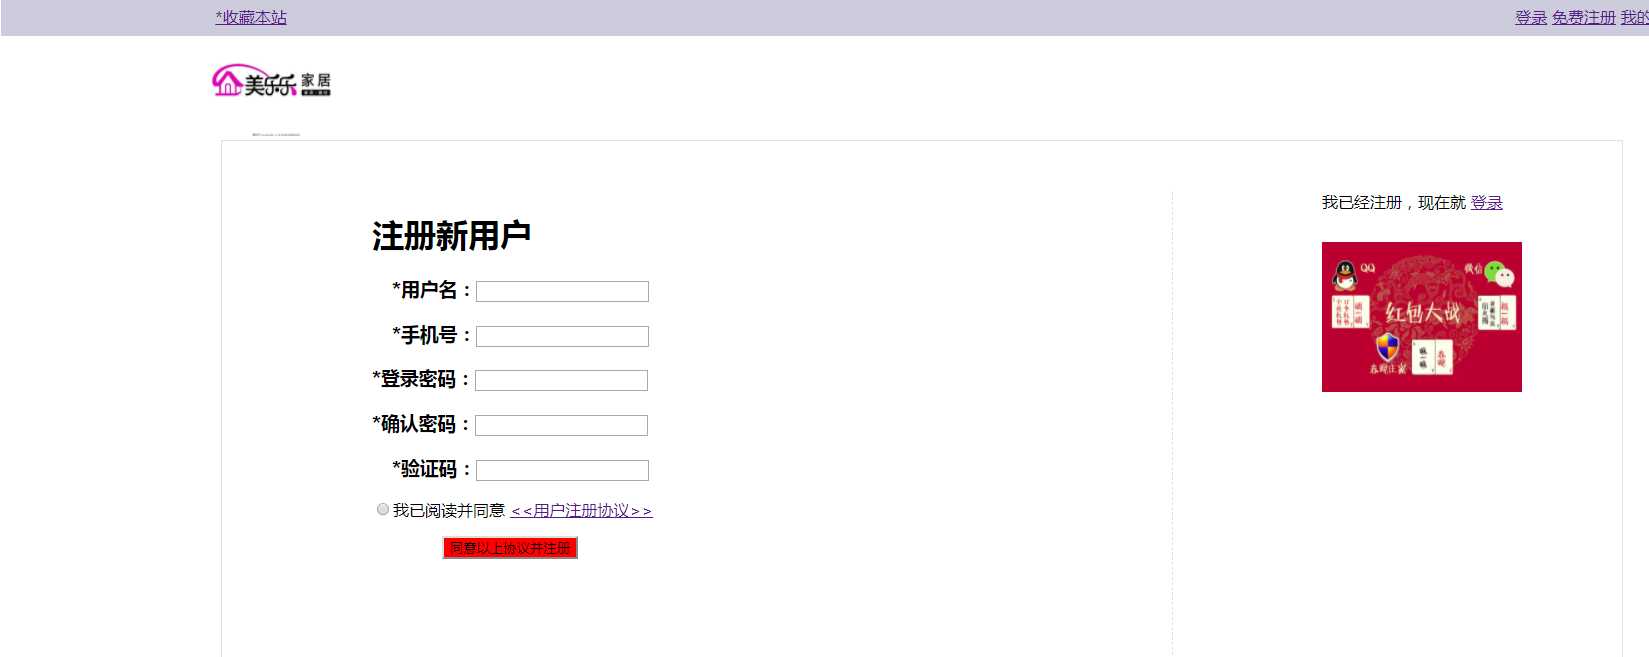
后期还可以进行优化!
标签:部分 头部 test ash har 协议 utf8 空间 stat
原文地址:http://www.cnblogs.com/qianmeng/p/7574178.html