标签:des android style blog http color os io 使用
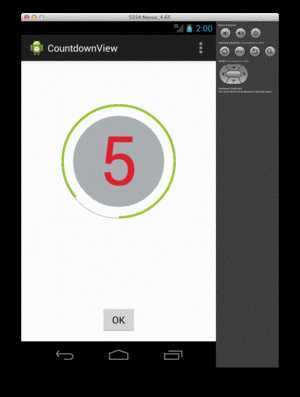
先看一下效果:

在点击OK键之后,开始倒计时。

自定义View并没有直接的用户交互,简化起见,可以自定义实现一个drawable,作为ImageView的背景
观察一下View的构成,分为几个部分:
1. 外围圆环边界
2. 进度条
3. 内部圆形背景
4. 倒计时数字
另外,要画出这几个部分,画笔Paint肯定少不了
好了,自定义一个“CountdownDrawable”继承Drawable
 1 public class CountdownDrawable extends Drawable {
 2
 3     //画笔
 4     private Paint mPaint;
 5     private RectF mArcRect;
 6
 7     //当前进度条进度
 8     private float progress;
 9     //边框圆颜色
10     private int outlineColor;
11     //内部背景圆颜色
12     private int innerColor;
13     //进度条颜色
14     private int ringColor;
15     //进度条宽度
16     private int ringWidth;
17     //倒计时数字
18     private int showNumber;
19     //数字颜色
20     private int textColor;
21
22     @Override
23     public void draw(Canvas canvas) {
24         // TODO Auto-generated method stub
25
26     }
27
28     @Override
29     public void setAlpha(int alpha) {
30         mPaint.setAlpha(alpha);
31     }
32
33     @Override
34     public void setColorFilter(ColorFilter cf) {
35     }
36
37     @Override
38     public int getOpacity() {
39         return mPaint.getAlpha();
40     }
41
42 }
变量初始化:
 1 public CountdownDrawable(int ringWidth, int outlineColor, int innerColor, int ringColor, int showNumber, int textColor) {
 2     mPaint = new Paint();
 3     mArcRect = new RectF();
 4
 5     this.outlineColor = outlineColor;
 6     this.innerColor = innerColor;
 7     this.ringColor = ringColor;
 8     this.ringWidth = ringWidth;
 9     this.showNumber = showNumber;
10     this.textColor = textColor;
11 }
 1 public void draw(Canvas canvas) {
 2     //获取view的边界
 3     final Rect bounds = getBounds();
 4
 5     int size = bounds.height() > bounds.width() ? bounds.width() : bounds.height();
 6     float outerRadius = ((size / 2) * 0.75f) * 0.937f;
 7     float innerRadius = ((size / 2) * 0.75f) * 0.75f;
 8     float offsetX = (bounds.width() - outerRadius * 2) / 2;
 9     float offsetY = (bounds.height() - outerRadius * 2) / 2;
10
11     //画边框圆
12     mPaint.setStyle(Paint.Style.STROKE);
13     mPaint.setStrokeWidth(1);
14     mPaint.setColor(outlineColor);
15     canvas.drawCircle(bounds.centerX(), bounds.centerY(), outerRadius, mPaint);
16
17     //画内部背景
18     mPaint.setStyle(Paint.Style.FILL);
19     mPaint.setColor(innerColor);
20     canvas.drawCircle(bounds.centerX(), bounds.centerY(), innerRadius, mPaint);
21
22     //画倒计时数字
23     float textSize = innerRadius * 2 * 0.75f;
24     mPaint.setTextSize(textSize);
25     mPaint.setTextAlign(Align.CENTER);
26     mPaint.setColor(textColor);
27     float textX = bounds.centerX();
28     float textY = bounds.centerY() - (mPaint.descent() + mPaint.ascent()) / 2;
29     canvas.drawText(Integer.toString(showNumber), textX, textY, mPaint);
30
31     //画进度条
32     int halfRingWidth = ringWidth / 2;
33     float arcX0 = offsetX + halfRingWidth;
34     float arcY0 = offsetY + halfRingWidth;
35     float arcX = offsetX + outerRadius * 2 - halfRingWidth;
36     float arcY = offsetY + outerRadius * 2 - halfRingWidth;
37
38     mPaint.setColor(ringColor);
39     mPaint.setStyle(Paint.Style.STROKE);
40     mPaint.setStrokeWidth(ringWidth);
41     mPaint.setStrokeCap(Paint.Cap.ROUND);
42     mArcRect.set(arcX0, arcY0, arcX, arcY);
43     canvas.drawArc(mArcRect, 89, progress, false, mPaint);
44 }
 1 public float getProgress() {
 2     return progress / PROGRESS_FACTOR;
 3 }
 4
 5 public void setProgress(float progress) {
 6     this.progress = progress * PROGRESS_FACTOR;
 7
 8     invalidateSelf();
 9 }
10
11 public int getShowNumber() {
12     return showNumber;
13 }
14
15 public void setShowNumber(int showNumber) {
16     this.showNumber = showNumber;
17
18     invalidateSelf();
19 }
首先定义一个ImageView,设置其图片为刚刚定义的drawable
1 mIv = (ImageView)findViewById(R.id.iv);
2 mCdDrawable = new CountdownDrawable(getResources().getDimensionPixelSize(R.dimen.drawable_ring_size),  getResources().getColor(R.color.dark_grey), getResources().getColor(R.color.brightly_grey)
3                 , getResources().getColor(R.color.holo_green_light), 5, getResources().getColor(R.color.red));
4 mIv.setImageDrawable(mCdDrawable);
各颜色定义如下:
1 <dimen name="drawable_ring_size">4dp</dimen>
2
3 <color name="dark_grey">#FF54585A</color>
4 <color name="holo_green_light">#FF99CC00</color>
5 <color name="brightly_grey">#CF9EA2A2</color>
6 <color name="red">#FFE61E27</color>
使用属性动画,计算进度条progress及倒计时数字showNumber
 1 private Animator prepareAnimator() {
 2     AnimatorSet animation = new AnimatorSet();
 3
 4     // 进度条动画
 5     ObjectAnimator progressAnimator = ObjectAnimator.ofFloat(mCdDrawable, "progress", 1f, 0f);
 6     progressAnimator.setDuration(5000);
 7     progressAnimator.setInterpolator(new LinearInterpolator());
 8     progressAnimator.addListener(new Animator.AnimatorListener() {
 9
10         @Override
11         public void onAnimationStart(Animator animation) {
12
13         }
14
15         @Override
16         public void onAnimationRepeat(Animator animation) {
17
18         }
19
20         @Override
21         public void onAnimationEnd(Animator animation) {
22             mIv.setVisibility(View.GONE);
23         }
24
25         @Override
26         public void onAnimationCancel(Animator animation) {
27             mIv.setVisibility(View.GONE);
28         }
29     });
30
31     // 居中的倒计时数字
32     ObjectAnimator showNumberAnimator = ObjectAnimator.ofInt(mCdDrawable, "showNumber", 5, 0);
33     showNumberAnimator.setDuration(5000);
34     showNumberAnimator.setInterpolator(new LinearInterpolator());
35
36     animation.playTogether(progressAnimator, showNumberAnimator);
37     return animation;
38 }
最后在button中添加点击事件
 1 private View.OnClickListener mBtnOnClickListener = new View.OnClickListener() {
 2
 3     @Override
 4     public void onClick(View v) {
 5         if(mAnimator != null) {
 6             mAnimator.cancel();
 7         }
 8         mIv.setVisibility(View.VISIBLE);
 9         mAnimator = prepareAnimator();
10         mAnimator.start();
11     }
12 };
标签:des android style blog http color os io 使用
原文地址:http://www.cnblogs.com/treecat-roboto/p/3962711.html