标签:cal package 能力 初始化 排除 host 技术 结构 作用
最近做了外包,都是工程专业术语,前期熟悉项目看文档看的挺累的,闲暇时间自己学习一下Spring Cloud,找点乐趣.
就有了下面的小项目.
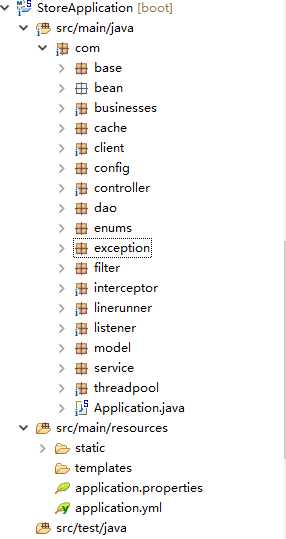
本项目是一个Spring boot项目.
一、nginx做LB
二、前后分离通过JSON交互数据
三、Controller层使用适配器
四、Service层很常规
五、缓存使用ehcache
六、dao层使用JPA简化开发
七、连接池使用dbcp2
八、redis缓存
九、WebMvcConfigurerAdapter拦截器
十、CommandLineRunner启动任务加载基础数据
十一、ApplicationListener监听器
十二、数据库使用mysql
十三、线程池用来执行task定时任务
十四、统一异常处理
下面通过代码示例,演示该项目

1,nignx编译安装与增加openssl模块随后单独整理
2,SpringBoot通过@RestController默认返回json数据
3,使用适配器是为了方便业务类开发规范,@PathVariable注解获取请求路径中的参数,通过WebCpplicationContext获取业务类Bean示例
package com.controller;

import java.lang.reflect.InvocationTargetException;
import java.lang.reflect.Method;
import java.util.HashMap;
import java.util.Map;

import org.springframework.beans.factory.annotation.Autowired;
import org.springframework.context.annotation.Scope;
import org.springframework.web.bind.annotation.PathVariable;
import org.springframework.web.bind.annotation.RequestMapping;
import org.springframework.web.bind.annotation.RestController;
import org.springframework.web.context.WebApplicationContext;

import com.base.BaseController;
import com.base.StringTools;
import com.businesses.BaseBusiness;

@RestController
@Scope("prototype")
@RequestMapping("/adapter")
public class AdapterController extends BaseController {

    @Autowired
    WebApplicationContext context;

    @RequestMapping("/{businessName}/{methodName}")
    public void executeAPI( @PathVariable String businessName,
            @PathVariable String methodName) throws Exception {
        Map<String, Object> map = new HashMap<String, Object>();
        String status = "0";
        String message = "success";
        String excep = "";
        businessName += "BusinessImpl";
        String request_json = null;
        try {
            request_json = StringTools.getStreamString(request.getInputStream());
            BaseBusiness business = (BaseBusiness) context
                    .getBean(businessName);
            Method method = null;
            Object result = null;
            method = business.getClass().getMethod(methodName, String.class);
            result = method.invoke(business, request_json);
            map.put("result", result);

        } catch (InvocationTargetException e) {
            message = e.getTargetException().getMessage();
            status = "500";
            excep = e.getTargetException().getMessage();
            log.error("excuteAPI Exception...", e);
            //此处设置后台全局异常处理使用
            //throw new RuntimeException();
        } catch (Exception e) {
            status = "500";
            message = e.getMessage();
            excep = e.getMessage();
            log.error("excuteAPI Exception...", e);
            //此处设置后台全局异常处理使用
            //throw new RuntimeException();
        }
        map.put("status", status);
        map.put("message", message);
        map.put("message_detail", excep);
        super.ajaxResponse(map);
    }
}
4,Business(Service)实现比较常规,是具体的业务实现
接口

package com.businesses;

import com.base.CommonException;
import com.bean.base.BaseResponse;

public interface MemberBusiness extends BaseBusiness{
    void addMember(String reqJson)throws CommonException;

    BaseResponse loginMember(String reqJson)throws CommonException;

    BaseResponse findMemberById(String reqJson)throws CommonException;
}
实现类

package com.businesses.impl;

import javax.servlet.http.HttpSession;

import org.springframework.beans.BeanUtils;
import org.springframework.beans.factory.annotation.Autowired;
import org.springframework.stereotype.Component;

import com.base.CommonException;
import com.base.GsonTools;
import com.bean.base.BaseResponse;
import com.bean.request.MemberFindById;
import com.bean.request.MemberLoginRequest;
import com.bean.request.MemberSaveRequest;
import com.bean.response.MemberResponse;
import com.businesses.MemberBusiness;
import com.dao.MemberRepository;
import com.enums.Constants;
import com.model.Member;

@Component("memberBusinessImpl")
public class MemberBusinessImpl implements MemberBusiness{

    @Autowired
    MemberRepository memberRepository;

    @Autowired
    BaseBusinessImpl baseBusinessImpl;
    @Override
    public void addMember(String reqJson) throws CommonException {
        MemberSaveRequest saveReq = GsonTools.str2T(reqJson, MemberSaveRequest.class);
        Member member= new Member();
        BeanUtils.copyProperties(saveReq, member);
        memberRepository.save(member);
    }

    @Override
    public BaseResponse loginMember(String reqJson) throws CommonException {
        MemberLoginRequest loginReq = GsonTools.str2T(reqJson, MemberLoginRequest.class);
        BaseResponse resp = new BaseResponse();
        Member member = memberRepository.findByMobile(loginReq.getMobile());
        if(member == null) {
            throw new CommonException(Constants.STRING_MOBILE_ERROR);
        }
        if(!member.getPassword().equals(loginReq.getPassword())) {
            throw new CommonException(Constants.STRING_PASSW_ERROR);
        }
        HttpSession session = baseBusinessImpl.getSession();
        session.setAttribute("member", member);
        resp.setFalg(true);
        resp.setMsg(Constants.STRING_LOGIN_SUCCESS);
        return resp;
    }


    @Override
    public BaseResponse findMemberById(String reqJson) throws CommonException {
        MemberFindById req = GsonTools.str2T(reqJson, MemberFindById.class);
        MemberResponse resp = new MemberResponse();
        Member member = memberRepository.findById(req.getId());
        if(null == member) {
            throw new CommonException("信息不存在,请核实后再查询");
        }
        resp.setMember(member);
        return resp;
    }

}
5,6JPA与二级缓存
JPA主要是实现JpaRepository接口,可以直接通过类似ByName一样查询语句自动实现查询
二级缓存是通过@CacheConfig(cacheNames = "memberCache"),@Cacheable实现的,这里要注意在Application启动类上添加@EnableCache注解告诉应用启用缓存
package com.dao;

import org.springframework.cache.annotation.CacheConfig;
import org.springframework.cache.annotation.Cacheable;
import org.springframework.data.jpa.repository.JpaRepository;

import com.model.Member;
@CacheConfig(cacheNames = "memberCache")
public interface MemberRepository extends JpaRepository<Member,Long>{
    @Cacheable
    Member findByMobile(String mobile);

    @Cacheable
    Member findById(Long id);
}
7,dbcp2连接池,在properties配置文件中配置
#dbcp2连接配置
spring.datasource.type=org.apache.commons.dbcp2.BasicDataSource
#初始化连接数量,默认值0
spring.datasource.dbcp2.initial-size=10
#最大空闲连接:连接池中容许保持空闲状态的最大连接数量,超过的空闲连接将被释放,如果设置为负数表示不限制,默认值8
spring.datasource.dbcp2.max-idle=20
#最小空闲连接:连接池中容许保持空闲状态的最小连接数量,低于这个数量将创建新的连接,如果设置为0则不创建,默认值0
spring.datasource.dbcp2.min-idle=10
#最大等待时间:当没有可用连接时,连接池等待连接被归还的最大时间(以毫秒计数),超过时间则抛出异常,如果设置为-1表示无限等待
spring.datasource.dbcp2.max-wait-millis=-1
#连接池创建的连接的默认的TransactionIsolation状态.
spring.datasource.dbcp2.default-transaction-isolation=1
#连接池创建的连接的默认的auto-commit状态
spring.datasource.dbcp2.default-auto-commit=true
#连接池创建的连接的默认的read-only状态. 如果没有设置则setReadOnly方法将不会被调用.(某些驱动不支持只读模式,比如:Informix)
spring.datasource.dbcp2.default-read-only=false

#指明是否在从池中取出连接前进行检验,如果检验失败,则从池中去除连接并尝试取出另一个.
#注意: 设置为true后如果要生效,validationQuery参数必须设置为非空字符串
spring.datasource.dbcp2.test-on-borrow=false

#指明连接是否被空闲连接回收器(如果有)进行检验.如果检测失败,则连接将被从池中去除.
#注意: 设置为true后如果要生效,validationQuery参数必须设置为非空字符串
spring.datasource.dbcp2.test-while-idle=true
#在空闲连接回收器线程运行期间休眠的时间值,以毫秒为单位.如果设置为非正数,则不运行空闲连接回收器线程
spring.datasource.dbcp2.time-between-eviction-runs-millis=-1
#在每次空闲连接回收器线程(如果有)运行时检查的连接数量
spring.datasource.dbcp2.num-tests-per-eviction-run=5
8,redis缓存配置

1 . 下载Redis
目前,最新的Redist版本为3.0,使用wget下载,命令如下:
# wget http://download.redis.io/releases/redis-3.0.4.tar.gz

2 . 解压Redis
下载完成后,使用tar命令解压下载文件:
# tar -xzvf redis-3.0.4.tar.gz

3 . 编译安装Redis
切换至程序目录,并执行make命令编译:
# cd redis-3.0.4
# make
执行安装命令
# make install
make install安装完成后,会在/usr/local/bin目录下生成下面几个可执行文件,它们的作用分别是:
redis-server:Redis服务器端启动程序
redis-cli:Redis客户端操作工具。也可以用telnet根据其纯文本协议来操作
redis-benchmark:Redis性能测试工具
redis-check-aof:数据修复工具
redis-check-dump:检查导出工具

4 . 配置Redis
复制配置文件到/etc/目录:
# cp redis.conf /etc/
为了让Redis后台运行,一般还需要修改redis.conf文件:
vi /etc/redis.conf
修改daemonize配置项为yes,使Redis进程在后台运行:
daemonize yes

5 . 启动Redis
配置完成后,启动Redis:
# cd /usr/local/bin
# ./redis-server /etc/redis.conf

7 . Redis配置参数
在 前面的操作中,我们用到了使Redis进程在后台运行的参数,下面介绍其它一些常用的Redis启动参数:
daemonize:是否以后台daemon方式运行
pidfile:pid文件位置
port:监听的端口号
timeout:请求超时时间
loglevel:log信息级别
logfile:log文件位置
databases:开启数据库的数量
save * *:保存快照的频率,第一个*表示多长时间,第三个*表示执行多少次写操作。在一定时间内执行一定数量的写操作时,自动保存快照。可设置多个条件。
rdbcompression:是否使用压缩
dbfilename:数据快照文件名(只是文件名)
dir:数据快照的保存目录(仅目录)
appendonly:是否开启appendonlylog,开启的话每次写操作会记一条log,这会提高数据抗风险能力,但影响效率。
appendfsync:appendonlylog如何同步到磁盘。三个选项,分别是每次写都强制调用fsync、每秒启用一次fsync、不调用fsync等待系统自己同步
9,拦截器我们通过实现WebMvcConfigurerAdapter,具体的拦截器功能在下面,执行的时机也在代码中详细标注了
package com.interceptor;

import org.springframework.context.annotation.Configuration;
import org.springframework.web.servlet.config.annotation.InterceptorRegistry;
import org.springframework.web.servlet.config.annotation.WebMvcConfigurerAdapter;
//添加拦截器,设置拦截范围,排除拦截范围
@Configuration
public class InterceptorHandler extends WebMvcConfigurerAdapter {
    public void addInterceptors(InterceptorRegistry registry) {
        registry.addInterceptor(new CustomInterceptor())
            .addPathPatterns("/**")
            .excludePathPatterns("/adapter/member/addMember");
    }
}

package com.interceptor;

import static java.lang.System.out;
import javax.servlet.http.HttpServletRequest;
import javax.servlet.http.HttpServletResponse;

import org.springframework.web.servlet.HandlerInterceptor;
import org.springframework.web.servlet.ModelAndView;

public class CustomInterceptor implements HandlerInterceptor{

    @Override
    public boolean preHandle(HttpServletRequest request, HttpServletResponse response, Object handler)
            throws Exception {
        //controller之前执行
        out.println("--------CustomInterceptor-------before Controller--------");
        return true;
    }

    @Override
    public void postHandle(HttpServletRequest request, HttpServletResponse response, Object handler,
            ModelAndView modelAndView) throws Exception {
        //controller之后view之前执行
        out.println("--------CustomInterceptor-------after Controller  And  before  modelAndView--------");
    }

    @Override
    public void afterCompletion(HttpServletRequest request, HttpServletResponse response, Object handler, Exception ex)
            throws Exception {
        //view渲染以后执行
        out.println("--------CustomInterceptor-------after modelAndView-----------");
    }

}
10,在项目中我们经常需要把数据在启动时加载到jvm中或redis中,我们可以使用CommandLineRunner启动任务加载基础数据@Order(1)是在有多个自定义CommandLineRunner时指定加载顺序的.
package com.linerunner;

import java.util.List;

import org.springframework.beans.factory.annotation.Autowired;
import org.springframework.boot.CommandLineRunner;
import org.springframework.core.annotation.Order;
import org.springframework.stereotype.Component;

import com.client.RedisClient;
import com.dao.MemberRepository;
import com.model.Member;

@Component
@Order(1)
public class CustomCommandLineRunner implements CommandLineRunner {

    @Autowired
    MemberRepository memberRepository;

    @Autowired
    private RedisClient redisClinet;

    @Override
    public void run(String... arg0) throws Exception {
        System.out.println("--------第一个看看什么时候执行-----------");

        List<Member> list = memberRepository.findAll();
        for (Member member : list) {
            redisClinet.set(member.getId().toString(), member.getMobile());
            System.out.println("redis 服务器获取到    --- " + redisClinet.get(member.getId().toString()));
        }
    }

}
11,监听器ApplicationListener
package com.listener;


import org.springframework.beans.factory.annotation.Autowired;
import org.springframework.boot.context.event.ApplicationEnvironmentPreparedEvent;
import org.springframework.context.ApplicationListener;
import org.springframework.web.context.WebApplicationContext;

public class CustomApplicationListener implements ApplicationListener<ApplicationEnvironmentPreparedEvent>{

    @Autowired
    WebApplicationContext wac;

    @Override
    public void onApplicationEvent(ApplicationEnvironmentPreparedEvent event) {
        System.out.println("---------启动前的listener-----------");
    }


}
12,mysql数据库,说下乱码解决吧,一般出现乱码,先查看查看workspace编码-->前台页面传过来的数据是否乱码-->数据库是否乱码 数据库出现乱码的话在my.ini中设置一下
[mysqld]设置项下的character-set-server=utf8,一般是此处问题
13,线程池用来执行task定时任务,线程池明天详细补充一下吧.
14,统一异常处理(当然要体验这个的话要在AdapterController把注解注释掉哦)
package com.exception;

import javax.servlet.http.HttpServletResponse;

import org.springframework.web.bind.annotation.ExceptionHandler;
import org.springframework.web.bind.annotation.RestControllerAdvice;

import com.bean.response.ExceptionResponse;

@RestControllerAdvice
public class GlobalExceptionHandler {

    @ExceptionHandler(RuntimeException.class)
    public ExceptionResponse exceptionHandler(RuntimeException e, HttpServletResponse response) {
        ExceptionResponse resp = new ExceptionResponse();
        resp.setCoed("100");
        resp.setMessage("全局异常处理");
        return resp;
    }

}
15,RedisClient
package com.client;

import org.apache.log4j.Logger;
import org.springframework.beans.factory.annotation.Autowired;
import org.springframework.stereotype.Component;

import redis.clients.jedis.Jedis;
import redis.clients.jedis.JedisPool;

@Component
public class RedisClient {

    Logger log = Logger.getLogger(RedisClient.class);

    @Autowired
    private JedisPool jedisPool;

    public void set(String key, String value) {
        try(Jedis jedis =jedisPool.getResource()) {
            jedis.set(key, value);
        } catch(Exception e) {
            log.error("jedisPoll 存储数据   出错了  ....", e);
        }
    }

    public String get(String key) throws Exception  {

        try(Jedis jedis =jedisPool.getResource()) {
            return jedis.get(key);
        } catch(Exception e) {
            log.error("jedisPoll 存储数据   出错了  ....", e);
            return null;
        }
    }
}
补充
配置文件加载顺序
//1命令行参数。
//2properties
//yml
//昂,还需要研究一下,待补充
详细配置文件

spring.datasource.url=jdbc:mysql://localhost:3306/store?useUnicode=true&characterEncoding=utf-8
spring.datasource.username=root
spring.datasource.password=123456
spring.datasource.driver-class-name=com.mysql.jdbc.Driver
#自动更新表结构,保留数据
spring.jpa.properties.hibernate.hbm2ddl.auto=update
spring.jpa.properties.hibernate.show_sql=true
spring.thymeleaf.cache=false

#dbcp2连接配置
spring.datasource.type=org.apache.commons.dbcp2.BasicDataSource
#初始化连接数量,默认值0
spring.datasource.dbcp2.initial-size=10
#最大空闲连接:连接池中容许保持空闲状态的最大连接数量,超过的空闲连接将被释放,如果设置为负数表示不限制,默认值8
spring.datasource.dbcp2.max-idle=20
#最小空闲连接:连接池中容许保持空闲状态的最小连接数量,低于这个数量将创建新的连接,如果设置为0则不创建,默认值0
spring.datasource.dbcp2.min-idle=10
#最大等待时间:当没有可用连接时,连接池等待连接被归还的最大时间(以毫秒计数),超过时间则抛出异常,如果设置为-1表示无限等待
spring.datasource.dbcp2.max-wait-millis=-1
#连接池创建的连接的默认的TransactionIsolation状态.
spring.datasource.dbcp2.default-transaction-isolation=1
#连接池创建的连接的默认的auto-commit状态
spring.datasource.dbcp2.default-auto-commit=true
#连接池创建的连接的默认的read-only状态. 如果没有设置则setReadOnly方法将不会被调用.(某些驱动不支持只读模式,比如:Informix)
spring.datasource.dbcp2.default-read-only=false

#指明是否在从池中取出连接前进行检验,如果检验失败,则从池中去除连接并尝试取出另一个.
#注意: 设置为true后如果要生效,validationQuery参数必须设置为非空字符串
spring.datasource.dbcp2.test-on-borrow=false

#指明连接是否被空闲连接回收器(如果有)进行检验.如果检测失败,则连接将被从池中去除.
#注意: 设置为true后如果要生效,validationQuery参数必须设置为非空字符串
spring.datasource.dbcp2.test-while-idle=true
#在空闲连接回收器线程运行期间休眠的时间值,以毫秒为单位.如果设置为非正数,则不运行空闲连接回收器线程
spring.datasource.dbcp2.time-between-eviction-runs-millis=-1
#在每次空闲连接回收器线程(如果有)运行时检查的连接数量
spring.datasource.dbcp2.num-tests-per-eviction-run=5
Redis配置
package com.config;
import org.springframework.beans.factory.annotation.Autowired;
import org.springframework.beans.factory.annotation.Qualifier;
import org.springframework.beans.factory.annotation.Value;
import org.springframework.context.annotation.Bean;
import org.springframework.context.annotation.Configuration;

import redis.clients.jedis.JedisPool;
import redis.clients.jedis.JedisPoolConfig;

@Configuration
public class RedisConfiguration {

    @Bean(name= "jedis.pool")
    @Autowired
    public JedisPool jedisPool(@Qualifier("jedis.pool.config") JedisPoolConfig config,
                @Value("${jedis.pool.host}")String host,
                @Value("${jedis.pool.port}")int port) {
        return new JedisPool(config, host, port);
    }

    @Bean(name= "jedis.pool.config")
    public JedisPoolConfig jedisPoolConfig (@Value("${jedis.pool.config.maxTotal}")int maxTotal,
                                @Value("${jedis.pool.config.maxIdle}")int maxIdle,
                                @Value("${jedis.pool.config.maxWaitMillis}")int maxWaitMillis) {
        JedisPoolConfig config = new JedisPoolConfig();
        config.setMaxTotal(maxTotal);
        config.setMaxIdle(maxIdle);
        config.setMaxWaitMillis(maxWaitMillis);
        config.setTestOnBorrow(false);
        config.setTestOnReturn(false);
        return config;
    }

}
昂,好乱,好晚了,睡觉睡觉,明天晚上再整理
后续会做动静分离,应用拆分,容错机制,高可用注册中心,哇,还有很长的啊....
标签:cal package 能力 初始化 排除 host 技术 结构 作用
原文地址:http://www.cnblogs.com/loginloading/p/7599729.html