标签:base 指定 ref commons upload 电脑 uuid bean 错误页面
一、导航
复杂类型的参数绑定
校验
异常处理
图片上传
json交互
拦截器
二、复杂类型参数绑定
①.包装类型的pojo参数绑定
使用场景:实现商品查询条件传入。
实现方法:》通过添加HttpServletRequest形参来获取参数
》通过包装类型的pojo来获取
package cn.mycookies.ssm.po;public class ItemsQueryVo {

    //为了系统 可扩展性,对原始生成的po进行扩展
    private ItemsCustom itemsCustom;

      public ItemsCustom getItemsCustom() {
        return itemsCustom;
    }

    public void setItemsCustom(ItemsCustom itemsCustom) {
        this.itemsCustom = itemsCustom;
    }

}
1.controller中的参数接收
// 商品查询
    @RequestMapping(value = "/queryItems.action")
    public ModelAndView queryItems3(ItemsQueryVo itemsQueryVo) throws Exception {
2.页面中的参数传递
商品名称<input type="text" name="itemsCustom.name"/></td>
②集合类型绑定
1.数组绑定
表现层实现
<c:forEach items="${itemsList }" var="item">
<tr>
    <td><input type="checkbox" name="items_id" value="${item.id }"/></td>
。。。
</c:forEach>
controller中实现
@RequestMapping(value = "/deleteItems", method = { RequestMethod.POST })
    public String deleteItems(Integer[] items_id) throws Exception {
③list集合绑定
通过包装类型的pojo来接收list集合
package cn.mycookies.ssm.po;

import java.util.ArrayList;
import java.util.List;


public class ItemsQueryVo {

    //批量商品信息
    List<ItemsCustom> itemsList = new ArrayList<ItemsCustom>();

    public List<ItemsCustom> getItemsList() {
        return itemsList;
    }
    public void setItemsList(List<ItemsCustom> itemsList) {
        this.itemsList = itemsList;
    }

}
页面定义
<c:forEach items="${itemsLists }" var="item" varStatus="index" >
<tr>
    <td><input type="hidden" name="itemsList[${index.index }].id" value="${item.id}"></td>
    <td><input name="itemsList[${index.index }].name" value="${item.name }"></td>
    <td><input name="itemsList[${index.index }].price" value="${item.price }"></td>
    <td><input name="itemsList[${index.index }].createtime" value="<fmt:formatDate value=‘${item.createtime}‘ pattern=‘yyyy-MM-dd HH:mm:ss‘/>"/></td>
    <td><input name="itemsList[${index.index }].detail" value="${item.detail }"></td>

</tr>
</c:forEach>
Controller中定义
    // 批量修改提交
    // 吧批量商品信息存储到ItemsQueryVo的itemsList属性中
    @RequestMapping(value = "/editItemsAllSubmit.action")
    public String editItemsAllSubmit(ItemsQueryVo itemsQueryVo)
            throws Exception {
④Map集合绑定
包装类如下
Public class QueryItemsVo {
private Map<String, Object> itemInfo = new HashMap<String, Object>();
  //get/set方法..
}
页面定义
<tr>
<td>学生信息:</td>
<td>
姓名:<inputtype="text"name="itemInfo[‘name‘]"/>
年龄:<inputtype="text"name="itemInfo[‘price‘]"/>
.. .. ..
</td>
</tr>
Controller中的方法
public String useraddsubmit(Model model,QueryItemsVo queryItmsVo)throws Exception{

}
三、数据校验
首先要导入相关jar包然后配置校验器,并注入校验器,最后定义校验规则,配置校验并捕获信息
springmvc配置文件中配置校验器
<!-- 校验器 -->
    <bean id="validator"
        class="org.springframework.validation.beanvalidation.LocalValidatorFactoryBean">
        <!-- 校验器 -->
        <property name="providerClass" value="org.hibernate.validator.HibernateValidator" />
        <!-- 指定校验使用的资源文件,如果不指定则默认使用classpath下的ValidationMessages.properties -->
        <property name="validationMessageSource" ref="messageSource" />
    </bean>
    <!-- 校验错误信息配置文件 -->
    <bean id="messageSource"
        class="org.springframework.context.support.ReloadableResourceBundleMessageSource">
        <!-- 资源文件名 -->
        <property name="basenames">
            <list>
                <value>classpath:CustomValidationMessages</value>
            </list>
        </property>
        <!-- 资源文件编码格式 -->
        <property name="fileEncodings" value="utf-8" />
        <!-- 对资源文件内容缓存时间,单位秒 -->
        <property name="cacheSeconds" value="120" />
    </bean>
注入校验器
<!-- conversion-service:注入自定义参数绑定 -->
    <mvc:annotation-driven validator="validator" conversion-service="conversionService"></mvc:annotation-driven>
添加校验规则
public class Items {
    private Integer id;

    //只针对分组一进行校验
    @Size(min=1,max=30,groups={ValidGroup1.class},message="{items.name.length.error}")
    private String name;

    private Float price;

    private String pic;

    @NotNull(message="{items.createtime.isNull}")
   private Date createtime;
错误信息配置文件CustomValidationMessages.properties
items.name.length.error=名字长度有误
items.createtime.isNull=创建时间不能为空
@RequestMapping(value="/editItemsSubmit.action" ,method={RequestMethod.POST})
    public String editItemsSubmit(
            Model model,
            HttpServletRequest request,
            Integer id,
            @ModelAttribute("itemsCustom") @Validated(value = ValidGroup1.class) ItemsCustom itemsCustom,
            BindingResult bindingResult,
            MultipartFile items_pic//用来接收商品的图片
            ) throws Exception {

        if (bindingResult.hasErrors()) {
            List<ObjectError> allErrors = bindingResult.getAllErrors();
            for (ObjectError error : allErrors) {
                System.out.println(error.getDefaultMessage() + "***");
            }
            model.addAttribute("allErrors", allErrors);
            return "items/editItems";
        }
**分组校验
1。定义一个借口不需要指定任何方法》2.在校验规则中添加分组》3.在controller方法中指定分组的校验
分组校验时数据只会按照指定分组对应的校验方式进行校验。
四、异常处理
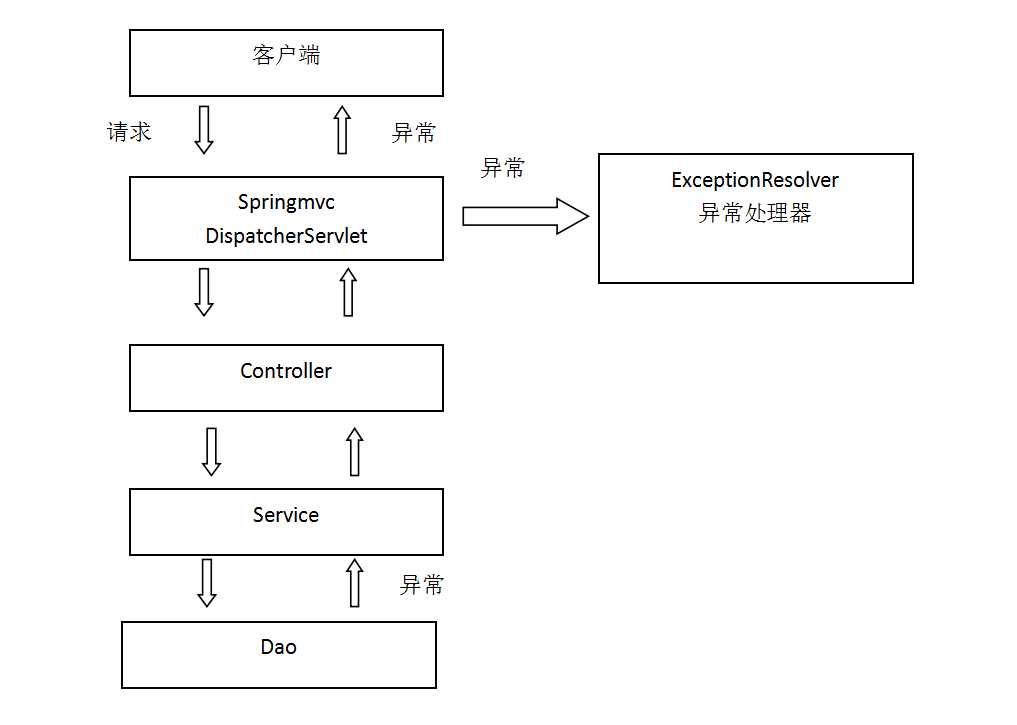
系统中异常包括两类:预期异常和运行时异常RuntimeException,前者通过捕获异常从而获取异常信息,后者主要通过规范代码开发、测试通过手段减少运行时异常的发生。系统的dao、service、controller出现都通过throws Exception向上抛出,最后由springmvc前端控制器交由异常处理器进行异常处理,如下图:

springmvc提供全局异常处理器,进行统一异常处理(一个系统只有一个)
1.自定义异常类(继承Exception)
2.定义一个全局异常处理器
public class CustomExceptionResolver implements HandlerExceptionResolver {

    @Override
    public ModelAndView resolveException(HttpServletRequest request,
            HttpServletResponse response, Object handler, Exception exception) {
        // handler就是处理器是配置要执行的handler对象,只有method方法
        // 1.解析异常类型
        String message = null;
        if (exception instanceof CustomException) {
            // 2.如果是系统自定义的异常直接取出异常在错误页面显示
            message = ((CustomException) exception).getMessage();
        } else {
            // 3.如果不是系统自定义异常,构造一个位置异常抛出
            message = "未知错误!";
        }
        ModelAndView modelAndView = new ModelAndView();
        modelAndView.addObject("message", message);
        modelAndView.setViewName("error");
        return modelAndView;
    }

}
3.在pringmvc.xml配置全局异常处理器
<bean class="cn.mycookies.ssm.exception.CustomExceptionResolver"></bean>
五、文件上传
1.导入文件上传jar包
2.在 页面form中提交enctype="multipart/form-data"的数据时,需要springmvc对multipart类型的数据进行解析。
<form id="itemForm" action="${pageContext.request.contextPath }/items/editItemsSubmit.action" method="post" enctype="multipart/form-data">
<!-- 上传名字和接收绑定的一致 -->
        <input type="file"  name="items_pic"
3.在springmvc.xml中配置multipart类型解析器。
    <!-- 文件上传 -->
    <bean id="multipartResolver"
        class="org.springframework.web.multipart.commons.CommonsMultipartResolver">
        <!-- 设置上传文件的最大尺寸为50MB -->
        <property name="maxUploadSize">
            <value>52428800</value>
        </property>
    </bean
4.controller方法中处理
    @RequestMapping(value="/editItemsSubmit.action" ,method={RequestMethod.POST})
    public String editItemsSubmit(
            Model model,
            HttpServletRequest request,
            Integer id,
            @ModelAttribute("itemsCustom") @Validated(value = ValidGroup1.class) ItemsCustom itemsCustom,
            BindingResult bindingResult,
            MultipartFile items_pic//用来接收商品的图片
            ) throws Exception {
    //异常处理
        if (bindingResult.hasErrors()) {
            List<ObjectError> allErrors = bindingResult.getAllErrors();
            for (ObjectError error : allErrors) {
                System.out.println(error.getDefaultMessage() + "***");
            }
            model.addAttribute("allErrors", allErrors);
            return "items/editItems";
        }
        //图片原始名称
        String originalFileName = items_pic.getOriginalFilename();
        //上传图片
        if(items_pic!=null&&originalFileName!=null&&originalFileName.length()>0){
            //存储图片的虚拟路径
            String pic_path = "D:\\develop\\upload\\temp\\";
            String prefix = "";
            Calendar calendar = Calendar.getInstance();
            //给上传的文件分包
            prefix=calendar.get(Calendar.YEAR)+"\\"+calendar.get(Calendar.MONTH)+"\\"+calendar.get(Calendar.DAY_OF_MONTH)+"\\";
            File file = new File(pic_path+prefix);
            //如果文件夹不存在就创建一个
            if(!file.isDirectory()){
                file.mkdirs();
            }
            //新图片的名字
            String newFileName =prefix+UUID.randomUUID()+originalFileName.substring(originalFileName.lastIndexOf("."));
            //新图片
            File newFile = new File(pic_path+newFileName);
            //将内存中的数据写入磁盘
            items_pic.transferTo(newFile);
            //删除以前的图片
            File oldFile = new File(pic_path+itemsCustom.getPic());
            oldFile.delete();

            //将新的图片名称写入到itemsCustom
            itemsCustom.setPic(newFileName);
        }

        // 调用servcie更新商品信息
        itemsService.updateItems(id, itemsCustom);


        return "forward:queryItems.action";
    }
注:配置虚拟目录
在tomcat的conf/server.xml文件中host标签下
<Context doBase="D:\develop\upload\temp" path="/pic" reloadable="false"/>
页面中显示上传的图片
<img src="/pic/${item.pic}" width=200 height=200/>
六、Json数据交互

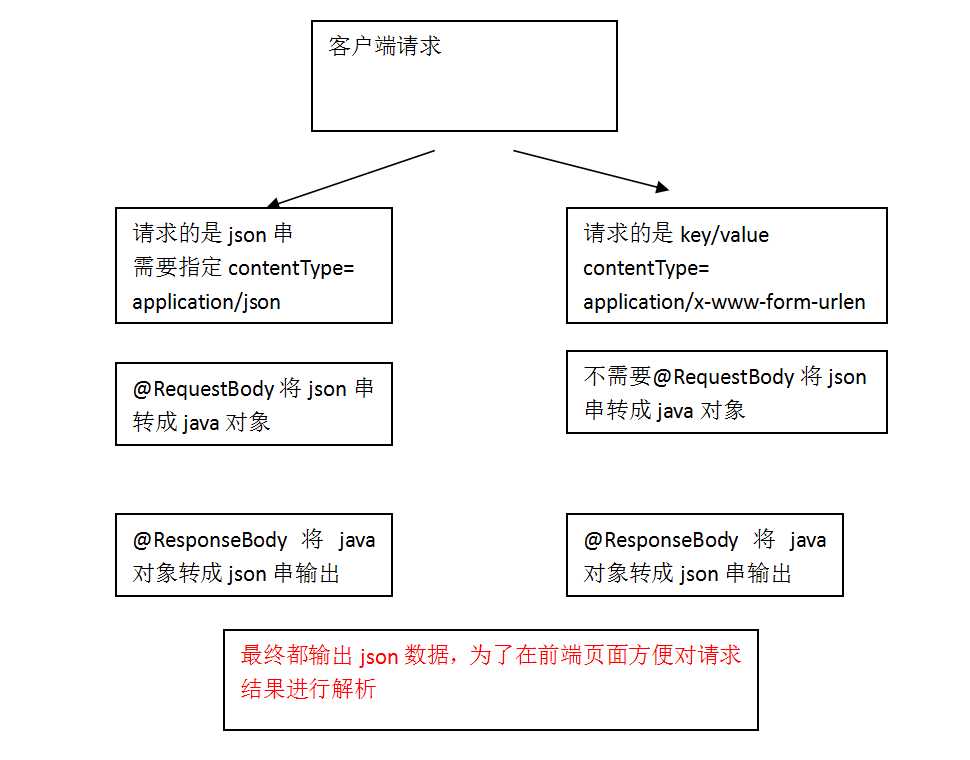
1.导入jar包(springmvc使用jackson包进行json转换)
2.配置json转换器
使用<mvc:annotation-driven />后无需在单独配置
3.交互测试
1.请求json数据,响应json
2.请求key-value,相应json
页面请求
    //请求的是json输出的是json
   function requestJson(){
     $.ajax({
      type:‘post‘,
      url:‘${pageContext.request.contextPath}/requestJson.action‘,
      contentType:‘application/json;charset=utf-8‘,
      data:‘{"name":"手机","price":"999"}‘,
     success:function(data){//返回json结果
      alert(data.name);
     }
    });
   }
   //请求的是key value  输出的是json
  function responseJson(){
    var user = "name=‘电脑‘&price=99.9";
   $.ajax({
   type:‘post‘,
   url:‘${pageContext.request.contextPath}/requestKeyValue.action‘,
   //keyvalue类型不需要指定 因为默认请求的就是keyvalue累I型那个
   //contentType:‘application/json;charset=utf-8‘,
   data:user,
  success:function(data){//返回json结果
   alert(1);
   alert(data);

  }
 });
controller中方法
    // 输入的是json串输出的json串
    @RequestMapping("requestJson.action")
    // @RequestBody:将接收到的json串转换为java对象
    // @ResponseBody:将java对象转为json
    public @ResponseBody
    ItemsCustom requestJson(@RequestBody ItemsCustom itemsCustom) {
        System.out.println(itemsCustom + "这是接受到的数据");
        itemsCustom.setDetail("这是我添加进来的信息");

        return itemsCustom;

    }

    // 输入的是key Value输出的是json串
    @RequestMapping("requestKeyValue.action")
    public @ResponseBody ItemsCustom requestKeyValue(ItemsCustom itemsCustom){
        itemsCustom.setDetail("这是我瞎JB设置的");
        return itemsCustom;
    }
}
七、拦截器
1.定义拦截器,实现HandlerInterceptor
public class HandlerInterceptor1 implements HandlerInterceptor {


    //handler方法执行之后执行
    //同一异常处理,同一日志处理
    @Override
    public void afterCompletion(HttpServletRequest request,
            HttpServletResponse response, Object handler, Exception exception)
            throws Exception {
        // TODO Auto-generated method stub
System.out.println("afterCompletion1........执行");
    }

    //进入handler方法之后返回modelandview之前执行
    //应用场景从modelAndView出发
    //将公用的模型数据传到页面中,也可以同一指定视图,比如菜单导航
    @Override
    public void postHandle(HttpServletRequest arg0, HttpServletResponse request,
            Object handler, ModelAndView modelAndView) throws Exception {
        // TODO Auto-generated method stub
System.out.println("postHandle1............执行");
    }

    //在进入handler方法之前执行
    //可以用于身份认证,身份授权等,认证不通过表示没有登陆需要此方法进行拦截不在向下执行
    @Override
    public boolean preHandle(HttpServletRequest request, HttpServletResponse response,
            Object handler) throws Exception {
        System.out.println("preHandle1...........执行");
        HttpSession session = request.getSession();

        //return false表示拦截 true放行
        return true;
    }

}
2.配置拦截器
    <!-- 拦截器的配置 -->
    <mvc:interceptors>
        <!-- 多个拦截器顺序执行 -->
        <mvc:interceptor>
            <!-- /**表示拦截所有url和子url路径 -->
            <mvc:mapping path="/**"/>
            <bean class="cn.mycookies.ssm.Interceptor.LoginInterceptor"></bean>
        </mvc:interceptor>
        <mvc:interceptor>
            <!-- /**表示拦截所有url和子url路径 -->
            <mvc:mapping path="/**"/>
            <bean class="cn.mycookies.ssm.Interceptor.HandlerInterceptor1"></bean>
        </mvc:interceptor>
        <mvc:interceptor>
            <!-- /**表示拦截所有url和子url路径 -->
            <mvc:mapping path="/**"/>
            <bean class="cn.mycookies.ssm.Interceptor.HandlerInterceptor2"></bean>
        </mvc:interceptor>
    </mvc:interceptors>
3.多个拦截器进行测试结论
两个拦截器都放行:preHandle顺序执行,PostHandle和afterCompletion逆序执行
拦截器1放行2不放行:(prehandle1>prehandle2>aftercompletion1)拦截器1放行拦截器2prehandle才会执行,拦截器2prehandle不放行,拦截器postHandle和afterCompletion不会执行,只要有一个拦截器不放行,postHandle都不会执行。
标签:base 指定 ref commons upload 电脑 uuid bean 错误页面
原文地址:http://www.cnblogs.com/liqiangchn/p/7622396.html