标签:home exce image rom www. values imageview 旋转 edittext
先说一下这篇文章里面的内容:TCP 客户端, 自定义对话框, 自定义按钮, ProgressBar竖直显示, 重力感应传感器,手机返回键新开启界面的问题(返回上次的界面),数据保存
软件的通信是配合
http://www.cnblogs.com/yangfengwu/p/7625608.html 用ESP8266+android,制作自己的WIFI小车(ESP8266篇)
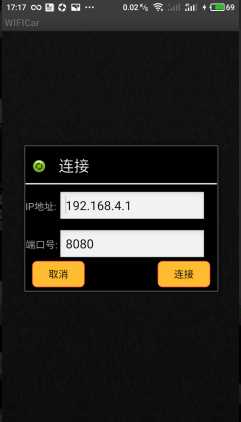
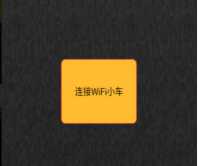
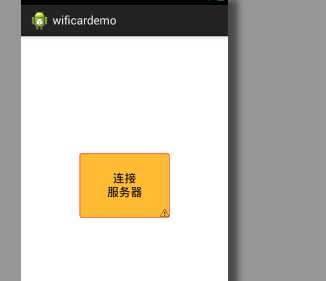
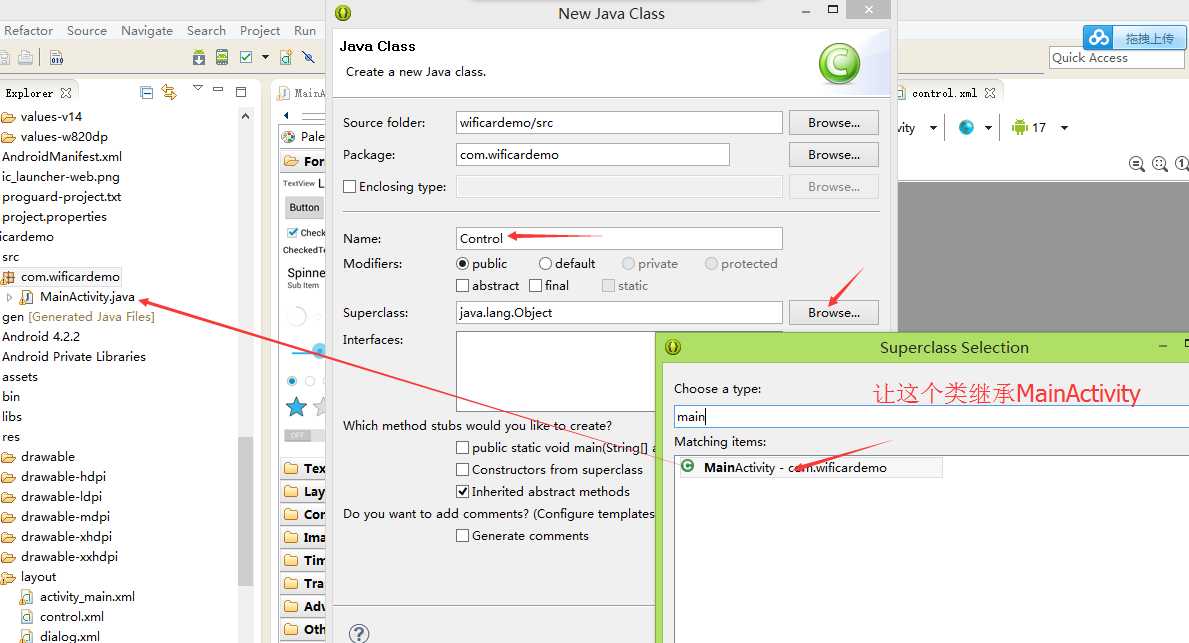
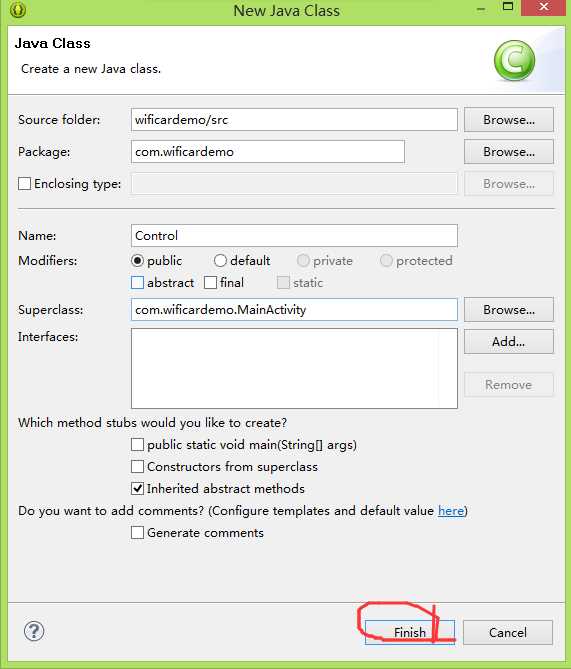
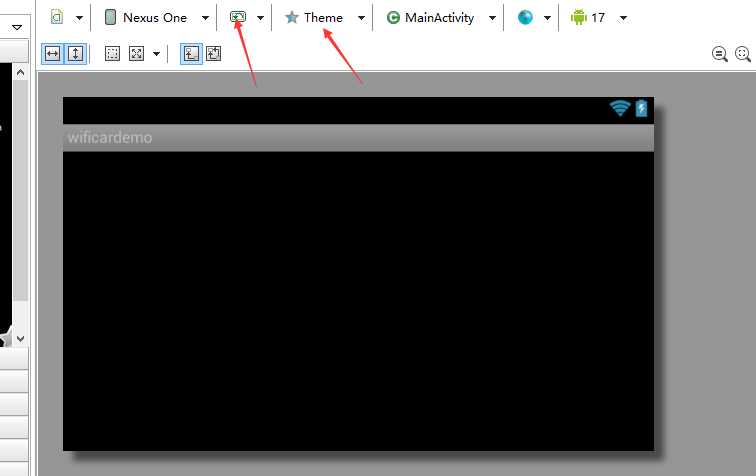
软件的第一个界面就一个按钮 点击按钮弹出一个自定义的对话框 连接的时候 连接上


其实一开始想多加一些功能,,不过后来想了想复杂了反而不利于学习.........我会从一开始做到结束都写清楚,如果有大神看到哪地方不合理请指教哈,,,,,
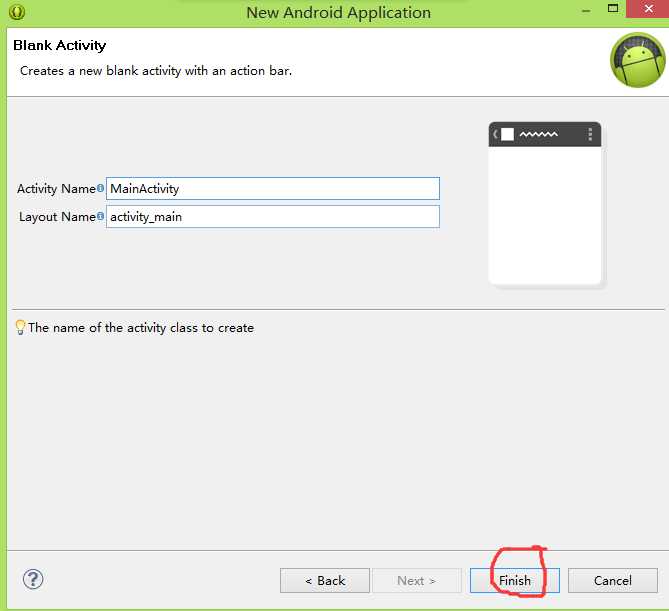
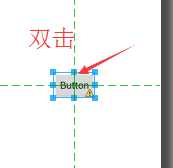
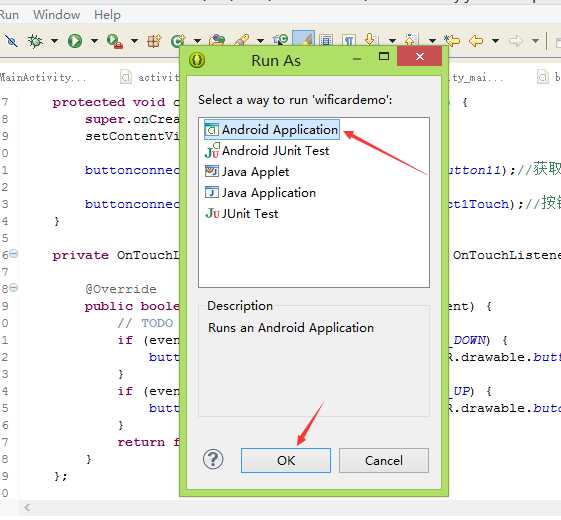
好现在开始做APP
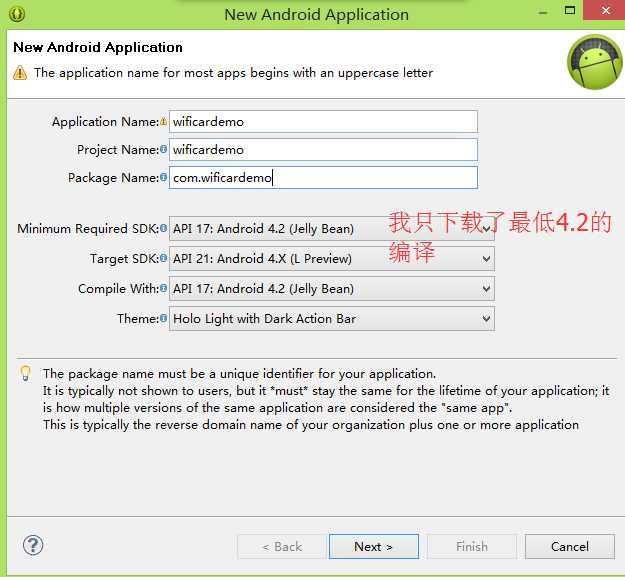
一路Next就行...
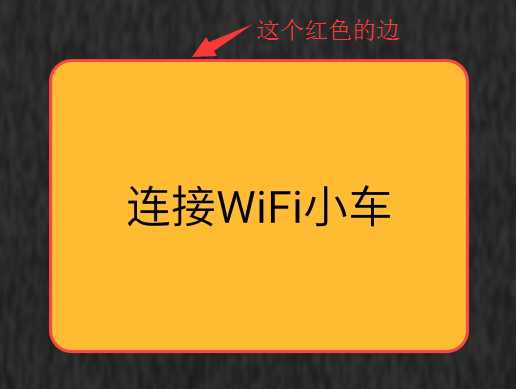
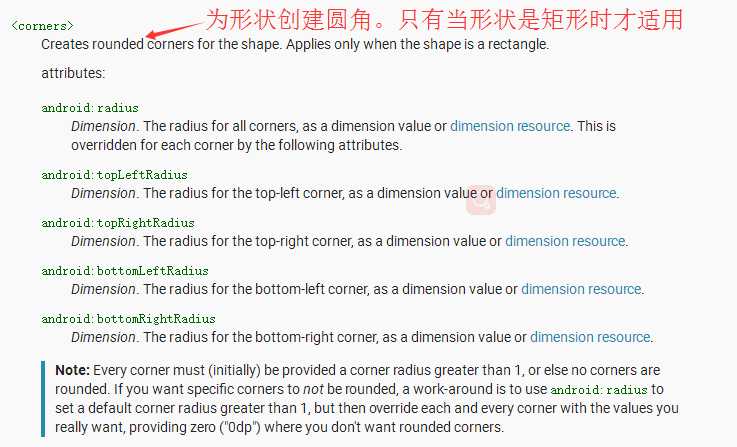
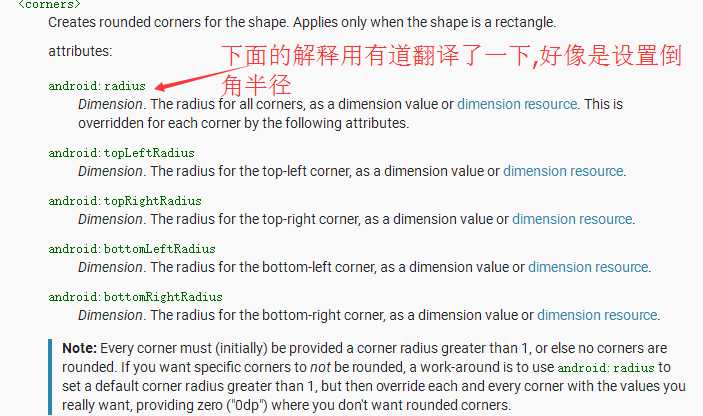
您会发现自己的按钮是圆边的
其实是自己自定义了一些参数
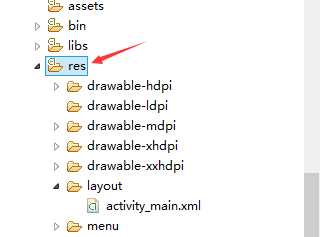
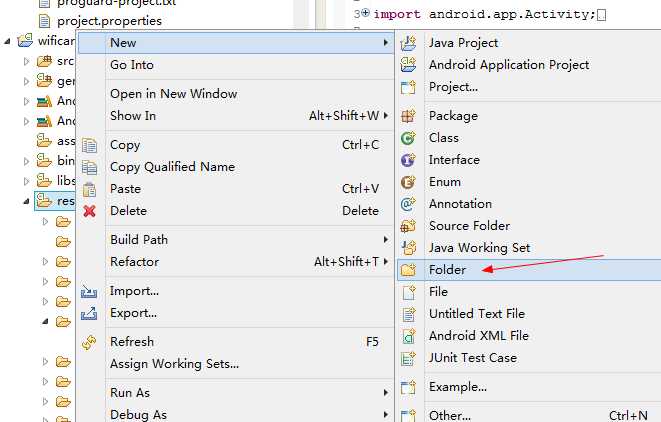
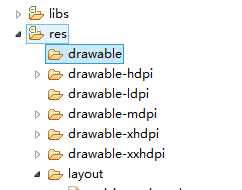
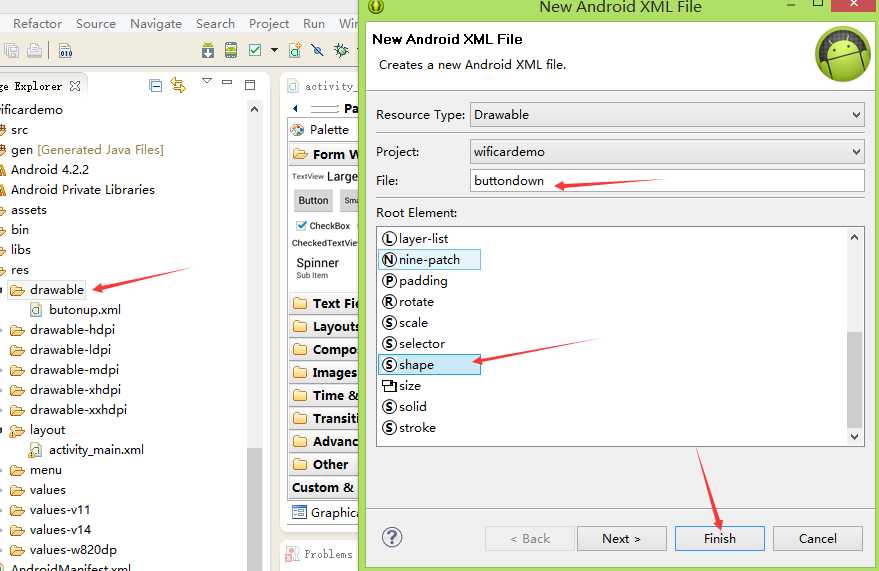
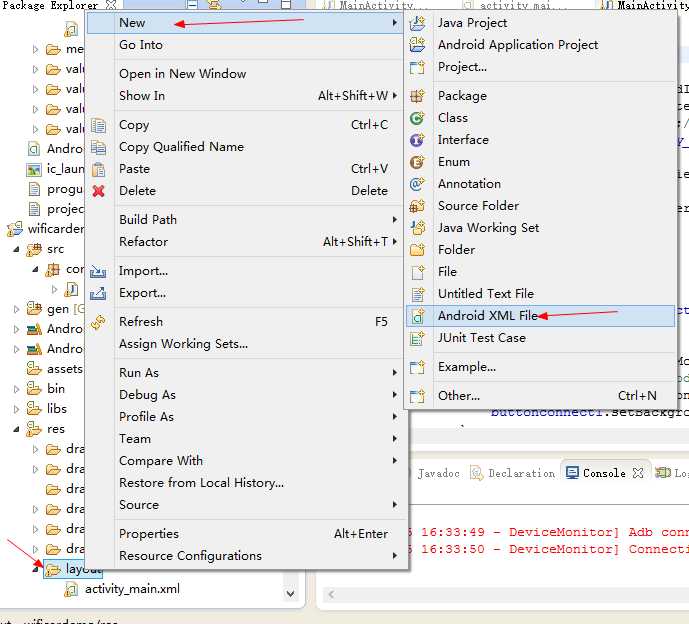
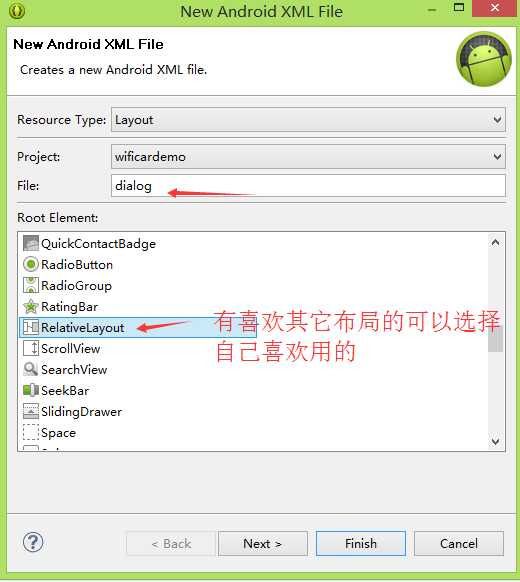
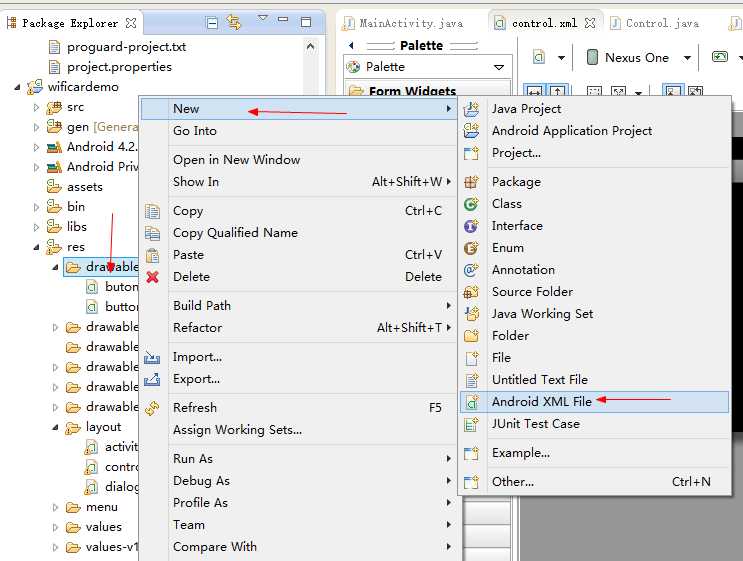
新建一个文件夹存储咱们自定义的一些东西
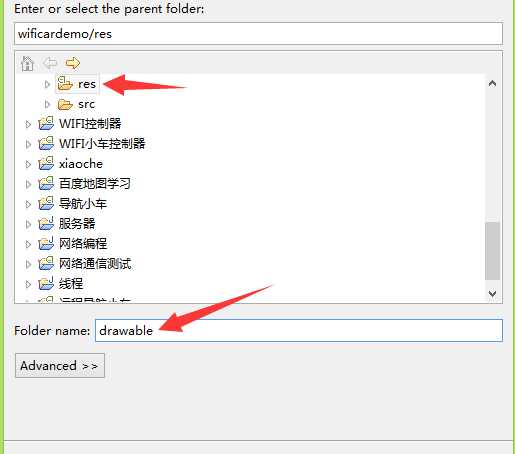
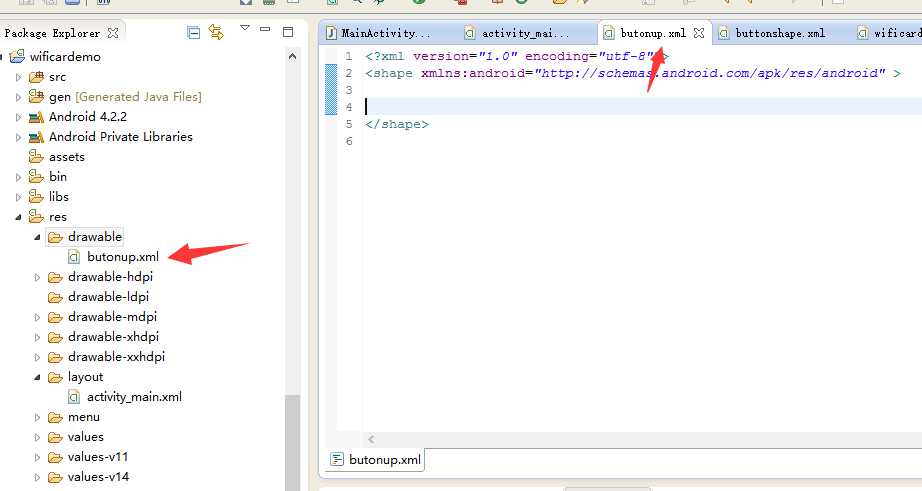
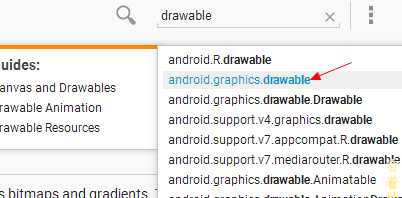
对了为什么名字是drawable
其实是官方提供的,,
http://www.android-doc.com/guide/topics/resources/drawable-resource.html#StateList
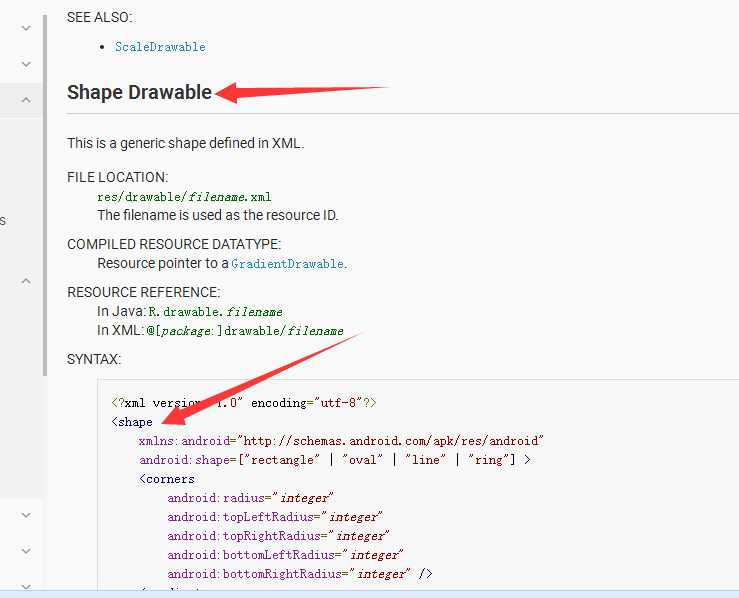
然后呢各个参数后面都有具体解释
有些小伙伴一看....英文的............大哥下一个有道翻译或者别的翻译软件翻译一下...................
可以自己搜索自己想要的
好像这些外形啦背景什么的都在

授人予鱼,也要授人予渔;
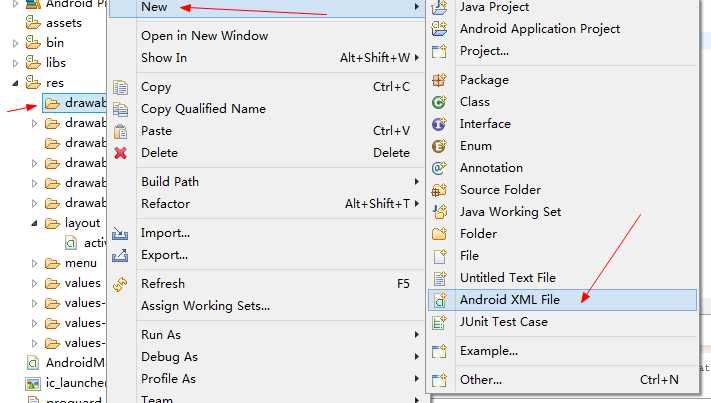
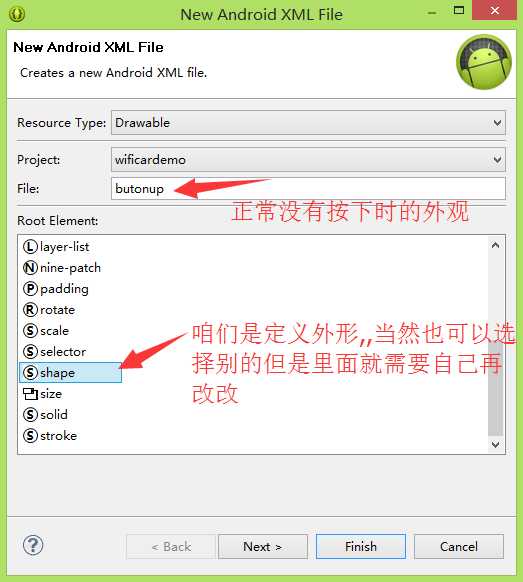
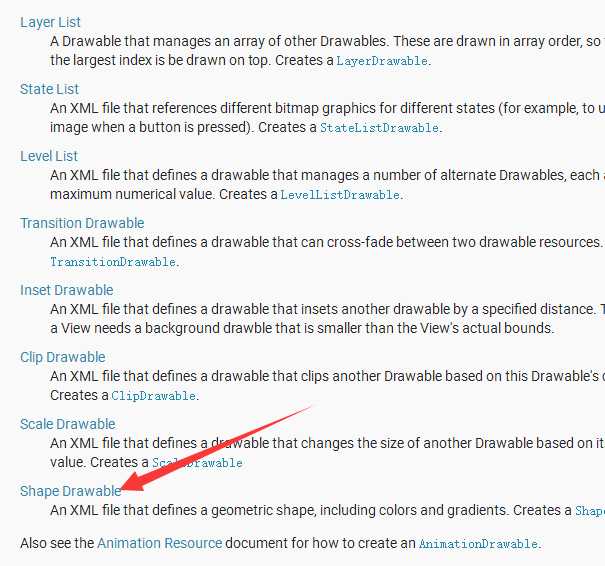
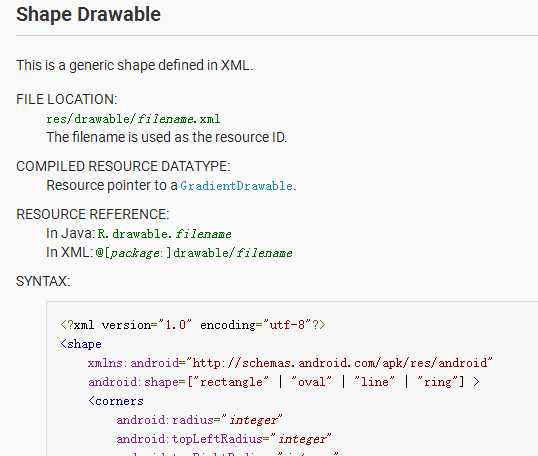
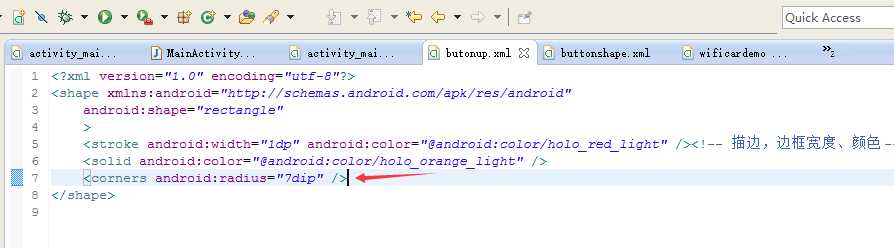
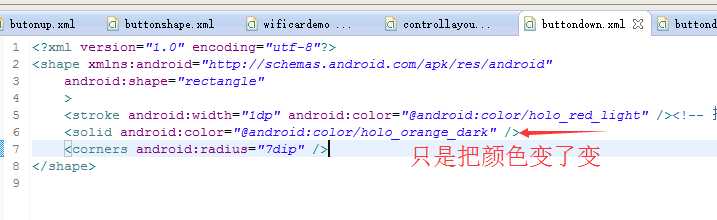
首先定义一下外形
方形
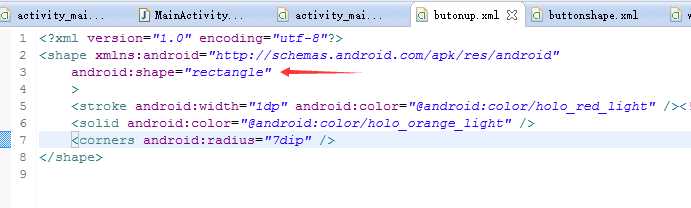
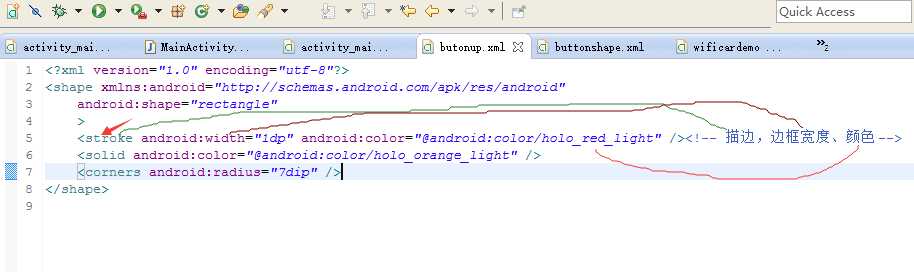
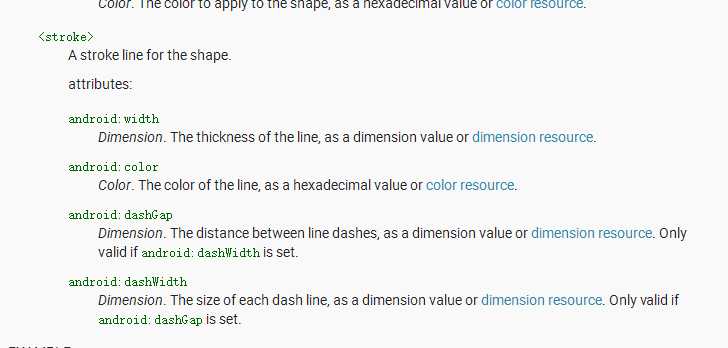
然后呢描一下边框,,,显得是一个按钮
其实可以官方解释
然后定义一下按钮现在显示的颜色
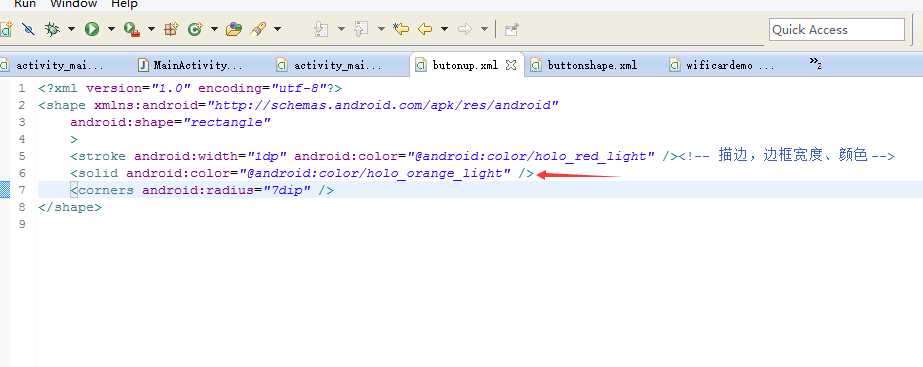
好现在让它的四个角变成圆角,,,对于我这个学机械的而言在solidworks里面应该叫做倒角,,,,有没有学机械的看到这篇文章哈...
记得曾经遇到一个人和我正好相反,,我是报的机械专业,自学的电气,,,,,,而另一个人是报的电气却喜欢机械........兴趣.........
好啦
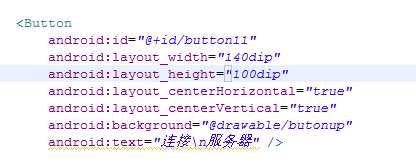
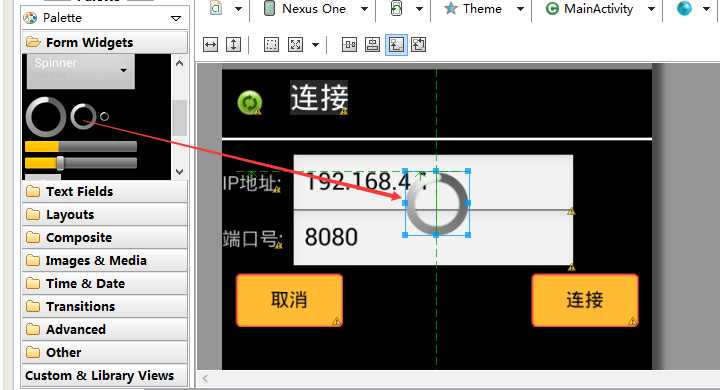
拖一个按钮过来,放到中心.....您也可以在布局文件里面自己写哈......我是怎样方便怎样弄,,我用的是相对布局
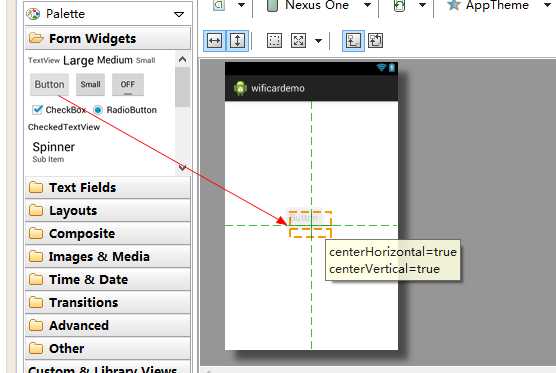
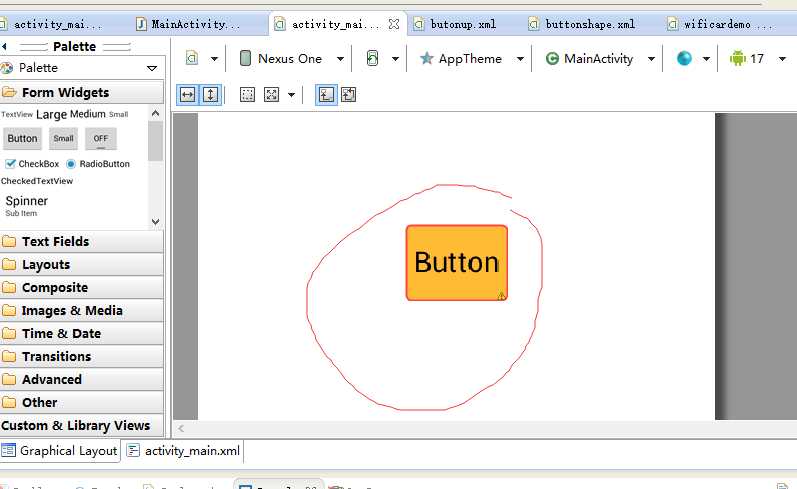
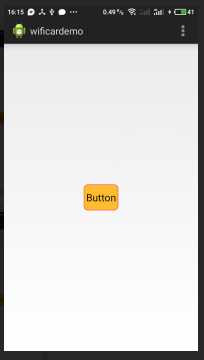
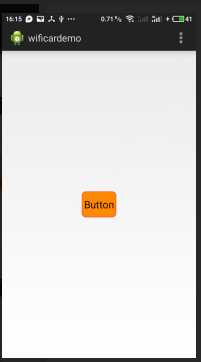
保存一下现在看效果
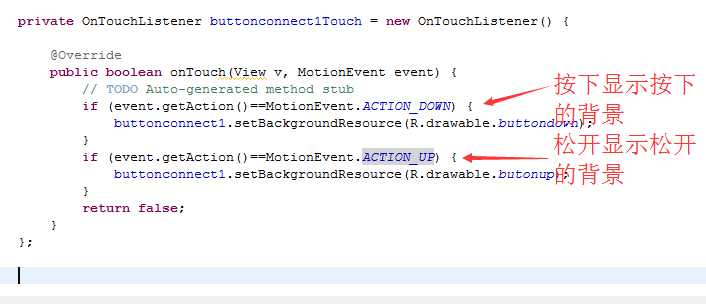
好现在再定义一个按钮按下时的外表文件
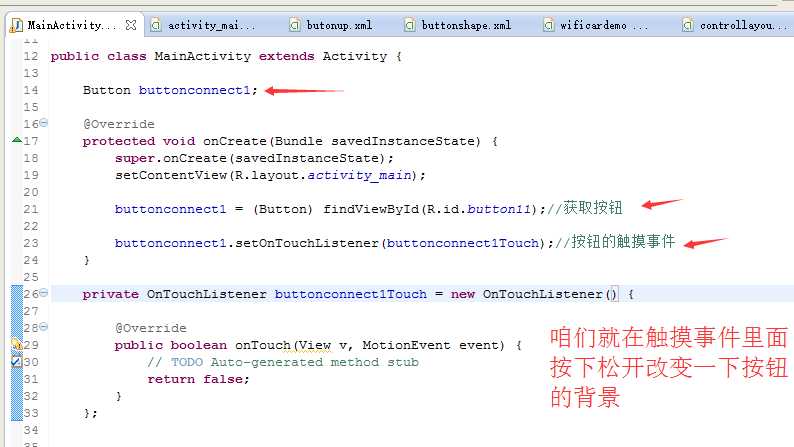
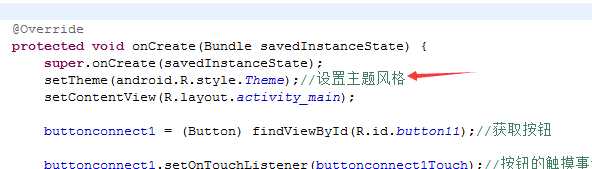
private OnTouchListener buttonconnect1Touch = new OnTouchListener() {

        @Override
        public boolean onTouch(View v, MotionEvent event) {
            // TODO Auto-generated method stub
            if (event.getAction()==MotionEvent.ACTION_DOWN) {
                buttonconnect1.setBackgroundResource(R.drawable.buttondown);
            }
            if (event.getAction()==MotionEvent.ACTION_UP) {
                buttonconnect1.setBackgroundResource(R.drawable.butonup);
            }
            return false;
        }
    };
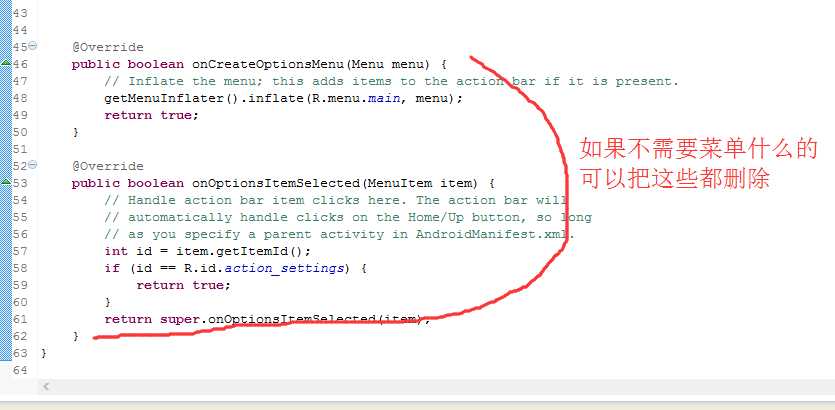
package com.wificardemo;

import android.app.Activity;
import android.os.Bundle;
import android.view.Menu;
import android.view.MenuItem;
import android.view.MotionEvent;
import android.view.View;
import android.view.View.OnTouchListener;
import android.widget.Button;

public class MainActivity extends Activity {

    Button buttonconnect1;

    @Override
    protected void onCreate(Bundle savedInstanceState) {
        super.onCreate(savedInstanceState);
        setContentView(R.layout.activity_main);

        buttonconnect1 = (Button) findViewById(R.id.button11);//获取按钮

        buttonconnect1.setOnTouchListener(buttonconnect1Touch);//按钮的触摸事件
    }

    private OnTouchListener buttonconnect1Touch = new OnTouchListener() {

        @Override
        public boolean onTouch(View v, MotionEvent event) {
            // TODO Auto-generated method stub
            if (event.getAction()==MotionEvent.ACTION_DOWN) {
                buttonconnect1.setBackgroundResource(R.drawable.buttondown);
            }
            if (event.getAction()==MotionEvent.ACTION_UP) {
                buttonconnect1.setBackgroundResource(R.drawable.butonup);
            }
            return false;
        }
    };


    @Override
    public boolean onCreateOptionsMenu(Menu menu) {
        // Inflate the menu; this adds items to the action bar if it is present.
        getMenuInflater().inflate(R.menu.main, menu);
        return true;
    }

    @Override
    public boolean onOptionsItemSelected(MenuItem item) {
        // Handle action bar item clicks here. The action bar will
        // automatically handle clicks on the Home/Up button, so long
        // as you specify a parent activity in AndroidManifest.xml.
        int id = item.getItemId();
        if (id == R.id.action_settings) {
            return true;
        }
        return super.onOptionsItemSelected(item);
    }
}
现在编译一下运行到手机看一下

我是直接用的自己的手机,,没有仿真,,现在我的电脑用仿真可是不得了......
平时的状态 按下后
自己看着改改大小和显示
咱们现在要做的是

其实这个是自己自定义的一个界面
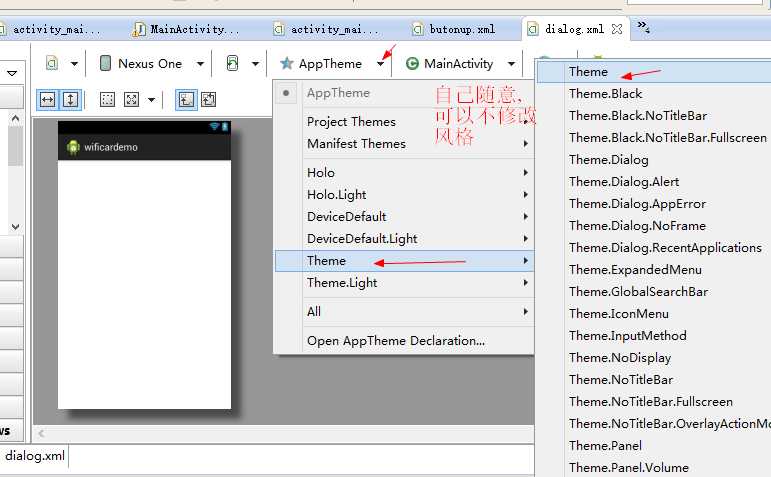
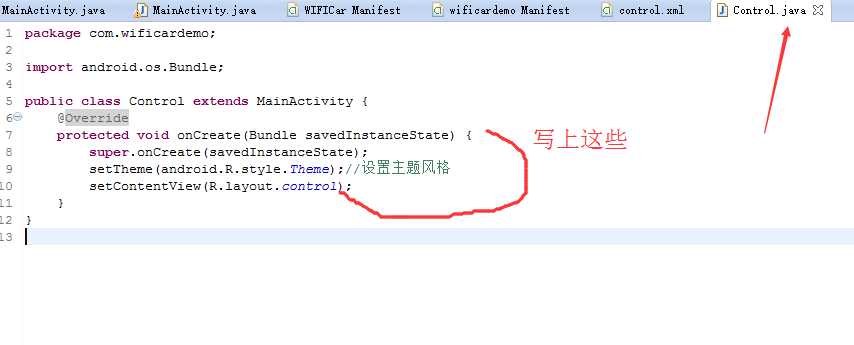
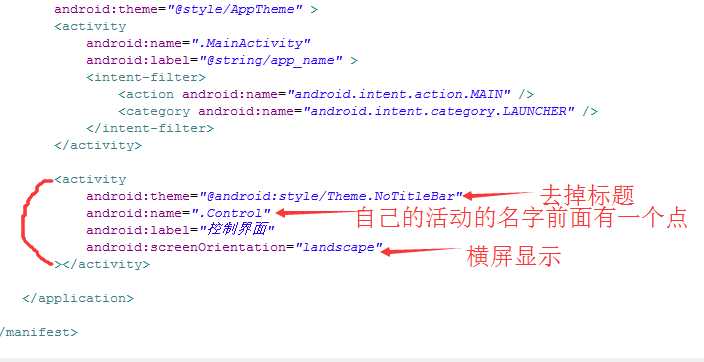
对了设置一下主题风格...
感觉这种风格挺好的
图片可以在我源码里面找,也可以自己弄自己的
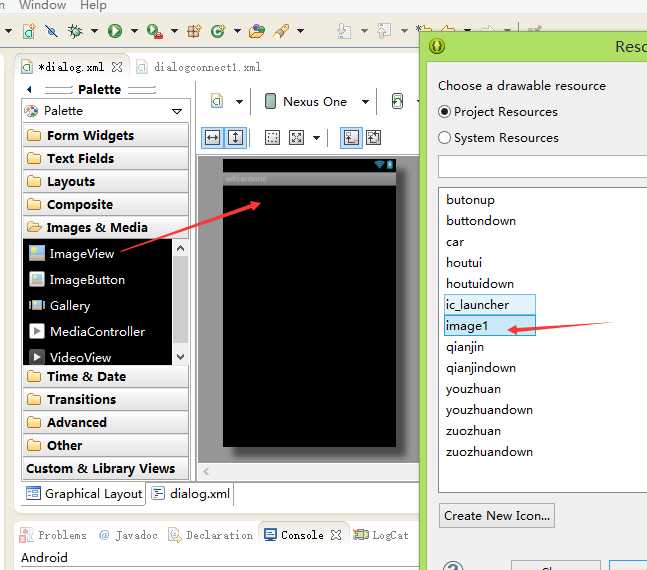
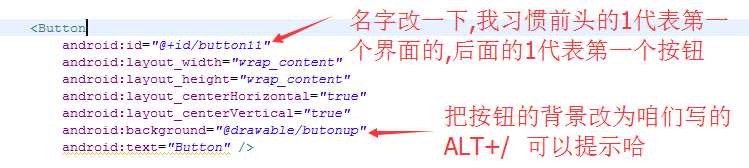
对了,,,,位置还有名字什么的自己看着修改哈


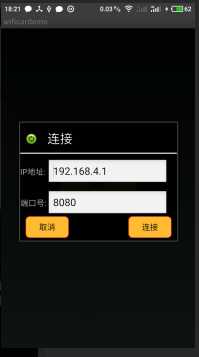
整体界面呢,,,
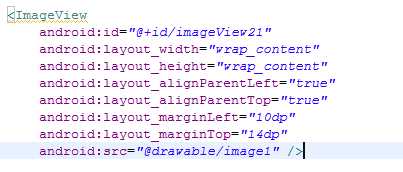
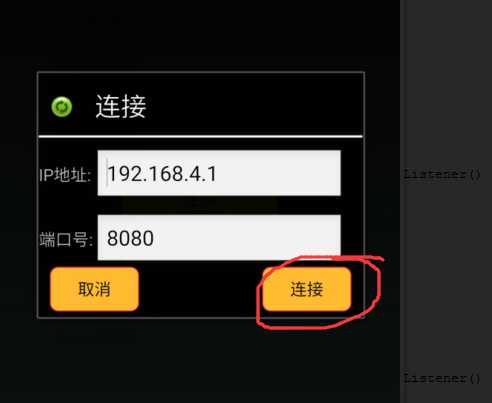
<?xml version="1.0" encoding="utf-8"?>
<RelativeLayout xmlns:android="http://schemas.android.com/apk/res/android"
    android:layout_width="match_parent"
    android:layout_height="match_parent" >

    <TextView
        android:background="@android:color/white"
        android:id="@+id/textView22"
        android:layout_width="wrap_content"
        android:layout_height="2dip"
        android:layout_alignParentLeft="true"
        android:layout_alignParentRight="true"
        android:layout_below="@+id/imageView21"
        android:layout_marginTop="15dp" />

    <TextView
        android:id="@+id/textView21"
        android:layout_width="wrap_content"
        android:layout_height="wrap_content"
         android:layout_marginTop="8dp"
        android:layout_marginLeft="19dp"
        android:layout_toRightOf="@+id/imageView21"
        android:text="连接"
        android:textAppearance="?android:attr/textAppearanceLarge"
        android:textColor="@android:color/white" />

    <TextView
        android:id="@+id/textView23"
        android:layout_width="wrap_content"
        android:layout_height="wrap_content"
        android:layout_alignParentLeft="true"
        android:layout_below="@+id/textView22"
        android:layout_marginTop="23dp"
        android:text="IP地址:" />

    <EditText
        android:id="@+id/editText21"
        android:layout_width="wrap_content"
        android:layout_height="wrap_content"
        android:layout_alignBaseline="@+id/textView23"
        android:layout_alignBottom="@+id/textView23"
        android:layout_alignLeft="@+id/textView21"
        android:ems="10"
        android:text="192.168.4.1" />

    <ImageView
        android:id="@+id/imageView21"
        android:layout_width="wrap_content"
        android:layout_height="wrap_content"
        android:layout_marginLeft="10dp"
        android:layout_marginTop="14dp"
        android:src="@drawable/image1" />

    <TextView
        android:id="@+id/textView24"
        android:layout_width="wrap_content"
        android:layout_height="wrap_content"
        android:layout_alignBaseline="@+id/editText22"
        android:layout_alignBottom="@+id/editText22"
        android:layout_alignParentLeft="true"
        android:text="端口号:" />

    <EditText
        android:id="@+id/editText22"
        android:layout_width="wrap_content"
        android:layout_height="wrap_content"
        android:layout_alignLeft="@+id/editText21"
        android:layout_below="@+id/editText21"
        android:layout_marginTop="10dp"
        android:ems="10"
        android:text="8080" />

    <Button
        android:id="@+id/button21"
        android:layout_width="80dp"
        android:layout_height="40dp"
        android:layout_alignParentRight="true"
        android:layout_below="@+id/editText22"
        android:layout_marginRight="10dp"
        android:background="@drawable/butonup"
        android:text="连接" />

    <Button
        android:id="@+id/Button22"
        android:layout_width="80dp"
        android:layout_height="40dp"
        android:layout_alignBottom="@+id/button21"
        android:layout_alignTop="@+id/button21"
        android:layout_marginLeft="10dp"
        android:background="@drawable/butonup"
        android:text="取消" />

    <ProgressBar
        android:id="@+id/progressBar21"
        android:layout_width="wrap_content"
        android:layout_height="wrap_content"
        android:layout_alignTop="@+id/textView23"
        android:layout_centerHorizontal="true" />

</RelativeLayout>
好了现在点击主界面的按钮把这个界面当做提示框显示出来
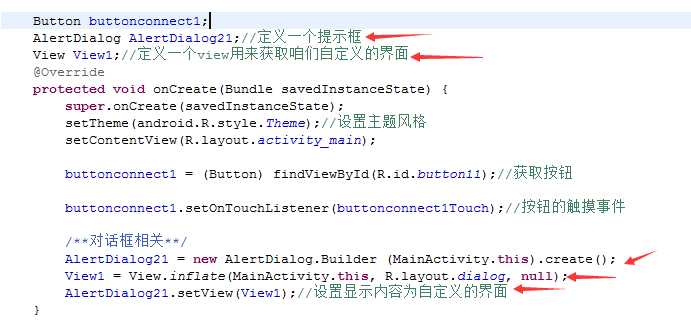
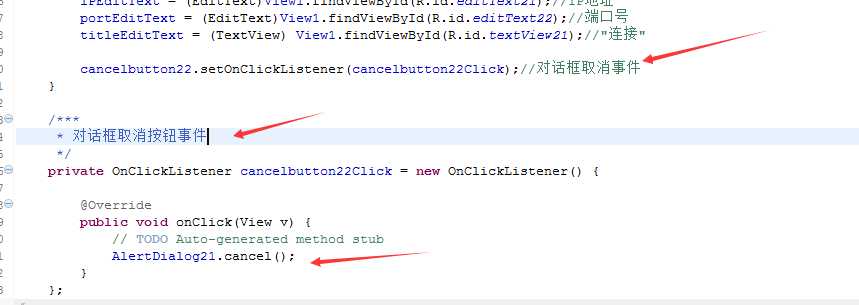
package com.wificardemo;

import android.app.Activity;
import android.app.AlertDialog;
import android.os.Bundle;
import android.view.Menu;
import android.view.MenuItem;
import android.view.MotionEvent;
import android.view.View;
import android.view.View.OnTouchListener;
import android.widget.Button;
import android.widget.EditText;
import android.widget.ProgressBar;
import android.widget.TextView;

public class MainActivity extends Activity {

    Button buttonconnect1;
    AlertDialog AlertDialog21;//定义一个提示框
    View View1;//定义一个view用来获取咱们自定义的界面
    Button connectbutton21;//连接服务器
    Button cancelbutton22;//取消按钮
    ProgressBar progressBar21;//进度条
    EditText iPEditText;//IP地址
    EditText portEditText;//端口号
    TextView titleEditText;//"连接"

    @Override
    protected void onCreate(Bundle savedInstanceState) {
        super.onCreate(savedInstanceState);
        setTheme(android.R.style.Theme);//设置主题风格
        setContentView(R.layout.activity_main);

        buttonconnect1 = (Button) findViewById(R.id.button11);//获取按钮

        buttonconnect1.setOnTouchListener(buttonconnect1Touch);//按钮的触摸事件

        /**对话框相关**/
        AlertDialog21 = new AlertDialog.Builder (MainActivity.this).create();
        View1 = View.inflate(MainActivity.this, R.layout.dialog, null);
        AlertDialog21.setView(View1);//设置显示内容为自定义的界面
        connectbutton21 = (Button) View1.findViewById(R.id.button21);//连接服务器按钮
        cancelbutton22 = (Button) View1.findViewById(R.id.Button22);//取消按钮
        progressBar21 = (ProgressBar) View1.findViewById(R.id.progressBar21);//进度条
        progressBar21.setVisibility(-1);//进度条不显示
        iPEditText = (EditText)View1.findViewById(R.id.editText21);//IP地址
        portEditText = (EditText)View1.findViewById(R.id.editText22);//端口号
        titleEditText = (TextView) View1.findViewById(R.id.textView21);//"连接"
    }

    /***
     * 主界面连接服务器按钮
     */
    private OnTouchListener buttonconnect1Touch = new OnTouchListener() {

        @Override
        public boolean onTouch(View v, MotionEvent event) {
            // TODO Auto-generated method stub
            if (event.getAction()==MotionEvent.ACTION_DOWN) {
                buttonconnect1.setBackgroundResource(R.drawable.buttondown);
            }
            if (event.getAction()==MotionEvent.ACTION_UP) {
                buttonconnect1.setBackgroundResource(R.drawable.butonup);
            }
            return false;
        }
    };


}
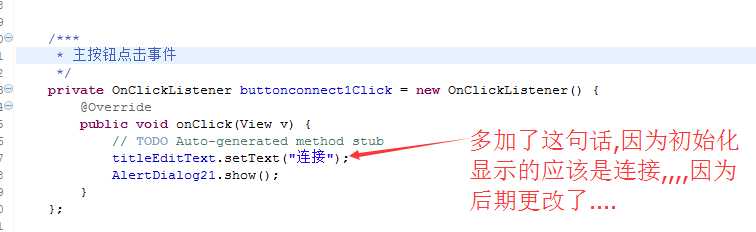
现在呢就缺少显示了...
我们在主按钮的点击事件中调用显示函数
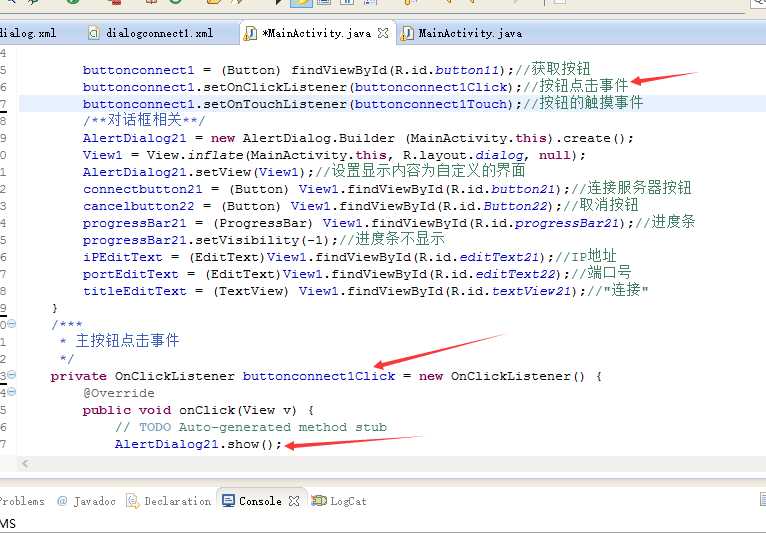
package com.wificardemo;

import android.app.Activity;
import android.app.AlertDialog;
import android.os.Bundle;
import android.view.Menu;
import android.view.MenuItem;
import android.view.MotionEvent;
import android.view.View;
import android.view.View.OnClickListener;
import android.view.View.OnTouchListener;
import android.widget.Button;
import android.widget.EditText;
import android.widget.ProgressBar;
import android.widget.TextView;

public class MainActivity extends Activity {

    Button buttonconnect1;
    AlertDialog AlertDialog21;//定义一个提示框
    View View1;//定义一个view用来获取咱们自定义的界面
    Button connectbutton21;//连接服务器
    Button cancelbutton22;//取消按钮
    ProgressBar progressBar21;//进度条
    EditText iPEditText;//IP地址
    EditText portEditText;//端口号
    TextView titleEditText;//"连接"

    @Override
    protected void onCreate(Bundle savedInstanceState) {
        super.onCreate(savedInstanceState);
        setTheme(android.R.style.Theme);//设置主题风格
        setContentView(R.layout.activity_main);

        buttonconnect1 = (Button) findViewById(R.id.button11);//获取按钮
        buttonconnect1.setOnClickListener(buttonconnect1Click);//按钮点击事件
        buttonconnect1.setOnTouchListener(buttonconnect1Touch);//按钮的触摸事件
        /**对话框相关**/
        AlertDialog21 = new AlertDialog.Builder (MainActivity.this).create();
        View1 = View.inflate(MainActivity.this, R.layout.dialog, null);
        AlertDialog21.setView(View1);//设置显示内容为自定义的界面
        connectbutton21 = (Button) View1.findViewById(R.id.button21);//连接服务器按钮
        cancelbutton22 = (Button) View1.findViewById(R.id.Button22);//取消按钮
        progressBar21 = (ProgressBar) View1.findViewById(R.id.progressBar21);//进度条
        progressBar21.setVisibility(-1);//进度条不显示
        iPEditText = (EditText)View1.findViewById(R.id.editText21);//IP地址
        portEditText = (EditText)View1.findViewById(R.id.editText22);//端口号
        titleEditText = (TextView) View1.findViewById(R.id.textView21);//"连接"
    }
    /***
     * 主按钮点击事件
     */
    private OnClickListener buttonconnect1Click = new OnClickListener() {
        @Override
        public void onClick(View v) {
            // TODO Auto-generated method stub
            AlertDialog21.show();
        }
    };

    /***
     * 主界面连接服务器按钮背景改变
     */
    private OnTouchListener buttonconnect1Touch = new OnTouchListener() {

        @Override
        public boolean onTouch(View v, MotionEvent event) {
            // TODO Auto-generated method stub
            if (event.getAction()==MotionEvent.ACTION_DOWN) {
                buttonconnect1.setBackgroundResource(R.drawable.buttondown);
            }
            if (event.getAction()==MotionEvent.ACTION_UP) {
                buttonconnect1.setBackgroundResource(R.drawable.butonup);
            }
            return false;
        }
    };


}
现在安装到手机上看一下---界面还可以
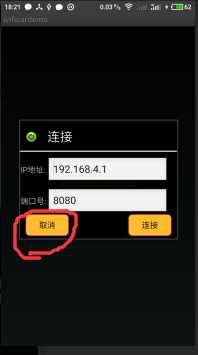
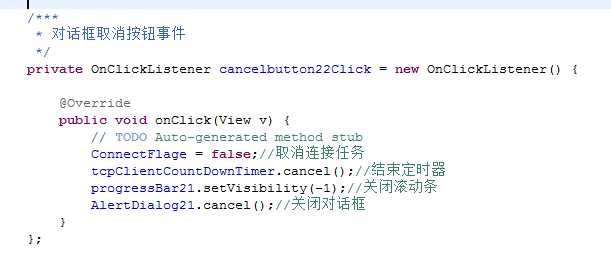
做这个简单的取消事件
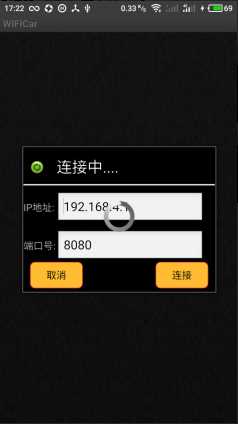
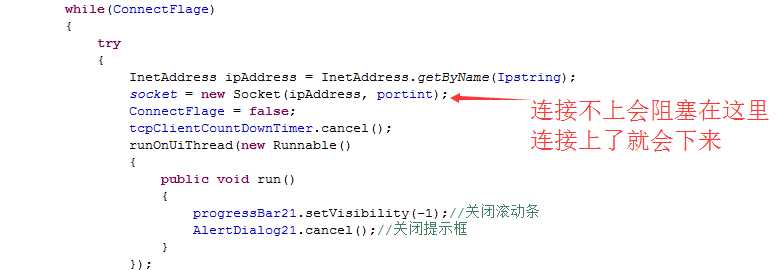
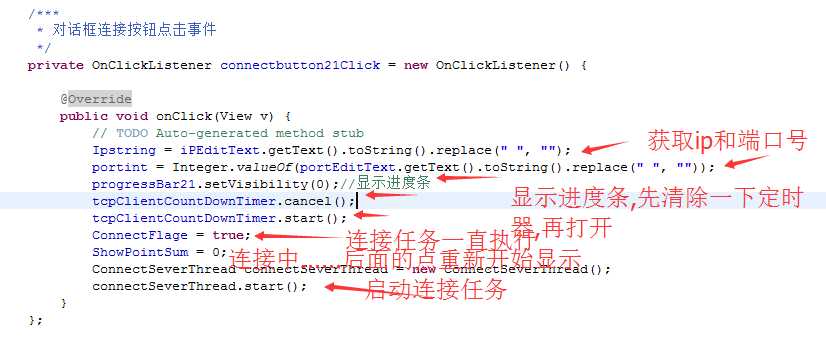
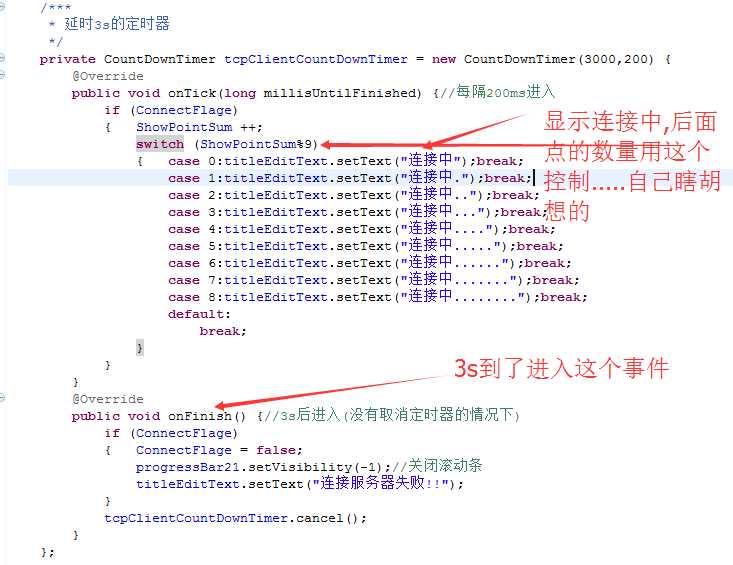
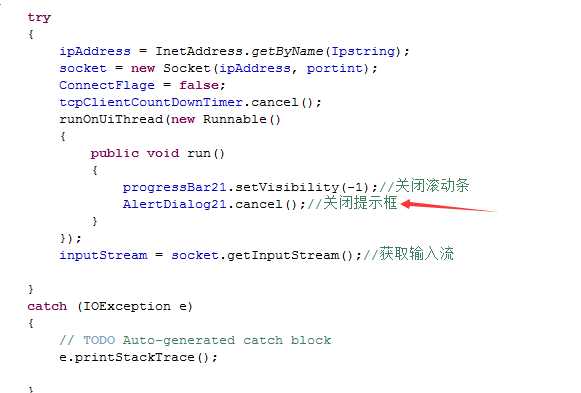
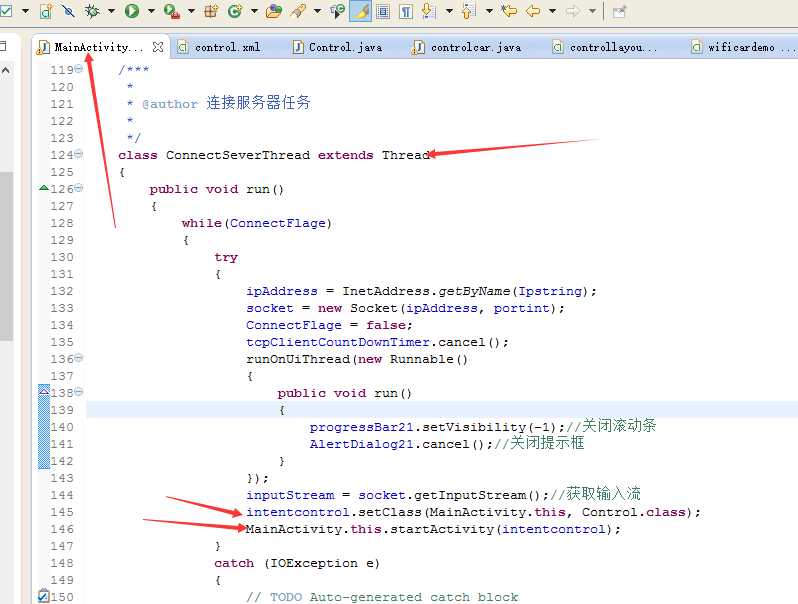
连接按钮呢!!我先说一下思路,,,按下连接按钮是启动一个连接任务,然后呢还要启动一个倒计时器(3S),,,控制这个连接任务执行的时间,还要显示进度条,,如果3S内连接上了,,那么在连接的后面关掉进度条,结束这个连接任务,取消定时器,关闭对话框,然后进入控制界面,,如果3S内没有连接上,也关闭连接任务,关掉进度条,同时显示连接失败.
现在的
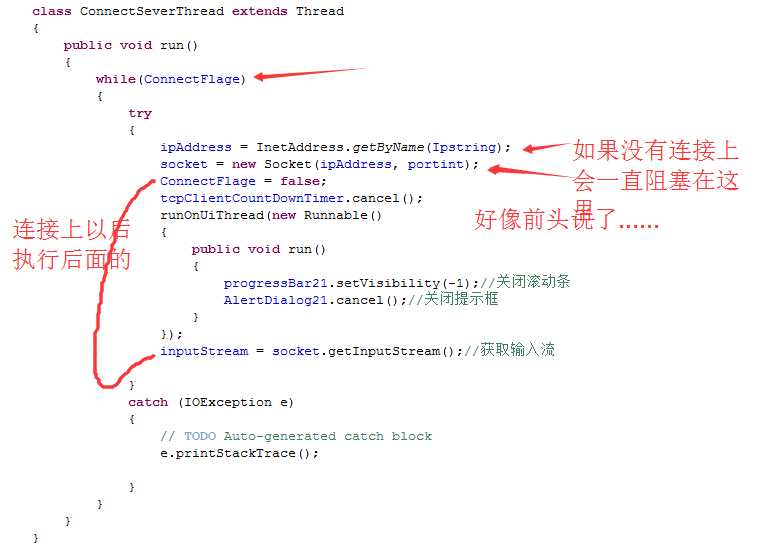
package com.wificardemo;

import java.io.IOException;
import java.io.InputStream;
import java.io.OutputStream;
import java.net.InetAddress;
import java.net.Socket;

import android.app.Activity;
import android.app.AlertDialog;
import android.os.Bundle;
import android.os.CountDownTimer;
import android.renderscript.Mesh.Primitive;
import android.view.Menu;
import android.view.MenuItem;
import android.view.MotionEvent;
import android.view.View;
import android.view.View.OnClickListener;
import android.view.View.OnTouchListener;
import android.widget.Button;
import android.widget.EditText;
import android.widget.ProgressBar;
import android.widget.TextView;

public class MainActivity extends Activity {

    Button buttonconnect1;
    AlertDialog AlertDialog21;//定义一个提示框
    View View1;//定义一个view用来获取咱们自定义的界面
    Button connectbutton21;//连接服务器
    Button cancelbutton22;//取消按钮
    ProgressBar progressBar21;//进度条
    EditText iPEditText;//IP地址
    EditText portEditText;//端口号
    TextView titleEditText;//"连接"

    String Ipstring="";//记录IP地址
    int portint=0;//记录端口号
    boolean ConnectFlage=true;
    int ShowPointSum=0;//显示点的数量,连接中.....(后面的点)
    Socket socket = null;//定义socket
    InetAddress ipAddress;
    OutputStream outputStream=null;//定义输出流
    InputStream inputStream=null;//定义输入流

    @Override
    protected void onCreate(Bundle savedInstanceState) {
        super.onCreate(savedInstanceState);
        setTheme(android.R.style.Theme);//设置主题风格
        setContentView(R.layout.activity_main);

        buttonconnect1 = (Button) findViewById(R.id.button11);//获取按钮
        buttonconnect1.setOnClickListener(buttonconnect1Click);//按钮点击事件
        buttonconnect1.setOnTouchListener(buttonconnect1Touch);//按钮的触摸事件
        /**对话框相关**/
        AlertDialog21 = new AlertDialog.Builder (MainActivity.this).create();
        View1 = View.inflate(MainActivity.this, R.layout.dialog, null);
        AlertDialog21.setView(View1);//设置显示内容为自定义的界面
        connectbutton21 = (Button) View1.findViewById(R.id.button21);//连接服务器按钮
        cancelbutton22 = (Button) View1.findViewById(R.id.Button22);//取消按钮
        progressBar21 = (ProgressBar) View1.findViewById(R.id.progressBar21);//进度条
        progressBar21.setVisibility(-1);//进度条不显示
        iPEditText = (EditText)View1.findViewById(R.id.editText21);//IP地址
        portEditText = (EditText)View1.findViewById(R.id.editText22);//端口号
        titleEditText = (TextView) View1.findViewById(R.id.textView21);//"连接"

        cancelbutton22.setOnClickListener(cancelbutton22Click);//对话框取消事件
        connectbutton21.setOnClickListener(connectbutton21Click);//对话框连接按钮点击事件
    }

    /***
     * 对话框连接按钮点击事件
     */
    private OnClickListener connectbutton21Click = new OnClickListener() {

        @Override
        public void onClick(View v) {
            // TODO Auto-generated method stub
            Ipstring = iPEditText.getText().toString().replace(" ", "");
            portint = Integer.valueOf(portEditText.getText().toString().replace(" ", ""));
            progressBar21.setVisibility(0);//显示进度条
            tcpClientCountDownTimer.cancel();
            tcpClientCountDownTimer.start();
            ConnectFlage = true;
            ShowPointSum = 0;
            ConnectSeverThread connectSeverThread = new ConnectSeverThread();
            connectSeverThread.start();
        }
    };


    /***
     *
     * @author 连接服务器任务
     *
     */
    class ConnectSeverThread extends Thread
    {
        public void run()
        {
            while(ConnectFlage)
            {
                try
                {
                    ipAddress = InetAddress.getByName(Ipstring);
                    socket = new Socket(ipAddress, portint);
                    ConnectFlage = false;
                    tcpClientCountDownTimer.cancel();
                    runOnUiThread(new Runnable()
                    {
                        public void run()
                        {
                            progressBar21.setVisibility(-1);//关闭滚动条
                            AlertDialog21.cancel();//关闭提示框
                        }
                    });
                    inputStream = socket.getInputStream();//获取输入流

                }
                catch (IOException e)
                {
                    // TODO Auto-generated catch block
                    e.printStackTrace();

                }
            }
        }
    }

    /***
     * 对话框取消按钮事件
     */
    private OnClickListener cancelbutton22Click = new OnClickListener() {

        @Override
        public void onClick(View v) {
            // TODO Auto-generated method stub
            ConnectFlage = false;//取消连接任务
            tcpClientCountDownTimer.cancel();//结束定时器
            progressBar21.setVisibility(-1);//关闭滚动条
            AlertDialog21.cancel();//关闭对话框
        }
    };

    /***
     * 延时3s的定时器
     */
    private CountDownTimer tcpClientCountDownTimer = new CountDownTimer(3000,200) {
        @Override
        public void onTick(long millisUntilFinished) {//每隔200ms进入
            if (ConnectFlage)
            {    ShowPointSum ++;
                switch (ShowPointSum%9)
                {   case 0:titleEditText.setText("连接中");break;
                    case 1:titleEditText.setText("连接中.");break;
                    case 2:titleEditText.setText("连接中..");break;
                    case 3:titleEditText.setText("连接中...");break;
                    case 4:titleEditText.setText("连接中....");break;
                    case 5:titleEditText.setText("连接中.....");break;
                    case 6:titleEditText.setText("连接中......");break;
                    case 7:titleEditText.setText("连接中.......");break;
                    case 8:titleEditText.setText("连接中........");break;
                    default:
                        break;
                }
            }
        }
        @Override
        public void onFinish() {//3s后进入(没有取消定时器的情况下)
            if (ConnectFlage)
            {    ConnectFlage = false;
                progressBar21.setVisibility(-1);//关闭滚动条
                titleEditText.setText("连接服务器失败!!");
            }
            tcpClientCountDownTimer.cancel();
        }
    };


    /***
     * 主按钮点击事件
     */
    private OnClickListener buttonconnect1Click = new OnClickListener() {
        @Override
        public void onClick(View v) {
            // TODO Auto-generated method stub
            titleEditText.setText("连接");
            AlertDialog21.show();
        }
    };

    /***
     * 主界面连接服务器按钮背景改变
     */
    private OnTouchListener buttonconnect1Touch = new OnTouchListener() {

        @Override
        public boolean onTouch(View v, MotionEvent event) {
            // TODO Auto-generated method stub
            if (event.getAction()==MotionEvent.ACTION_DOWN) {
                buttonconnect1.setBackgroundResource(R.drawable.buttondown);
            }
            if (event.getAction()==MotionEvent.ACTION_UP) {
                buttonconnect1.setBackgroundResource(R.drawable.butonup);
            }
            return false;
        }
    };

}
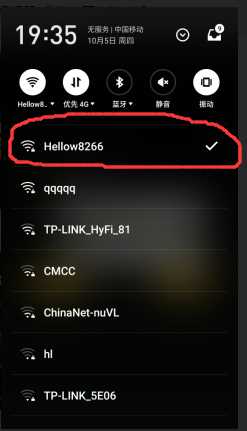
现在加上权限然后连接WIFI模块测试一下哈
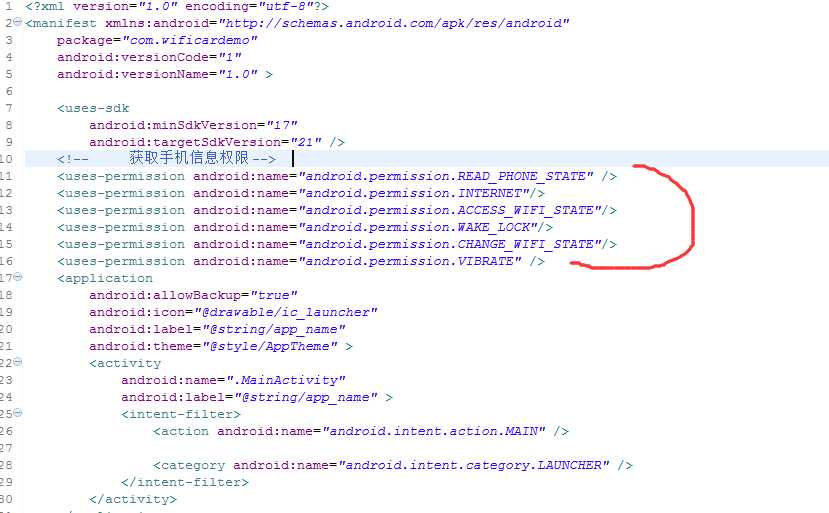
<uses-permission android:name="android.permission.READ_PHONE_STATE" />
    <uses-permission android:name="android.permission.INTERNET"/>
    <uses-permission android:name="android.permission.ACCESS_WIFI_STATE"/>
     <uses-permission android:name="android.permission.WAKE_LOCK"/>
     <uses-permission android:name="android.permission.CHANGE_WIFI_STATE"/>
     <uses-permission android:name="android.permission.VIBRATE" />
连接模块的无线
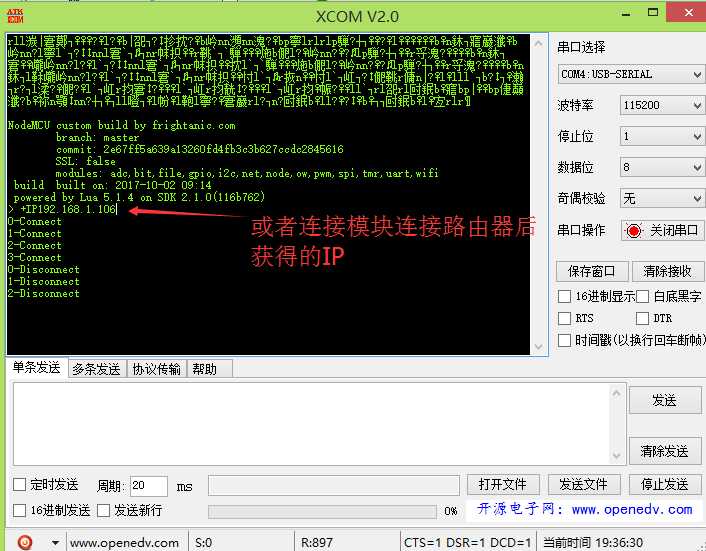
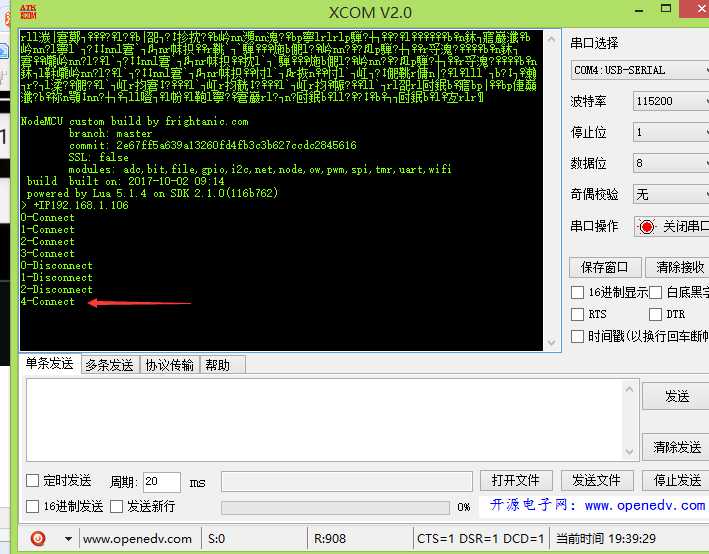
然后会发现
对话框消失了
因为咱们自己设置的消失
现在让它连接后打开控制界面
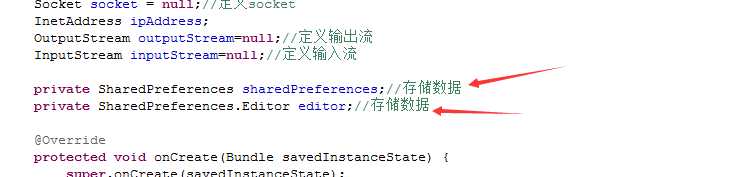
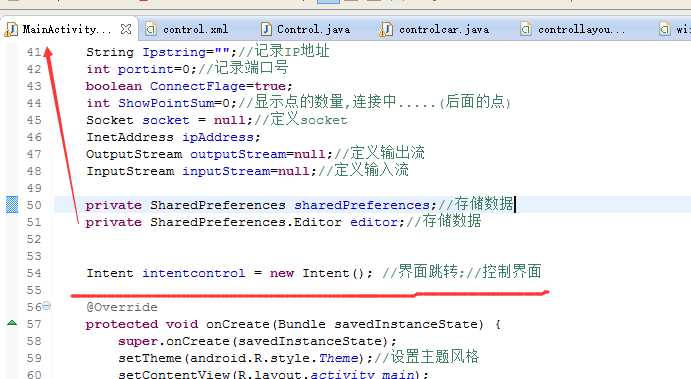
还是先把IP和端口号的信息做成能够保存的吧
咱们就用 SharedPreferences
可以看一下这篇文章的介绍
http://blog.csdn.net/baidu_31093133/article/details/51476726##1

然后
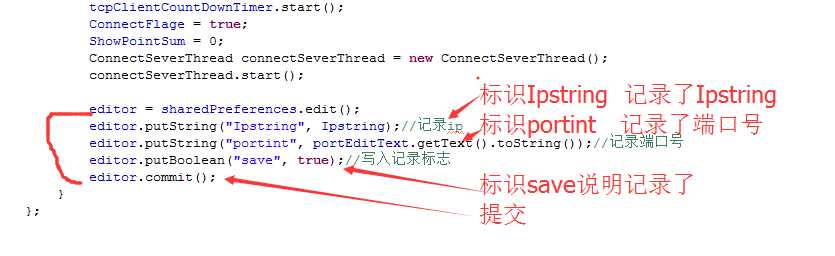
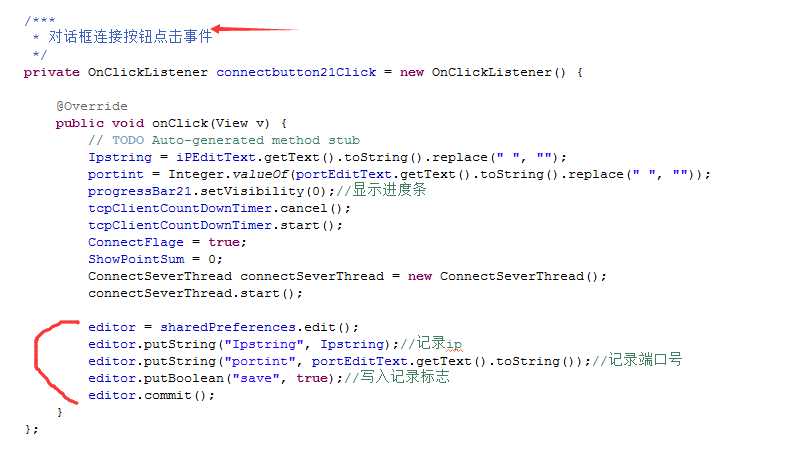
那么一开始运行就要检测是不是记录了,,如果记录了就取出来记录的数据然后显示在对应的文本框中
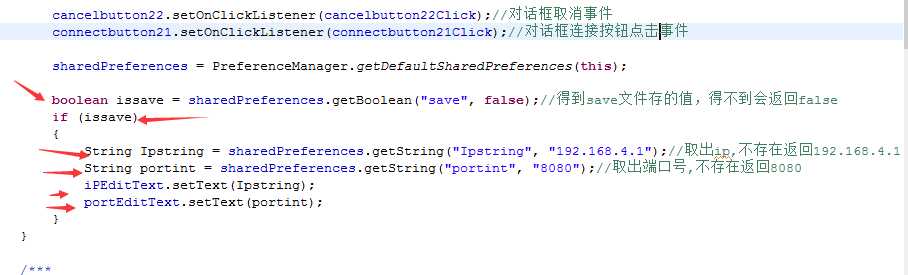
整体的代码
package com.wificardemo;

import java.io.IOException;
import java.io.InputStream;
import java.io.OutputStream;
import java.net.InetAddress;
import java.net.Socket;

import android.app.Activity;
import android.app.AlertDialog;
import android.content.SharedPreferences;
import android.os.Bundle;
import android.os.CountDownTimer;
import android.preference.PreferenceManager;
import android.renderscript.Mesh.Primitive;
import android.view.Menu;
import android.view.MenuItem;
import android.view.MotionEvent;
import android.view.View;
import android.view.View.OnClickListener;
import android.view.View.OnTouchListener;
import android.widget.Button;
import android.widget.EditText;
import android.widget.ProgressBar;
import android.widget.TextView;

public class MainActivity extends Activity {

    Button buttonconnect1;
    AlertDialog AlertDialog21;//定义一个提示框
    View View1;//定义一个view用来获取咱们自定义的界面
    Button connectbutton21;//连接服务器
    Button cancelbutton22;//取消按钮
    ProgressBar progressBar21;//进度条
    EditText iPEditText;//IP地址
    EditText portEditText;//端口号
    TextView titleEditText;//"连接"

    String Ipstring="";//记录IP地址
    int portint=0;//记录端口号
    boolean ConnectFlage=true;
    int ShowPointSum=0;//显示点的数量,连接中.....(后面的点)
    Socket socket = null;//定义socket
    InetAddress ipAddress;
    OutputStream outputStream=null;//定义输出流
    InputStream inputStream=null;//定义输入流

    private SharedPreferences sharedPreferences;//存储数据
    private SharedPreferences.Editor editor;//存储数据

    @Override
    protected void onCreate(Bundle savedInstanceState) {
        super.onCreate(savedInstanceState);
        setTheme(android.R.style.Theme);//设置主题风格
        setContentView(R.layout.activity_main);

        buttonconnect1 = (Button) findViewById(R.id.button11);//获取按钮
        buttonconnect1.setOnClickListener(buttonconnect1Click);//按钮点击事件
        buttonconnect1.setOnTouchListener(buttonconnect1Touch);//按钮的触摸事件
        /**对话框相关**/
        AlertDialog21 = new AlertDialog.Builder (MainActivity.this).create();
        View1 = View.inflate(MainActivity.this, R.layout.dialog, null);
        AlertDialog21.setView(View1);//设置显示内容为自定义的界面
        connectbutton21 = (Button) View1.findViewById(R.id.button21);//连接服务器按钮
        cancelbutton22 = (Button) View1.findViewById(R.id.Button22);//取消按钮
        progressBar21 = (ProgressBar) View1.findViewById(R.id.progressBar21);//进度条
        progressBar21.setVisibility(-1);//进度条不显示
        iPEditText = (EditText)View1.findViewById(R.id.editText21);//IP地址
        portEditText = (EditText)View1.findViewById(R.id.editText22);//端口号
        titleEditText = (TextView) View1.findViewById(R.id.textView21);//"连接"

        cancelbutton22.setOnClickListener(cancelbutton22Click);//对话框取消事件
        connectbutton21.setOnClickListener(connectbutton21Click);//对话框连接按钮点击事件

        sharedPreferences = PreferenceManager.getDefaultSharedPreferences(this);

        boolean issave = sharedPreferences.getBoolean("save", false);//得到save文件存的值,得不到会返回false
        if (issave)
        {
            String Ipstring = sharedPreferences.getString("Ipstring", "192.168.4.1");//取出ip,不存在返回192.168.4.1
            String portint = sharedPreferences.getString("portint", "8080");//取出端口号,不存在返回8080
            iPEditText.setText(Ipstring);
            portEditText.setText(portint);
        }
    }

    /***
     * 对话框连接按钮点击事件
     */
    private OnClickListener connectbutton21Click = new OnClickListener() {

        @Override
        public void onClick(View v) {
            // TODO Auto-generated method stub
            Ipstring = iPEditText.getText().toString().replace(" ", "");
            portint = Integer.valueOf(portEditText.getText().toString().replace(" ", ""));
            progressBar21.setVisibility(0);//显示进度条
            tcpClientCountDownTimer.cancel();
            tcpClientCountDownTimer.start();
            ConnectFlage = true;
            ShowPointSum = 0;
            ConnectSeverThread connectSeverThread = new ConnectSeverThread();
            connectSeverThread.start();

            editor = sharedPreferences.edit();
            editor.putString("Ipstring", Ipstring);//记录ip
            editor.putString("portint", portEditText.getText().toString());//记录端口号
            editor.putBoolean("save", true);//写入记录标志
            editor.commit();
        }
    };


    /***
     *
     * @author 连接服务器任务
     *
     */
    class ConnectSeverThread extends Thread
    {
        public void run()
        {
            while(ConnectFlage)
            {
                try
                {
                    ipAddress = InetAddress.getByName(Ipstring);
                    socket = new Socket(ipAddress, portint);
                    ConnectFlage = false;
                    tcpClientCountDownTimer.cancel();
                    runOnUiThread(new Runnable()
                    {
                        public void run()
                        {
                            progressBar21.setVisibility(-1);//关闭滚动条
                            AlertDialog21.cancel();//关闭提示框
                        }
                    });
                    inputStream = socket.getInputStream();//获取输入流

                }
                catch (IOException e)
                {
                    // TODO Auto-generated catch block
                    e.printStackTrace();

                }
            }
        }
    }

    /***
     * 对话框取消按钮事件
     */
    private OnClickListener cancelbutton22Click = new OnClickListener() {

        @Override
        public void onClick(View v) {
            // TODO Auto-generated method stub
            ConnectFlage = false;//取消连接任务
            tcpClientCountDownTimer.cancel();//结束定时器
            progressBar21.setVisibility(-1);//关闭滚动条
            AlertDialog21.cancel();//关闭对话框
        }
    };

    /***
     * 延时3s的定时器
     */
    private CountDownTimer tcpClientCountDownTimer = new CountDownTimer(3000,200) {
        @Override
        public void onTick(long millisUntilFinished) {//每隔200ms进入
            if (ConnectFlage)
            {    ShowPointSum ++;
                switch (ShowPointSum%9)
                {   case 0:titleEditText.setText("连接中");break;
                    case 1:titleEditText.setText("连接中.");break;
                    case 2:titleEditText.setText("连接中..");break;
                    case 3:titleEditText.setText("连接中...");break;
                    case 4:titleEditText.setText("连接中....");break;
                    case 5:titleEditText.setText("连接中.....");break;
                    case 6:titleEditText.setText("连接中......");break;
                    case 7:titleEditText.setText("连接中.......");break;
                    case 8:titleEditText.setText("连接中........");break;
                    default:
                        break;
                }
            }
        }
        @Override
        public void onFinish() {//3s后进入(没有取消定时器的情况下)
            if (ConnectFlage)
            {    ConnectFlage = false;
                progressBar21.setVisibility(-1);//关闭滚动条
                titleEditText.setText("连接服务器失败!!");
            }
            tcpClientCountDownTimer.cancel();
        }
    };


    /***
     * 主按钮点击事件
     */
    private OnClickListener buttonconnect1Click = new OnClickListener() {
        @Override
        public void onClick(View v) {
            // TODO Auto-generated method stub
            titleEditText.setText("连接");
            AlertDialog21.show();
        }
    };

    /***
     * 主界面连接服务器按钮背景改变
     */
    private OnTouchListener buttonconnect1Touch = new OnTouchListener() {

        @Override
        public boolean onTouch(View v, MotionEvent event) {
            // TODO Auto-generated method stub
            if (event.getAction()==MotionEvent.ACTION_DOWN) {
                buttonconnect1.setBackgroundResource(R.drawable.buttondown);
            }
            if (event.getAction()==MotionEvent.ACTION_UP) {
                buttonconnect1.setBackgroundResource(R.drawable.butonup);
            }
            return false;
        }
    };

}
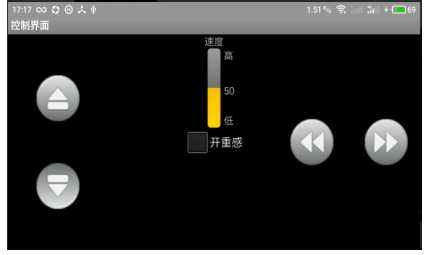
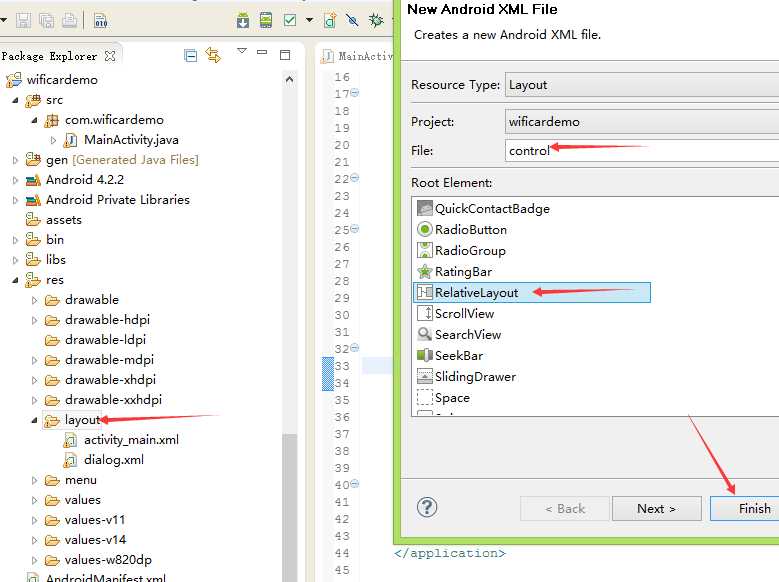
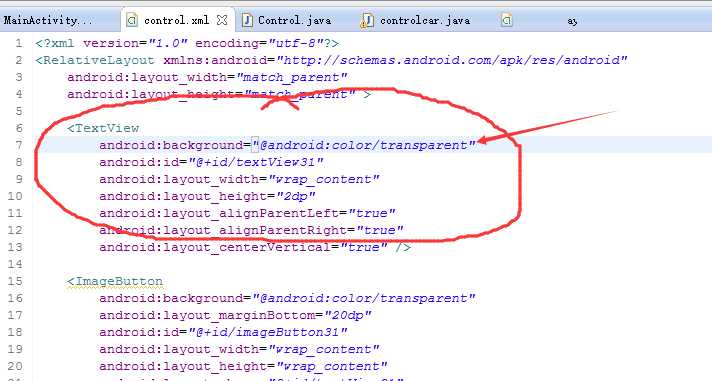
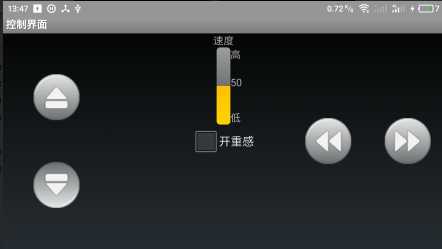
现在做控制界面
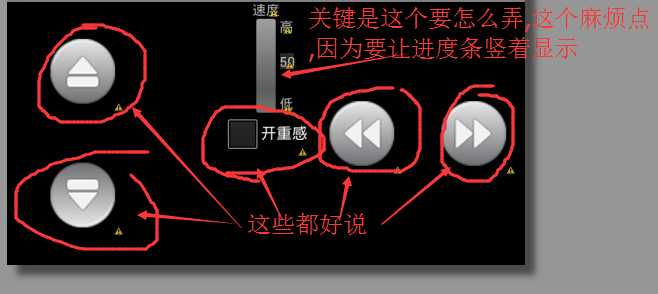
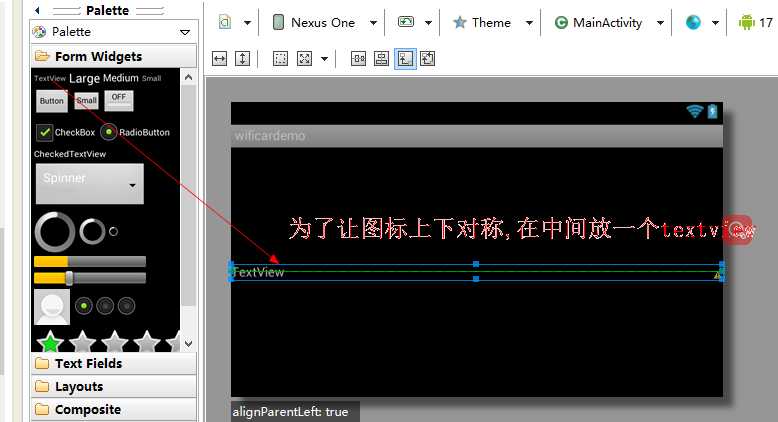

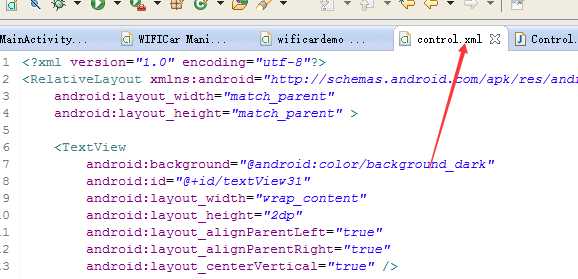
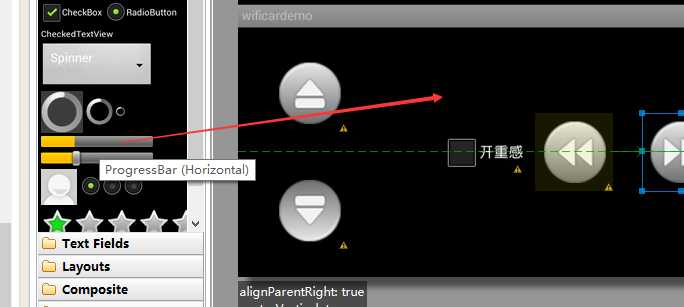
<?xml version="1.0" encoding="utf-8"?>
<RelativeLayout xmlns:android="http://schemas.android.com/apk/res/android"
    android:layout_width="match_parent"
    android:layout_height="match_parent" >

    <TextView
        android:background="@android:color/background_dark"
        android:id="@+id/textView31"
        android:layout_width="wrap_content"
        android:layout_height="2dp"
        android:layout_alignParentLeft="true"
        android:layout_alignParentRight="true"
        android:layout_centerVertical="true" />

    <ImageButton
        android:background="@android:color/transparent"
        android:layout_marginBottom="20dp"
        android:id="@+id/imageButton31"
        android:layout_width="wrap_content"
        android:layout_height="wrap_content"
        android:layout_above="@+id/textView31"
        android:layout_alignParentLeft="true"
        android:layout_marginLeft="35dp"
        android:src="@drawable/qianjin" />

    <ImageButton
        android:background="@android:color/transparent"
        android:layout_marginTop="20dp"
        android:id="@+id/imageButton32"
        android:layout_width="wrap_content"
        android:layout_height="wrap_content"
        android:layout_alignLeft="@+id/imageButton31"
        android:layout_below="@+id/textView31"
        android:src="@drawable/houtui" />

    <ImageButton
        android:background="@android:color/transparent"
        android:id="@+id/imageButton33"
        android:layout_width="wrap_content"
        android:layout_height="wrap_content"
        android:layout_alignParentRight="true"
        android:layout_centerVertical="true"
        android:layout_marginRight="10dp"
        android:src="@drawable/youzhuan" />

    <ImageButton
        android:background="@android:color/transparent"
        android:id="@+id/imageButton34"
        android:layout_width="wrap_content"
        android:layout_height="wrap_content"
        android:layout_centerVertical="true"
        android:layout_marginRight="30dp"
        android:layout_toLeftOf="@+id/imageButton33"
        android:src="@drawable/zuozhuan" />

    <CheckBox
        android:id="@+id/checkBox31"
        android:layout_width="wrap_content"
        android:layout_height="wrap_content"
        android:layout_centerHorizontal="true"
        android:layout_centerVertical="true"
        android:text="开重感" />

</RelativeLayout>
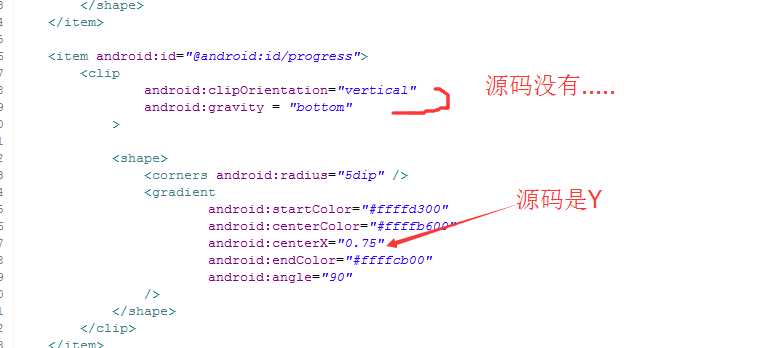
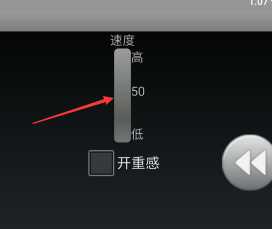
这个ProgressBar默认是,,水平的
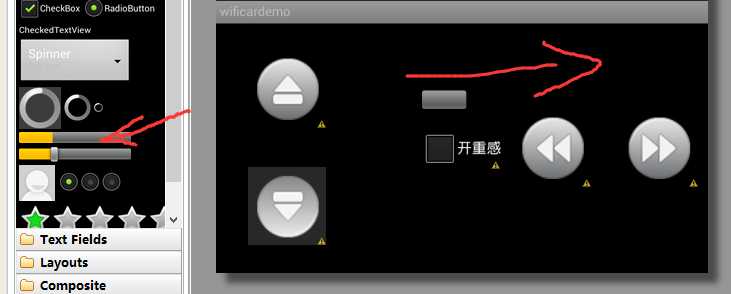
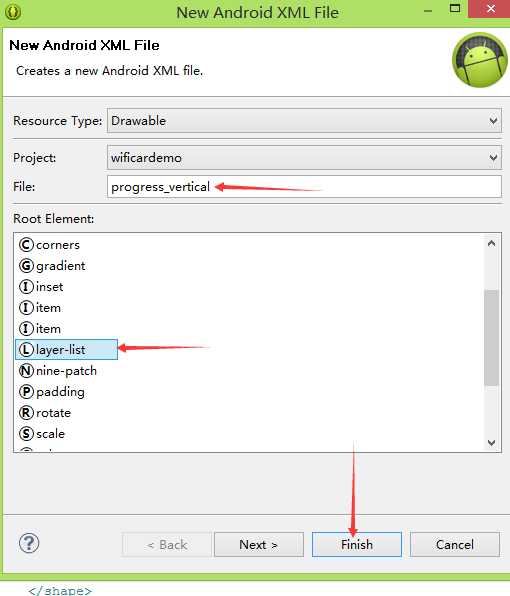
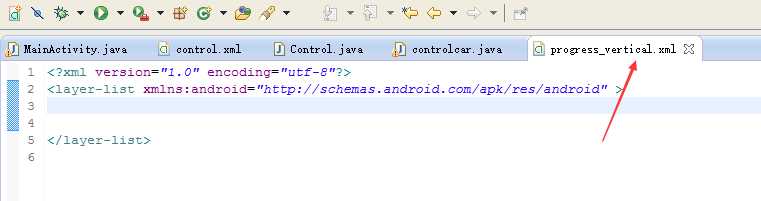
要改成竖直的其实就是自己写一个外观和变化的文件,然后调用,,,,,就像咱们自定义按钮样式一样
然后呢在里面加上
<?xml version="1.0" encoding="utf-8"?>
<layer-list xmlns:android="http://schemas.android.com/apk/res/android" >
    <item android:id="@android:id/background">
        <shape>
            <corners android:radius="5dip" />
            <gradient
                    android:startColor="#ff9d9e9d"
                    android:centerColor="#ff5a5d5a"
                    android:centerY="0.75"
                    android:endColor="#ff747674"
                    android:angle="270"
            />
        </shape>
    </item>

    <item android:id="@android:id/progress">
        <clip
                android:clipOrientation="vertical"
                android:gravity = "bottom"
            >

            <shape>
                <corners android:radius="5dip" />
                <gradient
                        android:startColor="#ffffd300"
                        android:centerColor="#ffffb600"
                        android:centerX="0.75"
                        android:endColor="#ffffcb00"
                        android:angle="90"
                />
            </shape>
        </clip>
    </item>

</layer-list>
要问我你怎么知道这样写..百度的,然后从源码里面copy 过来的.........亲们也可以百度哈,,,,,现在我也只是个入门的,只不过善于去用别人的东西,,不过后期我肯定会去学习这些东西代表的含义
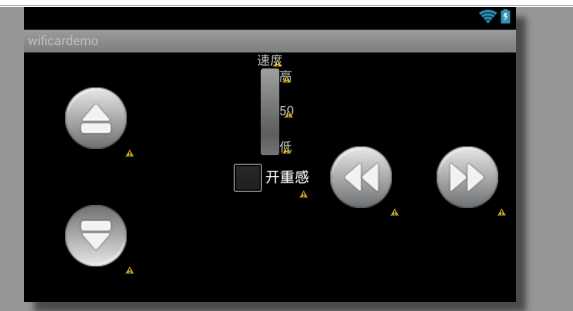
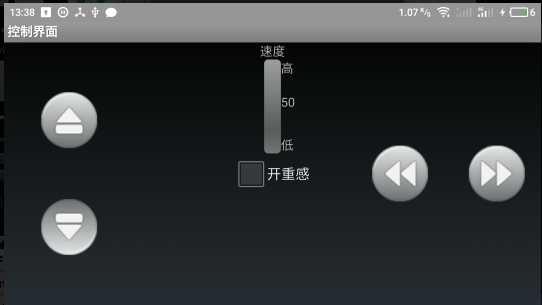
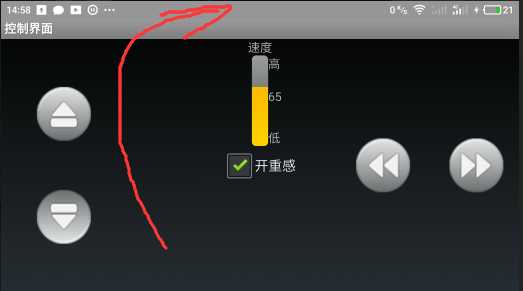
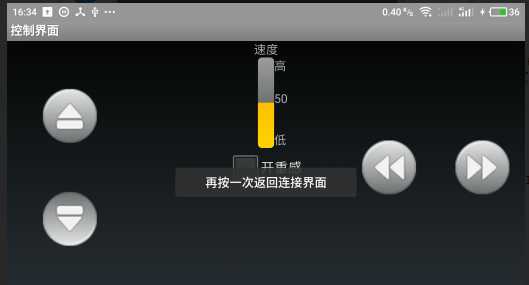
现在的控制的界面
布局文件
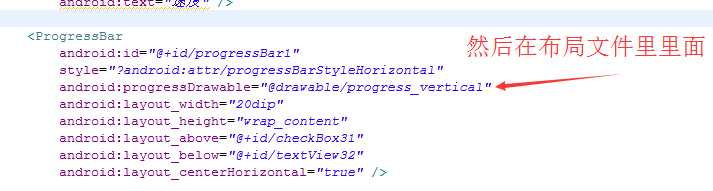
<?xml version="1.0" encoding="utf-8"?>
<RelativeLayout xmlns:android="http://schemas.android.com/apk/res/android"
    android:layout_width="match_parent"
    android:layout_height="match_parent" >

    <TextView
        android:background="@android:color/transparent"
        android:id="@+id/textView31"
        android:layout_width="wrap_content"
        android:layout_height="2dp"
        android:layout_alignParentLeft="true"
        android:layout_alignParentRight="true"
        android:layout_centerVertical="true" />

    <ImageButton
        android:background="@android:color/transparent"
        android:layout_marginBottom="20dp"
        android:id="@+id/imageButton31"
        android:layout_width="wrap_content"
        android:layout_height="wrap_content"
        android:layout_above="@+id/textView31"
        android:layout_alignParentLeft="true"
        android:layout_marginLeft="35dp"
        android:src="@drawable/qianjin" />

    <ImageButton
        android:background="@android:color/transparent"
        android:layout_marginTop="20dp"
        android:id="@+id/imageButton32"
        android:layout_width="wrap_content"
        android:layout_height="wrap_content"
        android:layout_alignLeft="@+id/imageButton31"
        android:layout_below="@+id/textView31"
        android:src="@drawable/houtui" />

    <ImageButton
        android:background="@android:color/transparent"
        android:id="@+id/imageButton33"
        android:layout_width="wrap_content"
        android:layout_height="wrap_content"
        android:layout_alignParentRight="true"
        android:layout_centerVertical="true"
        android:layout_marginRight="10dp"
        android:src="@drawable/youzhuan" />

    <ImageButton
        android:background="@android:color/transparent"
        android:id="@+id/imageButton34"
        android:layout_width="wrap_content"
        android:layout_height="wrap_content"
        android:layout_centerVertical="true"
        android:layout_marginRight="30dp"
        android:layout_toLeftOf="@+id/imageButton33"
        android:src="@drawable/zuozhuan" />

    <CheckBox
        android:id="@+id/checkBox31"
        android:layout_width="wrap_content"
        android:layout_height="wrap_content"
        android:layout_centerHorizontal="true"
        android:layout_centerVertical="true"
        android:text="开重感" />

    <TextView
        android:id="@+id/textView32"
        android:layout_width="wrap_content"
        android:layout_height="wrap_content"
        android:layout_alignParentTop="true"
        android:layout_centerHorizontal="true"
        android:text="速度" />

    <ProgressBar
        android:id="@+id/progressBar31"
        style="?android:attr/progressBarStyleHorizontal"
        android:progressDrawable="@drawable/progress_vertical"
        android:layout_width="20dip"
        android:layout_height="wrap_content"
        android:layout_above="@+id/checkBox31"
        android:layout_below="@+id/textView32"
        android:layout_centerHorizontal="true" />

    <TextView
        android:id="@+id/textView33"
        android:layout_width="wrap_content"
        android:layout_height="wrap_content"
        android:layout_alignTop="@+id/progressBar31"
        android:layout_toRightOf="@+id/progressBar31"
        android:text="高" />

    <TextView
        android:id="@+id/textView34"
        android:layout_width="wrap_content"
        android:layout_height="wrap_content"
        android:layout_above="@+id/checkBox31"
        android:layout_alignLeft="@+id/textView33"
        android:text="低" />

    <TextView
        android:id="@+id/textView35"
        android:layout_width="wrap_content"
        android:layout_height="wrap_content"
        android:layout_below="@+id/textView33"
        android:layout_marginTop="20dp"
        android:layout_toRightOf="@+id/progressBar31"
        android:text="50" />

</RelativeLayout>
现在连接上以后跳转到这个界面
设置在连接上以后,跳转
对了要在
现在可以试一试
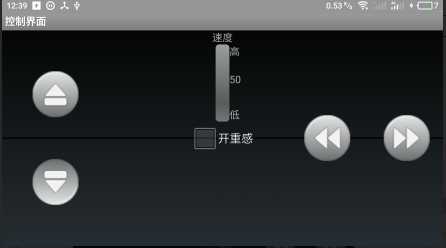
整体还好啦.....只不过中间的那个textview太明显了.....咱在代码中把他设置成透明的
下面开始做控制的代码,那些一看就懂的咱就稍微一说哈,,,
现在看重力传感器,,还是先看,这个,,因为重力传感器的数据要用这个ProgressBar显示
可以下载进去看一下
先把这个也做上
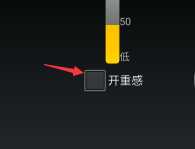
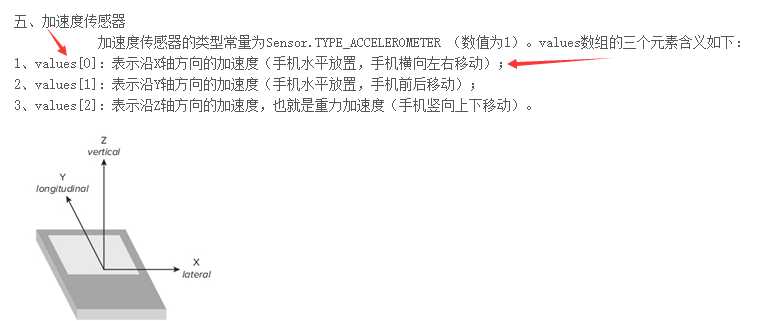
现在把手机的传感器弄上来
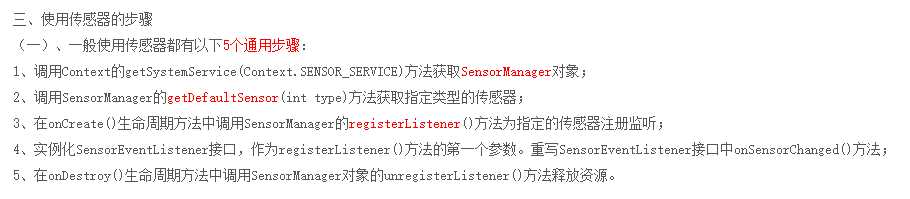
这是一个人介绍的感觉挺好的
http://blog.csdn.net/wll995806658/article/details/53993356
现在的程序
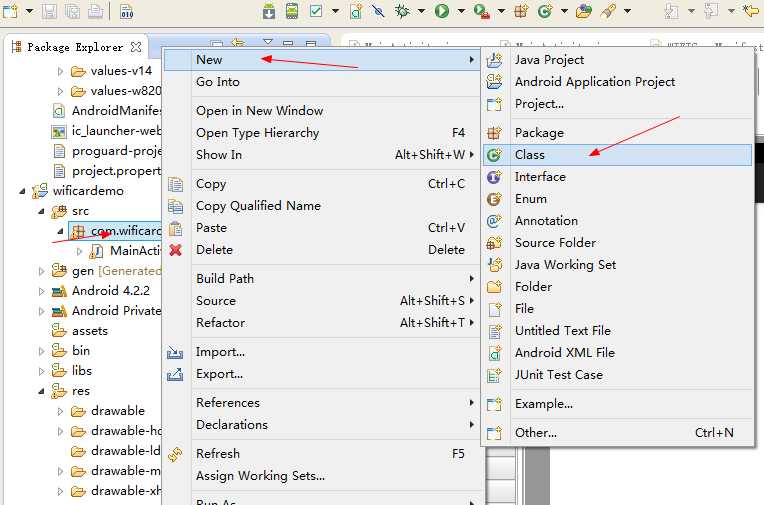
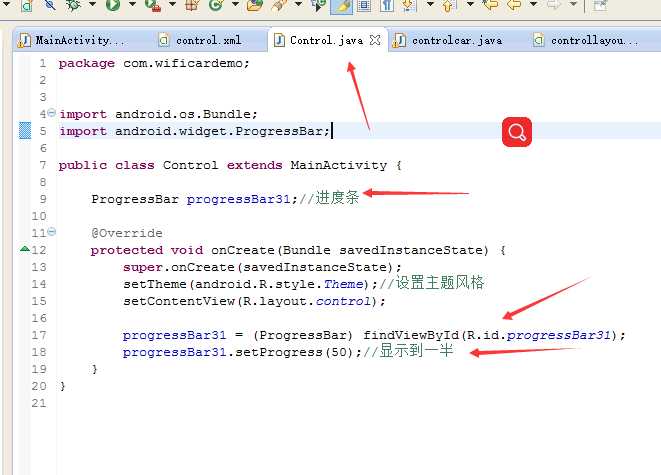
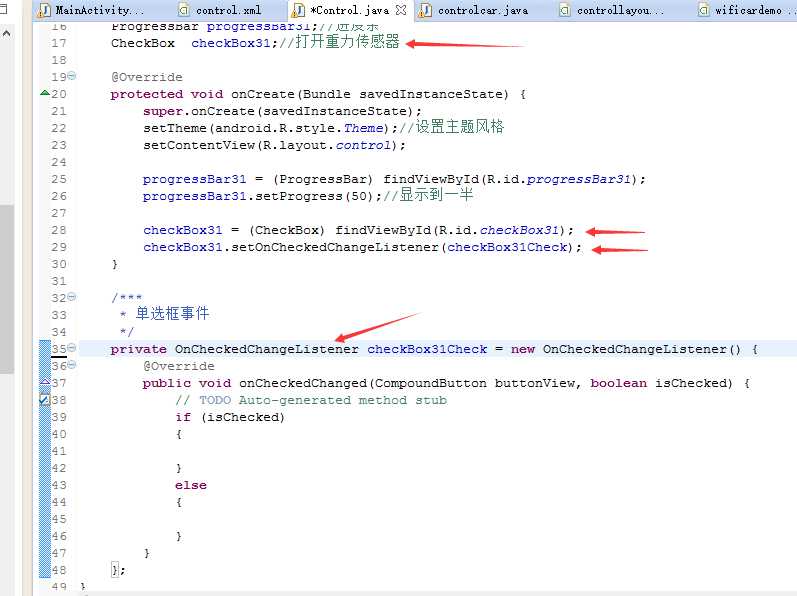
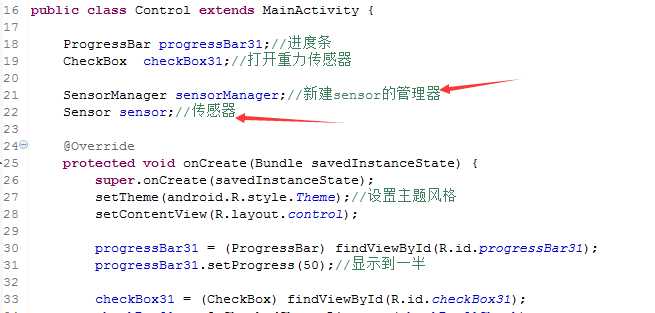
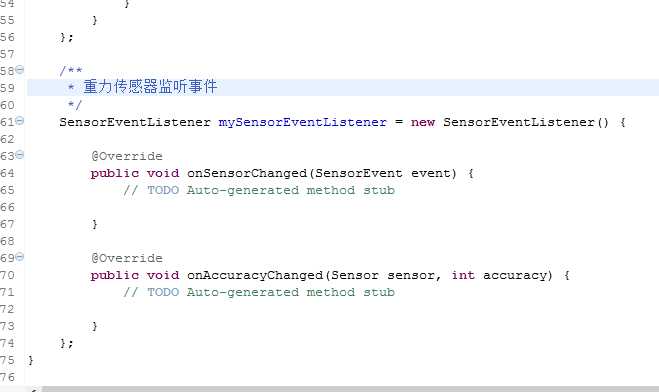
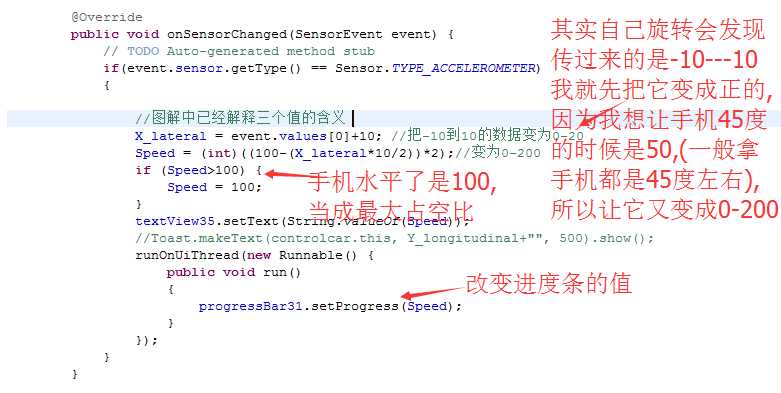
package com.wificardemo;


import android.hardware.Sensor;
import android.hardware.SensorEvent;
import android.hardware.SensorEventListener;
import android.hardware.SensorManager;
import android.os.Bundle;
import android.util.Log;
import android.widget.CheckBox;
import android.widget.CompoundButton;
import android.widget.TextView;
import android.widget.CompoundButton.OnCheckedChangeListener;
import android.widget.ProgressBar;

public class Control extends MainActivity {

    ProgressBar progressBar31;//进度条
    CheckBox  checkBox31;//打开重力传感器

    SensorManager sensorManager;//新建sensor的管理器
    Sensor sensor;//传感器
    float X_lateral;//X方向角度
    int Speed=0;//速度
    TextView textView35;//显示速度值

    @Override
    protected void onCreate(Bundle savedInstanceState) {
        super.onCreate(savedInstanceState);
        setTheme(android.R.style.Theme);//设置主题风格
        setContentView(R.layout.control);

        progressBar31 = (ProgressBar) findViewById(R.id.progressBar31);
        progressBar31.setProgress(50);//显示到一半

        checkBox31 = (CheckBox) findViewById(R.id.checkBox31);
        checkBox31.setOnCheckedChangeListener(checkBox31Check);

        textView35 = (TextView) findViewById(R.id.textView35);//速度显示
    }

    /***
     * 单选框事件
     */
    private OnCheckedChangeListener checkBox31Check = new OnCheckedChangeListener() {
        @Override
        public void onCheckedChanged(CompoundButton buttonView, boolean isChecked) {
            // TODO Auto-generated method stub
            if (isChecked)
            {
                sensorManager = (SensorManager) getSystemService(SENSOR_SERVICE);//获取手机里面的传感器
                sensor = sensorManager.getDefaultSensor(Sensor.TYPE_ACCELEROMETER);//选择获取重力传感器
                                              //监听函数                        重力传感器对象              工作频率
                sensorManager.registerListener(mySensorEventListener, sensor,  SensorManager.SENSOR_DELAY_NORMAL);// SENSOR_DELAY_GAME
            }
            else
            {
                sensorManager.unregisterListener(mySensorEventListener);//释放传感器
            }
        }
    };

    /**
     * 重力传感器监听事件
     */
    SensorEventListener mySensorEventListener = new SensorEventListener() {

        @Override
        public void onSensorChanged(SensorEvent event) {
            // TODO Auto-generated method stub
            if(event.sensor.getType() == Sensor.TYPE_ACCELEROMETER)
            {
                X_lateral = event.values[0]+10; //把-10到10的数据变为0-20
                Speed = (int)((100-(X_lateral*10/2))*2);//变为0-200
                if (Speed>100) {
                    Speed = 100;
                }
                textView35.setText(String.valueOf(Speed));
                //Toast.makeText(controlcar.this, Y_longitudinal+"", 500).show();
                runOnUiThread(new Runnable() {
                    public void run()
                    {
                        progressBar31.setProgress(Speed);
                    }
                });
            }
        }

        @Override
        public void onAccuracyChanged(Sensor sensor, int accuracy) {
            // TODO Auto-generated method stub

        }
    };
}
直接加了一些程序下载到手机旋转手机可以看出效果
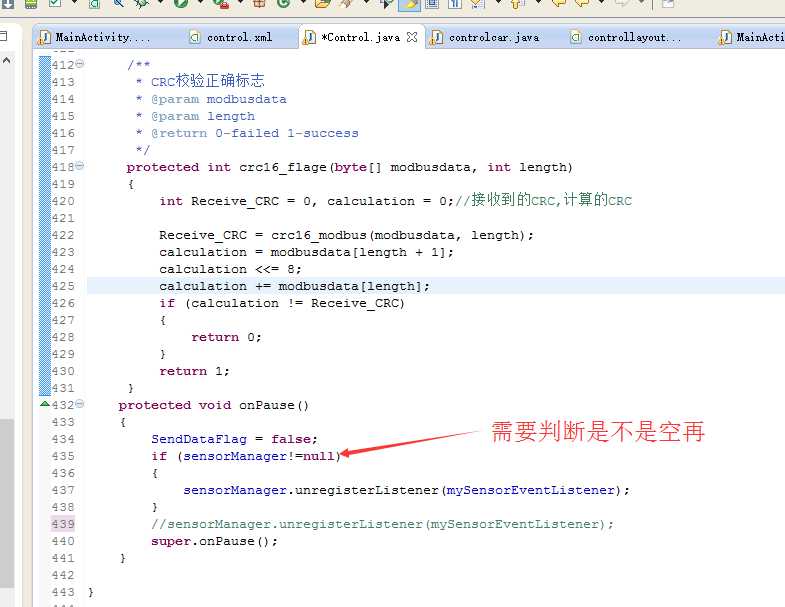
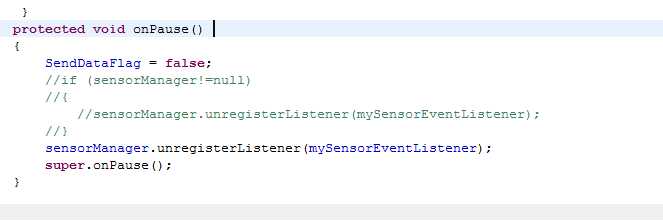
对了,,一定要加一个关掉传感器的操作.....因为一旦打开,,您不主动关掉,它就一直运行,,,,,,耗电哈,,耗电,,耗电,,,,
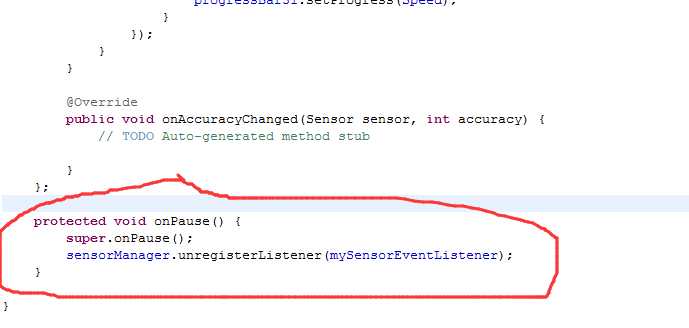
protected void onPause() {
        super.onPause();
        sensorManager.unregisterListener(mySensorEventListener);
    }
package com.wificardemo;


import android.hardware.Sensor;
import android.hardware.SensorEvent;
import android.hardware.SensorEventListener;
import android.hardware.SensorManager;
import android.os.Bundle;
import android.util.Log;
import android.widget.CheckBox;
import android.widget.CompoundButton;
import android.widget.TextView;
import android.widget.CompoundButton.OnCheckedChangeListener;
import android.widget.ProgressBar;
import android.widget.Toast;

public class Control extends MainActivity {

    ProgressBar progressBar31;//进度条
    CheckBox  checkBox31;//打开重力传感器

    SensorManager sensorManager;//新建sensor的管理器
    Sensor sensor;//传感器
    float X_lateral;//X方向角度
    int Speed=0;//速度
    TextView textView35;//显示速度值

    @Override
    protected void onCreate(Bundle savedInstanceState) {
        super.onCreate(savedInstanceState);
        setTheme(android.R.style.Theme);//设置主题风格
        setContentView(R.layout.control);

        progressBar31 = (ProgressBar) findViewById(R.id.progressBar31);
        progressBar31.setProgress(50);//显示到一半

        checkBox31 = (CheckBox) findViewById(R.id.checkBox31);
        checkBox31.setOnCheckedChangeListener(checkBox31Check);

        textView35 = (TextView) findViewById(R.id.textView35);//速度显示
    }

    /***
     * 单选框事件
     */
    private OnCheckedChangeListener checkBox31Check = new OnCheckedChangeListener() {
        @Override
        public void onCheckedChanged(CompoundButton buttonView, boolean isChecked) {
            // TODO Auto-generated method stub
            if (isChecked)
            {
                sensorManager = (SensorManager) getSystemService(SENSOR_SERVICE);//获取手机里面的传感器
                sensor = sensorManager.getDefaultSensor(Sensor.TYPE_ACCELEROMETER);//选择获取重力传感器
                                              //监听函数                        重力传感器对象              工作频率
                sensorManager.registerListener(mySensorEventListener, sensor,  SensorManager.SENSOR_DELAY_NORMAL);// SENSOR_DELAY_GAME
            }
            else
            {
                sensorManager.unregisterListener(mySensorEventListener);//释放传感器
            }
        }
    };

    /**
     * 重力传感器监听事件
     */
    SensorEventListener mySensorEventListener = new SensorEventListener() {

        @Override
        public void onSensorChanged(SensorEvent event) {
            // TODO Auto-generated method stub
            if(event.sensor.getType() == Sensor.TYPE_ACCELEROMETER)
            {
                X_lateral = event.values[0]+10; //把-10到10的数据变为0-20
                Speed = (int)((100-(X_lateral*10/2))*2);//变为0-200
                if (Speed>100) {
                    Speed = 100;
                }
                textView35.setText(String.valueOf(Speed));
                //Toast.makeText(controlcar.this, Y_longitudinal+"", 500).show();
                runOnUiThread(new Runnable() {
                    public void run()
                    {
                        progressBar31.setProgress(Speed);
                    }
                });
            }
            else
            {
                sensorManager.unregisterListener(mySensorEventListener);
                runOnUiThread(new Runnable() {
                    public void run()
                    {
                        checkBox31.setChecked(false);
                        Toast.makeText(Control.this, "传感器不存在!!!", 500).show();
                    }
                });
            }
        }

        @Override
        public void onAccuracyChanged(Sensor sensor, int accuracy) {
            // TODO Auto-generated method stub

        }
    };

    protected void onPause() {
        super.onPause();
        sensorManager.unregisterListener(mySensorEventListener);
    }

}
现在把按键的事件做上,,,按下咱做成震动一下,,当然也可以自己做成播放声音的
package com.wificardemo;


import android.app.Service;
import android.hardware.Sensor;
import android.hardware.SensorEvent;
import android.hardware.SensorEventListener;
import android.hardware.SensorManager;
import android.os.Bundle;
import android.os.Vibrator;
import android.util.Log;
import android.view.MotionEvent;
import android.view.View;
import android.view.View.OnTouchListener;
import android.widget.CheckBox;
import android.widget.CompoundButton;
import android.widget.ImageButton;
import android.widget.TextView;
import android.widget.CompoundButton.OnCheckedChangeListener;
import android.widget.ProgressBar;
import android.widget.Toast;

public class Control extends MainActivity {

    ProgressBar progressBar31;//进度条
    CheckBox  checkBox31;//打开重力传感器
    SensorManager sensorManager;//新建sensor的管理器
    Sensor sensor;//传感器
    float X_lateral;//X方向角度
    int Speed=0;//速度
    TextView textView35;//显示速度值

    ImageButton imageButton31;//前进
    ImageButton imageButton32;//后退
    ImageButton imageButton33;//右转
    ImageButton imageButton34;//左转

    boolean forward = false;
    boolean back = false;
    boolean right = false;
    boolean left = false;

    Vibrator vibrator;//按钮按下震动

    @Override
    protected void onCreate(Bundle savedInstanceState) {
        super.onCreate(savedInstanceState);
        setTheme(android.R.style.Theme);//设置主题风格
        setContentView(R.layout.control);

        progressBar31 = (ProgressBar) findViewById(R.id.progressBar31);
        progressBar31.setProgress(50);//显示到一半

        checkBox31 = (CheckBox) findViewById(R.id.checkBox31);
        checkBox31.setOnCheckedChangeListener(checkBox31Check);

        textView35 = (TextView) findViewById(R.id.textView35);//速度显示

        imageButton31 = (ImageButton) findViewById(R.id.imageButton31);//前进
        imageButton32 = (ImageButton) findViewById(R.id.imageButton32);//后退
        imageButton33 = (ImageButton) findViewById(R.id.imageButton33);//右转
        imageButton34 = (ImageButton) findViewById(R.id.imageButton34);//左转

        imageButton31.setOnTouchListener(imageButton31Touch);//前进
        imageButton32.setOnTouchListener(imageButton32Touch);//后退
        imageButton33.setOnTouchListener(imageButton33Touch);//右转
        imageButton34.setOnTouchListener(imageButton34Touch);//左转

        vibrator=(Vibrator)getSystemService(Service.VIBRATOR_SERVICE);//震动
    }

    /***
     * 前进按钮
     */
    private OnTouchListener imageButton31Touch = new OnTouchListener() {

        @Override
        public boolean onTouch(View v, MotionEvent event) {
            // TODO Auto-generated method stub
            if (event.getAction()==MotionEvent.ACTION_DOWN) {
                forward = true;
                back=false;
                imageButton31.setImageResource(R.drawable.qianjindown);

                vibrator.vibrate(new long[]{0,20}, -1);//震动
            }
            if (event.getAction()==MotionEvent.ACTION_UP) {
                forward = false;
                imageButton31.setImageResource(R.drawable.qianjin);
            }
            return false;
        }
    };

    /***
     * 后退按钮
     */
    private OnTouchListener imageButton32Touch = new OnTouchListener() {

        @Override
        public boolean onTouch(View v, MotionEvent event) {
            // TODO Auto-generated method stub
            if (event.getAction()==MotionEvent.ACTION_DOWN) {
                back=true;
                forward=false;
                imageButton32.setImageResource(R.drawable.houtuidown);
                vibrator.vibrate(new long[]{0,20}, -1);
            }
            if (event.getAction()==MotionEvent.ACTION_UP) {
                back=false;
                imageButton32.setImageResource(R.drawable.houtui);
            }
            return false;
        }
    };

    /***
     * 右转按钮
     */
    private OnTouchListener imageButton33Touch = new OnTouchListener() {

        @Override
        public boolean onTouch(View v, MotionEvent event) {
            // TODO Auto-generated method stub
            if (event.getAction()==MotionEvent.ACTION_DOWN) {
                right=true;
                left=false;
                imageButton33.setImageResource(R.drawable.youzhuandown);
                vibrator.vibrate(new long[]{0,20}, -1);
            }
            if (event.getAction()==MotionEvent.ACTION_UP) {
                right=false;
                imageButton33.setImageResource(R.drawable.youzhuan);
            }
            return false;
        }
    };

    /***
     * 左转按钮
     */
    private OnTouchListener imageButton34Touch = new OnTouchListener() {

        @Override
        public boolean onTouch(View v, MotionEvent event) {
            // TODO Auto-generated method stub
            if (event.getAction()==MotionEvent.ACTION_DOWN) {
                left=true;
                right=false;
                imageButton34.setImageResource(R.drawable.zuozhuandown);
                vibrator.vibrate(new long[]{0,20}, -1);
            }
            if (event.getAction()==MotionEvent.ACTION_UP) {
                left=false;
                imageButton34.setImageResource(R.drawable.zuozhuan);
            }
            return false;
        }
    };

    /***
     * 单选框事件
     */
    private OnCheckedChangeListener checkBox31Check = new OnCheckedChangeListener() {
        @Override
        public void onCheckedChanged(CompoundButton buttonView, boolean isChecked) {
            // TODO Auto-generated method stub
            if (isChecked)
            {
                sensorManager = (SensorManager) getSystemService(SENSOR_SERVICE);//获取手机里面的传感器
                sensor = sensorManager.getDefaultSensor(Sensor.TYPE_ACCELEROMETER);//选择获取重力传感器
                                              //监听函数                        重力传感器对象              工作频率
                sensorManager.registerListener(mySensorEventListener, sensor,  SensorManager.SENSOR_DELAY_NORMAL);// SENSOR_DELAY_GAME
            }
            else
            {
                sensorManager.unregisterListener(mySensorEventListener);//释放传感器
            }
        }
    };

    /**
     * 重力传感器监听事件
     */
    SensorEventListener mySensorEventListener = new SensorEventListener() {

        @Override
        public void onSensorChanged(SensorEvent event) {
            // TODO Auto-generated method stub
            if(event.sensor.getType() == Sensor.TYPE_ACCELEROMETER)
            {
                X_lateral = event.values[0]+10; //把-10到10的数据变为0-20
                Speed = (int)((100-(X_lateral*10/2))*2);//变为0-200
                if (Speed>100) {
                    Speed = 100;
                }
                textView35.setText(String.valueOf(Speed));
                //Toast.makeText(controlcar.this, Y_longitudinal+"", 500).show();
                runOnUiThread(new Runnable() {
                    public void run()
                    {
                        progressBar31.setProgress(Speed);
                    }
                });
            }
            else
            {
                sensorManager.unregisterListener(mySensorEventListener);
                runOnUiThread(new Runnable() {
                    public void run()
                    {
                        checkBox31.setChecked(false);
                        Toast.makeText(Control.this, "传感器不存在!!!", 500).show();
                    }
                });
            }
        }

        @Override
        public void onAccuracyChanged(Sensor sensor, int accuracy) {
            // TODO Auto-generated method stub

        }
    };

    protected void onPause() {
        super.onPause();
        sensorManager.unregisterListener(mySensorEventListener);
    }

}
现在呢建一个发送任务开始发送数据了......
在前一篇的关于8266的设置
规定的协议
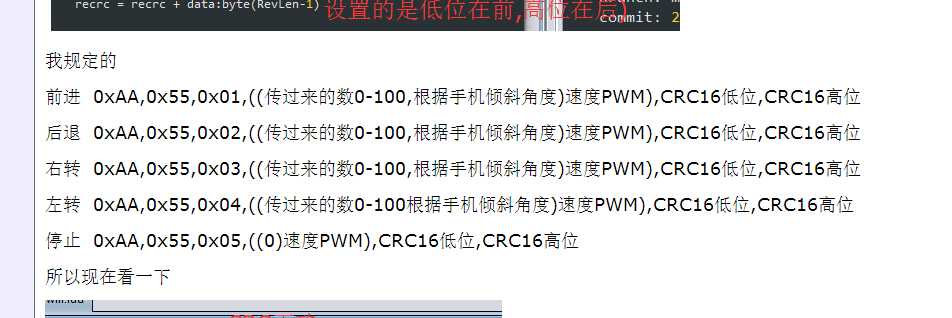
看一下现在的代码
package com.wificardemo;


import java.io.IOException;
import java.nio.ByteBuffer;


import android.app.Service;
import android.content.Intent;
import android.hardware.Sensor;
import android.hardware.SensorEvent;
import android.hardware.SensorEventListener;
import android.hardware.SensorManager;
import android.os.Bundle;
import android.os.Vibrator;
import android.util.Log;
import android.view.MotionEvent;
import android.view.View;
import android.view.View.OnTouchListener;
import android.widget.CheckBox;
import android.widget.CompoundButton;
import android.widget.ImageButton;
import android.widget.TextView;
import android.widget.CompoundButton.OnCheckedChangeListener;
import android.widget.ProgressBar;
import android.widget.Toast;

public class Control extends MainActivity {

    ProgressBar progressBar31;//进度条
    CheckBox  checkBox31;//打开重力传感器
    SensorManager sensorManager;//新建sensor的管理器
    Sensor sensor;//传感器
    float X_lateral;//X方向角度
    int Speed=0;//速度
    TextView textView35;//显示速度值

    ImageButton imageButton31;//前进
    ImageButton imageButton32;//后退
    ImageButton imageButton33;//右转
    ImageButton imageButton34;//左转

    boolean forward = false;
    boolean back = false;
    boolean right = false;
    boolean left = false;

    Vibrator vibrator;//按钮按下震动


    byte[] sendbyte = new byte[4];//发送的数据缓存
    boolean SendDataFlag = true;//发送数据任务控制
    SendMsgThread sendMsgThread;//发送数据任务
    boolean stopcar = false;//执行一次发送停车数据
    Intent intentmain = new Intent(); //界面跳转--主界面

    @Override
    protected void onCreate(Bundle savedInstanceState) {
        super.onCreate(savedInstanceState);
        setTheme(android.R.style.Theme);//设置主题风格
        setContentView(R.layout.control);

        progressBar31 = (ProgressBar) findViewById(R.id.progressBar31);
        progressBar31.setProgress(50);//显示到一半

        checkBox31 = (CheckBox) findViewById(R.id.checkBox31);
        checkBox31.setOnCheckedChangeListener(checkBox31Check);

        textView35 = (TextView) findViewById(R.id.textView35);//速度显示

        imageButton31 = (ImageButton) findViewById(R.id.imageButton31);//前进
        imageButton32 = (ImageButton) findViewById(R.id.imageButton32);//后退
        imageButton33 = (ImageButton) findViewById(R.id.imageButton33);//右转
        imageButton34 = (ImageButton) findViewById(R.id.imageButton34);//左转

        imageButton31.setOnTouchListener(imageButton31Touch);//前进
        imageButton32.setOnTouchListener(imageButton32Touch);//后退
        imageButton33.setOnTouchListener(imageButton33Touch);//右转
        imageButton34.setOnTouchListener(imageButton34Touch);//左转

        vibrator=(Vibrator)getSystemService(Service.VIBRATOR_SERVICE);//震动

        sendMsgThread = new SendMsgThread();
        sendMsgThread.start();//启动发送数据任务
    }

    /***
     * 前进按钮
     */
    private OnTouchListener imageButton31Touch = new OnTouchListener() {

        @Override
        public boolean onTouch(View v, MotionEvent event) {
            // TODO Auto-generated method stub
            if (event.getAction()==MotionEvent.ACTION_DOWN) {
                forward = true;
                back=false;
                imageButton31.setImageResource(R.drawable.qianjindown);//改变背景

                vibrator.vibrate(new long[]{0,20}, -1);//震动
            }
            if (event.getAction()==MotionEvent.ACTION_UP) {
                forward = false;
                imageButton31.setImageResource(R.drawable.qianjin);//改变背景
            }
            return false;
        }
    };

    /***
     * 后退按钮
     */
    private OnTouchListener imageButton32Touch = new OnTouchListener() {

        @Override
        public boolean onTouch(View v, MotionEvent event) {
            // TODO Auto-generated method stub
            if (event.getAction()==MotionEvent.ACTION_DOWN) {
                back=true;
                forward=false;
                imageButton32.setImageResource(R.drawable.houtuidown);//改变背景
                vibrator.vibrate(new long[]{0,20}, -1); //震动
            }
            if (event.getAction()==MotionEvent.ACTION_UP) {
                back=false;
                imageButton32.setImageResource(R.drawable.houtui);//改变背景
            }
            return false;
        }
    };

    /***
     * 右转按钮
     */
    private OnTouchListener imageButton33Touch = new OnTouchListener() {

        @Override
        public boolean onTouch(View v, MotionEvent event) {
            // TODO Auto-generated method stub
            if (event.getAction()==MotionEvent.ACTION_DOWN) {
                right=true;
                left=false;
                imageButton33.setImageResource(R.drawable.youzhuandown);//改变背景
                vibrator.vibrate(new long[]{0,20}, -1);  //震动
            }
            if (event.getAction()==MotionEvent.ACTION_UP) {
                right=false;
                imageButton33.setImageResource(R.drawable.youzhuan);//改变背景
            }
            return false;
        }
    };

    /***
     * 左转按钮
     */
    private OnTouchListener imageButton34Touch = new OnTouchListener() {

        @Override
        public boolean onTouch(View v, MotionEvent event) {
            // TODO Auto-generated method stub
            if (event.getAction()==MotionEvent.ACTION_DOWN) {
                left=true;
                right=false;
                imageButton34.setImageResource(R.drawable.zuozhuandown);//改变背景
                vibrator.vibrate(new long[]{0,20}, -1); //震动
            }
            if (event.getAction()==MotionEvent.ACTION_UP) {
                left=false;
                imageButton34.setImageResource(R.drawable.zuozhuan);//改变背景
            }
            return false;
        }
    };

    /**
     *左转大于右转大于后退大于前进
     *(单个按钮)谁按下执行谁
     *
     */
    class SendMsgThread extends Thread
    {
        public void run()
        {
            while(SendDataFlag)
            {
                sendbyte[0] = (byte)0xaa;
                sendbyte[1] = (byte)0x55;
                if (!checkBox31.isChecked()) {//没有打开重力传感器速度默认50
                    sendbyte[3] = 50;
                }
                if (forward) {//前进
                    sendbyte[2] = (byte)0x01;
                }
                if (back) {//后退
                    sendbyte[2] = (byte)0x02;
                }
                if (right) {//右转
                    sendbyte[2] = (byte)0x03;
                }
                if (left) {//左转
                    sendbyte[2] = (byte)0x04;
                }

                if (forward || back || right || left) //有按下的按钮
                {
                    stopcar = true;//有过按钮操作
                    netSend(sendbyte);
                }
                else//没有按下的按钮发送一次停车指令
                {
                    if (stopcar) //有过按钮操作
                    {
                        stopcar = false;
                        sendbyte[2] = (byte)0x05;
                        sendbyte[3] = (byte)0x00;
                        netSend(sendbyte);
                    }
                }

                try {
                    Thread.sleep(100);//延时100ms
                } catch (InterruptedException e) {
                    // TODO Auto-generated catch block
                    e.printStackTrace();
                }
            }
        }
    }

    /**
     * 发送数据
     * @param byt
     */
    private void netSend(byte[] byt)
    {
        int crc = 0;
        ByteBuffer Crcbyte = ByteBuffer.allocate(4);//创建4个字节的  ByteBuffer

        byte[] sendbyte = new byte[byt.length + 2];//后面加2是原来存储CRC

        for (int i = 0; i < byt.length; i++)//copy数据
        {
            sendbyte[i] = byt[i];
        }

        crc = crc16_modbus(byt, byt.length);//计算CRC
        Crcbyte.putInt(crc);//把int转成byte--默认是转成4个字节的,,所以上面定义了4个字节的↑↑

        sendbyte[sendbyte.length - 2] = Crcbyte.get(3);//低位在前----java看来默认的大端模式存储数据
        sendbyte[sendbyte.length - 1] = Crcbyte.get(2);//高位在后


        try
        {
            outputStream = socket.getOutputStream();
            outputStream.write(sendbyte);
        }
        catch (IOException e)
        {
            SendDataFlag = false;
            socket = null;
            runOnUiThread(new Runnable() {
                @Override
                public void run() {
                    // TODO Auto-generated method stub
                    Toast.makeText(Control.this, "与服务器断开连接,请重新连接", 500).show();
                }
            });
            intentmain.setClass(Control.this, MainActivity.class);//有错误跳转到主界面重新连接
                Control.this.startActivity(intentmain);

        }
    }

    /***
     * 单选框事件
     */
    private OnCheckedChangeListener checkBox31Check = new OnCheckedChangeListener() {
        @Override
        public void onCheckedChanged(CompoundButton buttonView, boolean isChecked) {
            // TODO Auto-generated method stub
            if (isChecked)
            {
                sensorManager = (SensorManager) getSystemService(SENSOR_SERVICE);//获取手机里面的传感器
                sensor = sensorManager.getDefaultSensor(Sensor.TYPE_ACCELEROMETER);//选择获取重力传感器
                                              //监听函数                        重力传感器对象              工作频率
                sensorManager.registerListener(mySensorEventListener, sensor,  SensorManager.SENSOR_DELAY_NORMAL);// SENSOR_DELAY_GAME
            }
            else
            {
                sensorManager.unregisterListener(mySensorEventListener);//释放传感器
            }
        }
    };

    /**
     * 重力传感器监听事件
     */
    SensorEventListener mySensorEventListener = new SensorEventListener() {

        @Override
        public void onSensorChanged(SensorEvent event) {
            // TODO Auto-generated method stub
            if(event.sensor.getType() == Sensor.TYPE_ACCELEROMETER)
            {
                X_lateral = event.values[0]+10; //把-10到10的数据变为0-20
                Speed = (int)((100-(X_lateral*10/2))*2);//变为0-200
                if (Speed>100) {
                    Speed = 100;
                }
                sendbyte[3] = (byte)Speed;//得到速度变量
                textView35.setText(String.valueOf(Speed));
                //Toast.makeText(controlcar.this, Y_longitudinal+"", 500).show();
                runOnUiThread(new Runnable() {
                    public void run()
                    {
                        progressBar31.setProgress(Speed);
                    }
                });
            }
            else
            {
                sensorManager.unregisterListener(mySensorEventListener);
                runOnUiThread(new Runnable() {
                    public void run()
                    {
                        checkBox31.setChecked(false);
                        Toast.makeText(Control.this, "传感器不存在!!!", 500).show();
                    }
                });
            }
        }

        @Override
        public void onAccuracyChanged(Sensor sensor, int accuracy) {
            // TODO Auto-generated method stub

        }
    };
    /**
     * CRC检验值
     * @param modbusdata
     * @param length
     * @return CRC检验值
     */
     protected int crc16_modbus(byte[] modbusdata, int length)
     {
         int i=0, j=0;

         int crc = 0;

         try
         {
             for (i = 0; i < length; i++)
             {
                 crc ^= (modbusdata[i]&(0xff));//注意这里要&0xff
                 for (j = 0; j < 8; j++)
                 {
                     if ((crc & 0x01) == 1)
                     {
                         crc = (crc >> 1) ;
                         crc = crc ^ 0xa001;
                     }
                     else
                     {
                         crc >>= 1;
                     }
                 }
             }
         }
         catch (Exception e)
         {

         }

         return crc;
     }

     /**
      * CRC校验正确标志
      * @param modbusdata
      * @param length
      * @return 0-failed 1-success
      */
     protected int crc16_flage(byte[] modbusdata, int length)
     {
         int Receive_CRC = 0, calculation = 0;//接收到的CRC,计算的CRC

         Receive_CRC = crc16_modbus(modbusdata, length);
         calculation = modbusdata[length + 1];
         calculation <<= 8;
         calculation += modbusdata[length];
         if (calculation != Receive_CRC)
         {
             return 0;
         }
         return 1;
     }
    protected void onPause() {
     SendDataFlag = false;
        sensorManager.unregisterListener(mySensorEventListener);

    super.onPause();
  }
}
代码越来越多,,有什么办法把以前的折叠
整体就是程序一开始启动发送数据任务,,,
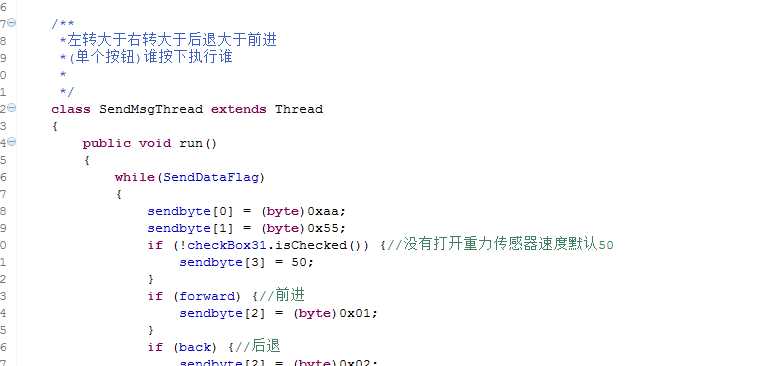
发送数据的方式可以轻松的看出来
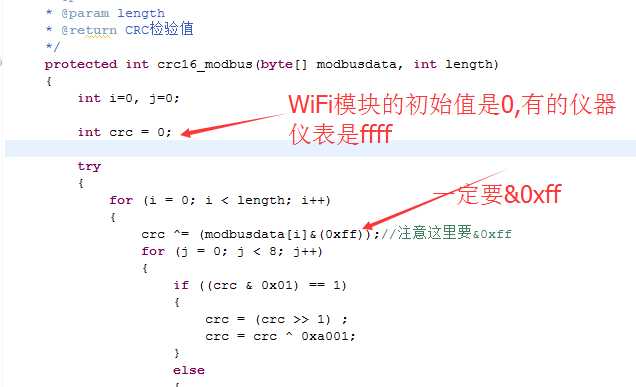
关于为什么需要&0xff,可以看这篇文章
http://bbs.csdn.net/topics/260061974
现在呢!!把MainActivity的
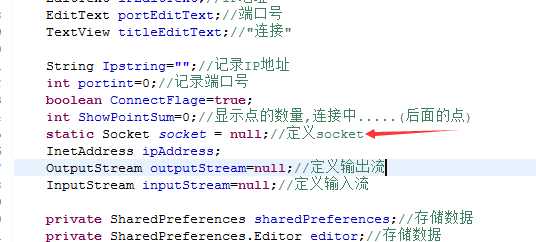
改为静态的,,,,
因为换到了其它界面,,,所以在其它界面这个socket是null
静态的可以避免啦..............
当然也可以在跳转界面的时候想办法把socket传过去.............
现在可以终于可以控制车了.....................
算了不演示了,,一口气写完
现在在控制界面实现这个功能,按一次提示返回主界面,,2S内连续按就返回
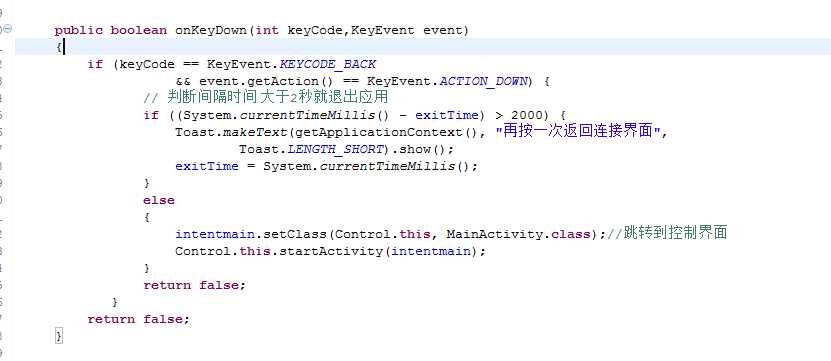

public boolean onKeyDown(int keyCode,KeyEvent event)
     {
         if (keyCode == KeyEvent.KEYCODE_BACK
                    && event.getAction() == KeyEvent.ACTION_DOWN) {
                // 判断间隔时间 大于2秒就退出应用
                if ((System.currentTimeMillis() - exitTime) > 2000) {
                    Toast.makeText(getApplicationContext(), "再按一次返回连接界面",
                            Toast.LENGTH_SHORT).show();
                    exitTime = System.currentTimeMillis();
                }
                else
                {
                    intentmain.setClass(Control.this, MainActivity.class);//跳转到控制界面
                    Control.this.startActivity(intentmain);
                }
                return false;
            }
         return false;
     }
主界面呢按返回键
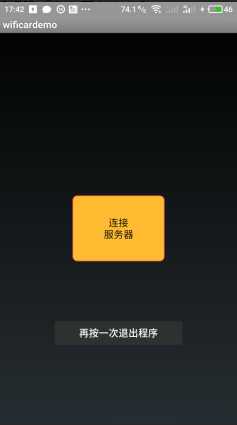
/***
     * 手机返回按钮
     */
    public boolean onKeyDown(int keyCode,KeyEvent event)
     {
         if (keyCode == KeyEvent.KEYCODE_BACK && event.getAction() == KeyEvent.ACTION_DOWN) {
                // 判断间隔时间 大于2秒就退出应用
                if ((System.currentTimeMillis() - exitTime) > 2000)
                {
                    Toast.makeText(getApplicationContext(), "再按一次退出程序",Toast.LENGTH_SHORT).show();
                    exitTime = System.currentTimeMillis();
                }
                else
                {
                    try{socket.close();} catch (IOException e) {e.printStackTrace();}
                    try{outputStream.close();} catch (IOException e) {e.printStackTrace();}
                    try{inputStream.close();} catch (IOException e) {e.printStackTrace();}
                    MainActivity.this.finish();
                }
                return false;
            }
         return false;
     }
    protected void onPause() {
        super.onPause();
        MainActivity.this.finish();
    }
虽然实现了,但是自己还是有疑问,,,这里就不说了,,等着再整理成一篇文章(关于Activity加载问题)
现在呢还需要加一个功能,,判断Socket是否断开,,,控制界面跳转到连接界面后,,点击主界面的主按钮如果判断socket还在连接着,就直接跳转到控制界面,,,咱们是利用的接收数据判断
自己看的这篇文章
http://blog.csdn.net/HelloMyPeople/article/details/51906460?locationNum=11&fps=1
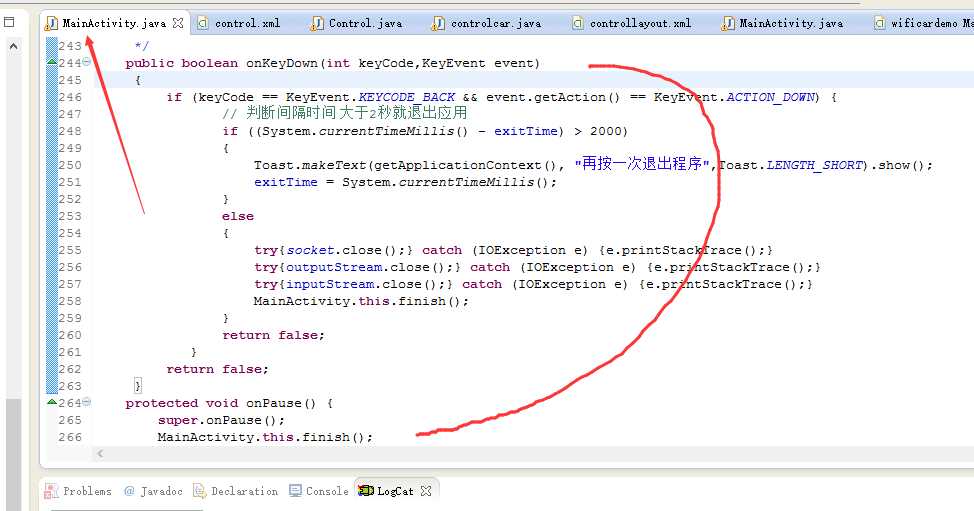
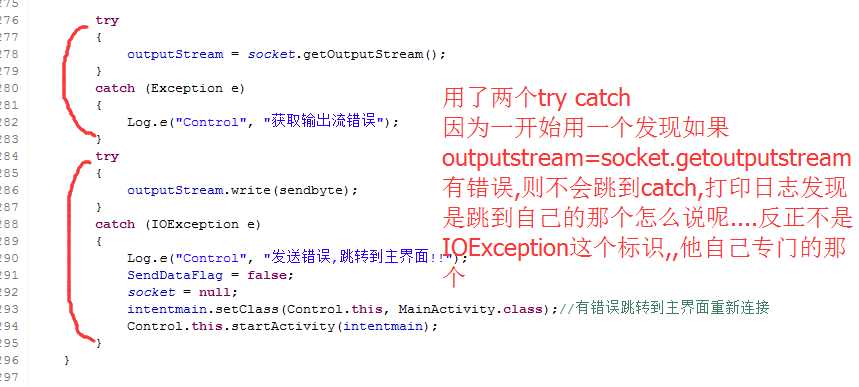
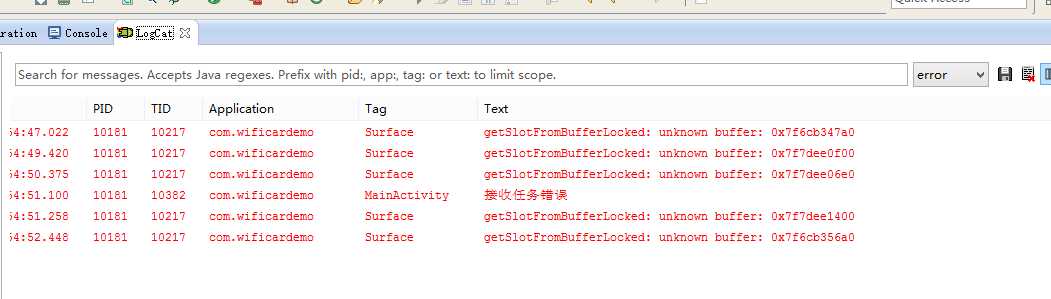
修改一下程序,........说一下自己遇到的问题以及解决方法(关于Activity加载问题,还有一下细节问题)---上面的程序有bug.....每次都是重新点击连接.....因为
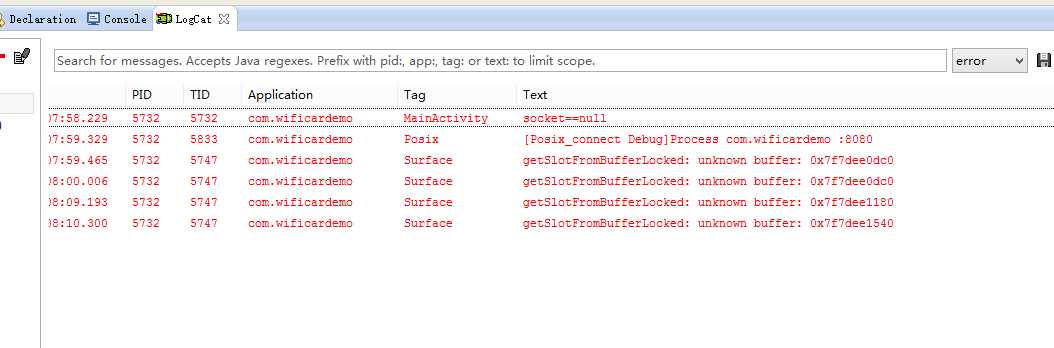
否则可以看一看打印的日志
所以导致了每回连接的时候,即使一开始连接上了还是会重新连接
改成这样

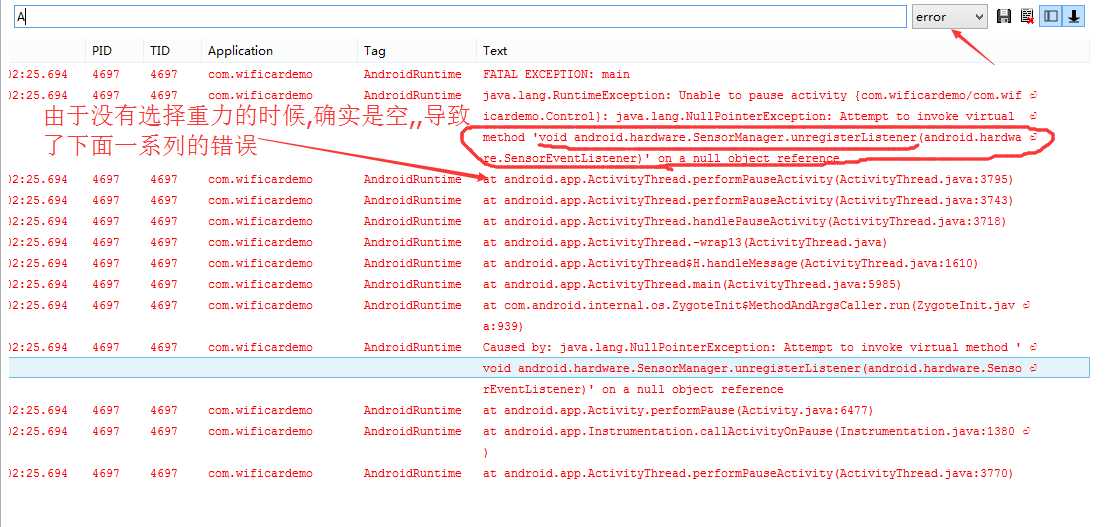
好了......关于现在的错误搜索了一下没得到想要的结果,,有人说是Android本身的.....
为了不出现意外我在所有的sensorManager.unregisterListener(mySensorEventListener);都加了先判断sensorManager是不是null
还有下面
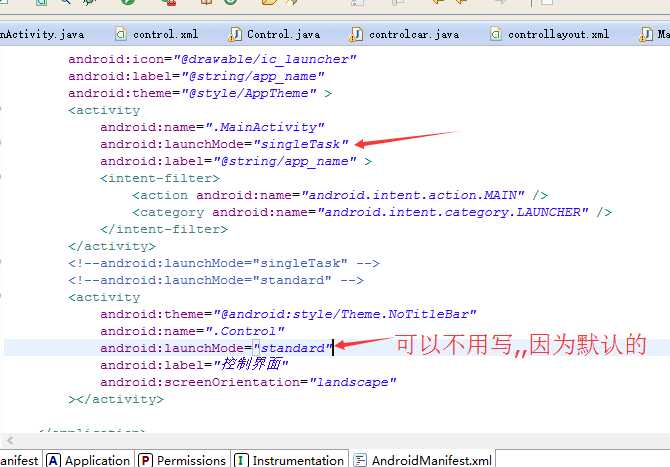
下面说一下activity的launchMode 加载模式
大家有没有遇到过,多个界面的时候退出的时候不是返回到以前的界面就是又重新加载现在的界面
现在说一下问题所在
界面加载的时候默认
就咱现在的而言不设置加载方式
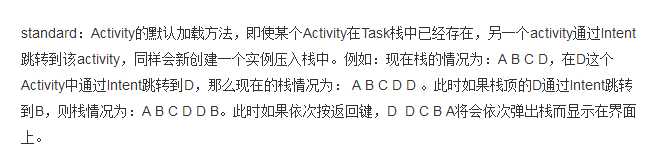
先是A打开B,,,因为B是standard模式,,,所以现在是 AB
然后从B加载A因为A是standard模式 所以现在是 ABA,,,,,,
假设没有错误令ABA前头的AB销毁的话,,那么按下手机的返回键 会依次显示B,,然后 A,然后才退出程序
我现在想
先是A打开B,,,因为B是standard模式,,,所以现在是 AB
然后从B加载A因为A是standard模式 所以现在是 ABA
我想在A按返回键的时候退出程序那么可以选择一种方案
把A设置成
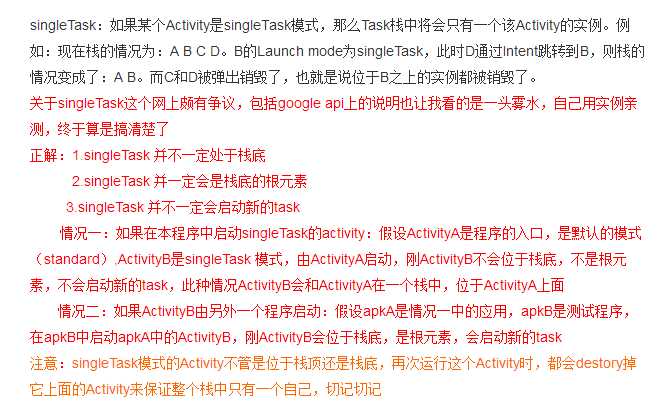
如果A是这种模式咱在走一走
A打开B AB
B打开A 因为B在A前头所以把B给销毁了,这种方式不会创建新的实例,,,所以只剩下A
然后按下返回键----注销A 程序会退出
网上呢!还有一些方式,,比如存储所有的Activity,退出的时候把所有的Activity销毁,,然后退出,,,,,
感觉还是知道为什么会这样自己才会有更好的理解,,才会想出自己的办法
感谢这位博主..写出这篇这么好的文章
http://blog.163.com/w_z_w_z_w/blog/static/21995700720139131355207/
所以呢
自己还修改了一些地方
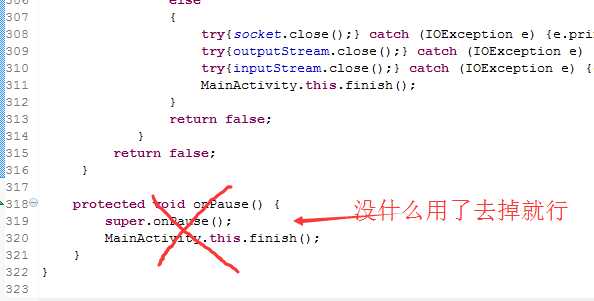
/***
     * 手机返回按钮
     */
    public boolean onKeyDown(int keyCode,KeyEvent event)
     {
         if (keyCode == KeyEvent.KEYCODE_BACK && event.getAction() == KeyEvent.ACTION_DOWN) {
                // 判断间隔时间 大于2秒就退出应用
                if ((System.currentTimeMillis() - exitTime) > 2000)
                {
                    Toast.makeText(getApplicationContext(), "再按一次退出程序",Toast.LENGTH_SHORT).show();
                    exitTime = System.currentTimeMillis();
                }
                else
                {
                    try
                    {
                        if (socket!=null)
                        {
                            socket.close();
                        }
                    }
                    catch (IOException e)
                    {
                        e.printStackTrace();
                    }
                    try
                    {
                        if (outputStream!=null)
                        {
                            outputStream.close();
                        }
                    }
                    catch (IOException e)
                    {
                        e.printStackTrace();
                    }
                    try
                    {
                        if (inputStream!=null)
                        {
                            inputStream.close();
                        }
                    }
                    catch (IOException e)
                    {
                        e.printStackTrace();
                    }
                    MainActivity.this.finish();
                }
                return false;
            }
         return false;
     }
都判断了一下是不是空,,,其实对于退出而言感觉没有必要判断了,,,,,反正都需要注销,,但是呢我想让打印的日志把错误降到自己感觉
可以的程度..............
整个启动退出..............
好了源码
链接:http://pan.baidu.com/s/1nuFGdlv 密码:rq9g
用ESP8266+android,制作自己的WIFI小车(Android 软件)
标签:home exce image rom www. values imageview 旋转 edittext
原文地址:http://www.cnblogs.com/yangfengwu/p/7633980.html