标签:source headers agent div header tran directory 自动 logs
1):? 安装JDK环境
2):? 在官网下载Flume,http://mirror.bit.edu.cn/apache/flume
既是:wget http://mirror.bit.edu.cn/apache/flume/1.7.0/apache-flume-1.7.0-bin.tar.gz
注意:1):一个文件可以配置多个代理,一般配置key采用多段式配置,第二段则 为agent的别名,
agent可配置多个Source,Channel,Sink,每个agent都 必须需要配置sources,channels,
sinks三个属性,如:agent.sources=s1,s2
2): 每个agent的Source,Channel与Sink在agent上下文中都有一个唯一个名 称,
可以通过“代理.配置组件.名称.属性名”配置各种组件的属性,
如 agent.channels.c1.type=memory
下面三个properties文件
1:hello-world.properties
agent.sources = s1
agent.channels = c1
agent.sinks = k1

agent.sources.s1.type = netcat
agent.sources.s1.channels = c1
agent.sources.s1.bind = 0.0.0.0
agent.sources.s1.port = 12345

agent.channels.c1.type = memory

agent.sinks.k1.type = logger
agent.sinks.k1.channel = c1
2 :http.properties
agent.sources=s1
agent.sinks=k1
agent.channels=c1

agent.sources.s1.type=http
agent.sources.s1.bind=0.0.0.0
agent.sources.s1.port=50000
agent.sources.s1.channels=c1

agent.sinks.k1.type=logger
agent.sinks.k1.channel=c1

agent.channels.c1.type=memory
agent.channels.c1.capacity=1000
agent.channels.c1.transactionCapacity=100

#bin/flume-ng agent -n agent -c conf -f conf/http.properties -Dflume.root.logger=INFO,console
#curl -X POST -d ‘[{"headers" :{"name":"lancer","level":"min"},"body":"text"}]‘ http://172.31.166.34:50000
spooling.properties
agent.channels = c1
agent.sources = s1
agent.sinks = k1

//source的类型为spooldir
agent.sources.s1.type = spooldir
agent.sources.s1.channels = c1
//spooling directory
agent.sources.s1.spoolDir = /data/log/flumeSpool
agent.sources.s1.fileHeader = true
agent.sources.s1.fileSuffix = .COMPLETED

agent.channels.c1.type = memory

agent.sinks.k1.type = logger
agent.sinks.k1.channel = c1

#cp /data/demo_sql/data_op/order.data /data/log/flumeSpool/
,命令 :rz 可以把文件导入进去
3):把文件到要到到conf下的路径才可以哦(不用全部导入进去)

4):会到上一个文件路径flume_z下
命令:bin/flume-ng agent -n agent -c ./conf -f conf/hello-world.properties -Dflume.root.logger=INFO,console
5):如果你导入的是第一个 hello-world.properties文件 ,它的port(端口号是)12345 那么
使用 命令 ss -natal 看一下是否有 12345 的端口号 有则可以运行
命令 :telnet localhost 12345
6):Ctrl+c 退出了flume 进程自动销毁
7):如想它flume退出了,不销毁, 那么就要改为后台进程了
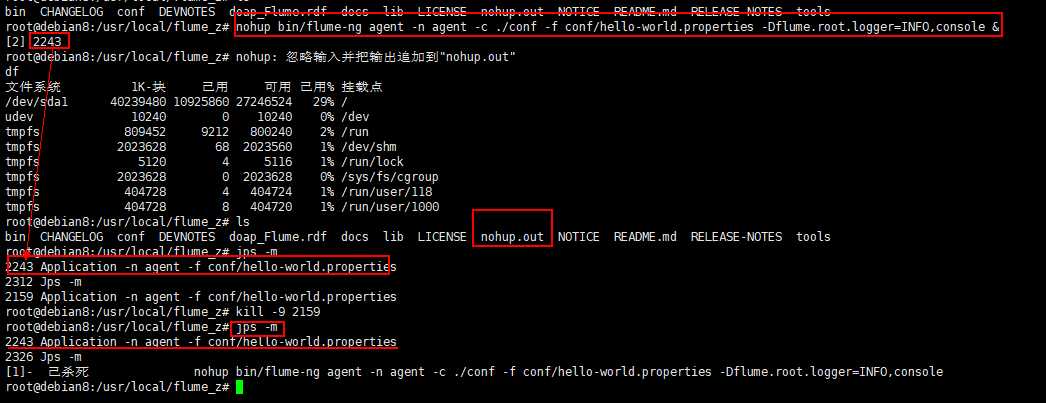
命令:nohup bin/flume-ng agent -n agent -c ./conf -f conf/hello-world.properties -Dflume.root.logger=INFO,console &
回车 =》再回车
8)查看是否可以后台了
命令:jps -m
9):kill -9 进程ID
标签:source headers agent div header tran directory 自动 logs
原文地址:http://www.cnblogs.com/zhu520/p/7638709.html