标签:alt ade sel UI dash app 文件 systemctl htm
系统:CentOS Linux release 7.2.1511 (Core)
相关工具:xftp
服务器软件:.net core,nginx
.NET Core分为两种应用类型:Portable applications(便携应用) Self-contained application(自宿主应用)
我们选择便携应用,这样发布的项目会小一点,也是微软推荐的发布方式。

确保这份发布应用可以在windows上运行,以减少后续的问题。
这个不多说了,网上好多教程。
sudo yum install libunwind libicu(安装libicu依赖)

curl -sSL -o dotnet.tar.gz https://go.microsoft.com/fwlink/?LinkID=809131(下载sdk压缩包,不一定非要用这个,可以去官网找最新的链接)

sudo mkdir -p /opt/dotnet && sudo tar zxf dotnet.tar.gz -C /opt/dotnet(解压缩)

sudo ln -s /opt/dotnet/dotnet /usr/local/bin(创建链接)
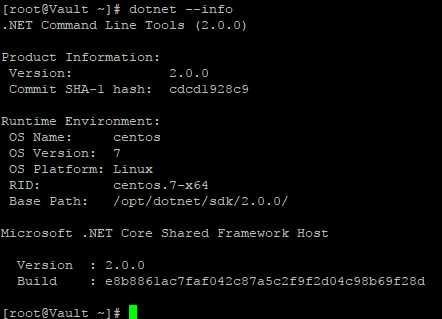
输入 dotnet –info 来查看是否安装成功

如果可以执行则表明.NET Core SDK安装成功
使用Xftp上传到服务器,需要注意一点,配置xftp时,协议选择sftp,不要选ftp,否则会出现连不上服务器的情况。
项目上传至服务 home/WebApp
命令:dotnet /home/WebApp/WebApp.dll

可以看到端口号是5000:Now listening on: http://localhost:5000
curl -o  nginx.rpm http://nginx.org/packages/centos/7/noarch/RPMS/nginx-release-centos-7-0.el7.ngx.noarch.rpm

rpm -ivh nginx.rpm

yum install nginx
输入:systemctl start nginx 来启动nginx。
输入:systemctl enable nginx 来设置nginx的开机启动(linux宕机、重启会自动运行nginx不需要连上去输入命令)。
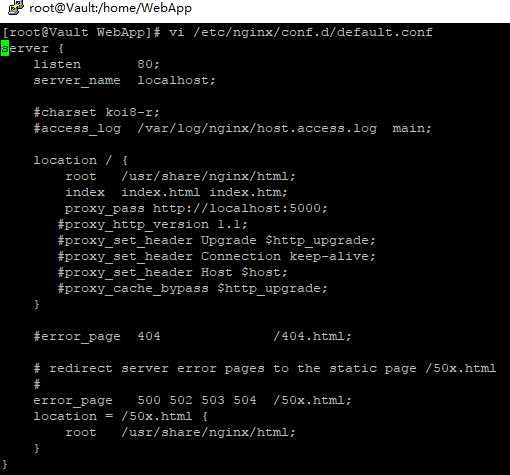
修改 /etc/nginx/conf.d/default.conf 文件。

将文本内容替换为上图:
server {
    listen       80;
    server_name  localhost;

    #charset koi8-r;
    #access_log  /var/log/nginx/host.access.log  main;

    location / {
        root   /usr/share/nginx/html;
        index  index.html index.htm;
        proxy_pass http://localhost:5000;
       #proxy_http_version 1.1;
       #proxy_set_header Upgrade $http_upgrade;
       #proxy_set_header Connection keep-alive;
       #proxy_set_header Host $host;
       #proxy_cache_bypass $http_upgrade;
    }

    #error_page  404              /404.html;

    # redirect server error pages to the static page /50x.html
    #
    error_page   500 502 503 504  /50x.html;
    location = /50x.html {
        root   /usr/share/nginx/html;
    }
}
:wq 覆盖保存。
执行:nginx –s reload 使其即时生效
感谢博客园的大牛园友的无私奉献!!
参考:http://www.cnblogs.com/ants/p/5732337.html
标签:alt ade sel UI dash app 文件 systemctl htm
原文地址:http://www.cnblogs.com/nowar/p/7698769.html