一、IP基础知识
1.ipv4
2进制32位-----10进制
172.25.0.10/255.255.255.0 ##或者172.25.0.10/24
172.25.0.10:ip地址
255.255.255.0:子网掩码
子网掩码255位对应的ip位为网络位
子网掩码0对应的ip位为主机位
二、配置IP
<<图形化>>
1.图形界面
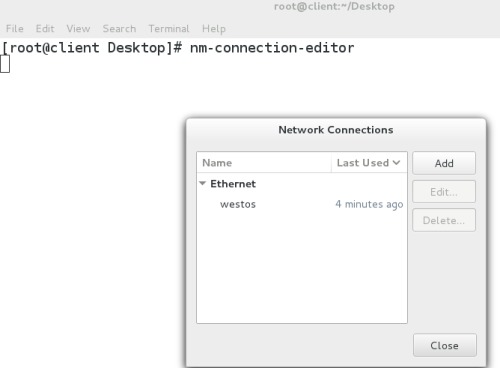
nm-connection-editor ##具体操作可查看unit9
图示:图形界面配置IP
2.文本化图形
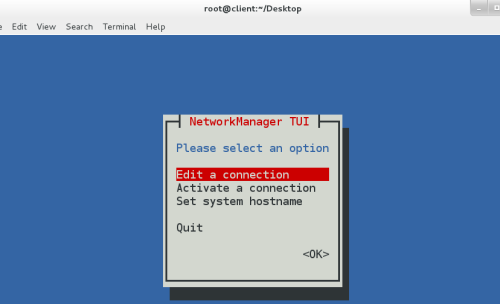
nmtui
图示:文本界面配置IP【与图形界面相似,需要键盘控制选项,有[tab]或者上下键进行切换,回车键进行执行,以下示例开始部分操作】
<<命令>>
ifconfig 网卡 ip netmask ##临时设定,可双击按键[tab]进行每次补齐下一条需要值添加或者执行的内容
[root@localhost Desktop]# nmcli connection add type ethernet con-name westos ifname eth0 autoconnect yes ##选择连接,添加IP,类型:ethernet,con-name【IP名】为westos,ifname:eth0,authconnect yes :确定选择自动连接,【此为动态设定】
图示:配置动态IP
[root@localhost Desktop]# nmcli connection add type ethernet con-name westos ifname eth0 ip4 ip/24 ##选择连接,添加IP,类型:ethernet,con-name【IP名】为westos,ifname:eth0,ip4 ip/24,子网掩码为24【此外静态设定】
示图:配置静态IP
[root@localhost Desktop]# nmcli connection delete westos #删除之前配置的IPwestos
[root@localhost Desktop]# nmcli connection show ##当前IP设备显示
[root@localhost Desktop]# nmcli connection down westos ##关闭当前IP
[root@localhost Desktop]# nmcli connection up westos ##开启当前IP
[root@localhost Desktop]# nmcli connection modify "westos" ipv4.addresses 新IP/24 ##修改当前IPwestos的IP新地址为。。。。
[root@localhost Desktop]# nmcli connection modify "westos" ipv4.method <auto|manual> ##修改当前IP为静态或动态IP
[root@localhost Desktop]# systemctl stop NetManager.service
[root@localhost Desktop]# systemctl restart network.service ##重启网络服务器,加载网络配置
[root@localhost Desktop]# systemctl start NetManager.service
[root@localhost Desktop]# nmcli device connect eth0 ##当前接口使用设备连接
[root@localhost Desktop]# nmcli device disconnect eth0 ##当前接口使用设备断开
[root@localhost Desktop]# nmcli device show ##当前接口使用设备显示
[root@localhost Desktop]# nmcli device status ##当前设备状态显示
<<文件>>【永久设定】
dhcp ##动态获取
[root@localhost Desktop]# vim /etc/sysconfig/network-scripts/ifcfg-eth0
DEVICE=eth0 ##接口使用设备
BOOTPROTO=dhcp ##网卡工作模式
ONBOOT=yes ##网络服务开启时自动激活
NAME=eth0 ##网络接口名称
:wq
[root@localhost Desktop]# systemctl restart network
图示:文件形式动态获取IP
static|none ##静态网络
[root@localhost Desktop]# vim /etc/sysconfig/network-scripts/ifcfg-eth0
DEVICE=eth0 ##设备
BOOTPROTO=static|none ##设备工作方式
ONBOOT=yes ##开启网络服务激活设备
NAME=eth0 ##网络接口名称
IPADDR=172.25.0.100 ##IP
NETMASK=255.255.255.0 | PREFIX=24 ##子网掩码
[root@localhost Desktop]# systemctl restart network
图示:文件形式静态设定IP
$$$PS:书写脚本文件进行静态IP设定
[root@localhost Desktop]# cd mnt
[root@localhost mnt]# vim set_ip.sh ##建立以set_ip.sh命名的脚本
图示:脚本文件内容
三、GATEWAY网关
1.路由器
主要功能是用来作nat的
dnat 目的地地址转换
snat 源地址转换
2.网关
路由器上和自己处在同一个网段的那个ip
3.设定网关
图示:网关初始状态
[root@localhost Desktop]# systemctl stop NetwrokManager
[root@localhost Desktop]# vim /etc/sysconfig/network ##全局网关
GATEWAY=网关ip
图示:/etc/sysconfig/network修改
[root@localhost Desktop]# vim /etc/sysconfig/network-scripts/ifcfg-网卡配置文件 ##网卡接口网关
GATEWAY=网关ip
图示:/etc/sysconfig/network-scripts/ifcfg-eth0修改
[root@localhost Desktop]# systemctl restart netwrok
route -n ##查询网关
Kernel IP routing table
Destination Gateway Genmask Flags Metric Ref Use Iface
0.0.0.0 (网关)172.25.0.254 0.0.0.0 UG 0 0 0 eth0
172.25.0.0 0.0.0.0 255.255.255.0 U 0 0 0 eth0
图示:网关开启
四、dns服务
1.dns
dns是一台服务器
这台服务器提供了回答客户主机名和ip对应关系的功能
DNS(Domain Name System,域名系统),因特网上作为域名和IP地址相互映射的一个分布式数据库,能够使用户更方便的访问互联网,而不用去记住能够被机器直接读取的IP数串。通过主机名,最终得到该主机名对应的IP地址的过程叫做域名解析(或主机名解析)。
DNS功能
每个IP地址都可以有一个主机名,主机名由一个或多个字符串组成,字符串之间用小数点隔开。有了主机名,就不要死记硬背每台IP设备的IP地址,只要记住相对直观有意义的主机名就行了。这就是DNS协议所要完成的功能。
主机名到IP地址的映射有两种方式:
DNS功能
1)静态映射,每台设备上都配置主机到IP地址的映射,各设备独立维护自己的映射表,而且只供本设备使用;
2)动态映射,建立一套域名解析系统(DNS),只在专门的DNS服务器上配置主机到IP地址的映射,网络上需要使用主机名通信的设备,首先需要到DNS服务器查询主机所对应的IP地址。
通过主机名,最终得到该主机名对应的IP地址的过程叫做域名解析(或主机名解析)。
2.设定dns
[root@localhost Desktop]# vim /etc/resolv.conf
nameserver dns服务器ip
图示:/etc/resolv.conf内容 [root@localhost Desktop]# vim /etc/sysconfig/network-scripts/ifcfg-网卡配置文件
DNS1=dns服务器ip
图示:/etc/sysconfig/network-scripts/ifcfg-eth0内容 3.本地解析文件【客户端】
[root@localhost Desktop]# vim /etc/hosts
ip 主机名称
示图:解析文件内容
4.本地解析文件和dns读取的优先级调整
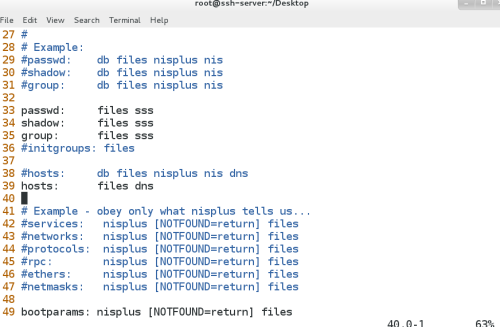
/etc/nsswitch.conf
38 #hosts: db files nisplus nis dns
39 hosts: files dns ##files代表本地解析文件,dns代表dns服务器,哪个在前面哪个优先
图示:/etc/nsswitch.conf内容

本文出自 “13342594” 博客,请务必保留此出处http://13352594.blog.51cto.com/13342594/1975411
原文地址:http://13352594.blog.51cto.com/13342594/1975411