标签:unit http upd 多个 就是 client group copy nec
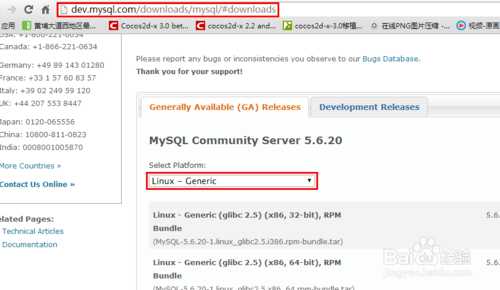
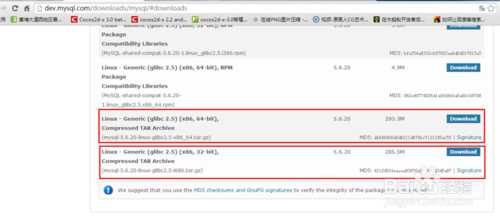
到mysql官网下载mysql编译好的二进制安装包,在下载页面Select Platform:选项选择linux-generic,然后把页面拉到底部,64位系统下载Linux - Generic (glibc 2.5) (x86, 64-bit),32位系统下载Linux - Generic (glibc 2.5) (x86, 32-bit)


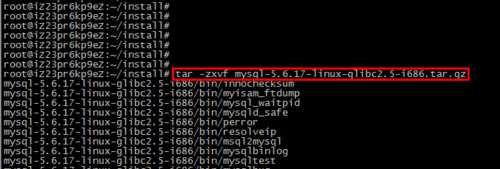
进入安装包所在目录,执行命令:tar mysql-5.6.17-linux-glibc2.5-i686.tar.gz

执行命令:cp mysql-5.6.17-linux-glibc2.5-i686 /usr/local/mysql -r
注意:目录结尾不要加/

执行命令:groupadd mysql和useradd -r -g mysql mysql


进入安装mysql软件目录:执行命令 cd /usr/local/mysql
修改当前目录拥有者为mysql用户:执行命令 chown -R mysql:mysql ./
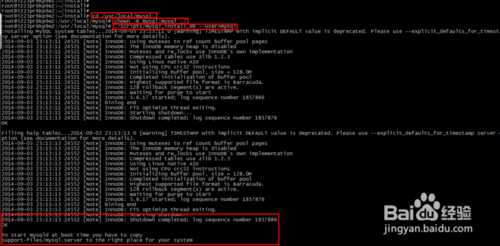
安装数据库:执行命令 ./scripts/mysql_install_db --user=mysql
修改当前目录拥有者为root用户:执行命令 chown -R root:root ./
修改当前data目录拥有者为mysql用户:执行命令 chown -R mysql:mysql data
到此数据库安装完毕

添加开机启动:执行命令cp support-files/mysql.server /etc/init.d/mysql,把启动脚本放到开机初始化目录
启动mysql服务:执行命令service mysql start
执行命令:ps -ef|grep mysql 看到mysql服务说明启动成功,如图

执行命令:./bin/mysqladmin -u root password ‘密码‘

ln -s /usr/local/mysql/bin/mysql /usr/local/bin/mysql
注意:建议使用软链过去,不要直接包文件复制,便于系统安装多个版本的mysql

以上更详细的内容地址:http://jingyan.baidu.com/article/a378c9609eb652b3282830fd.html
注意问题:
自我感觉mysql 5.7这一系列的版本都很变态啊,不管是windows的还是Linux,安装的时候总会出些莫名其妙的想法。当初在windows下安装mysql的时候,年轻不懂事下了5.7版本的,结果出现了各种难以捉摸的bug,在网上查也找不到,最后发现一个同病相怜的人诉说是版本问题,装成5.6就好了。而这次装linux的,年少轻狂的我忘记了windows下的教训,装了5.7,结果一直出现各种bug,哎,还是太年轻了。希望大家能吸取教训吧。
9.安装完后的使用
安装完以后,大家可以输入mysql -uroot -p,然后enter password来进入mysql。
进去后可以使用mysql的各种语法,首先可以查看database:show databases。
Linux下mysql的卸载:
1、查找以前是否装有mysql
命令:rpm -qa|grep -i mysql
可以看到mysql的两个包:
mysql-4.1.12-3.RHEL4.1
mysqlclient10-3.23.58-4.RHEL4.1
2、删除mysql
删除命令:rpm -e --nodeps 包名
( rpm -ev mysql-4.1.12-3.RHEL4.1 )
3、删除老版本mysql的开发头文件和库
检查各个mysql文件夹是否删除干净
find / -name mysql
结果如下:
/var/lib/mysql
/usr/local/mysql
/usr/lib/mysql
/usr/include/mysql
命令:
rm -fr /usr/lib/mysql
rm -fr /usr/include/mysql
注意:卸载后/var/lib/mysql中的数据及/etc/my.cnf不会删除,如果确定没用后就手工删除
rm -f /etc/my.cnf
rm -fr /var/lib/mysql
4.删除mysql用户及用户组
userdel mysql
groupdel mysql
Linux下创建和删除软链接:
1.先建立一个软连接
 1 [root@rekfan.com test]# ls -il
 2 总计  0
 3 1491138 -rw-r–r– 1 root root 48 07-14 14:17 file1
 4 1491139 -rw-r–r– 2  root root 0 07-14 14:17 file2
 5 1491139 -rw-r–r– 2 root root 0 07-14 14:17  file2hand
 6 #建立file1和file1soft软连接
 7 [root@rekfan.com test]# ln -s file1  file1soft
 8 [root@rekfan.com test]# ls -il
 9 总计 0
10 1491138 -rw-r–r– 1 root  root 48 07-14 14:17 file1
11 1491140 lrwxrwxrwx 1 root root 5 07-14 14:24  file1soft -> file1
12 1491139 -rw-r–r– 2 root root 0 07-14 14:17  file2
13 1491139 -rw-r–r– 2 root root 0 07-14 14:17 file2hand
其中,ln -s file1 filesoft 中的file1就是源文件,file1soft就是目标链接文件名,其作用是当进入filesoft目录,实际上是链接进入了file1目录
2.删除上面建立的软连接
 1 [root@rekfan.com test]# ls -il
 2 总计  0
 3 1491138 -rw-r–r– 1 root root 0 07-14 14:17 file1
 4 1491140 lrwxrwxrwx 1  root root 5 07-14 14:24 file1soft -> file1
 5 1491139 -rw-r–r– 2 root root 0  07-14 14:17 file2
 6 1491139 -rw-r–r– 2 root root 0 07-14 14:17  file2hand
 7 #删除软连接
 8 [root@rekfan.com test]# rm -rf file1soft
 9 [root@rekfan.com test]#  ls -il
10 总计 0
11 1491138 -rw-r–r– 1 root root 0 07-14 14:17 file1
12 1491139  -rw-r–r– 2 root root 0 07-14 14:17 file2
13 1491139 -rw-r–r– 2 root root 0 07-14  14:17 file2hand
1 [root@localhost mysql]# bin/mysqladmin -u root password root
2 bin/mysqladmin: connect to server at ‘localhost‘ failed
3 error: ‘Can‘t connect to local MySQL server through socket ‘/tmp/mysql.sock‘ (2)‘
4 Check that mysqld is running and that the socket: ‘/tmp/mysql.sock‘ exists!
5 [root@localhost mysql]# bin/mysql -u root -p
6 Enter password:
7 ERROR 2002 (HY000): Can‘t connect to local MySQL server through socket ‘/tmp/mysql.sock‘ (2)
8 分析:是/tmp/mysql.sock 不存在
由于搜索的mysql.sock路径是在/tmp下,而mysql安装的mysql.sock在/var/lib/mysql下,所以选择建立符号(软)连接:
1 # ln -s /var/lib/mysql/mysql.sock /tmp/mysql.sock
2 # bin/mysql -u root
3 Welcome to the MySQL monitor. Commands end with ; or g.
4 Your MySQL connection id is 1
5 Server version: 5.0.45 MySQL Community Server (GPL)
6 Type ‘help;‘ or ‘h‘ for help. Type ‘c‘ to clear the buffer.
7 mysql>
Linux 安装 mysql 转 http://www.cnblogs.com/fnlingnzb-learner/p/5830622.html
标签:unit http upd 多个 就是 client group copy nec
原文地址:http://www.cnblogs.com/chen-msg/p/7765564.html