标签:tick 按钮 分割 min configure def ext python gre
 1 # 使用tkinter编写登录窗口
 2 # Grid(网格)布局管理器会将控件放置到一个二维的表格里,主控件被分割为一系列的行和列
 3 # stricky设置对齐方式,参数N/S/W/E分别表示上、下、左、右
 4 # columnspan:指定控件跨越多列显示
 5 # rowspan:指定控件跨越多行显示
 6 # padx、pady分别设置横向和纵向间隔大小
 7
 8 import tkinter as tk
 9
10 root = tk.Tk()
11 root.title("请登录")
12
13
14 def reg():
15     ‘‘‘登录校验‘‘‘
16     username = e_user.get()
17     passwd = e_pwd.get()
18     len_user = len(username)
19     len_pwd = len(passwd)
20     if username == ‘admin‘ and passwd == ‘123‘:
21         l_msg[‘text‘] = ‘登录成功!‘
22         l_msg[‘fg‘] = ‘green‘
23     else:
24         l_msg.configure(text=‘登录失败!‘, fg=‘red‘)
25     # e_user.delete(0, len_user)  # 清空输入框
26     e_pwd.delete(0, len_pwd)
27
28
29 # 登录结果提示
30 l_msg = tk.Label(root, text=‘‘)
31 l_msg.grid(row=0, columnspan=2)  # 跨越两列显示
32
33 # 第一行用户名输入框
34 l_user = tk.Label(root, text=‘用户名:‘)
35 l_user.grid(row=1, sticky=tk.W)
36 e_user = tk.Entry(root)
37 e_user.grid(row=1, column=1, sticky=tk.E, padx=3)
38
39 # 第二行密码输入框
40 l_pwd = tk.Label(root, text=‘密码:‘)
41 l_pwd.grid(row=2, sticky=tk.E)
42 e_pwd = tk.Entry(root)
43 e_pwd[‘show‘] = ‘*‘  # 隐藏显示
44 e_pwd.grid(row=2, column=1, sticky=tk.E, padx=3)
45
46 # 第三行登录按钮
47 f_btn = tk.Frame(root)
48 b_login = tk.Button(f_btn, text=‘登录‘, width=6, command=reg)
49 b_login.grid(row=0, column=0)
50 b_cancel = tk.Button(f_btn, text=‘取消‘, width=6, command=root.quit)
51 b_cancel.grid(row=0, column=1)
52 f_btn.grid(row=3, columnspan=2, pady=10)
53
54 root.mainloop()
55
56 # 原始按钮布局
57 # b_login = tk.Button(root, text=‘登录‘, command=reg)
58 # b_login.grid(row=3, column=1, sticky=tk.W, pady=10)
59 # b_cancel = tk.Button(root, text=‘取消‘, command=root.quit)
60 # b_cancel.grid(row=3, column=1)
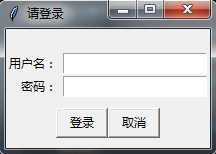
截图:

python之tkinter使用-Grid(网格)布局管理器
标签:tick 按钮 分割 min configure def ext python gre
原文地址:http://www.cnblogs.com/gongxr/p/7765866.html