标签:libc UI gnu github use version sci das dev
首先更新输入:
sudo apt-get update
sudo apt-get upgrade
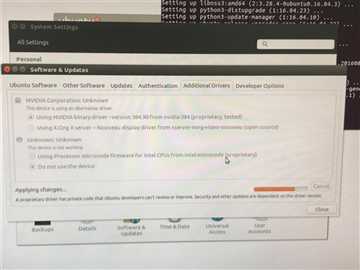
然后打开System Settings中Software&Updates
如下选择,并点击Apply Changes。

编辑文件
sudo gedit /etc/modprobe.d/blacklist-nouveau.conf
在打开的文件中写入:
blacklist nouveau option nouveau modeset=0
执行
sudo update-initramfs -u
重启,输入
reboot
依次输入:
sudo apt-get install libprotobuf-dev libleveldb-dev libsnappy-dev libopencv-dev libhdf5-serial-dev protobuf-compiler

sudo apt-get install --no-install-recommends libboost-all-dev

sudo apt-get install libopenblas-dev liblapack-dev libatlas-base-dev

sudo apt-get install libgflags-dev libgoogle-glog-dev liblmdb-dev

sudo apt-get install git cmake build-essential
打开配置文件:
sudo gedit ~/.bashrc
添加:
export LD_LIBRARY_PATH=/usr/lib/x86_64-linux-gnu:$LD_LIBRARY_PATH

export LD_LIBRARY_PATH=/lib/x86_64-linux-gnu:$LD_LIBRARY_PATH
保存退出
执行可执行文件:
sudo sh cuda_8.0.61_375.26_linux.run --no-opengl-libs
注意:安装过程中不要选择安装显卡驱动,其他选择yes即可。
重启:
reboot
打开配置文件:
sudo gedit ~/.bashrc
添加环境变量:
export PATH=/usr/local/cuda-8.0/bin:$PATH

export LD_LIBRARY_PATH=/usr/local/cuda/lib64:$LD_LIBRARY_PATH
使配置生效:
source ~/.bashrc
cd /usr/local/cuda-8.0/samples/1_Utilities/deviceQuery

sudo make

./deviceQuery
下载cudnn,并且拷贝到/usr/local路径下:
sudo cp /home/peiyuyang/cudnn-8.0-linux-x64-v6.0.tgz /usr/local
解压,执行:
sudo tar -zxvf cudnn-8.0-linux-x64-v6.0.tgz
解压后,执行:
sudo cp cuda/include/cudnn.h /usr/local/cuda/include/
sudo cp cuda/lib64/libcudnn* /usr/local/cuda/lib64/
sudo chmod a+r /usr/local/cuda/include/cudnn.h
sudo chmod a+r /usr/local/cuda/lib64/libcudnn*
安装git:
sudo apt install git
下载:
git clone https://github.com/jayrambhia/Install-OpenCV
打开路径:
cd Install-OpenCV/Ubuntu/
赋权限:
chmod +x *
保险起见:
sudo apt-get update
运行脚本:
./opencv_latest.sh
时间较长,最终出现OpenCV-3.3.0 ready to be used,安装成功。
安装路径下:
git clone https://github.com/BVLC/caffe.git
將user目录下所有文件权限改为当前用户的权限:
chown -R uer.uer /home/user
进入caffe路径,拷贝Makefile.config.example:
sudo cp Makefile.config.example Makefile.config
修改Makefile.config文件:
sudo gedit Makefile.config
修改:
将
#USE_CUDNN := 1
修改成:
USE_CUDNN := 1

将
#OPENCV_VERSION := 3
修改为:
OPENCV_VERSION := 3

将
#WITH_PYTHON_LAYER := 1
修改为
WITH_PYTHON_LAYER := 1

将
INCLUDE_DIRS := $(PYTHON_INCLUDE) /usr/local/include
LIBRARY_DIRS := $(PYTHON_LIB) /usr/local/lib /usr/lib
修改为:
INCLUDE_DIRS := $(PYTHON_INCLUDE) /usr/local/include /usr/include/hdf5/serial
LIBRARY_DIRS := $(PYTHON_LIB) /usr/local/lib /usr/lib /usr/lib/x86_64-linux-gnu /usr/lib/x86_64-linux-gnu/hdf5/serial
修改Makefile文件:
gedit Makefile
修改:
将
NVCCFLAGS +=-ccbin=$(CXX) -Xcompiler-fPIC $(COMMON_FLAGS)
修改为:
NVCCFLAGS += -D_FORCE_INLINES -ccbin=$(CXX) -Xcompiler -fPIC $(COMMON_FLAGS)

将
LIBRARIES += glog gflags protobuf boost_system boost_filesystem m hdf5_hl hdf5
修改为:
LIBRARIES += glog gflags protobuf boost_system boost_filesystem m hdf5_serial_hl hdf5_serial
修改host_config.h文件:
sudo gedit /usr/local/cuda/include/host_config.h
修改:
将
#error-- unsupported GNU version! gcc versions later than 4.9 are not supported!
改为
//#error-- unsupported GNU version! gcc versions later than 4.9 are not supported!
开始编译caffe:
make all -j8
编译成功后运行测试:
sudo make runtest -j8
安装依赖 :
sudo apt-get install -y python-numpy python-scipy python-matplotlib python-sklearn python-skimage python-h5py python-protobuf python-leveldb python-networkx python-nose python-pandas python-gflags cython ipython
编译:
make pycaffe -j8
成功后貌似还不能python,import caffe。先进行下一步。
安装解压后,进入解压目录,运行:
bash Anaconda2-4.4.0-linux-x86_64.sh
选择添加环境变量。
使环境变量生效
source ~/.bashrc
之后进行:
sudo pip install easydict
pip install protobuf
sudo apt-get install python-protobuf
conda install libgcc
然后可以顺利import caffe。
标签:libc UI gnu github use version sci das dev
原文地址:http://www.cnblogs.com/peiyuYang/p/7784787.html