标签:图像 字体加粗 针对 中间 外边距 over 5.6 计算机 版本
CSS是能够真正做到网页表现与内容分离的一种样式设计语言。相对于传统HTML的表现而言,CSS能够对网页中的对象的位置排版进行像素级的精确控制,支持几乎所有的字体字号样式,拥有对网页对象和模型样式编辑的能力,并能够进行初步交互设计,是目前基于文本展示最优秀的表现设计语言。CSS能够根据不同使用者的理解能力,简化或者优化写法,针对各类人群,有较强的易读性。
层叠样式表(英语:Cascading Style Sheets,简写CSS),又称串样式列表、层次结构式样式表文件,一种用来为结构化文档(如HTML文档或XML应用)添加样式(字体、间距和颜色等)的计算机语言,由W3C定义和维护。目前最新版本是CSS2.1,为W3C的推荐标准。CSS3现在已被大部分现代浏览器支持,而下一版的CSS4仍在开发过程中。
从1990年代初HTML被发明开始,样式表就以各种形式出现了,不同的浏览器结合了它们各自的样式语言,读者可以使用这些样式语言来调节网页的显示方式。一开始样式表是给读者用的,最初的HTML版本只含有很少的显示属性,读者来决定网页应该怎样被显示。
但随着HTML的成长,为了满足设计师的要求,HTML获得了很多显示功能。随着这些功能的增加外来定义样式的语言越来越没有意义了。
1994年哈坤·利提出了CSS的最初建议。伯特·波斯(Bert Bos)当时正在设计一个叫做“Argo”的浏览器,他们决定一起合作设计CSS。
当时已经有过一些样式表语言的建议了,但CSS是第一个含有“层叠”的主意的。在CSS中,一个文件的样式可以从其他的样式表中继承下来。读者在有些地方可以使用他自己更喜欢的样式,在其他地方则继承,或“层叠”作者的样式。这种层叠的方式使作者和读者都可以灵活地加入自己的设计,混合各人的爱好。
哈坤于1994年在芝加哥的一次会议上第一次展示了CSS的建议,1995年他与波斯一起再次展示这个建议。当时W3C刚刚创建,W3C对CSS的发展很感兴趣,它为此组织了一次讨论会。哈坤、波斯和其他一些人(比如微软的托马斯·雷尔登)是这个项目的主要技术负责人。1996年底,CSS已经完成。1996年12月CSS要求的第一版本被出版。
1997年初,W3C内组织了专门管CSS的工作组,其负责人是克里斯·里雷。这个工作组开始讨论第一版中没有涉及到的问题,其结果是1998年5月出版的第二版要求。到2007年为止,第三版还未完备。
通过HTML元素的style属性来设置CSS样式,语法如下:
style="css属性:css属性值;"
示例:
<!DOCTYPE html>
<html>
  <head>
    <title>01_第一种使用方式.html</title>
  </head>
  <body>
    <!-- style="css属性:css属性值;" -->
    <div style="color:red;" >ITCAST</div>
  </body>
</html>
通过HTML页面的style元素来设置CSS样式,语法如下:
<style type="text/css">
    选择器 {
        属性名 : 属性值;
    }
</style>
示例:
<!DOCTYPE html>
<html>
  <head>
    <title>02_第二种使用方式.html</title>
    <meta http-equiv="content-type" content="text/html; charset=UTF-8">
    <!--
        style标签:封装样式内容
            * type:指定使用样式,值为"text/css"
            * 设置CSS语法:
                选择器 {
                    属性名 : 属性值;
                }
     -->
    <style type="text/css">
        div {
            color : red;
        }
    </style>
  </head>
  <body>
    <div>ITCAST</div>
  </body>
</html>
通过HTML元素的style属性来引入外部CSS样式,语法如下:
<style type="text/css">
    @import url(样式表名称)
</style>
示例:
<!DOCTYPE html>
<html>
  <head>
    <title>03_第三种使用方式.html</title>
    <meta http-equiv="content-type" content="text/html; charset=UTF-8">
    <!--
        style标签:封装样式内容
            * type:指定使用样式,值为"text/css"
            * 设置CSS语法:
                @import url(样式表名称)
     -->
    <style type="text/css">
        @import url(div.css)
    </style>
  </head>
  <body>
    <div>ITCAST</div>
  </body>
</html>
通过HTML页面的link元素来引入外部CSS样式,语法如下:
<link href="css文件路径" rel="stylesheet" type="text/css" />
示例:
<!DOCTYPE html>
<html>
  <head>
    <title>04_第四种使用方式.html</title>
    <meta http-equiv="content-type" content="text/html; charset=UTF-8">
    <!--
        link标签:
            * href:引入外部css文件路径
            * rel:设置引入文件为样式文件
            * type:指定使用样式,值为"text/css"
     -->
    <link href="div.css" rel="stylesheet" type="text/css" />
  </head>
  <body>
    <div>ITCAST</div>
  </body>
</html>
示例:
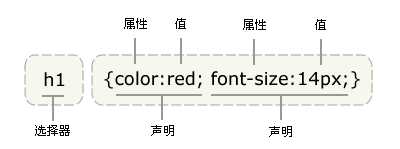
语法格式:
选择器 {属性名称 : 属性值; 属性名称 : 属性值;...}
语法特点:
注释是用来解释你的代码,并且可以随意编辑它,浏览器会忽略它。CSS注释以 "/*" 开始, 以 "*/" 结束。
<style type="text/css">
    /* 这是一个注释 */
    div {
        /* 这是另一个注释 */
        color : red;
    }
</style>
例如在设置字体颜色时,以下几种方式效果相同。
#show1 {color : red;}
#show2 {color : #ff0000;}
像上面这种使用十六进制设置颜色时,如果两两相同,可以写成如下格式:
#show2 {color : #f00;}
#show3 {color : rgb(255,0,0);}
上面的格式还可以写成如下格式:
#show3 {color : rgb(100%,0%,0%);}
注意:当使用 RGB 百分比时,即使当值为 0 时也要写百分比符号。但是在其他的情况下就不需要这么做了。
div {font-family : Courier, "Courier New", monospace;}
如果要定义不止一个声明,则需要用分号将每个声明分开。
大多数样式表包含不止一条规则,而大多数规则包含不止一个声明。多重声明和空格的使用使得样式表更容易被编辑。
|
属性 |
描述 |
|
background |
简写属性,作用是将背景属性设置在一个声明中。 |
|
background-attachment |
背景图像是否固定或者随着页面的其余部分滚动。 |
|
background-color |
设置元素的背景颜色。 |
|
background-image |
把图像设置为背景。 |
|
background-position |
设置背景图像的起始位置。 |
|
background-repeat |
设置背景图像是否及如何重复。 |
<!DOCTYPE html>
<html>
  <head>
    <title>08_背景色.html</title>
    <meta http-equiv="content-type" content="text/html; charset=UTF-8">
    <style type="text/css">
        body {background-color: yellow}
        h1 {background-color: #00ff00}
        h2 {background-color: transparent}
        p {background-color: rgb(250,0,255)}
        p.no2 {background-color: gray; padding: 20px;}
    </style>
  </head>
  <body>
    <h1>这是标题 1</h1>
    <h2>这是标题 2</h2>
    <p>这是段落</p>
    <p class="no2">这个段落设置了内边距。</p>
  </body>
</html>
<!DOCTYPE html>
<html>
  <head>
    <title>背景图像.html</title>
    <meta http-equiv="content-type" content="text/html; charset=UTF-8">
    <style type="text/css">
        body {background-image:url(a.jpg);}
        p.flower {background-image: url(b.jpg); padding: 20px;}
        a.radio {background-image: url(c.jpg);  padding: 20px;}
    </style>
  </head>
  <body>
    <p class="flower">
        我是一个有花纹背景的段落。
        <a href="#" class="radio">我是一个有放射性背景的链接。</a>
    </p>
    <p>
        <b>注释:</b>为了清晰地显示出段落和链接的背景图像,我们为它们设置了少许内边距。
    </p>
  </body>
</html>
<!DOCTYPE html>
<html>
  <head>
    <title>背景重复.html</title>
    <meta http-equiv="content-type" content="text/html; charset=UTF-8">
    <style type="text/css">
        body
        {
        background-image:
        url(b.jpg);
        background-repeat: repeat-y
        }
    </style>
  </head>
  <body>
  </body>
</html>
<!DOCTYPE html>
<html>
  <head>
    <title>背景定位.html</title>
    <meta http-equiv="content-type" content="text/html; charset=UTF-8">
    <style type="text/css">
        body
        {
        background-image:
        url(b.jpg);
        background-repeat: no-repeat;
        background-position:center;
        }
    </style>
  </head>
  <body>
  </body>
</html>
|
单一关键字 |
等价的关键字 |
|
center |
center center |
|
top |
top center 或 center top |
|
bottom |
bottom center 或 center bottom |
|
right |
right center 或 center right |
|
left |
left center 或 center left |
body
{
    background-image:
    url(b.jpg);
    background-repeat: no-repeat;
    background-position:50% 50%;
}
body
{
    background-image:
    url(b.jpg);
    background-repeat: no-repeat;
    background-position:50px 100px;
}
<!DOCTYPE html>
<html>
  <head>
    <title>背景关联.html</title>
    <meta http-equiv="content-type" content="text/html; charset=UTF-8">
    <style type="text/css">
        body
        {
            background-image:url(b.jpg);
            background-repeat:no-repeat;
            background-attachment:fixed
        }
    </style>
  </head>
  <body>
    <p>图像不会随页面的其余部分滚动。</p>
    <p>图像不会随页面的其余部分滚动。</p>
    <p>图像不会随页面的其余部分滚动。</p>
    <p>图像不会随页面的其余部分滚动。</p>
    <p>图像不会随页面的其余部分滚动。</p>
    <p>图像不会随页面的其余部分滚动。</p>
    <p>图像不会随页面的其余部分滚动。</p>
    <p>图像不会随页面的其余部分滚动。</p>
    <p>图像不会随页面的其余部分滚动。</p>
    <p>图像不会随页面的其余部分滚动。</p>
    <p>图像不会随页面的其余部分滚动。</p>
    <p>图像不会随页面的其余部分滚动。</p>
    <p>图像不会随页面的其余部分滚动。</p>
    <p>图像不会随页面的其余部分滚动。</p>
  </body>
</html>
|
属性 |
描述 |
|
color |
设置文本颜色 |
|
direction |
设置文本方向。 |
|
line-height |
设置行高。 |
|
letter-spacing |
设置字符间距。 |
|
text-align |
对齐元素中的文本。 |
|
text-decoration |
向文本添加修饰。 |
|
text-indent |
缩进元素中文本的首行。 |
|
text-shadow |
设置文本阴影。CSS2 包含该属性,但是 CSS2.1 没有保留该属性。 |
|
text-transform |
控制元素中的字母。 |
|
unicode-bidi |
设置文本方向。 |
|
white-space |
设置元素中空白的处理方式。 |
|
word-spacing |
设置字间距。 |
<!DOCTYPE html>
<html>
  <head>
    <title>13_缩进文本.html</title>
    <meta http-equiv="content-type" content="text/html; charset=UTF-8">
    <style type="text/css">
        p {text-indent: 5em;}
    </style>
  </head>
  <body>
    <p>缩进文本</p>
  </body>
</html>
p {text-indent: 20%;}
<!DOCTYPE html>
<html>
  <head>
    <title>14_水平对齐.html</title>
    <meta http-equiv="content-type" content="text/html; charset=UTF-8">
    <style type="text/css">
        p {text-align:center;}
    </style>
  </head>
  <body>
    <p>水平对齐</p>
  </body>
</html>
|
值 |
描述 |
|
left |
把文本排列到左边。默认值:由浏览器决定。 |
|
right |
把文本排列到右边。 |
|
center |
把文本排列到中间。 |
|
justify |
实现两端对齐文本效果。 |
|
inherit |
规定应该从父元素继承 text-align 属性的值。 |
<!DOCTYPE html>
<html>
  <head>
    <title>字间隔.html</title>
    <meta http-equiv="content-type" content="text/html; charset=UTF-8">
    <style type="text/css">
        p.spread {word-spacing: 30px;}
        p.tight {word-spacing: -0.5em;}
    </style>
  </head>
  <body>
    <p class="spread">This is some text.</p>
    <p class="tight">This is some text.</p>
  </body>
</html>
<!DOCTYPE html>
<html>
  <head>
    <title>字母间隔.html</title>
    <meta http-equiv="content-type" content="text/html; charset=UTF-8">
    <style type="text/css">
        h1 {letter-spacing: -0.5em}
        h4 {letter-spacing: 20px}
    </style>
  </head>
  <body>
    <h1>This is header 1</h1>
    <h4>This is header 4</h4>
  </body>
</html>
<!DOCTYPE html>
<html>
  <head>
    <title>字符转换.html</title>
    <meta http-equiv="content-type" content="text/html; charset=UTF-8">
    <style type="text/css">
      h1 {text-transform: uppercase}
      p.uppercase {text-transform: uppercase}
      p.lowercase {text-transform: lowercase}
      p.capitalize {text-transform: capitalize}
    </style>
  </head>
  <body>
    <h1>This Is An H1 Element</h1>
    <p class="uppercase">This is some text in a paragraph.</p>
    <p class="lowercase">This is some text in a paragraph.</p>
    <p class="capitalize">This is some text in a paragraph.</p>
  </body>
</html>
<!DOCTYPE html>
<html>
  <head>
    <title>文本装饰.html</title>
    <meta http-equiv="content-type" content="text/html; charset=UTF-8">
    <style type="text/css">
        a {text-decoration: none;}
    </style>
  </head>
  <body>
    <a href="#">文本装饰</a>
  </body>
</html>
<!DOCTYPE html>
<html>
  <head>
    <title>处理空白符.html</title>
    <meta http-equiv="content-type" content="text/html; charset=UTF-8">
    <style type="text/css">
        p {white-space: normal;}
    </style>
  </head>
  <body>
    <p>This     paragraph has    many
    spaces           in it.</p>

    <p>注释:当 white-space 属性设置为 normal 时,会合并所有的空白符,并忽略换行符。</p>
  </body>
</html>
<!DOCTYPE html>
<html>
  <head>
    <title>文本方向.html</title>
    <meta http-equiv="content-type" content="text/html; charset=UTF-8">
    <style type="text/css">
        div.one{direction: rtl}
        div.two{direction: ltr}
    </style>
  </head>
  <body>
    <div class="one">Some text. Right-to-left direction.</div>
    <div class="two">Some text. Left-to-right direction.</div>
  </body>
</html>
|
属性 |
描述 |
|
font |
简写属性。作用是把所有针对字体的属性设置在一个声明中。 |
|
font-family |
设置字体系列。 |
|
font-size |
设置字体的尺寸。 |
|
font-size-adjust |
当首选字体不可用时,对替换字体进行智能缩放。(CSS2.1 已删除该属性。) |
|
font-stretch |
对字体进行水平拉伸。(CSS2.1 已删除该属性。) |
|
font-style |
设置字体风格。 |
|
font-variant |
以小型大写字体或者正常字体显示文本。 |
|
font-weight |
设置字体的粗细。 |
<!DOCTYPE html>
<html>
  <head>
    <title>字体系列.html</title>
    <meta http-equiv="content-type" content="text/html; charset=UTF-8">
    <style type="text/css">
        body {font-family:sans-serif;}
        h1 {font-family:Georgia;}
        p {font-family: Times, TimesNR, ‘New Century Schoolbook‘, Georgia, ‘New York‘, serif;}
    </style>
  </head>
  <body>
    <h1>This is heading 1</h1>
    <p>This is a paragraph.</p>
    <p>This is a paragraph.</p>
    <p>...</p>
  </body>
</html>
<!DOCTYPE html>
<html>
  <head>
    <title>字体风格.html</title>
    <meta http-equiv="content-type" content="text/html; charset=UTF-8">
    <style type="text/css">
        p.normal {font-style:normal}
        p.italic {font-style:italic}
        p.oblique {font-style:oblique}
    </style>
  </head>
  <body>
    <p class="normal">This is a paragraph, normal.</p>
    <p class="italic">This is a paragraph, italic.</p>
    <p class="oblique">This is a paragraph, oblique.</p>
  </body>
</html>
<!DOCTYPE html>
<html>
  <head>
    <title>字体变形.html</title>
    <meta http-equiv="content-type" content="text/html; charset=UTF-8">
    <style type="text/css">
        p.normal {font-variant: normal}
        p.small {font-variant: small-caps}
    </style>
  </head>
  <body>
    <p class="normal">This is a paragraph</p>
    <p class="small">This is a paragraph</p>
  </body>
</html>
<!DOCTYPE html>
<html>
  <head>
    <title>字体加粗.html</title>
    <meta http-equiv="content-type" content="text/html; charset=UTF-8">
    <style type="text/css">
        p.normal {font-weight: normal}
        p.thick {font-weight: bold}
        p.thicker {font-weight: 900}
    </style>
  </head>
  <body>
    <p class="normal">This is a paragraph</p>
    <p class="thick">This is a paragraph</p>
    <p class="thicker">This is a paragraph</p>
  </body>
</html>
<!DOCTYPE html>
<html>
  <head>
    <title>字体大小.html</title>
    <meta http-equiv="content-type" content="text/html; charset=UTF-8">
    <style type="text/css">
        h1 {font-size:60px;}
        h2 {font-size:40px;}
        p {font-size:14px;}
    </style>
  </head>
  <body>
    <h1>This is heading 1</h1>
    <h2>This is heading 2</h2>
    <p>This is a paragraph.</p>
    <p>This is a paragraph.</p>
    <p>...</p>
  </body>
</html>
元素选择器就是通过HTML页面的元素名称来设置css样式。具体语法如下:
元素名称 { 属性名 : 属性值; }
示例:
div {color : red; }
类选择器就是通过HTML元素的class属性值来设置css样式。具体语法如下:
.class属性值 { 属性名 : 属性值; }
示例:
.myDiv {color : red; }
ID选择器就是通过HTML元素的id属性值来设置css样式。具体语法如下:
#id属性值 { 属性名 : 属性值; }
示例:
#show1 {color : red; }
属性选择器就是通过HTML元素的属性名称来设置css样式。具体语法如下:
[属性名称] { 属性名 : 属性值; }
示例:
[name] {color : red; }
|
选择器 |
描述 |
|
[attribute] |
用于选取带有指定属性的元素。 |
|
[attribute=value] |
用于选取带有指定属性和值的元素。 |
|
[attribute~=value] |
用于选取属性值中包含指定词汇的元素。 |
|
[attribute|=value] |
用于选取带有以指定值开头的属性值的元素,该值必须是整个单词。 |
|
[attribute^=value] |
匹配属性值以指定值开头的每个元素。 |
|
[attribute$=value] |
匹配属性值以指定值结尾的每个元素。 |
|
[attribute*=value] |
匹配属性值中包含指定值的每个元素。 |
后代选择器就是设置HTML页面的指定元素的后代元素(中间使用空格)的css样式。具体语法如下:
祖先元素 后代元素 { 属性名 : 属性值; }
示例:
div em {color : red; }
子选择器就是设置HTML页面的指定元素的子元素的css样式。具体语法如下:
祖先元素 > 子元素{ 属性名 : 属性值; }
示例:
div > em {color : red; }
相邻元素选择器就是设置HTML页面的指定元素的下一个兄弟元素的css样式。具体语法如下:
指定元素 + 兄弟元素 { 属性名 : 属性值; }
示例:
div + div {color : red; }
/* no grouping */
h1 {color:blue;}
h2 {color:blue;}
h3 {color:blue;}
h4 {color:blue;}
h5 {color:blue;}
h6 {color:blue;}

/* grouping */
h1, h2, h3, h4, h5, h6 {color:blue;}
* {color:red;}
|
属性 |
描述 |
CSS |
|
:active |
向被激活的元素添加样式。 |
1 |
|
:focus |
向拥有键盘输入焦点的元素添加样式。 |
2 |
|
:hover |
当鼠标悬浮在元素上方时,向元素添加样式。 |
1 |
|
:link |
向未被访问的链接添加样式。 |
1 |
|
:visited |
向已被访问的链接添加样式。 |
1 |
|
:first-child |
向元素的第一个子元素添加样式。 |
2 |
|
:lang |
向带有指定 lang 属性的元素添加样式。 |
2 |
a:link {color: #FF0000}        /* 未访问的链接 */
a:visited {color: #00FF00}    /* 已访问的链接 */
a:hover {color: #FF00FF}    /* 鼠标移动到链接上 */
a:active {color: #0000FF}    /* 选定的链接 */
p:first-child {font-weight: bold;}
:lang 伪类可以为不同的语言定义特殊的规则。
<!DOCTYPE html>
<html>
  <head>
   <meta http-equiv="content-type" content="text/html; charset=UTF-8">
    <style type="text/css">
        q:lang(no) {
            quotes: "~" "~"
        }
    </style>
  </head>
  <body>
    <p>文字<q lang="no">段落中的引用的文字</q>文字</p>
  </body>
</html>
|
属性 |
描述 |
CSS |
|
:first-letter |
向文本的第一个字母添加特殊样式。 |
1 |
|
:first-line |
向文本的首行添加特殊样式。 |
1 |
|
:before |
在元素之前添加内容。 |
2 |
|
:after |
在元素之后添加内容。 |
2 |
"first-letter" 伪元素用于向文本的首字母设置特殊样式。
p:first-letter {font-weight: bold;}
"first-line" 伪元素用于向文本的首行设置特殊样式。
p:first-line {font-weight: bold;}
":before" 伪元素可以在元素的内容前面插入新内容。
h1:before {content: url(logo.jpg);}
":after" 伪元素可以在元素的内容之后插入新内容。
h1:after {content: url(logo.jpg);}
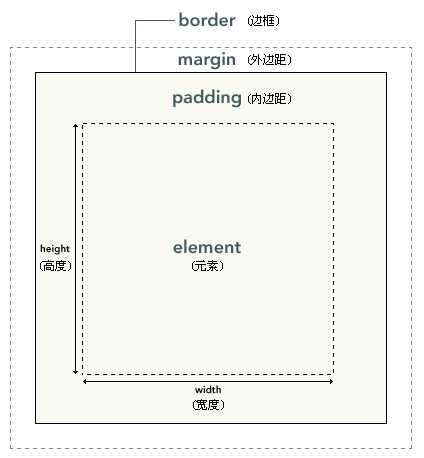
元素框的最内部分是实际的内容,直接包围内容的是内边距。内边距呈现了元素的背景。内边距的边缘是边框。边框以外是外边距,外边距默认是透明的,因此不会遮挡其后的任何元素。
|
属性 |
描述 |
|
简写属性。作用是在一个声明中设置元素的所内边距属性。 |
|
|
设置元素的下内边距。 |
|
|
设置元素的左内边距。 |
|
|
设置元素的右内边距。 |
|
|
设置元素的上内边距。 |
<!DOCTYPE html>
<html>
  <head>
    <title>内边距.html</title>
    <meta http-equiv="content-type" content="text/html; charset=UTF-8">
    <style type="text/css">
        td.test1 {padding: 1.5cm}
        td.test2 {padding: 0.5cm 2.5cm}
    </style>
  </head>
  <body>
    <table border="1">
        <tr>
            <td class="test1">
                这个表格单元的每个边拥有相等的内边距。
            </td>
        </tr>
    </table>
    <br />
    <table border="1">
        <tr>
            <td class="test2">
                这个表格单元的上和下内边距是 0.5cm,左和右内边距是 2.5cm。
            </td>
        </tr>
    </table>
  </body>
</html>
|
属性 |
描述 |
|
简写属性,用于把针对四个边的属性设置在一个声明。 |
|
|
用于设置元素所有边框的样式,或者单独地为各边设置边框样式。 |
|
|
简写属性,用于为元素的所有边框设置宽度,或者单独地为各边边框设置宽度。 |
|
|
简写属性,设置元素的所有边框中可见部分的颜色,或为 4 个边分别设置颜色。 |
|
|
简写属性,用于把下边框的所有属性设置到一个声明中。 |
|
|
设置元素的下边框的颜色。 |
|
|
设置元素的下边框的样式。 |
|
|
设置元素的下边框的宽度。 |
|
|
简写属性,用于把左边框的所有属性设置到一个声明中。 |
|
|
设置元素的左边框的颜色。 |
|
|
设置元素的左边框的样式。 |
|
|
设置元素的左边框的宽度。 |
|
|
简写属性,用于把右边框的所有属性设置到一个声明中。 |
|
|
设置元素的右边框的颜色。 |
|
|
设置元素的右边框的样式。 |
|
|
设置元素的右边框的宽度。 |
|
|
简写属性,用于把上边框的所有属性设置到一个声明中。 |
|
|
设置元素的上边框的颜色。 |
|
|
设置元素的上边框的样式。 |
|
|
设置元素的上边框的宽度。 |
<!DOCTYPE html>
<html>
  <head>
    <title>边框.html</title>
    <meta http-equiv="content-type" content="text/html; charset=UTF-8">
    <style type="text/css">
        p {border: medium double rgb(250,0,255)}
    </style>
  </head>
  <body>
    <p>Some text</p>
  </body>
</html>
|
属性 |
描述 |
|
简写属性。在一个声明中设置所有外边距属性。 |
|
|
设置元素的下外边距。 |
|
|
设置元素的左外边距。 |
|
|
设置元素的右外边距。 |
|
|
设置元素的上外边距。 |
<!DOCTYPE html>
<html>
  <head>
    <title>外边距.html</title>
    <meta http-equiv="content-type" content="text/html; charset=UTF-8">
    <style type="text/css">
        p.margin {margin: 2cm 4cm 3cm 4cm}
    </style>
  </head>
  <body>
    <p>这个段落没有指定外边距。</p>
    <p class="margin">这个段落带有指定的外边距。这个段落带有指定的外边距。这个段落带有指定的外边距。这个段落带有指定的外边距。这个段落带有指定的外边距。</p>
    <p>这个段落没有指定外边距。</p>
  </body>
</html>
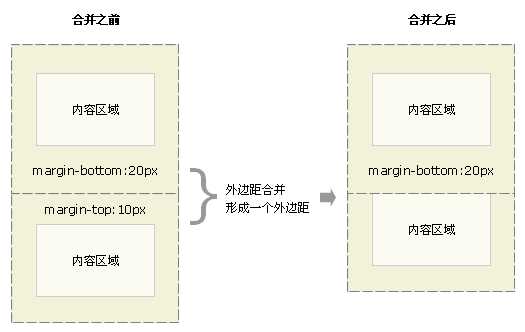
<!DOCTYPE html>
<html>
  <head>
    <title>外边距合并.html</title>
    <meta http-equiv="content-type" content="text/html; charset=UTF-8">
    <style type="text/css">
        * {
          margin:0;
          padding:0;
          border:0;
        }
        #d1 {
          width:100px;
          height:100px;
          margin-top:20px;
          margin-bottom:20px;
          background-color:red;
        }
        #d2 {
          width:100px;
          height:100px;
          margin-top:10px;
          background-color:blue;
        }
    </style>
  </head>
  <body>
    <div id="d1"></div>
    <div id="d2"></div>
    <p>请注意,两个 div 之间的外边距是 20px,而不是 30px(20px + 10px)。</p>
  </body>
</html>
<!DOCTYPE html>
<html>
  <head>
    <title>相对定位.html</title>
    <meta http-equiv="content-type" content="text/html; charset=UTF-8">
    <style type="text/css">
    h2.pos_left {
        position:relative;
        left:-20px
    }
    h2.pos_right {
        position:relative;
        left:20px
    }
    </style>
  </head>
  <body>
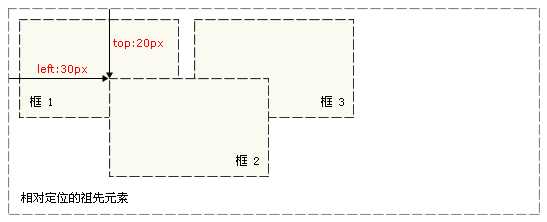
    <h2>这是位于正常位置的标题</h2>
    <h2 class="pos_left">这个标题相对于其正常位置向左移动</h2>
    <h2 class="pos_right">这个标题相对于其正常位置向右移动</h2>
  </body>
</html>
<!DOCTYPE html>
<html>
  <head>
    <title>绝对定位.html</title>
    <meta http-equiv="content-type" content="text/html; charset=UTF-8">
    <style type="text/css">
        h2.pos_abs {
            position:absolute;
            left:100px;
            top:150px
        }
    </style>
  </head>
  <body>
    <h2 class="pos_abs">这是带有绝对定位的标题</h2>
  </body>
</html>
<!DOCTYPE html>
<html>
  <head>
    <title>浮动.html</title>
    <meta http-equiv="content-type" content="text/html; charset=UTF-8">
    <style type="text/css">
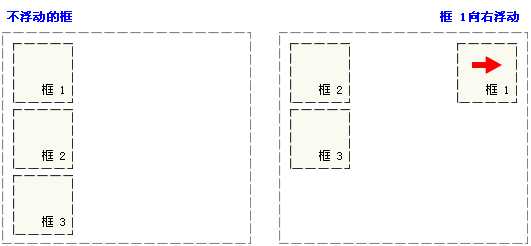
    img {
        float:right;
        border:1px dotted black;
        margin:0px 0px 15px 20px;
    }
    </style>
  </head>
  <body>
    <p>
    <img src="girl.jpg" />
    This is some text. This is some text. This is some text.
    This is some text. This is some text. This is some text.
    This is some text. This is some text. This is some text.
    This is some text. This is some text. This is some text.
    This is some text. This is some text. This is some text.
    This is some text. This is some text. This is some text.
    This is some text. This is some text. This is some text.
    This is some text. This is some text. This is some text.
    This is some text. This is some text. This is some text.
    This is some text. This is some text. This is some text.
    </p>
  </body>
</html>
标签:图像 字体加粗 针对 中间 外边距 over 5.6 计算机 版本
原文地址:http://www.cnblogs.com/aaron911/p/7799012.html