标签:生成 nec wrapper ons wrap 判断 碰撞检测 z-index 一个
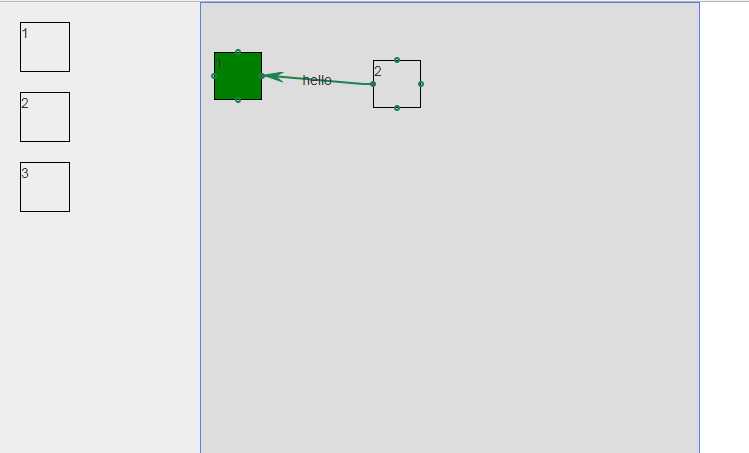
使用jsplumb构建流程图模型时,有一个需求要求,选项可以从选项表中拖拽到指定容器,并且两个选项要接触到的时候才能连接起来,不接触不能连接。效果图如下
略丑~
因为这里用到了拖拽,拖放功能,所以用到的有jquery,jquery-ui,jsplumb,考虑到兼容ie8,用到的是jsplumb-1.7.10版本。
首先简单的布局
<style>
html,body {
    height:100%;
    padding:0;
    margin:0;
}
    #container{
        width:200px;
        height:500px;

        background:#eee;
        float:left;

    }
    #container .node {
        width:50px;
        height:50px;
        border:1px solid #000;
        margin-top:20px;
        margin-left:20px;
        z-index:999;
    }
    #wrapper {

        width:500px;
        height:500px;
        margin-left:200px;
        border:1px solid #5182E4;
        background:#ddd;
        position:relative;

    }
</style>

<div id="container">
        <div class="node" id="Node1">1</div>
        <div class="node" id="Node2">2</div>
        <div class="node" id="Node3">3</div>
</div>

<div id="wrapper">

</div>
接下来就是功能实现,第一步拖拽
 $(‘#container .node‘).draggable({
          helper:‘clone‘,
          revert: ‘invalid‘,//放置不到位自动恢复原位
          stop:function(event,ui){
            //准备碰撞检测所需要的条件
              var r1 = ui.offset.left+ui.helper.context.offsetWidth;
              var l1 = ui.offset.left;
              var b1 = ui.offset.top+ui.helper.context.offsetHeight;
              var t1 = ui.offset.top;

              var L = $(‘#wrapper‘)[0].offsetLeft;

              var T = $(‘#wrapper‘)[0].offsetTop;

              var id= ui.helper.context.id;

              var len = $(‘#wrapper‘).children(‘.node‘).length;


             var uid = ‘dragNode‘+len;

              var arr=[];

              $(‘#wrapper‘).children(‘.node‘).each(function(){


                  var json={};

                  json.id = $(this).context.id;
                  json.left = $(this).context.offsetLeft+L;
                  json.right = $(this).context.offsetLeft+L+$(this)[0].offsetWidth;
                  json.top = $(this).context.offsetTop+T;
                  json.bottom = $(this).context.offsetTop+T+$(this)[0].offsetHeight;

                  arr.push(json);

              });


            //jsplumb 设置样式
              var common = {
                          anchors:[‘Left‘,‘Right‘],
                          endpoint:[‘Dot‘,{radius:2}],

                          paintStyle:{
                            strokeStyle:‘#1e8151‘,
                            fillStyle:‘transparent‘,
                            radius:2,
                            lineWidth:2,
                        }


                      };


              for(var i=0;i<arr.length;i++){
                  if(arr[i].id!=uid){

                      var id3= arr[i].id;
                    //碰撞检测
                      if(r1<arr[i].left||b1<arr[i].top||l1>arr[i].right||t1>arr[i].bottom){

                          $(‘#‘+id3).css(‘background‘,‘red‘)
                          console.log(2);
                      }else {
                          $(‘#‘+id3).css(‘background‘,‘green‘);

                      //碰撞后,连接到一起
                        jsPlumb.connect({
                            source:uid,
                            target:arr[i].id,
                            scope:‘‘,
                            connector:[
                                ‘Straight‘,
                                {
                                    stub:[10,10],
                                    gap:0
                                }
                            ],
                            overlays:[
                                [‘Arrow‘,{width:10,height:10,location:0.9}],
                                [‘Label‘,{label:‘hello‘,location:0.5}]
                            ]
                        },common);

                        var lef = ui.offset.left+50;

                        //jsPlumb 动画,选项连接后自动分离开一段距离

                        jsPlumb.animate(uid,{left:lef},{duration:350,easing:‘easeOutBack‘});

                      }

                  }
              }


          }
        });
选项可以拖拽后,还要有放置的地儿,当然draggable里也可以,这里使用droppable;
$(‘#wrapper‘).droppable({

            drop:function(event,ui){

                var leng = $(‘#wrapper‘).children(‘.node‘).length+1;

                 var arr=[];

                var id = "dragNode"+leng;

                var id2 = ui.draggable[0].id;

                var left = parseInt(ui.offset.left-$(this).offset().left);
                var top = parseInt(ui.offset.top-$(this).offset().top);

                var width = ui.draggable[0].clientWidth;
                var height = ui.draggable[0].clientHeight;


                var len = $(this).children(‘.node‘).length;

            //判断容器内拖拽的是否重复
                if(!len){
                    $(this).append($(‘<div style="position:absolute;" class="node" id="‘+id+‘">‘+$(ui.helper).html()+‘</div>‘));
                    $(‘#‘+id).css(‘left‘,left).css(‘top‘,top);
                    $(‘#‘+id).css(‘width‘,width).css(‘height‘,height);

                    $(‘#‘+id).css(‘border‘,‘1px solid #000‘);
                }else {
                        $(this).children(‘.node‘).each(function(){
                             // console.log($(this).html());

                             arr.push($(this).html());

                        });


                        if(arr.indexOf($(ui.helper).html())>-1){
                            alert(‘已存在!‘);
                            return;
                        }else {
                            $(this).append($(‘<div style="position:absolute;" class="node" id="‘+id+‘">‘+$(ui.helper).html()+‘</div>‘));
                            $(‘#‘+id).css(‘left‘,left).css(‘top‘,top);
                            $(‘#‘+id).css(‘width‘,width).css(‘height‘,height);

                            $(‘#‘+id).css(‘border‘,‘1px solid #000‘);
                        }
                }


                arr.push(id2);

            //限制容器内选项的拖拽范围
                jsPlumb.draggable(id,{
                    containment:‘parent‘
                });

            //
                var connectorPaintStyle={
                    lineWidth:4,
                    strokeStyle:‘#61B7CF‘,
                    joinstyle:‘round‘,

                };
                var connectorHoverStyle = {
                    lineWidth:4,
                    strokeStyle:‘#216477‘,

                };
                var defaults = {
                    endpoint:[‘Dot‘,{radius:2}],
                    connectorStyle:connectorPaintStyle,
                    connectorHoverStyle:connectorHoverStyle,
                    paintStyle:{
                        strokeStyle:‘#1e8151‘,
                        fillStyle:‘transparent‘,
                        radius:2,
                        lineWidth:2,

                    },
                    isSource:true,
                    connector:[‘Flowchart‘,{stub:[40,60],gap:5,cornerRadius:5,alwaysRespectStubs:true}],
                    isTarget:true,
                    maxConnections:-1,
                    connectorOverlays:[
                        [‘Arrow‘,{width:10,length:10,location:1}],
                        [‘Label‘,{label:‘yes‘,width:10,height:10}]
                        ]
                };

                //在添加连接点
                jsPlumb.addEndpoint(id,{anchors:‘TopCenter‘},defaults);
                jsPlumb.addEndpoint(id,{anchors:‘BottomCenter‘},defaults);
                jsPlumb.addEndpoint(id,{anchors:‘RightMiddle‘},defaults);
                jsPlumb.addEndpoint(id,{anchors:‘LeftMiddle‘},defaults);


            }

        });
利用jsplumb与碰撞检测,自动生成流程图的过程基本就这样了。
标签:生成 nec wrapper ons wrap 判断 碰撞检测 z-index 一个
原文地址:http://www.cnblogs.com/xiaoshudian/p/7852966.html