标签:image version 技术 应用 状态 opengl es 常用 nta lis
Android性能优化方面也有很多文章了,这里就做一个总结,从原理到方法,工具等做一个简单的了解,从而可以慢慢地改变编码风格,从而提高性能。
既然和布局相关,那么我们需要了解Android系统是如何处理UI组件的更新操作的。
1、Android需要把XML布局文件转换成GPU能够识别并绘制的对象。这个操作是在DisplayList的帮助下完成的。DisplayList持有所有将要交给GPU绘制到屏幕上的数据信息。
2、CPU负责把UI组件计算成Polygons,Texture纹理,然后交给GPU进行栅格化渲染。
3、GPU进行栅格化渲染。
4、硬件展示在屏幕上。
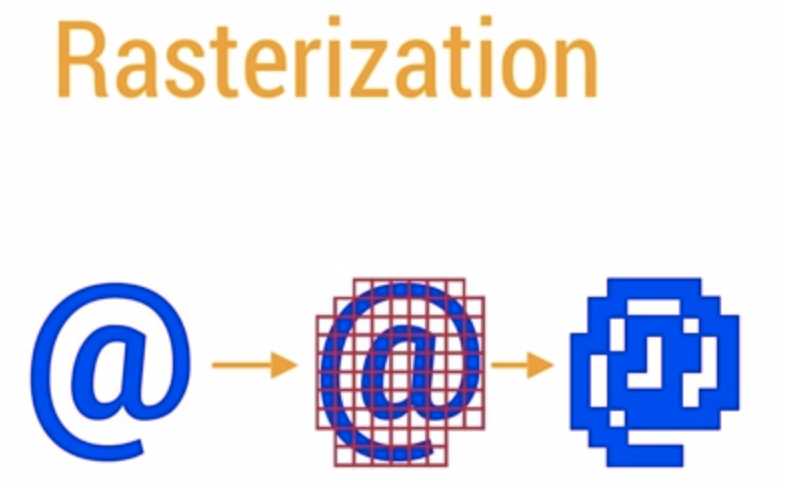
那么什么是栅格化呢?Resterization栅格化是绘制那些Button,Shape,Path,String,Bitmap等组件最基础的操作,它把那些组件拆分到不同的像素上进行显示,如上图所示,手机的屏幕其实都是有一个一个小格子组成的图片,而当这些小格子非常非常小的时候,那么就看起来像上图第一个@中所示一样了。这是一个很费时的操作,因此这也是为什么要引入GPU原因。
每次从CPU转移到GPU是一件很麻烦的事情,所幸的是OpenGL ES可以把那些需要渲染的文理Hold在GPU的Memory里面,在下次需要渲染的时候直接进行操作。Android里面那些由主题所提供的资源,例如Bitmap,Drawables都是一起打包到统一的Texture文理当中, 然后再传递到GPU里面,这意味着每次你需要使用这些资源的时候,都是直接从文理里面进行获取渲染的。当然随着UI组件的越来越丰富,有了更多演变的形态。例如显示图片的时候,需要先经过CPU的计算加载到内存中,然后传递到GPU进行渲染。文字的显示更加复杂,需要先经过CPU换算成纹理,然后再交给GPU进行渲染,回到CPU绘制单个字符的时候,再重新引用经过GPU渲染的内容。动画则是一个更加复杂的流程。
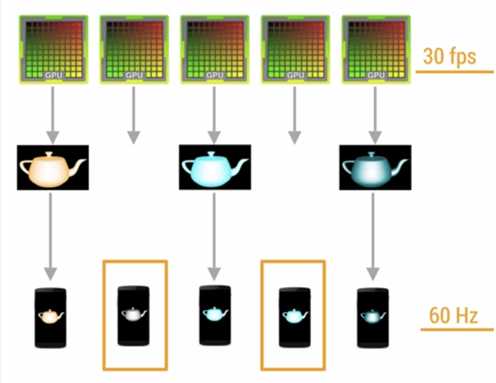
为了能够使得APP流畅,我们需要在每一帧16ms以内完成所有的CPU与GPU计算,绘制,渲染等等操作。也就是帧率为60fps,为什么帧率要为60fps呢,因为人眼与大脑之间的协作无法感知超过60fps的画面更新。开发app的性能目标就是保持60fps,这意味着每一帧你只有16ms=1000/60的时间来处理所有的任务。这里需要了解下刷新率和帧率:
Refresh Rate:代表了屏幕在一秒内刷新屏幕的次数,这取决于硬件的固定参数,例如60HZ。
Frame Rate:代表了GPU在一秒内挥之操作的帧数,例如30fps,60fps。
此外这里引入了VSYNC的机制,Android就是通过VSYNC信号来同步UI绘制和动画,使得它们可以获得一个达到60fps的固定的帧率。GPU会获取图形数据进行渲染,然后硬件负责把渲染后的内容呈现到屏幕上,他们两者不停地进行协作。不幸的是,刷新频率和帧率并不是总能保持相同的节奏。如果发生帧率与刷新频率不一致的情况,就会容易出现显示内容发生断裂,重叠。
帧率超过刷新率只是理想的状况,在超过60fps的情况下,GPU所产生的帧数据会因为等待VSYNC的刷新信息而被Hold住,这样能够保持每次刷新都有实际的新的数据可以显示。
但是我们遇到更多的情况是帧率小于刷新频率。在这种情况下,某些帧显示的画面内容就会与上一帧的画面相同。糟糕的事情是,帧率从超过60fps突然掉到60fps以下,这样就会发生LAG,JANK,HITCHING等卡顿停顿的不顺滑的情况,这也是用户感受不好的原因所在。
在某个View第一次需要被渲染时,DisplayList会因此而被创建,当这个View要显示到屏幕上时,我们会执行GPU的绘制指令来进行渲染。如果你在后续有执行类似移动这个view的位置等操作而需要再次渲染这个View时,我们就仅仅需要额外操作一次渲染指令就够了。然而如果修改了View中的某些可见组件,那么之前的DisplayList就无法继续使用了,我们需要回头重新创建一个DisplayList并且重新执行渲染指令并更新到屏幕上。
需要注意的是:任何时候View中的绘制内容发生变化时,都会重新执行创建DisplayList,渲染DisplayList,更新到屏幕上等一系列操作。这个流程的表现性能取决于View的复杂程度,View的状态变化以及渲染管道的执行性能。
所以我们需要尽量减少Overdraw。
Overdraw(过度绘制):描述的是屏幕上的某个像素在同一帧的时间内被绘制了多次。在多层次的UI结构里面,如果不可见的UI也在做绘制的操作,就会导致某些像素区域被绘制了多次,浪费大量的CPU以及GPU资源。(可以通过开发者选项,打开Show GPU Overdraw的选项,观察UI上的Overdraw情况)。
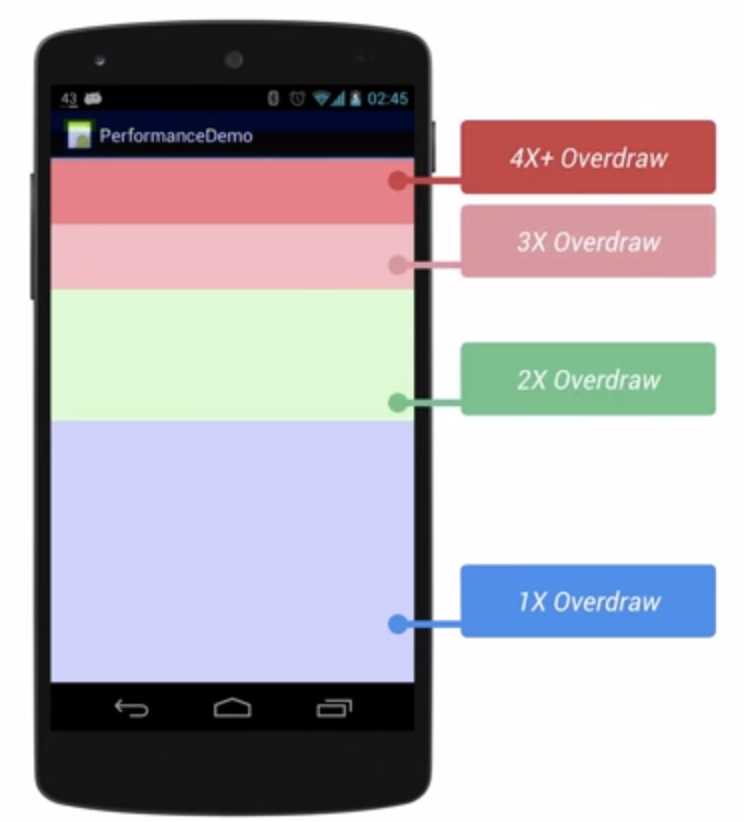
蓝色、淡绿、淡红,深红代表了4种不同程度的Overdraw的情况,我们的目标就是尽量减少红色Overdraw,看到更多的蓝色区域。
综上,布局的优化其实说白了就是减少层级,越简单越好,减少overdraw,就能更好的突出性能。
下面介绍几种布局优化的方式:
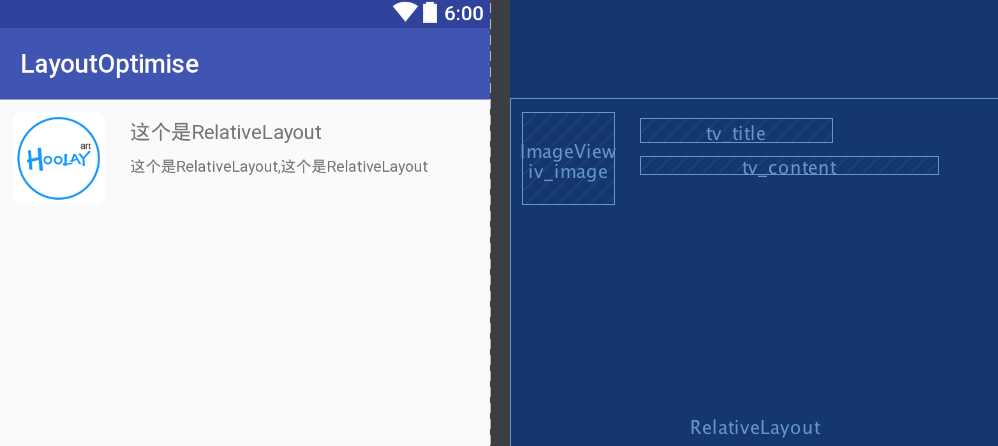
在RelativeLayout和LinearLayout同时能够满足需求时,尽量使用RelativeLayout,这一点可以从我们MainActivity默认布局就可以看出,默认是RelativeLayout,因为可以通过扁平的RelativeLayout降低LinearLayout嵌套所产生布局树的层级。
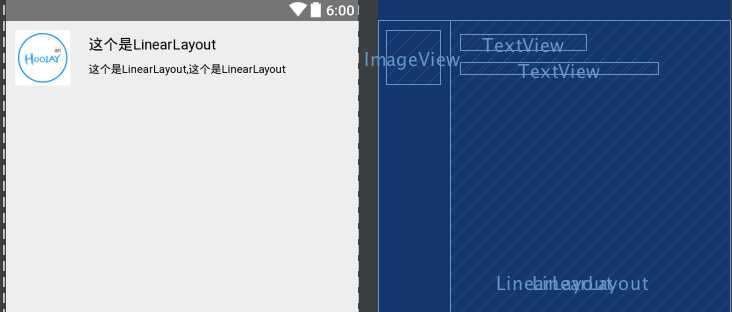
Android提供了几种方便的布局管理器,大多数时候,你只需要这些布局的一部分基本特性去实现UI。 一般情况下用LinearLayout的时候总会比RelativeLayout多一个View的层级。而每次往应用里面增加一个View,或者增加一个布局管理器的时候,都会增加运行时对系统的消耗,因此这样就会导致界面初始化、布局、绘制的过程变慢。还是举个例子吧,先看一下布局图。
首先用LinearLayout方式来实现:
|
1
|
<?xml version="1.0" encoding="utf-8"?> |
|
1
2
3
4
5
6
7
8
9
10
11
12
13
14
15
16
17
18
19
20
21
22
23
24
25
26
27
28
29
30
31
32
33
|
<LinearLayout xmlns:android="http://schemas.android.com/apk/res/android" android:layout_width="match_parent" android:layout_height="match_parent"> <ImageView android:layout_width="wrap_content" android:layout_height="wrap_content" android:layout_margin="10dp" android:src="@mipmap/ic_launcher" /> <LinearLayout android:layout_width="match_parent" android:layout_height="match_parent" android:orientation="vertical"> <TextView android:layout_width="wrap_content" android:layout_height="wrap_content" android:layout_marginLeft="10dp" android:layout_marginTop="16dp" android:text="这个是LinearLayout" android:textSize="16sp" /> <TextView android:layout_width="wrap_content" android:layout_height="wrap_content" android:layout_marginLeft="10dp" android:layout_marginTop="10dp" android:text="这个是LinearLayout,这个是LinearLayout" android:textSize="12sp" /> </LinearLayout></LinearLayout> |
接着是RelativeLayout方式:
|
1
2
3
4
5
6
7
8
9
10
11
12
13
14
15
16
17
18
19
20
21
22
23
24
25
26
27
28
29
30
31
32
33
34
|
<?xml version="1.0" encoding="utf-8"?><RelativeLayout xmlns:android="http://schemas.android.com/apk/res/android" android:layout_width="match_parent" android:layout_height="match_parent"> <ImageView android:id="@+id/iv_image" android:layout_width="wrap_content" android:layout_height="wrap_content" android:layout_margin="10dp" android:src="@mipmap/ic_launcher" /> <TextView android:id="@+id/tv_title" android:layout_width="wrap_content" android:layout_height="wrap_content" android:layout_marginLeft="10dp" android:layout_marginTop="16dp" android:layout_toRightOf="@+id/iv_image" android:text="这个是LinearLayout" android:textSize="16sp" /> <TextView android:id="@+id/tv_content" android:layout_width="wrap_content" android:layout_height="wrap_content" android:layout_below="@+id/tv_title" android:layout_marginLeft="10dp" android:layout_marginTop="10dp" android:layout_toRightOf="@+id/iv_image" android:text="这个是LinearLayout,这个是LinearLayout" android:textSize="12sp" /></RelativeLayout> |
很明显Relativelayout的层级比linearlayout的层级少了一层,这个界面比较简单,但是如果界面很复杂的情况下,那么怎么来优化或者看到一目了然的层级树呢?别担心,Android自带了工具,下面就介绍下Hierarchy View的简单使用吧。
为了考虑安全问题,真机上不好尝试,虽然也有办法可以解决,但是现在模拟器还是挺快的,也不用折腾那么多了,就可以直接用模拟器来实现好了,接着模拟器运行app,打开需要获取view层级的那个界面。
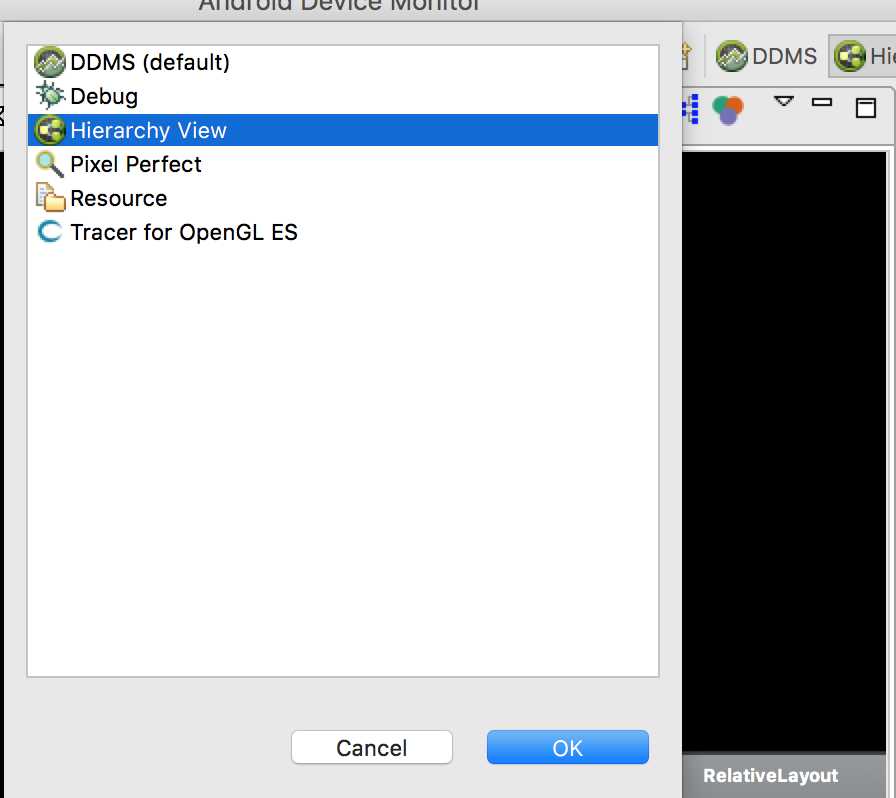
然后依次点击菜单Tools -> Android -> Android Device Monitor。

打开Android Device Monitor后,选中Hierarchy View,然后通过Hierarchy View来获取当前的View的分级图。
接着我们就可以来看一下两个分级的不同了。这里主要截取两个不同的地方:
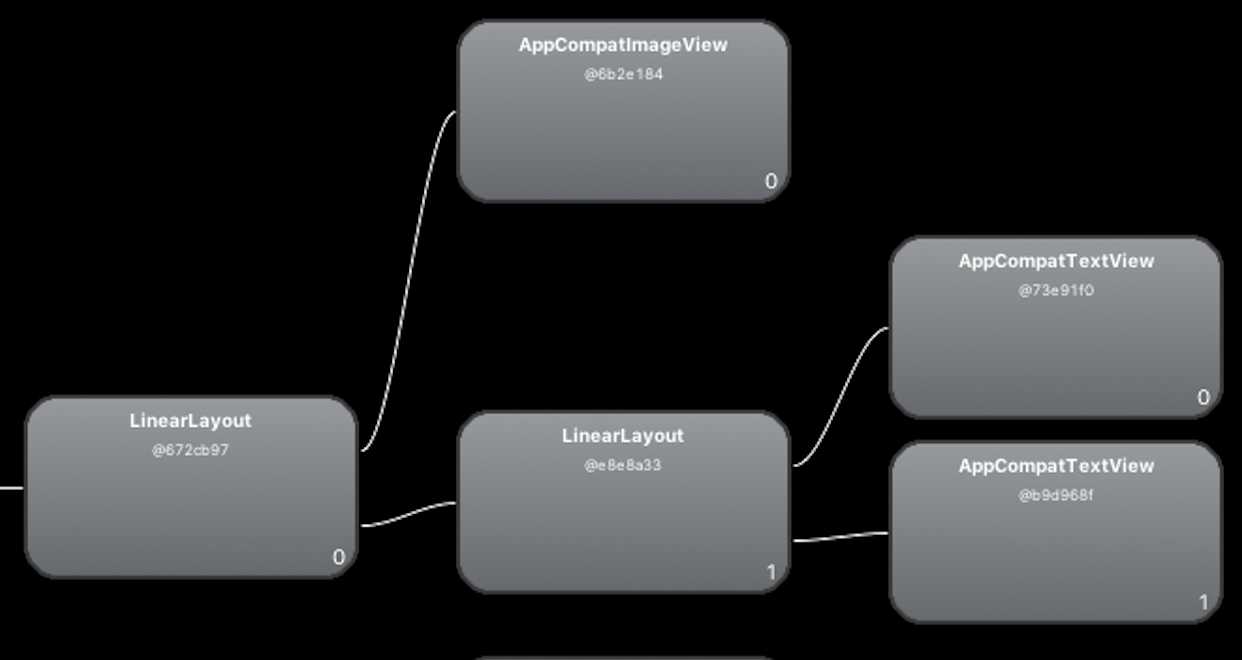
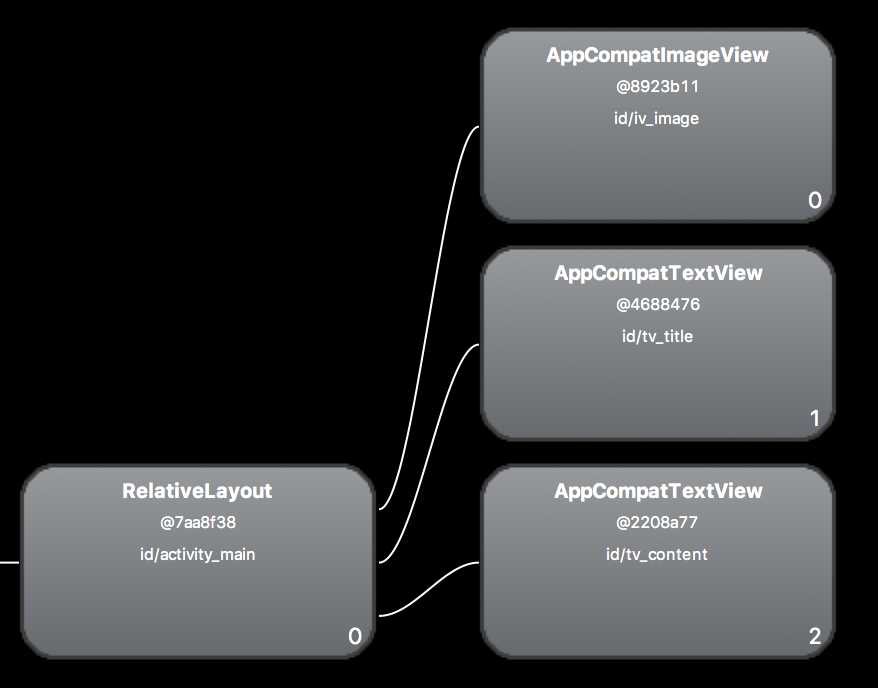
首先是LinearLayout:
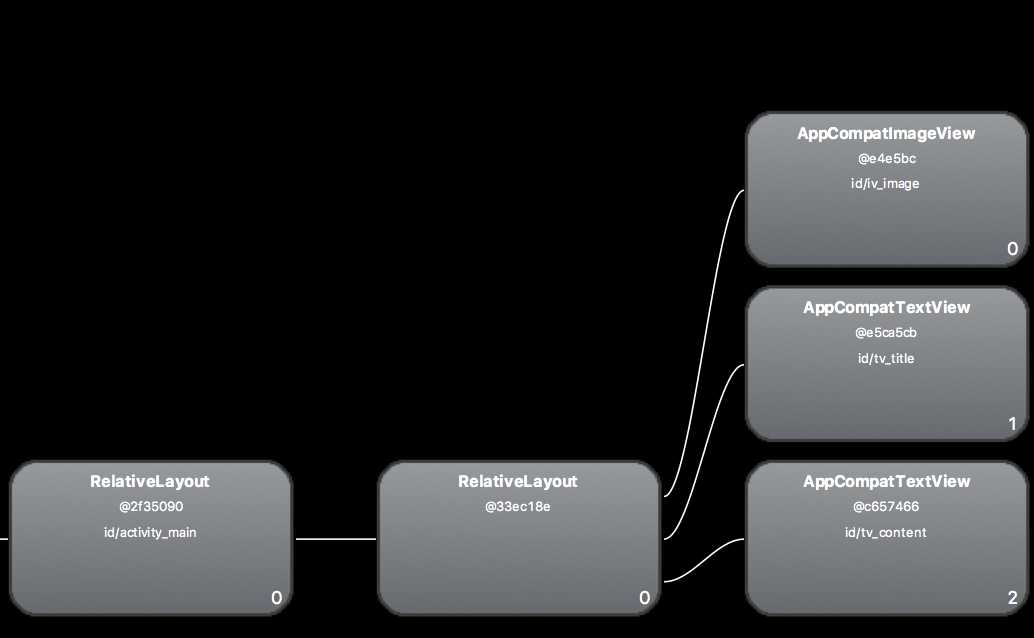
接着是RelativeLayout:
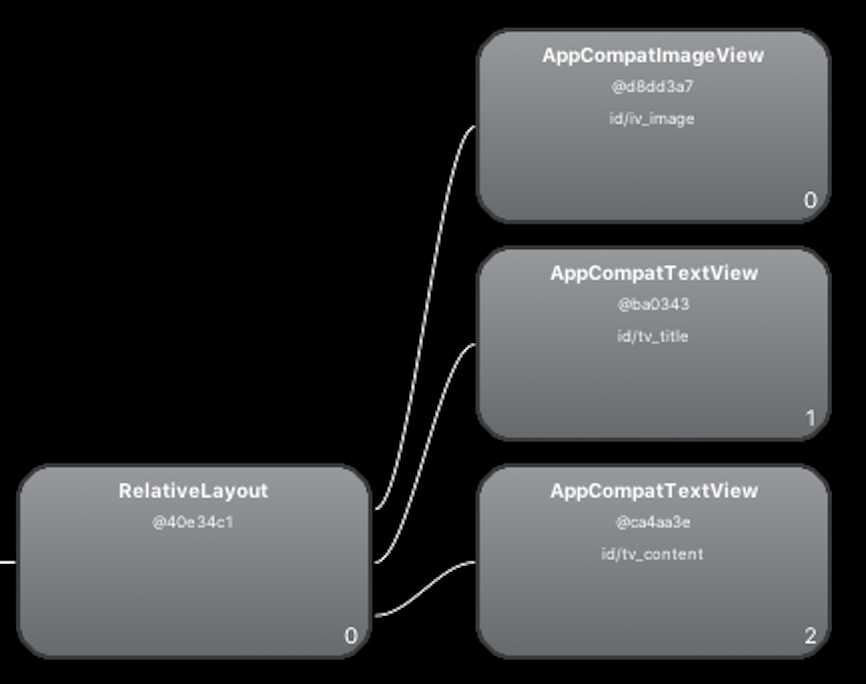
很明显的可以看出来RelativeLayout比LinearLayout少了一个层级,当然渲染的时间也是大大减少了。
include标签常用于将布局中的公共部分提取出来,比如我们要在activity_main.xml中需要上述LinearLayout的数据,那么就可以直接include进去了。
|
1
2
3
4
5
6
7
8
9
10
11
12
13
14
15
|
<?xml version="1.0" encoding="utf-8"?><RelativeLayout xmlns:android="http://schemas.android.com/apk/res/android" xmlns:tools="http://schemas.android.com/tools" android:id="@+id/activity_main" android:layout_width="match_parent" android:layout_height="match_parent" android:paddingBottom="@dimen/activity_vertical_margin" android:paddingLeft="@dimen/activity_horizontal_margin" android:paddingRight="@dimen/activity_horizontal_margin" android:paddingTop="@dimen/activity_vertical_margin" tools:context="com.jared.layoutoptimise.MainActivity"> <include layout="@layout/item_test_linear_layout" /> </RelativeLayout> |
merge标签是作为include标签的一种辅助扩展来使用,它的主要作用是为了防止在引用布局文件时产生多余的布局嵌套。
Android渲染需要消耗时间,布局越复杂,性能就越差。如上述include标签引入了之前的LinearLayout之后导致了界面多了一个层级。
这个时候用merge的话,就可以减少一个层级了,代码如下:
|
1
2
3
4
5
6
7
8
9
10
11
12
13
14
15
16
17
18
19
20
21
22
23
24
25
26
27
28
29
30
31
32
33
34
|
<?xml version="1.0" encoding="utf-8"?><merge xmlns:android="http://schemas.android.com/apk/res/android" android:layout_width="match_parent" android:layout_height="match_parent"> <ImageView android:id="@+id/iv_image" android:layout_width="wrap_content" android:layout_height="wrap_content" android:layout_margin="10dp" android:src="@mipmap/ic_launcher" /> <TextView android:id="@+id/tv_title" android:layout_width="wrap_content" android:layout_height="wrap_content" android:layout_marginLeft="10dp" android:layout_marginTop="16dp" android:layout_toRightOf="@+id/iv_image" android:text="这个是MergeLayout" android:textSize="16sp" /> <TextView android:id="@+id/tv_content" android:layout_width="wrap_content" android:layout_height="wrap_content" android:layout_below="@+id/tv_title" android:layout_marginLeft="10dp" android:layout_marginTop="10dp" android:layout_toRightOf="@+id/iv_image" android:text="这个是MergeLayout,这个是MergeLayout" android:textSize="12sp" /></merge> |
activity_main就可以直接include了。
|
1
2
3
4
5
6
7
8
9
10
11
12
13
14
|
<RelativeLayout xmlns:android="http://schemas.android.com/apk/res/android" xmlns:tools="http://schemas.android.com/tools" android:id="@+id/activity_main" android:layout_width="match_parent" android:layout_height="match_parent" android:paddingBottom="@dimen/activity_vertical_margin" android:paddingLeft="@dimen/activity_horizontal_margin" android:paddingRight="@dimen/activity_horizontal_margin" android:paddingTop="@dimen/activity_vertical_margin" tools:context="com.jared.layoutoptimise.MainActivity"> <include layout="@layout/item_merge_layout" /></RelativeLayout> |
然后看下层级:
 2.3、viewstub标签:
viewstub是view的子类。他是一个轻量级View, 隐藏的,没有尺寸的View。他可以用来在程序运行时简单的填充布局文件。接着简单试用下viewstub吧。首先修改activity_main.xml文件如下:
|
1
2
3
4
5
6
7
8
9
10
11
12
13
14
15
16
17
18
19
20
21
22
23
24
25
26
27
28
29
30
31
32
33
34
35
36
37
38
39
40
41
42
43
44
45
|
<?xml version="1.0" encoding="utf-8"?><RelativeLayout xmlns:android="http://schemas.android.com/apk/res/android" xmlns:tools="http://schemas.android.com/tools" android:id="@+id/activity_main" android:layout_width="match_parent" android:layout_height="match_parent" android:paddingBottom="@dimen/activity_vertical_margin" android:paddingLeft="@dimen/activity_horizontal_margin" android:paddingRight="@dimen/activity_horizontal_margin" android:paddingTop="@dimen/activity_vertical_margin" tools:context="com.jared.layoutoptimise.MainActivity"> <include android:id="@+id/layout_merge" layout="@layout/item_merge_layout" /> <Button android:id="@+id/btn_view_show" android:layout_width="wrap_content" android:layout_height="wrap_content" android:layout_marginTop="10dp" android:text="显示ViewStub" android:textAllCaps="false" android:layout_below="@+id/tv_content"/> <Button android:id="@+id/btn_view_hide" android:layout_width="wrap_content" android:layout_height="wrap_content" android:layout_marginTop="10dp" android:layout_marginLeft="50dp" android:layout_toRightOf="@+id/btn_view_show" android:text="隐藏ViewStub" android:textAllCaps="false" android:layout_below="@+id/tv_content"/> <ViewStub android:id="@+id/vs_test" android:layout_width="match_parent" android:layout_height="match_parent" android:layout="@layout/item_test_linear_layout" android:layout_below="@+id/btn_view_show" android:layout_marginTop="10dp" /></RelativeLayout> |
这里的ViewStub控件的layout指定为item_test_linear_layout。当点击button隐藏的时候不会显示item_test_linear_layout,而点击button显示的时候就会用item_test_linear_layout替代ViewStub。
ConstraintLayout允许你在不适用任何嵌套的情况下创建大型而又复杂的布局。它与RelativeLayout非常相似,所有的view都依赖于兄弟控件和父控件的相对关系。但是,ConstraintLayout比RelativeLayout更加灵活,目前在AndroidStudio中使用也十分方便,就和以前的拖拉控件十分相似。那么怎么使用呢?
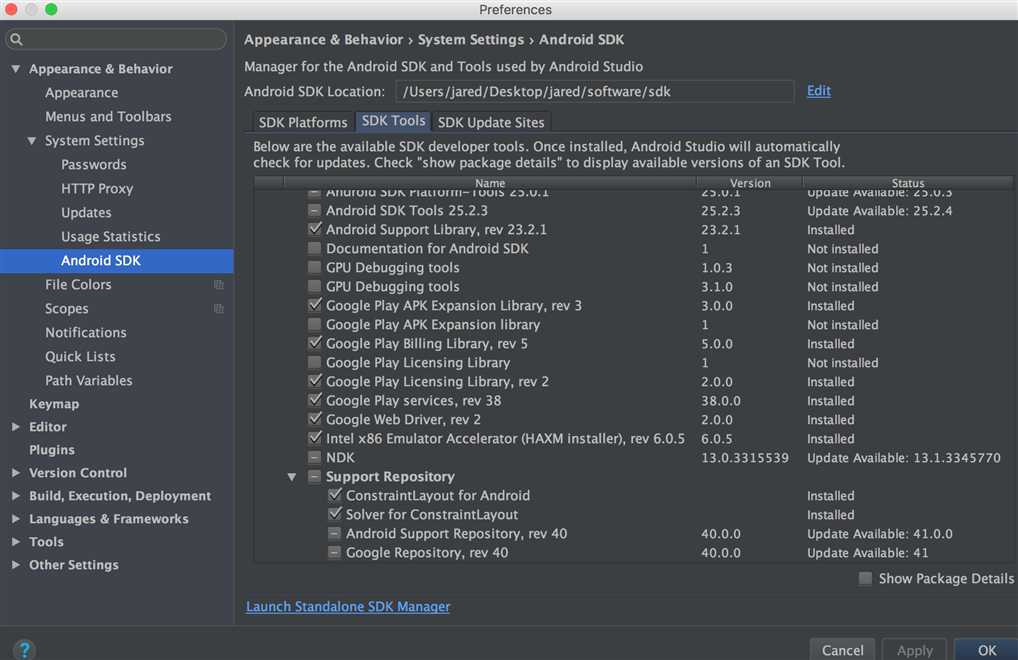
首先是安装Constaintlayout了。Android SDK -> SDK Tools -> Support Repository中的ConstrainLayout for Android和Solver for ConstaintLayout。
然后build.gradle中添加:
|
1
|
compile ‘com.android.support.constraint:constraint-layout:1.0.0-beta4‘ |
然后同步下就可以正常使用ConstaintLayout了。
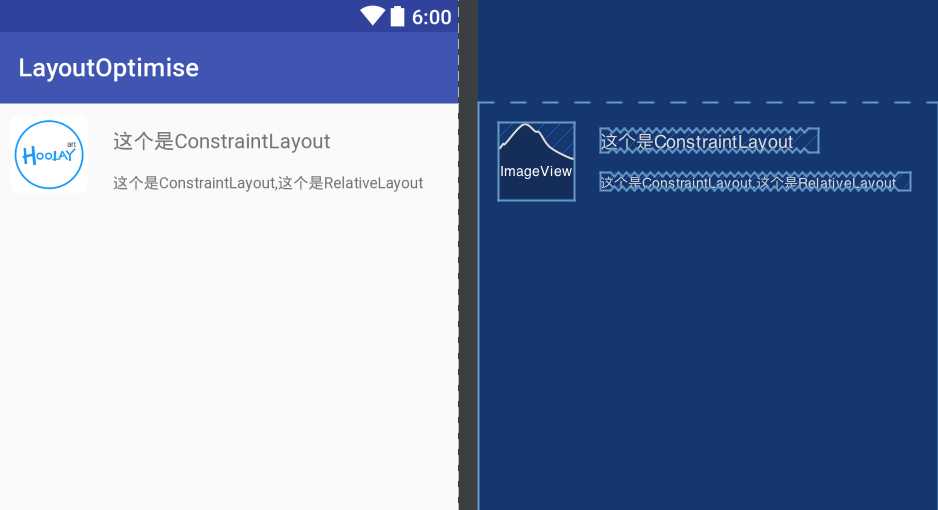
接着我们来实现上述的布局文件,首先把布局按照constraintLayout的方式来布。效果如下,其实很像ios的布局,具体怎么用的就不一一介绍了:
看下代码是怎样的:
|
1
2
3
4
5
6
7
8
9
10
11
12
13
14
15
16
17
18
19
20
21
22
23
24
25
26
27
28
29
30
31
32
33
34
35
36
37
38
39
40
41
42
43
44
45
46
47
|
<?xml version="1.0" encoding="utf-8"?><android.support.constraint.ConstraintLayout xmlns:android="http://schemas.android.com/apk/res/android" xmlns:app="http://schemas.android.com/apk/res-auto" xmlns:tools="http://schemas.android.com/tools" android:id="@+id/lay_root" android:layout_width="match_parent" android:layout_height="match_parent"> <ImageView android:id="@+id/iv_image" android:layout_width="wrap_content" android:layout_height="wrap_content" android:layout_margin="10dp" android:src="@mipmap/ic_launcher" android:layout_marginStart="16dp" app:layout_constraintLeft_toLeftOf="parent" android:layout_marginLeft="16dp" android:layout_marginTop="16dp" app:layout_constraintTop_toTopOf="parent" /> <TextView android:id="@+id/tv_title" android:layout_width="0dp" android:layout_height="wrap_content" android:layout_toRightOf="@+id/iv_image" android:text="这个是ConstraintLayout" android:textSize="16sp" app:layout_constraintLeft_toRightOf="@+id/iv_image" android:layout_marginStart="20dp" android:layout_marginLeft="20dp" android:layout_marginTop="20dp" app:layout_constraintTop_toTopOf="parent" /> <TextView android:id="@+id/tv_content" android:layout_width="0dp" android:layout_height="wrap_content" android:layout_below="@+id/tv_title" android:layout_toRightOf="@+id/iv_image" android:text="这个是ConstraintLayout,这个是RelativeLayout" android:textSize="12sp" app:layout_constraintTop_toBottomOf="@+id/tv_title" android:layout_marginTop="16dp" app:layout_constraintLeft_toLeftOf="@+id/tv_title" /></android.support.constraint.ConstraintLayout> |
最后运行之后看下布局的层级如下:
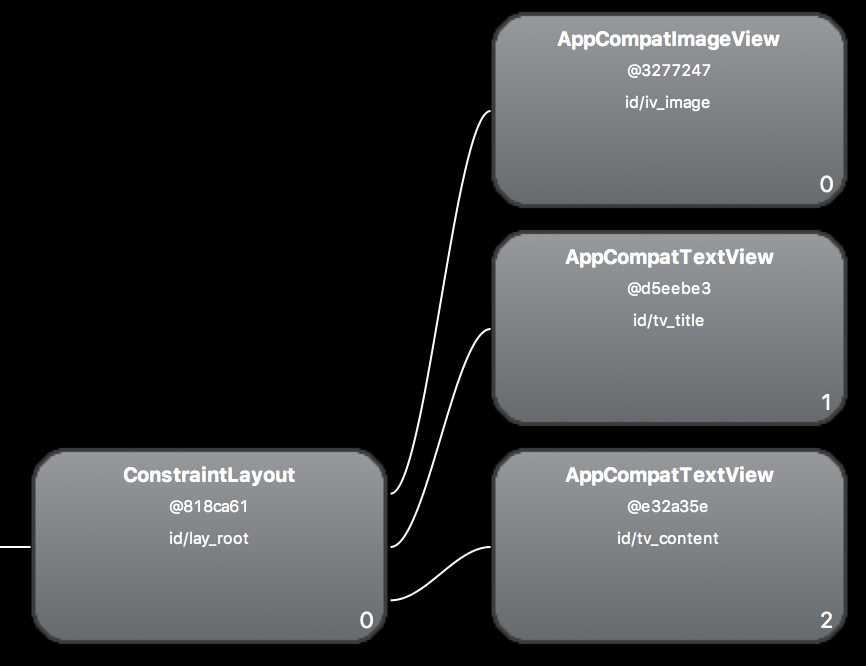
这个是简单的布局,如果是复杂的布局的话,那用Constaintlayout的话最多就两个层级了,不像Relative和Linear一样一层嵌套一层的。
一些Lint规则如下:
1、使用组合控件: 包含了一个ImageView以及一个TextView控件的LinearLayout如果能够作为一个组合控件将会被更有效的处理。
2、合并作为根节点的帧布局(Framelayout) :如果一个帧布局时布局文件中的根节点,而且它没有背景图片或者padding等,更有效的方式是使用merge标签替换该Framelayout标签 。
3、无用的叶子节点:通常来说如果一个布局控件没有子视图或者背景图片,那么该布局控件时可以被移除(由于它处于 invisible状态)。
4、无用的父节点 :如果一个父视图即有子视图,但没有兄弟视图节点,该视图不是ScrollView控件或者根节点,并且它没有背景图片,也是可以被移除的,移除之后,该父视图的所有子视图都直接迁移至之前父视图的布局层次。同样能够使解析布局以及布局层次更有效。
5、过深的布局层次:内嵌过多的布局总是低效率地。考虑使用一些扁平的布局控件,例如 RelativeLayout、GridLayout ,来改善布局过程。默认最大的布局深度为10 。
标签:image version 技术 应用 状态 opengl es 常用 nta lis
原文地址:http://www.cnblogs.com/senior-engineer/p/7868031.html