标签:style blog http color io os 使用 java ar
Struts2 + Spring + Hibernate整合。
使用的是无配置方法进行SSH的整合,struts-convertion plugin + spring annotation + hibernate annotation方式,无配置快速开发。
示例
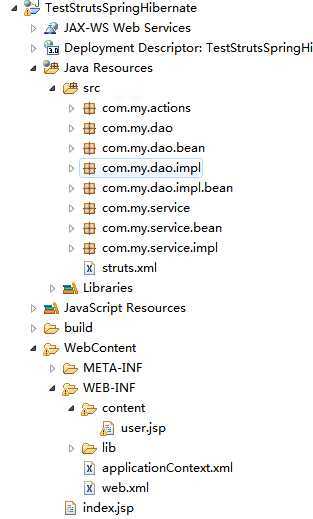
项目结构:

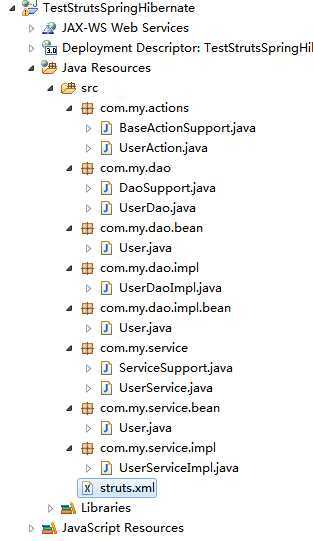
src源码结构:

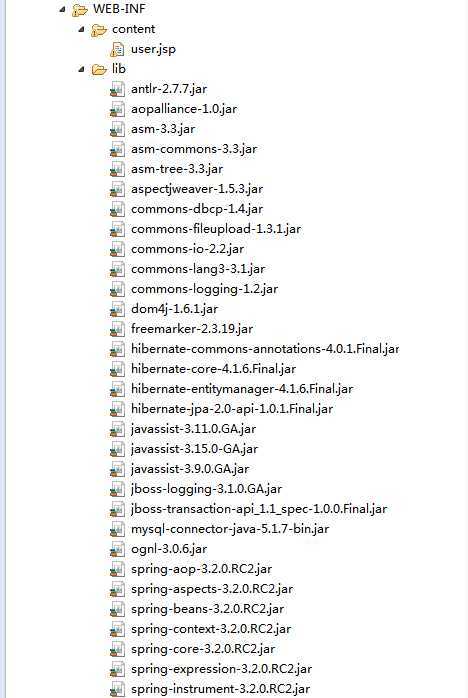
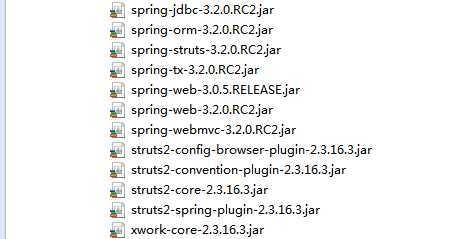
WEB-INF\lib目录需要加入的jar包有:


1、将struts.xml加入到src目录当中:
<?xml version="1.0" encoding="UTF-8"?>
<!DOCTYPE struts PUBLIC
    "-//Apache Software Foundation//DTD Struts Configuration 2.3//EN"
    "http://struts.apache.org/dtds/struts-2.3.dtd">

<struts>
    <!-- 使用Spring整合Struts -->
    <constant name="struts.objectFactory" value="spring" />
    <!-- 把它设置为开发模式,发布时要设置为false -->
    <constant name="struts.devMode" value="true" />
    <!-- 设置在class被修改时是否热加载,发布时要设置为false -->
    <constant name="struts.convention.classes.reload" value="true"/>
    <!-- 自动动态方法的调用,使用这个设置后可以这样调用:action!method -->
    <constant name="struts.enable.DynamicMethodInvocation" value="true" />
    <!-- 指定jsp文件所在的目录地址 -->
    <constant name="struts.convention.result.path" value="/WEB-INF/content/" />
    <!-- 使用struts-default默认的转换器,如果是rest的使用:rest-default,rest需要rest的jar插件 -->
    <constant name="struts.convention.default.parent.package" value="struts-default"/>
    <!-- 用于配置包名后缀。默认为action、actions、struts-->
    <constant name="struts.convention.package.locators" value="actions" />
    <!-- 用于配置类名后缀,默认为Action,设置后,Struts2只会去找这种后缀名的类做映射 -->
    <constant name="struts.convention.action.suffix" value="Action"/>
    <!-- 设置即使没有@Action注释,依然创建Action映射。默认值是false。因为Convention-Plugin是约定优于配置的风格,
        可以不通过注解根据预先的定义就能访问相应Action中的方法 -->
    <constant name="struts.convention.action.mapAllMatches" value="true"/>
    <!-- 自定义jsp文件命名的分隔符 -->
    <constant name="struts.convention.action.name.separator" value="-" />
    <!-- 国际化资源文件名称 -->
    <constant name="struts.custom.i18n.resources" value="i18n" />
    <!-- 是否自动加载国际化资源文件  -->
    <constant name="struts.i18n.reload" value="true" />
    <!-- 浏览器是否缓存静态内容 -->
    <constant name="struts.serve.static.browserCache" value="false" />
     <!-- 上传文件大小限制设置 -->
    <constant name="struts.multipart.maxSize" value="-1" />
    <!-- 主题,将值设置为simple,即不使用UI模板。这将不会生成额外的html标签 -->
    <constant name="struts.ui.theme" value="simple" />
    <!-- 编码格式 -->
    <constant name="struts.i18n.encoding" value="UTF-8" />

</struts>
使用SSH的struts.xml配置关键的一步是加入这一句:
<constant name="struts.objectFactory" value="spring" />
这里使用的是struts的convention插件,这样不需要手动写struts的配置。
2、在WEB-INF目录下新增一个xml:applicationContext.xml
<?xml version="1.0" encoding="UTF-8"?>
<beans xmlns="http://www.springframework.org/schema/beans"
             xmlns:xsi="http://www.w3.org/2001/XMLSchema-instance"
             xmlns:context="http://www.springframework.org/schema/context"
             xmlns:aop="http://www.springframework.org/schema/aop"
             xmlns:tx="http://www.springframework.org/schema/tx"
             xsi:schemaLocation="http://www.springframework.org/schema/beans
                     http://www.springframework.org/schema/beans/spring-beans-2.5.xsd
                     http://www.springframework.org/schema/context http://www.springframework.org/schema/context/spring-context-2.5.xsd
                     http://www.springframework.org/schema/aop http://www.springframework.org/schema/aop/spring-aop-2.5.xsd
                     http://www.springframework.org/schema/tx http://www.springframework.org/schema/tx/spring-tx-2.5.xsd">

    <bean id="dataSource" class="org.springframework.jdbc.datasource.DriverManagerDataSource">
        <property name="driverClassName" value="com.mysql.jdbc.Driver" />
        <property name="url" value="jdbc:mysql://127.0.0.1/test" />
        <property name="username" value="root" />
        <property name="password" value="root" />
    </bean>

    <bean id="sessionFactory" class="org.springframework.orm.hibernate4.LocalSessionFactoryBean">
        <property name="dataSource" ref="dataSource" />
        <property name="packagesToScan">
            <list>
                <value>com.my.dao.impl</value>
            </list>
        </property>
        <property name="hibernateProperties">
            <value>
                hibernate.dialect=org.hibernate.dialect.MySQL5Dialect
                hibernate.hbm2ddl.auto=update
                hibernate.show_sql=true
                hibernate.format_sql=false
                hibernate.cache.use_second_level_cache=true
                hibernate.cache.use_query_cache=false
                hibernate.cache.provider_class=org.hibernate.cache.internal.NoCacheProvider
                hibernate.current_session_context_class= org.springframework.orm.hibernate4.SpringSessionContext
            </value>
        </property>
    </bean>
    <bean id="txManager" class="org.springframework.orm.hibernate4.HibernateTransactionManager">
        <property name="sessionFactory" ref="sessionFactory" />
    </bean>

    <context:component-scan base-package="com.my" />

    <tx:annotation-driven transaction-manager="txManager" />
    <tx:advice id="txAdvice" transaction-manager="txManager">
        <tx:attributes>
            <tx:method name="*" read-only="true"/>
            <tx:method name="add*" propagation="REQUIRED" rollback-for="Exception"/>
            <tx:method name="create*" propagation="REQUIRED" rollback-for="Exception"/>
            <tx:method name="insert*" propagation="REQUIRED" rollback-for="Exception"/>
            <tx:method name="update*" propagation="REQUIRED" rollback-for="Exception"/>
            <tx:method name="delete*" propagation="REQUIRED" rollback-for="Exception"/>
            <tx:method name="remove*" propagation="REQUIRED" rollback-for="Exception"/>
        </tx:attributes>
    </tx:advice>

    <aop:config>
      <aop:pointcut id="allServiceMethods" expression="execution(* com.my.service.*.*(..))"/>
      <aop:advisor advice-ref="txAdvice" pointcut-ref="allServiceMethods"/>
    </aop:config>

</beans>
这个spring的xml配置主要是设置spring与hibernate的关联。
3、web.xml设置
<?xml version="1.0" encoding="UTF-8"?>
<web-app xmlns:xsi="http://www.w3.org/2001/XMLSchema-instance" xmlns="http://java.sun.com/xml/ns/javaee" xsi:schemaLocation="http://java.sun.com/xml/ns/javaee http://java.sun.com/xml/ns/javaee/web-app_3_0.xsd" id="WebApp_ID" version="3.0">
    <display-name>TestStrutsSpringHibernate</display-name>
    <welcome-file-list>
        <welcome-file>index.jsp</welcome-file>
    </welcome-file-list>

    <!-- 使用ContextLoaderListener初始化Spring容器 -->
    <listener>
        <listener-class>org.springframework.web.context.ContextLoaderListener</listener-class>
    </listener>
    <!-- 定义Struts 2的FilterDispathcer的Filter -->
    <filter>
        <filter-name>struts2</filter-name>
        <filter-class>org.apache.struts2.dispatcher.ng.filter.StrutsPrepareAndExecuteFilter</filter-class>
    </filter>
    <!-- FilterDispatcher用来初始化Struts 2并且处理所有的WEB请求。 -->
    <filter-mapping>
        <filter-name>struts2</filter-name>
        <url-pattern>/*</url-pattern>
        <dispatcher>REQUEST</dispatcher>
        <dispatcher>FORWARD</dispatcher>
        <dispatcher>INCLUDE</dispatcher>
        <dispatcher>ERROR</dispatcher>
    </filter-mapping>
</web-app>
在filter-mapping中有四个dispatcher,这是用于jsp的内容转发使用的。
4、/index.jsp
<%@ page language="java" contentType="text/html; charset=UTF-8"
    pageEncoding="UTF-8"%>
<!DOCTYPE html PUBLIC "-//W3C//DTD HTML 4.01 Transitional//EN" "http://www.w3.org/TR/html4/loose.dtd">
<html>
<head>
<meta http-equiv="Content-Type" content="text/html; charset=UTF-8">
<title>Index</title>
</head>
<body>
    <jsp:forward page="user"></jsp:forward>
</body>
</html>
注意上面的<jsp:forward />,如果第3步中没有设置filter-mapping的<dispatcher>FORWARD</dispatcher>,那这里功能会失效抛异常。
5、源码
package:com.my.dao
下面有两个类:DaoSupport(抽象DAO主类)和UserDao(接口)
package com.my.dao;

import javax.annotation.Resource;

import org.hibernate.SessionFactory;
import org.springframework.stereotype.Repository;

@Repository
public abstract class DaoSupport {
    @Resource
    private SessionFactory sessionFactory;

    public SessionFactory getSessionFactory() {
        return sessionFactory;
    }

    public void setSessionFactory(SessionFactory sessionFactory) {
        this.sessionFactory = sessionFactory;
    }
}
package com.my.dao;

import java.util.List;

import com.my.dao.bean.User;

public interface UserDao {
    /*
     * get all users
     */
    public List<User> findUsers();
}
以及对应的DAO bean:
package com.my.dao.bean;

public class User {
    public long id;
    public String name;

    public long getId() {
        return id;
    }
    public void setId(long id) {
        this.id = id;
    }
    public String getName() {
        return name;
    }
    public void setName(String name) {
        this.name = name;
    }
}
UserDao接口的实现类:(实现接口和继承DAO主抽象类)
package com.my.dao.impl;

import java.util.ArrayList;
import java.util.List;

import org.hibernate.Query;
import org.hibernate.Session;
import org.springframework.beans.BeanUtils;
import org.springframework.stereotype.Repository;

import com.my.dao.DaoSupport;
import com.my.dao.UserDao;
import com.my.dao.bean.User;

@Repository(value = "userDao")
public class UserDaoImpl extends DaoSupport implements UserDao {
    /*
     * get all users
     */
    @SuppressWarnings("unchecked")
    public List<User> findUsers() {
        List<User> joUsers = new ArrayList<User>();
        try {
            Session session = super.getSessionFactory().getCurrentSession();
            Query query = session.createQuery("FROM User");
            List<com.my.dao.impl.bean.User> poUsers = query.list();
            for (com.my.dao.impl.bean.User user : poUsers) {
                User u = new User();
                BeanUtils.copyProperties(user, u);
                joUsers.add(u);
            }
        } catch (Exception e) {
            e.printStackTrace();
        }
        return joUsers;
    }
}
DAO中对应数据库的persistent object:(hibernate的ORM映射关系对象)
package com.my.dao.impl.bean;

import javax.persistence.Column;
import javax.persistence.Entity;
import javax.persistence.GeneratedValue;
import javax.persistence.GenerationType;
import javax.persistence.Id;
import javax.persistence.Table;

@Entity
@Table(name="user")
public class User {
    @Id
    @GeneratedValue(strategy=GenerationType.IDENTITY)
    public long id;

    @Column(name="name", length=200, nullable=false)
    public String name;

    public long getId() {
        return id;
    }

    public void setId(long id) {
        this.id = id;
    }

    public String getName() {
        return name;
    }

    public void setName(String name) {
        this.name = name;
    }
}
pacakge:com.my.service
下面有两个类:ServiceSupport(抽象Service主类)和UserService(接口)
package com.my.service;

public abstract class ServiceSupport {

}
package com.my.service;

import java.util.List;

import com.my.service.bean.User;

public interface UserService {
    /*
     * get all users
     */
    public List<User> findUsers();
}
Service Bean(BO)
package com.my.service.bean;

public class User {
    public long id;
    public String name;

    public long getId() {
        return id;
    }
    public void setId(long id) {
        this.id = id;
    }
    public String getName() {
        return name;
    }
    public void setName(String name) {
        this.name = name;
    }
}
Service接口的实现类:UserServiceImpl,实现ServiceSupport抽象主类和UserService接口
package com.my.service.impl;

import java.util.ArrayList;
import java.util.List;

import javax.annotation.Resource;

import org.springframework.beans.BeanUtils;
import org.springframework.stereotype.Service;

import com.my.dao.UserDao;
import com.my.service.ServiceSupport;
import com.my.service.UserService;
import com.my.service.bean.User;

@Service(value="userService")
public class UserServiceImpl extends ServiceSupport implements UserService {
    @Resource(name="userDao")
    private UserDao userDao;

    public UserDao getUserDao() {
        return userDao;
    }

    public void setUserDao(UserDao userDao) {
        this.userDao = userDao;
    }

    /*
     * get all users
     */
    public List<User> findUsers(){
        List<User> boUsers = new ArrayList<User>();
        List<com.my.dao.bean.User> poUsers = userDao.findUsers();
        for(com.my.dao.bean.User user : poUsers){
            User u = new User();
            BeanUtils.copyProperties(user, u);
            boUsers.add(u);
        }
        return boUsers;
    }
}
package:com.my.actions
action的基类,继承说struts2的ActionSupport类:
package com.my.actions;

import com.opensymphony.xwork2.ActionSupport;

@SuppressWarnings("serial")
public abstract class BaseActionSupport extends ActionSupport {

}
UserAction,继承说BaseActionSupport基类:
package com.my.actions;

import java.util.List;

import javax.annotation.Resource;

import org.apache.struts2.ServletActionContext;
import org.springframework.stereotype.Controller;

import com.my.service.UserService;
import com.my.service.bean.User;

@Controller
@SuppressWarnings("serial")
public class UserAction extends BaseActionSupport {
    @Resource(name="userService")
    private UserService userService;

    public UserService getUserService() {
        return userService;
    }

    public void setUserService(UserService userService) {
        this.userService = userService;
    }

    @Override
    public String execute() throws Exception {
        List<User> users = userService.findUsers();
        ServletActionContext.getRequest().setAttribute("users", users);
        return SUCCESS;
    }
}
6、加入action对应的jsp:
路径:WEB-INF\content\user.jsp
<%@ page language="java" contentType="text/html; charset=UTF-8"
    pageEncoding="UTF-8"%>
<%@ taglib prefix="s" uri="/struts-tags" %>
<!DOCTYPE html PUBLIC "-//W3C//DTD HTML 4.01 Transitional//EN" "http://www.w3.org/TR/html4/loose.dtd">
<html>
<head>
<meta http-equiv="Content-Type" content="text/html; charset=UTF-8">
<title>Insert title here</title>
</head>
<body>
    Total users: ${users.size()}<br/>
    <table cellpadding="1" border="1px">
        <tr>
            <th>User id</th>
            <th>User name</th>
        </tr>
        <s:iterator id="users" value="#request.users">
            <tr>
                <td><s:property value="id"/></td>
                <td><s:property value="name"/></td>
            </tr>
        </s:iterator>
    </table>
</body>
</html>
7、运行结果:

标签:style blog http color io os 使用 java ar
原文地址:http://www.cnblogs.com/HD/p/3972513.html