标签:后缀 javaee text inter jsp 学习 结构 index.jsp success
1.环境搭配:MyEclipse10.7,tomcat9.0 jdk1.8
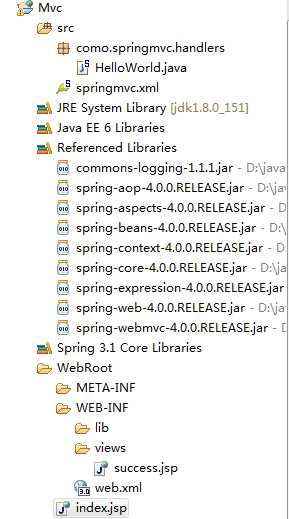
2.目录结构:
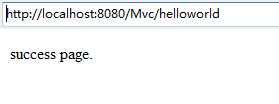
3.运行效果:

页面代码:
web.xml
<?xml version="1.0" encoding="UTF-8"?>
<web-app version="3.0"
    xmlns="http://java.sun.com/xml/ns/javaee"
    xmlns:xsi="http://www.w3.org/2001/XMLSchema-instance"
    xsi:schemaLocation="http://java.sun.com/xml/ns/javaee
    http://java.sun.com/xml/ns/javaee/web-app_3_0.xsd">
  <display-name></display-name>
   <!-- 配置DispatcherServlet -->

          <servlet>
              <servlet-name>springDispatcherServlet</servlet-name>
              <servlet-class>org.springframework.web.servlet.DispatcherServlet</servlet-class>
              <!-- 配置 DispatcherServlet的一个初始化参数:配置SpringMvc 配置文件的位置和名称-->
                   <init-param>
                      <param-name>contextConfigLocation</param-name>
                      <param-value>classpath:springmvc.xml</param-value>
              </init-param>
              <!-- 也可以不通过contextConfigLocation 来配置SpringMvc的配置文件,而使用默认的
                      默认的配置文件为:/WEB-INF/<servlet-name>-servlet.xml
                          /WEB-INF/springDispatcherServlet-servlet.xml
              -->

          <!-- 设置启动 -->
          <load-on-startup>1</load-on-startup>
          </servlet>

          <servlet-mapping>
          <!-- 请求处理 -->
              <servlet-name>springDispatcherServlet</servlet-name>
              <!-- /:应答所有请求 -->
              <url-pattern>/</url-pattern>
          </servlet-mapping>
  <welcome-file-list>
    <welcome-file>index.jsp</welcome-file>
  </welcome-file-list>
</web-app>
springmvc.xml
<?xml version="1.0" encoding="UTF-8"?>
<beans xmlns="http://www.springframework.org/schema/beans"

         xmlns:aop="http://www.springframework.org/schema/aop"

       xmlns:mvc="http://www.springframework.org/schema/mvc"

       xmlns:xsi="http://www.w3.org/2001/XMLSchema-instance"

       xmlns:context="http://www.springframework.org/schema/context"

       xmlns:p="http://www.springframework.org/schema/p"

  xsi:schemaLocation="

              http://www.springframework.org/schema/beans

                 http://www.springframework.org/schema/beans/spring-beans-4.0.xsd

              http://www.springframework.org/schema/mvc

              http://www.springframework.org/schema/tx/spring-mvc-4.0.xsd

               http://www.springframework.org/schema/context

               http://www.springframework.org/schema/context/spring-context-4.0.xsd

               http://www.springframework.org/schema/aop

             http://www.springframework.org/schema/aop/spring-aop-4.0.xsd">

             <!-- 配置自定义扫描包 -->
             <context:component-scan base-package="como.springmvc.handlers"></context:component-scan>
           <!-- 配置视图解析器:如何把handler方法返回值解析为实际的物理视图 -->

           <bean class="org.springframework.web.servlet.view.InternalResourceViewResolver">
                       <!-- 前缀 -->
                       <property name="prefix" value="/WEB-INF/views/"></property>
                       <!-- 后缀 -->
                       <property name="suffix" value=".jsp"></property>
           </bean>
           </beans>
HelloWorld.java
package como.springmvc.handlers;

import org.springframework.stereotype.Controller;
import org.springframework.web.bind.annotation.RequestMapping;


@Controller
public class HelloWorld {
    /*1.使用@RequestMapping 注解来映射请求的URL,与index.jsp中的请求一致
    2.返回值会通过视图解析器解析为实际的物理视图,对于InternalResourceViewResolver视图解析器
        会做如下解析:
        通过prefix  +  returnVal +后缀  这样的方式得到实际的物理视图,然后做转发操作
        /WEB-INF/views/+success+.jsp

    */
    @RequestMapping("/helloworld")
            public String hello(){
                System.out.println("hello world");
                return "success";
            }
}
success.jsp
<%@ page language="java" import="java.util.*" pageEncoding="UTF-8"%>
<%
String path = request.getContextPath();
String basePath = request.getScheme()+"://"+request.getServerName()+":"+request.getServerPort()+path+"/";
%>

<!DOCTYPE HTML PUBLIC "-//W3C//DTD HTML 4.01 Transitional//EN">
<html>
  <head>
    <base href="<%=basePath%>">

    <title>My JSP ‘success.jsp‘ starting page</title>

  </head>

  <body>
   success page. <br>
  </body>
</html>
index.jsp
<%@ page language="java" import="java.util.*" pageEncoding="UTF-8"%>
<%
String path = request.getContextPath();
String basePath = request.getScheme()+"://"+request.getServerName()+":"+request.getServerPort()+path+"/";
%>

<!DOCTYPE HTML PUBLIC "-//W3C//DTD HTML 4.01 Transitional//EN">
<html>
  <head>
    <base href="<%=basePath%>">

    <title>My JSP ‘index.jsp‘ starting page</title>

  </head>

  <body>
     <!--@RequestMapping("/helloworld")  -->
    <a href="helloworld">hello world</a>
  </body>
</html>
前几天看了一点Spring,现在开始接触SpringMvc,学的有点急,过程还不是很懂,慢慢来吧。。。。。。
标签:后缀 javaee text inter jsp 学习 结构 index.jsp success
原文地址:http://www.cnblogs.com/liurg/p/8004282.html