标签:优点 set 体验 new 技术分享 deadlock 理解 利用 notify
今天打算重新学习一遍多线程,通过条理的的梳理,更加巩固基础知识。
谈起多线程,我们需要分清楚一些概念,什么是程序、进程和线程?
线程与进程的关系:
这里一个进程可以分为单线程进程和多线程进程,它们之间的关系如图所示:

什么时候需要多线程?
多线程程序的优点:
如何创建线程呢,创建线程的方法有两种:
 1 //1.创建一个继承于Thread类的子类
 2 class SubThread extends Thread {
 3
 4     // 2.重写Thread类的run()方法,此方法内为线程要执行的任务
 5     public void run() {
 6         for (int i = 0; i < 100; i++) {
 7             System.out.println(Thread.currentThread().getName() + ":" + i);
 8         }
 9     }
10 }
11
12 // 3.实现Runnable接口
13 class InstRunnable implements Runnable {
14
15     // 4. 实现Runnable接口的run()方法
16     public void run() {
17         for (int i = 0; i < 100; i++) {
18             System.out.println(Thread.currentThread().getName() + ":" + i);
19         }
20     }
21 }
22
23 public class ThreadMain {
24
25     public static void main(String[] args) {
26
27         // 5.实例化一个线程实例
28         SubThread st = new SubThread();
29
30         // 6.调用start()方法启动线程,然后调用相应的run()方法
31         st.start();
32
33         // 线程只能执行一次start(),多次执行报错
34         // st.start();
35
36         // run()方法不能直接启动线程,调用run()方法无变化
37         // st.run();
38
39         // 7.实例化InstRunnable类
40         InstRunnable ir = new InstRunnable();
41
42         // 8.启动线程,并调用run()方法
43         new Thread(ir).start();
44     }
45
46 }
实现Runnable接口创建线程的优点:
 1 class Window implements Runnable {
 2     int ticket = 100;
 3     public void run() {
 4         while(true) {
 5             if(ticket>0) {
 6                 System.out.println(Thread.currentThread().getName()+"售票,票号为:"+ticket--);
 7             }else {
 8                 break;
 9             }
10         }
11     }
12 }
13
14 public class TestWindow1 {
15
16     public static void main(String[] args) {
17         Window w = new Window();
18
19         Thread w1 = new Thread(w);
20         Thread w2 = new Thread(w);
21         Thread w3 = new Thread(w);
22
23         w1.setName("窗口1");
24         w2.setName("窗口2");
25         w3.setName("窗口3");
26
27         w1.start();
28         w2.start();
29         w3.start();
30     }
31
32 }
Thread类常用的几个方法:
 1 package cn.lyog.javase;
 2
 3 class SubThread extends Thread {
 4
 5     // 子线程要执行的代码放入run()方法中
 6     public void run() {
 7         for (int i = 0; i < 100; i++) {
 8             try {
 9                 // 静态方法,调取当前的线程
10                 Thread.currentThread();
11
12                 // 显式的让线程睡眠100毫秒
13                 Thread.sleep(100);
14             } catch (InterruptedException e) {
15                 e.printStackTrace();
16             }
17
18             // getName()用来获取此线程的名字
19             System.out.println(Thread.currentThread().getName() + ":" + i);
20         }
21     }
22 }
23
24 public class ThreadMain {
25
26     public static void main(String[] args) {
27
28         SubThread st = new SubThread();
29
30         // 设置st线程的名字
31         st.setName("子线程");
32
33         // 启动线程并执行相应的run()方法
34         st.start();
35
36         // 设置此线程的名字
37         Thread.currentThread().setName("主线程");
38
39         /*
40          * 设置线程的优先级(n的范围是1到10)
41          * MAX_PRIORITY的值为10
42          * NORM_PRIORITY的值为5
43          * MIN_PRIORITY的值为1
44          */
45         Thread.currentThread().setPriority(Thread.MAX_PRIORITY);
46
47         for (int i = 0; i < 100; i++) {
48
49             // 获取线程的名字
50             System.out.println(Thread.currentThread().getName() + ":" + i);
51
52             // 获取线程的优先级
53             System.out.println(Thread.currentThread().getPriority() + ":" + i);
54
55             if (i > 10) {
56                 try {
57                     // 当i>10时,执行st,直到st执行完毕,继续执行main
58                     st.join(10);
59                 } catch (InterruptedException e) {
60                     e.printStackTrace();
61                 }
62             }
63         }
64     }
65 }
线程分为两类:守护线程和用户线程
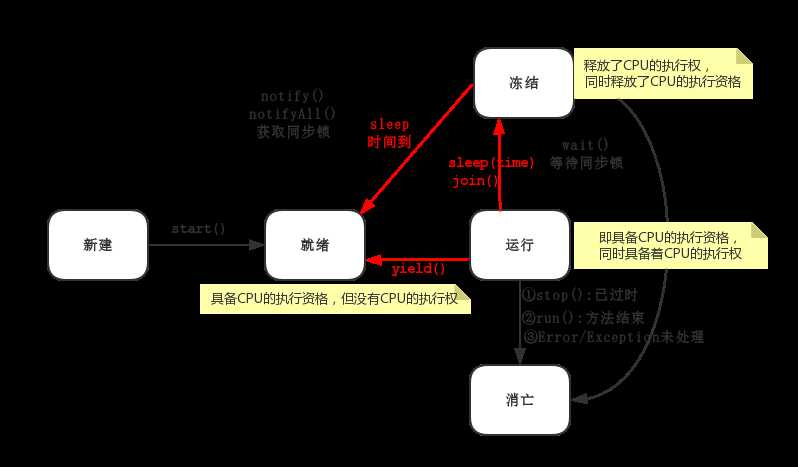
线程的生命周期:

线程安全问题的原因:由于一个线程在操作共享数据的过程中,未执行完毕的情况下,另外一个线程参与进来,导致共享数据存在安全问题。
线程安全问题的解决方案:让一个线程执行完毕后,其他线程才能参与进来。(线程同步机制)
 1 class Windows implements Runnable {
 2     int ticket = 100;
 3     Object obj = new Object();
 4
 5     @Override
 6     public void run() {
 7         // 同步代码块
 8         synchronized (obj) {
 9             // 操作共享数据ticket的代码
10         }
11     }
12
13 }
14
15 class Windows1 implements Runnable {
16     int ticket = 100;
17
18     public synchronized void show() {
19         // 操作共享数据ticket的代码
20     }
21
22     @Override
23     public void run() {
24         // 同步方法
25         show();
26     }
27
28 }
释放锁的操作有:
不会释放锁的操作有:
线程的死锁:不同的线程分别占用对方需要的同步资源不放弃,都在等待对方放弃自己需要的同步资源,就形成了线程的死锁。
解决方法:
 1 package cn.lyog.javase;
 2
 3 public class TestDeadLock {
 4     static StringBuffer sb1 = new StringBuffer();
 5     static StringBuffer sb2 = new StringBuffer();
 6
 7     public static void main(String[] args) {
 8         new Thread() {
 9             public void run() {
10                 synchronized (sb1) {
11                     try {
12                         Thread.currentThread();
13                         Thread.sleep(10);
14                     } catch (InterruptedException e) {
15                         e.printStackTrace();
16                     }
17                     sb1.append("A");
18                     synchronized (sb2) {
19                         sb2.append("B");
20                         System.out.println(sb1);
21                         System.out.println(sb2);
22                     }
23                 }
24             }
25         }.start();
26         new Thread() {
27             public void run() {
28                 synchronized (sb2) {
29                     try {
30                         Thread.currentThread();
31                         Thread.sleep(100);
32                     } catch (InterruptedException e) {
33                         e.printStackTrace();
34                     }
35                     sb1.append("C");
36                     synchronized (sb1) {
37                         sb2.append("D");
38                         System.out.println(sb1);
39                         System.out.println(sb2);
40                     }
41                 }
42             }
43         }.start();
44     }
45
46 }
线程通讯,在java.lang.Object包下面定义了三个方法:wait()、notify()和notifyAll(),它们只能在synchronized方法或者synchronized代码块中才能执行
 1 // 线程通讯之交替打印数字
 2 class PrintNum implements Runnable {
 3
 4     int num = 1;
 5
 6     @Override
 7     public void run() {
 8         while (true) {
 9             synchronized (this) {
10                 notify();
11                 if (num <= 100) {
12                     System.out.println(Thread.currentThread().getName() + ":" + num);
13                     num++;
14                 } else {
15                     break;
16                 }
17
18                 try {
19                     wait();
20                 } catch (InterruptedException e) {
21                     e.printStackTrace();
22                 }
23             }
24
25         }
26
27     }
28
29 }
30
31 public class TestCommunication {
32
33     public static void main(String[] args) {
34         PrintNum pn = new PrintNum();
35
36         Thread t1 = new Thread(pn);
37         Thread t2 = new Thread(pn);
38
39         t1.setName("甲");
40         t2.setName("乙");
41
42         t1.start();
43         t2.start();
44
45     }
46 }
标签:优点 set 体验 new 技术分享 deadlock 理解 利用 notify
原文地址:http://www.cnblogs.com/lyog/p/8013072.html