在thymeleaf 里面有个消息表达式: #{...} , 可以借此来实现国际化.
在我使用这个功能的时候, 碰到了一个问题, 按照 JavaEE开发的颠覆者 Spring Boot实战 上面编码的时候, 出现了以下问题, 相信很多人都碰到过.
??home.welcome_zh_CN??
这里推荐一篇博客, 里面有解决办法. 玩转spring boot——国际化
我也想将我自己代码记录下来.
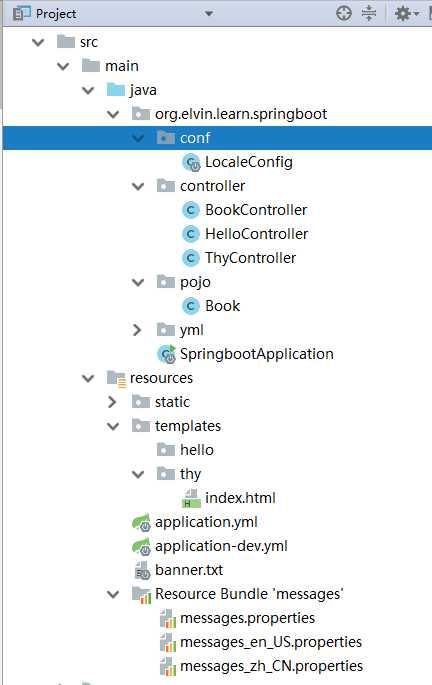
一. 目录预览

这里我并没有按照资料上所述的, 将properties文件建在 index.html 同级别目录下, 也没有将名称命名为: index.properties
之前是这么弄的, 但是有上述问题.
二. properties文件内容
messages.properties:
welcome=welcome here! and 欢迎欢迎!
这个是在, 没有语言匹配上的时候, 才会显示
messages_en_US.properties:
welcome=welcome here!
messages_zh_CN.properties:
welcome=欢迎欢迎!
三. 控制器
package org.elvin.learn.springboot.controller;

import org.elvin.learn.springboot.pojo.Book;
import org.joda.time.DateTime;
import org.springframework.stereotype.Controller;
import org.springframework.ui.Model;
import org.springframework.web.bind.annotation.GetMapping;
import org.springframework.web.bind.annotation.RequestMapping;

import java.util.ArrayList;
import java.util.List;

/**
 * author: Elvin
 * Date: 2017/12/13 9:29
 * Description:
 */
@Controller
@RequestMapping("thy")
public class ThyController {

    @GetMapping("index")
    public String index(Model model) {
        model.addAttribute("color", "red");
        return "thy/index";
    }
}
四. 视图
<!DOCTYPE html>
<html xmlns:th="http://www.thymeleaf.org" >
<head>
    <meta http-equiv="Content-Type" content="text/html; charset=UTF-8" />
    <meta name="viewport" content="width=device-width, initial-scale=1, maximum-scale=1.0, user-scalable=no"/>
    <title>Title</title>
    <!--@ { } 链接网址表达式, 会自动加入虚拟路径-->
    <link th:href="@{/bootstrap-3.3.7/css/bootstrap.css}" rel="stylesheet"/>
    <link th:href="@{/bootstrap-3.3.7/css/bootstrap-theme.css}" rel="stylesheet"/>
    <style th:inline="text">
        /*通过[ [ $ { }]]的方式访问model中的属性*/
        .bgcolor {
            background-color:[[${color}]]
        }
    </style>
</head>
<body>

<div class="panel panel-primary">
    <div class="panel-heading">
        <h3 class="panel-title">欢迎</h3>
        <a style="background-color: #0f0f0f" th:href="@{/thy/index?lang=en_US}">English(US)</a>
        <a style="background-color: #0f0f0f" th:href="@{/thy/index?lang=zh_CN}">简体中文</a>
    </div>
    <div class="panel-body">
        <!-- $ { }变量表达式, 可以访问model中的属性 -->
        <span class="bgcolor" th:utext="#{welcome}">hahaha</span>
    </div>
</div>
</body>
</html>
五. 结果
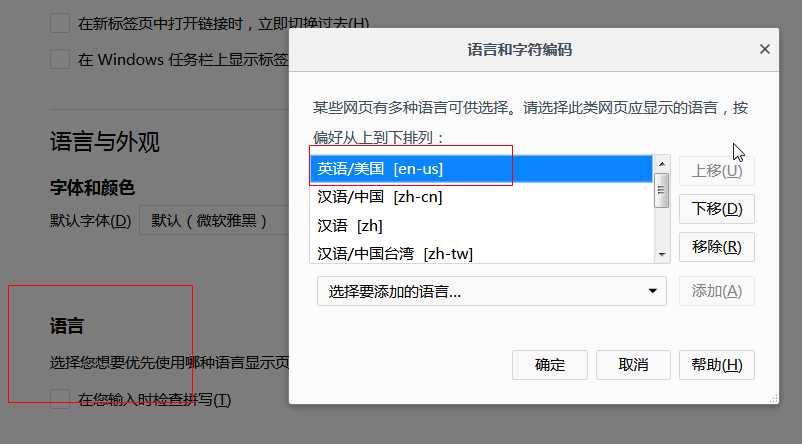
使用火狐浏览器(可以调显示语言).
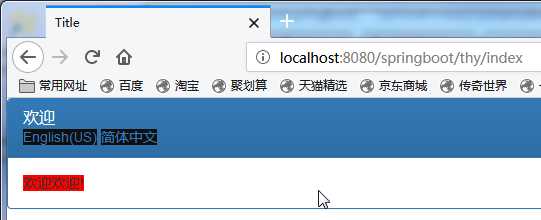
第一次打开的时候, 已经是能正常显示的了. 不再报错

此时, 调整火狐默认显示语言

刷新页面:

可能有人注意到, 我这里有两个链接, 用来切换显示的. 按照上面的方式, 是不能这么切换的. 此时需要做一些修改
六. 自定义显示
加入配置文件
package org.elvin.learn.springboot.conf;

import java.util.Locale;

import org.springframework.boot.autoconfigure.EnableAutoConfiguration;
import org.springframework.context.annotation.Bean;
import org.springframework.context.annotation.ComponentScan;
import org.springframework.context.annotation.Configuration;
import org.springframework.web.servlet.LocaleResolver;
import org.springframework.web.servlet.config.annotation.InterceptorRegistry;
import org.springframework.web.servlet.config.annotation.WebMvcConfigurerAdapter;
import org.springframework.web.servlet.i18n.LocaleChangeInterceptor;
import org.springframework.web.servlet.i18n.SessionLocaleResolver;

@Configuration
@EnableAutoConfiguration
@ComponentScan
public class LocaleConfig extends WebMvcConfigurerAdapter {
    @Bean
    public LocaleResolver localeResolver() {
        SessionLocaleResolver slr = new SessionLocaleResolver();
        // 默认语言
        //slr.setDefaultLocale(Locale.US);
        return slr;
    }

    @Bean
    public LocaleChangeInterceptor localeChangeInterceptor() {
        LocaleChangeInterceptor lci = new LocaleChangeInterceptor();
        // 参数名
        lci.setParamName("lang");
        return lci;
    }

    @Override
    public void addInterceptors(InterceptorRegistry registry) {
        registry.addInterceptor(localeChangeInterceptor());
    }
}
这里的默认语言可设置, 也可不设置. 如果不设置, 就会根据浏览器默认语言去判断显示哪一个信息.
七. 结果
这里可以根据 lang 去自己选择显示那种语言了


