linux系统为Centos 64位
第一步:从http://nginx.org/download/上下载相应的版本(或者wget http://nginx.org/download/nginx-1.5.9.tar.gz直接在Linux上用命令下载)
第二步:解压 tar -zxvf nginx-1.5.9.tar.gz
第三步:设置一下配置信息 ./configure --prefix=/usr/local/nginx ,或者不执行此步,直接默认配置
第四步:
make 编译 (make的过程是把各种语言写的源码文件,变成可执行文件和各种库文件)
make install 安装 (make install是把这些编译出来的可执行文件和库文件复制到合适的地方)
在配置信息的时候,也就是在第三步,出现了一下错误:
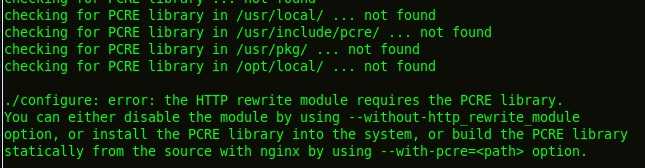
错误为:./configure: error: the HTTP rewrite module requires the PCRE library.
安装pcre-devel解决问题
yum -y install pcre-devel
还有可能出现:
错误提示:./configure: error: the HTTP cache module requires md5 functions
from OpenSSL library. You can either disable the module by using
--without-http-cache option, or install the OpenSSL library into the system,
or build the OpenSSL library statically from the source with nginx by using
--with-http_ssl_module --with-openssl=<path> options.
解决办法:
yum -y install openssl openssl-devel
安装后在linux下启动和关闭nginx:
启动操作
/usr/nginx/sbin/nginx (/usr/nginx/sbin/nginx -t 查看配置信息是否正确)
停止操作是通过向nginx进程发送信号(什么是信号请参阅linux文 章)来进行的
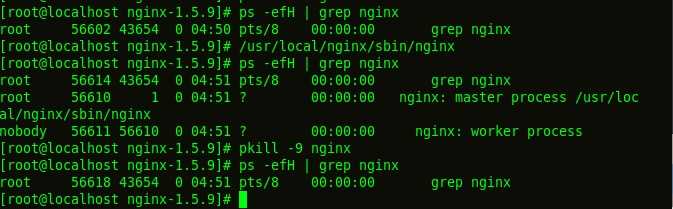
步骤1:查询nginx主进程号
ps -ef | grep nginx
在进程列表里 面找master进程,它的编号就是主进程号了。
步骤2:发送信号
从容停止Nginx:
kill -QUIT 主进程号
快速停止Nginx:
kill -TERM 主进程号
强制停止Nginx:
pkill -9 nginx
另外, 若在nginx.conf配置了pid文件存放路径则该文件存放的就是Nginx主进程号,如果没指定则放在nginx的logs目录下。有了pid文 件,我们就不用先查询Nginx的主进程号,而直接向Nginx发送信号了,命令如下:
kill -信号类型 ‘/usr/nginx/logs/nginx.pid‘
平滑重启
如果更改了配置就要重启Nginx,要先关闭Nginx再打开?不是的,可以向Nginx 发送信号,平滑重启。
平滑重启命令:
kill -HUP 住进称号或进程号文件路径
或者使用
/usr/nginx/sbin/nginx -s reload
nginx -t -c /usr/nginx/conf/nginx.conf
或者

加了中文注解的nginx.conf
  1 user www www;
  2 # 工作进程个数,可配置多个
  3 worker_processes auto;
  4
  5 error_log /data/wwwlogs/error_nginx.log crit;
  6 pid /var/run/nginx.pid;
  7 worker_rlimit_nofile 51200;
  8
  9 events {
 10   use epoll;
 11   # 单个进程最大连接数
 12   worker_connections 51200;
 13   multi_accept on;
 14 }
 15
 16 http {
 17   include mime.types;
 18   default_type application/octet-stream;
 19   server_names_hash_bucket_size 128;
 20   client_header_buffer_size 32k;
 21   large_client_header_buffers 4 32k;
 22   client_max_body_size 1024m;
 23   client_body_buffer_size 10m;
 24   sendfile on;
 25   tcp_nopush on;
 26   keepalive_timeout 120;
 27   server_tokens off;
 28   tcp_nodelay on;
 29
 30   fastcgi_connect_timeout 300;
 31   fastcgi_send_timeout 300;
 32   fastcgi_read_timeout 300;
 33   fastcgi_buffer_size 64k;
 34   fastcgi_buffers 4 64k;
 35   fastcgi_busy_buffers_size 128k;
 36   fastcgi_temp_file_write_size 128k;
 37   fastcgi_intercept_errors on;
 38
 39   #Gzip Compression
 40   gzip on;
 41   gzip_buffers 16 8k;
 42   gzip_comp_level 6;
 43   gzip_http_version 1.1;
 44   gzip_min_length 256;
 45   gzip_proxied any;
 46   gzip_vary on;
 47   gzip_types
 48     text/xml application/xml application/atom+xml application/rss+xml application/xhtml+xml image/svg+xml
 49     text/javascript application/javascript application/x-javascript
 50     text/x-json application/json application/x-web-app-manifest+json
 51     text/css text/plain text/x-component
 52     font/opentype application/x-font-ttf application/vnd.ms-fontobject
 53     image/x-icon;
 54   gzip_disable "MSIE [1-6]\.(?!.*SV1)";
 55
 56   #If you have a lot of static files to serve through Nginx then caching of the files‘ metadata (not the actual files‘ contents) can save some latency.
 57   open_file_cache max=1000 inactive=20s;
 58   open_file_cache_valid 30s;
 59   open_file_cache_min_uses 2;
 60   open_file_cache_errors on;
 61
 62 ######################## default ############################
 63   # 服务器集群名称  和下面的location地址对应
 64   upstream myServer {
 65     # weigth参数表示权值,权值越高被分配到的几率越大
 66     # server 127.0.0.1:8080 weight=1;
 67     # server 127.0.0.1:8060 weight=1;
 68     server 47.93.10.184:8080;
 69     server 47.93.10.184:8081;
 70
 71   }
 72
 73   # 每一个server相当于一个代理服务器
 74   server {
 75   # 监听端口,默认80
 76   listen 8848;
 77   # 当前服务的域名,可以有多个,用空格分隔(我们是本地所以是localhost)  www.kolbe.cn
 78   server_name localhost;
 79   #server_name _;
 80   access_log /data/wwwlogs/access_nginx.log combined;
 81   root /data/wwwroot/default;
 82   # 当没有指定主页时,默认会选择这个指定的文件,可多个,空格分隔
 83   index index.html index.htm index.php;
 84   # 表示匹配的路径,这时配置了/表示所有请求都被匹配到这里
 85   location / {
 86       # 请求转向自定义的服务器列表
 87       proxy_pass http://myServer;
 88   }
 89   location /nginx_status {
 90     stub_status on;
 91     access_log off;
 92     allow 127.0.0.1;
 93     deny all;
 94     }
 95   location ~ [^/]\.php(/|$) {
 96     #fastcgi_pass remote_php_ip:9000;
 97     fastcgi_pass unix:/dev/shm/php-cgi.sock;
 98     fastcgi_index index.php;
 99     include fastcgi.conf;
100     }
101   location ~ .*\.(gif|jpg|jpeg|png|bmp|swf|flv|mp4|ico)$ {
102     expires 30d;
103     access_log off;
104     }
105   location ~ .*\.(js|css)?$ {
106     expires 7d;
107     access_log off;
108     }
109   location ~ /\.ht {
110     deny all;
111     }
112   }
113
114 ########################## vhost #############################
115   include vhost/*.conf;
116 }