呃,终于到了这地方……
newCompilation(params) {
    // ...
    this.applyPlugins("this-compilation", compilation, params);
    // 31
    console.log(this._plugins[‘compilation‘].length);
    this.applyPlugins("compilation", compilation, params);
    return compilation;
}
MMP,有31个函数,估计可以写到明年了。
这里先梳理所有事件的注入来源,经检测,全部来源于WebpackOptionsApply中,回到那个可怕的模块,梳理后如下:
class WebpackOptionsApply extends OptionsApply {
    constructor() {
        super();
    }
    process(options, compiler) {
        // ...
        if (typeof options.target === "string") {
            // ...
            switch (options.target) {
                case "web":
                    JsonpTemplatePlugin = require("./JsonpTemplatePlugin");
                    NodeSourcePlugin = require("./node/NodeSourcePlugin");
                    compiler.apply(
                        new JsonpTemplatePlugin(options.output),
                        // plugin + 3
                        new FunctionModulePlugin(options.output),
                        new NodeSourcePlugin(options.node),
                        new LoaderTargetPlugin(options.target)
                    );
                    break;
                    // ...
            }
        }
        // ...

        // plugin + 1
        compiler.apply(new EntryOptionPlugin());
        compiler.applyPluginsBailResult("entry-option", options.context, options.entry);
        // plugin + 24
        compiler.apply( /**/ );

        compiler.apply( /**/ );

        // ...
        // plugin + 1
        compiler.apply(new TemplatedPathPlugin());
        // plugin + 1
        compiler.apply(new RecordIdsPlugin());
        // plugin + 1
        compiler.apply(new WarnCaseSensitiveModulesPlugin());
        // ...
        return options;
    }
}
还好都集中在一个地方,这样又可以写流水账了。
这里先要过一个地方,之前似乎遗留了:
compiler.apply(new EntryOptionPlugin());
compiler.applyPluginsBailResult("entry-option", options.context, options.entry);
这里注入了entry-option事件流,并在下一行代码触发,所以直接进去看实现:
function itemToPlugin(context, item, name) {
    if (Array.isArray(item)) {
        return new MultiEntryPlugin(context, item, name);
    }
    return new SingleEntryPlugin(context, item, name);
}

module.exports = class EntryOptionPlugin {
    apply(compiler) {
        // context => options.context
        // entry => options.entry
        compiler.plugin("entry-option", (context, entry) => {
            // 针对单字符串或数组情况
            if (typeof entry === "string" || Array.isArray(entry)) {
                // 输出文件为main
                compiler.apply(itemToPlugin(context, entry, "main"));
            }
            // 对象 => 多入口
            else if (typeof entry === "object") {
                Object.keys(entry).forEach(name => compiler.apply(itemToPlugin(context, entry[name], name)));
            }
            // 函数
            else if (typeof entry === "function") {
                compiler.apply(new DynamicEntryPlugin(context, entry));
            }
            return true;
        });
    }
};
这里针对字符串、数组、对象、函数四种情况分别做了处理,先只看单字符串,其余情况后面单独讲解。
单字符串会进入SingleEntryPlugin插件:
"use strict";
const SingleEntryDependency = require("./dependencies/SingleEntryDependency");
class SingleEntryPlugin {
    constructor(context, entry, name) {
        this.context = context;
        this.entry = entry;
        this.name = name;
    };
    apply(compiler) {
        compiler.plugin("compilation", (compilation, params) => { /**/ });
        compiler.plugin("make", (compilation, callback) => { /**/ });
    };
    static createDependency(entry, name) {
        // 该模块有一个isEqualResource方法判断entry是否一样
        const dep = new SingleEntryDependency(entry);
        dep.loc = name;
        return dep;
    }
}
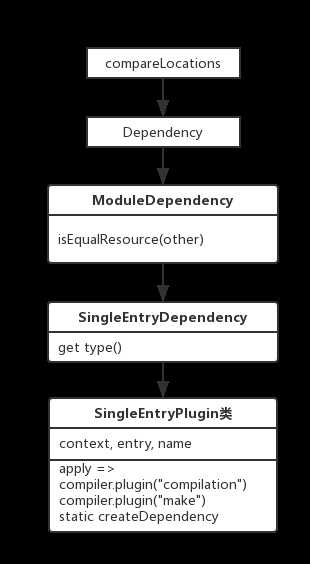
这里引入的SingleEntryDependency原型链比较长,而且没有什么营养,出一个示意图,不贴源码了:

可以看到该模块注入了两个事件流,静态方法后面再讲。
第一小节先这样结束吧!
