在搭建之前,有必要了解下什么是fastcgi,但鉴于我自己也不大了解,这里就不搬门弄斧了,请参考各种百科和官网资料.
1.资源下载
python下载地址:戳这里
webpy下载地址:戳这里
flup下载地址:戳这里
nginx下载地址:戳这里
建议先把python装好,然后装setuptools,easy_install,接着用easy_install命令可以直接下载安装web.py,flup.
nginx下载解压即可用,不过需要稍微配置一下.
2.nginx配置
安装完成测试下,打开nginx.exe再访问localhost显示文件夹html下的index.html内容就没什么问题了.
conf下的nginx.conf是它的配置文件,这东西参数好多,配置参数详解候可以参考这篇文章,而且配置之前记得留备份啊
我们现在需要改的东西如下.
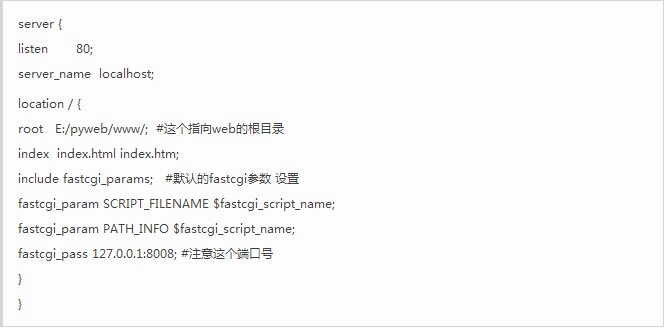
server {
        listen       80;
        server_name  www.xspython.com;

        location / {
            root   "D:\Project\Python\web";
            index  index.html index.htm;
            include fastcgi_params;
            fastcgi_param  SCRIPT_FILENAME  $fastcgi_script_name;
            fastcgi_param  PATH_INFO  $fastcgi_script_name;
            fastcgi_pass   127.0.0.1:8008;
        }
}
设置完后用命令行的方式
nginx –s stop 停止服务
nginx –t 测试配置文件是否有错误
nginx 启动服务
然后访问localhost,会显示pyweb/www/下的index.html(自己随便写个hello world吧)
3.web.py
新建一个code.py文件,其内容如下
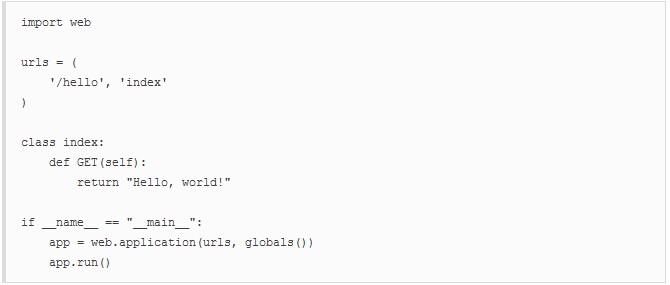
import web

urls = (
    ‘/‘, ‘index‘,
    "/list", "list",
)

class index:
    def GET(self):
        return "Hello, world123456!"

class list:
    def GET(self):
        return "Hello, list!"

if __name__ == "__main__":
    app = web.application(urls, globals())
    app.run()
然后命令行启动它,像这样python code.py 8008 fastcgi,这里的8008即第二步配置文件中设置端口号,如果不一致是无法正常访问的.
现在访问localhost/hello,看是不是返回了Hello, world?
现在访问www.xspython.com,看是不是返回了Hello, world?