通过简单的JavaScript 图片库案例来讲解函数应用及扩展。
这是一个图片库小页面,通过单击1、2、3、4在原来的页面变换图片和描述。

下面是HTML标签:
 1 <body>
 2 <h1>Snapshots</h1>
 3 <ul>
 4     <li><a href="images/1.jpg" onClick="showPic(this); return false;" title="one">1</a></li>
 5 //href="images/1.jpg" onClick="showPic(this); return false;" title="one"
 6 //这些都是接来下要通过Javascript调用的标签属性
 7     <li><a href="images/2.jpg" onClick="showPic(this); return false;" title="two">2</a></li>
 8     <li><a href="images/3.jpg" onClick="showPic(this); return false;" title="three">3</a></li>
 9     <li><a href="images/4.jpg" onClick="showPic(this); return false;" title="four">4</a></li>
10     <img src="images/show.jpg" alt="my img gallery" id="placeholder">
11 </ul>
12 <p id="description">Choose an image.</p>
13 </body>
图片变换步骤:1.获取a对象并取得href参数-> 2.获取img 对象-> 3.将href 的参数赋值给img 的src属性。
 1 //getElementsByTag( a );可以来获取a的对象,但是局限性,但是获取哪个a标签?因为Tag返回的是一段数组。
 2 //这里我们可以封装一个方法function()用标签属性onClick调用这个函数
 3 //在调用这个函数时,用this 关键字传递参数,就可以简单的把该a对象传递过去了
 4 //onClick="showPic(this); return false;"为什么,后面要返回false。不加则会跳到href指定页面,返回false可以使链接无效。
 5
 6 showPic(whichpic)
 7 function showPic(whichpic){
 8 //whichpic就是传递过来的相对getElementsByTag( a );
 9         var source = whichpic.getAttribute("href");
10         var placeholder = document.getElementById("placeholder");
11         placeholder.setAttribute("src",source);
12         }
13 如此一来,就可以变换图片了
文本变换如上步骤差不多,但在此前,先了解一下节点
1.childNodes 属性
在一颗节点树上,childNodes属性可以用来获取任何一个元素的所有子元素,它是一个包含这个元素全部子元素的数组:
element.childNodes
1 function counBodyChildren(){
2     var body_element = document.getelementsByTagName("body")[0];
3     alert( body_element.childNodes.length );
4 }//这个小函数可以显示出你body 元素的子元素的总个数。
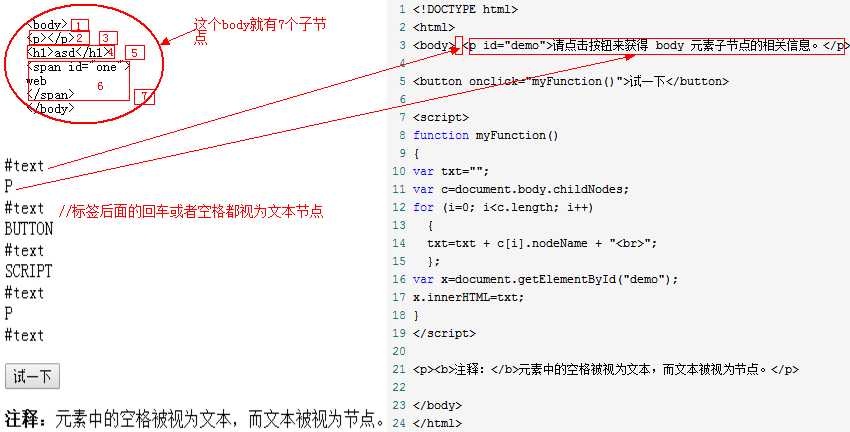
或者你想更清楚的了解childNodes具体是查询了哪个节点,可以尝试一下代码:
 1 <!DOCTYPE html>
 2 <html>
 3 <body> <p id="demo">请点击按钮来获得 body 元素子节点的相关信息。</p>
 4
 5 <button onclick="myFunction()">试一下</button>
 6
 7 <script>
 8 function myFunction()
 9 {
10 var txt="";
11 var c=document.body.childNodes;
12 for (i=0; i<c.length; i++)
13   {
14   txt=txt + c[i].nodeName + "<br>";
15   };
16 var x=document.getElementById("demo");
17 x.innerHTML=txt;
18 }
19 </script>
20
21 <p><b>注释:</b>元素中的空格被视为文本,而文本被视为节点。</p>
22
23 </body>
24 </html>
得到的结果如下:

了解节点后继续完善图片库变( showPic(whichpic) )更图片时的描述:
 1 function showPic(whichpic){
 2         var source = whichpic.getAttribute("href");
 3         var placeholder = document.getElementById("placeholder");
 4         placeholder.setAttribute("src",source);
 5 //我们已经传入了a=whichpic标签对象了
 6 //再用getAttribute获取a对象的title属性值,再获取P对象传入text。
 7         var text = whichpic.getAttribute("title");
 8         var description = document.getElementById("description");
 9         description.firstChild.nodeValue = text;
10         }
11 //补充:childNodes里现在已经不包括属性节点了。
 1 function showPic(whichpic){
 2         var source = whichpic.getAttribute("href");
 3         var placeholder = document.getElementById("placeholder");
 4         placeholder.setAttribute("src",source);
 5 //我们已经传入了a=whichpic标签对象了
 6 //再用getAttribute获取a对象的title属性值,再获取P对象传入text。
 7         var text = whichpic.getAttribute("title");
 8         var description = document.getElementById("description");
 9         description.firstChild.nodeValue = text;
10         }
11 //node.firstChild 等价于node.childNodes[0]
12 //node.lastChild 等价于node.childNodes[node.childNodes.length-1]
13 //补充:childNodes里现在已经不包括属性节点了。
