安装python-alipay-sdk
pip install python-alipay-sdk --upgrade
原理介绍:
1.进行秘钥配置,因为传输的数据必须要进行签名加密,ubuntu内置命令openssl可以生成私钥,根据私钥生成公钥
openssl
OpenSSL> genrsa -out app_private_key.pem 2048 # 私钥 2048对应的是rsa加密时候的复杂程度,即rsa2
OpenSSL> rsa -in app_private_key.pem -pubout -out app_public_key.pem # 导出公钥
OpenSSL> exit
2.cat app_publict_key.pem 查看公钥的内容
将-----BEGIN PUBLIC KEY-----和-----END PUBLIC KEY-----中间的内容保存在支付宝的用户配置中(沙箱或者正式)
https://openhome.alipay.com/platform/appDaily.htm?tab=info
3.配置好公钥后,支付宝会生成公钥,将公钥的内容复制保存到一个文本文件中(alipay_pubilc_key.pem),注意需要在文本的首尾添加标记位(-----BEGIN PUBLIC KEY-----和-----END PUBLIC KEY-----)
4.将刚刚生成的私钥app_private_key.pem和支付宝公钥alipay_public_key.pem放到我们的项目目录中
5.使用支付宝 python包的初始化
6.调用支付接口
https://docs.open.alipay.com/270/alipay.trade.page.pay/
7.获取支付结果接口
https://docs.open.alipay.com/api_1/alipay.trade.query
代码部分:
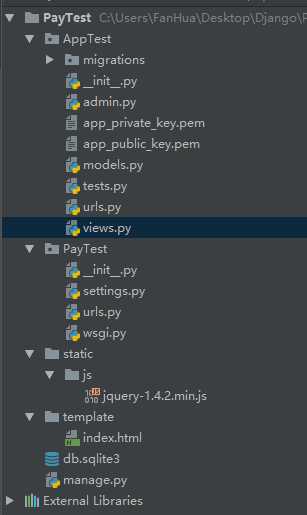
1.整个项目架构
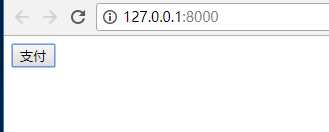
index.html代码
<!DOCTYPE html>
<html lang="en">
<head>
    <meta charset="UTF-8">
    <title>Title</title>
    <script src="static/js/jquery-1.4.2.min.js"></script>
    <script>
        $(function () {
            $(‘#btn‘).click(function () {
                var order_id = "20180105002";
                var req_data = {
                    order_id: order_id,
                    csrfmiddlewaretoken: "{{ csrf_token }}"
                };
                $.post("/pay/", req_data, function (data) {
                    window.open(data.url)
                });
                $.get("/check_pay/?order_id=" + order_id, function (data) {
                    if (0 == data.code) {
                        // 支付成功
                        alert("支付成功");
                        location.reload();
                    } else {
                        alert(data.message)
                    }
                })
            })
        })
    </script>
</head>
<body>
<input type="button" id="btn" value="支付">
</body>
</html>
2.AppTest.views.py代码
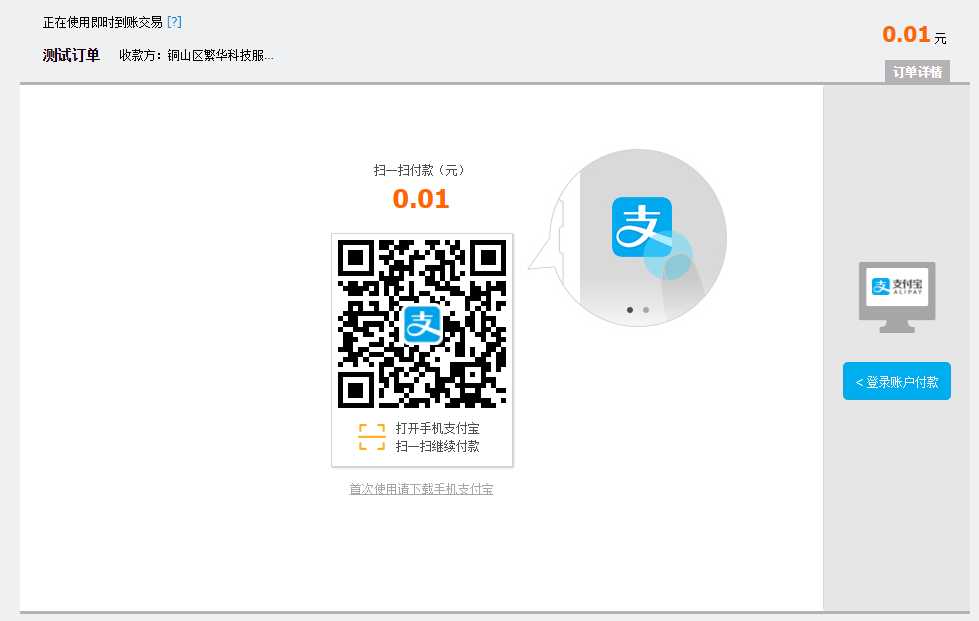
#coding:utf-8
from django.shortcuts import render

from django.shortcuts import render
from django.http import JsonResponse
from alipay import AliPay
import os
from django.conf import settings


def index(request):
    return render(request, "index.html",locals())


def pay(request):
    order_id = request.POST.get("order_id")
    # 创建用于进行支付宝支付的工具对象
    alipay = AliPay(
        appid=settings.ALIPAY_APPID,
        app_notify_url=None,  # 默认回调url
        app_private_key_path=os.path.join(settings.BASE_DIR, "AppTest/app_private_key.pem"),
        alipay_public_key_path=os.path.join(settings.BASE_DIR, "AppTest/alipay_public_key.pem"),
        # 支付宝的公钥,验证支付宝回传消息使用,不是你自己的公钥,
        sign_type="RSA2",  # RSA 或者 RSA2
        debug=True  # 默认False  配合沙箱模式使用
    )

    # 电脑网站支付,需要跳转到https://openapi.alipay.com/gateway.do? + order_string
    order_string = alipay.api_alipay_trade_page_pay(
        out_trade_no=order_id,
        total_amount=str(0.01),  # 将Decimal类型转换为字符串交给支付宝
        subject="测试订单",
        return_url="https://example.com",
        notify_url="https://example.com/notify"  # 可选, 不填则使用默认notify url
    )

    # 让用户进行支付的支付宝页面网址
    url = settings.ALIPAY_URL + "?" + order_string

    return JsonResponse({"code": 0, "message": "请求支付成功", "url": url})


def check_pay(request):
    # 创建用于进行支付宝支付的工具对象
    order_id = request.GET.get("order_id")
    alipay = AliPay(
        appid=settings.ALIPAY_APPID,
        app_notify_url=None,  # 默认回调url
        app_private_key_path=os.path.join(settings.BASE_DIR, "AppTest/app_private_key.pem"),
        alipay_public_key_path=os.path.join(settings.BASE_DIR, "AppTest/alipay_public_key.pem"),
        # 支付宝的公钥,验证支付宝回传消息使用,不是你自己的公钥,
        sign_type="RSA2",  # RSA2,官方推荐,配置公钥的时候能看到
        debug=True  # 默认False  配合沙箱模式使用
    )

    while True:
        # 调用alipay工具查询支付结果
        response = alipay.api_alipay_trade_query(order_id)  # response是一个字典
        # 判断支付结果
        code = response.get("code")  # 支付宝接口调用成功或者错误的标志
        trade_status = response.get("trade_status")  # 用户支付的情况

        if code == "10000" and trade_status == "TRADE_SUCCESS":
            # 表示用户支付成功
            # 返回前端json,通知支付成功
            return JsonResponse({"code": 0, "message": "支付成功"})

        elif code == "40004" or (code == "10000" and trade_status == "WAIT_BUYER_PAY"):
            # 表示支付宝接口调用暂时失败,(支付宝的支付订单还未生成) 后者 等待用户支付
            # 继续查询
            print(code)
            print(trade_status)
            continue
        else:
            # 支付失败
            # 返回支付失败的通知
            return JsonResponse({"code": 1, "message": "支付失败"})
# Create your views here.
3.主urls.py
from django.conf.urls import include, url
from django.contrib import admin

urlpatterns = [
    url(r‘^admin/‘, include(admin.site.urls)),
    url(r‘^‘, include(‘AppTest.urls‘)),
]
4.AppTest urls.py
from django.conf.urls import include, url
from views import *

urlpatterns = [
    url(r"^$", index),
    url(r"^pay/$", pay),
    url(r"^check_pay/$", check_pay),
]
5.setttings.py中设置
修改templates部分
TEMPLATES = [
    {
        ‘BACKEND‘: ‘django.template.backends.django.DjangoTemplates‘,
        ‘DIRS‘: [
            os.path.join(BASE_DIR,"template").replace("\\","/")
        ],
        ‘APP_DIRS‘: True,
        ‘OPTIONS‘: {
            ‘context_processors‘: [
                ‘django.template.context_processors.debug‘,
                ‘django.template.context_processors.request‘,
                ‘django.contrib.auth.context_processors.auth‘,
                ‘django.contrib.messages.context_processors.messages‘,
            ],
        },
    },
]
末尾加入
STATIC_URL = ‘/static/‘
STATICFILES_DIRS = [os.path.join(BASE_DIR, "static")]

# 支付宝配置参数
ALIPAY_APPID = "2017072407880788"
ALIPAY_URL = "https://openapi.alipay.com/gateway.do"
测试效果:
返回结果
https://example.com/?total_amount=0.01×tamp=2018-01-06+21%3A28%3A38&sign=fg19hD85DPPuN1aaI%2B%2BskuomKUxaDGE%2FdvyttEyV3vubVkVvBDXVziZaGybXqZs5o4bXYojx587qNBb8e%2FjAJOBCwKwYZxd7qR3AKlVabkPDzEOlzvEaSW7HTQpsWsVeX6BW%2ByEO8pWQ8c%2BS8B8tS8a8AFtQxeW92as4hdNjQU2YBZ2SVxtKSohWbFWpny1gDWXinQ3y2HNo4t5lmA8fRknB0MaUPwR1SzWa0k%2BylYjpWEnzC6OihP0Er21Ad8fiUwtSxZqH4xIAhnbofAy%2BHYZZVsv5lYg%2Brb87eM6Yz7xwUe5v5dDEoz%2FOLjsuB0GDRTdvhHqs39cGIoMXFfEpbw%3D%3D&trade_no=2018010621001004260217512776&sign_type=RSA2&auth_app_id=2017072407880788&charset=utf-8&seller_id=2088221936946848&method=alipay.trade.page.pay.return&app_id=2017072407880788&out_trade_no=20180105002&version=1.0