控制反转和依赖注入
- Spring通过依赖注入实现控制反转。
- JavaEE项目通过工厂模式实现控制反转。
- Spring的依赖注入原理也是基于工厂模式。
- Spring提供了使用xml、注解、java配置、groovy配置实现依赖注入。
测试环境说明
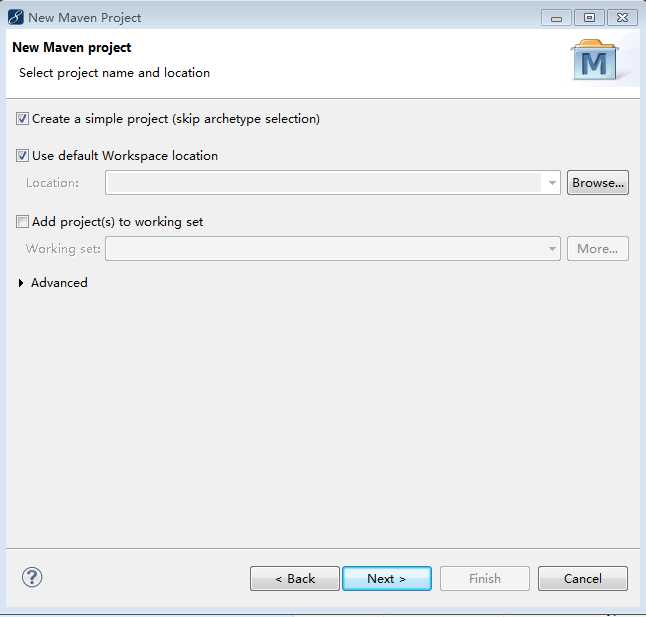
1.使用myeclipse创建maven项目,jdk基于1.7

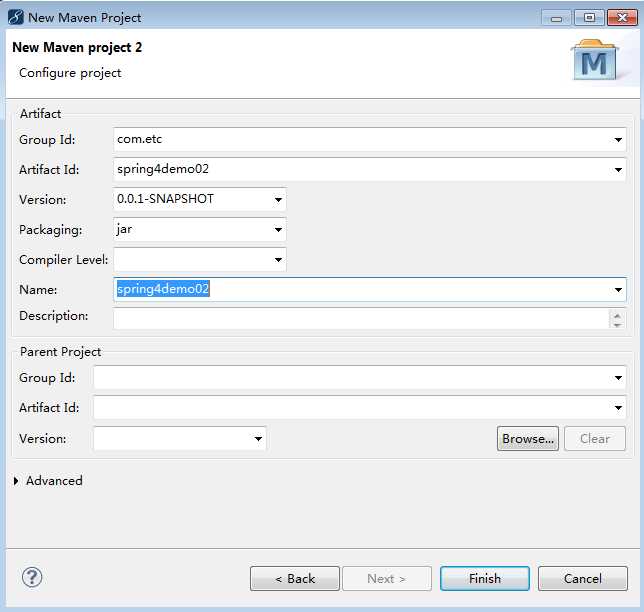
2.填写maven项目GAV(三坐标)

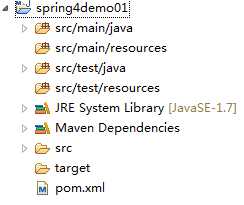
3.项目结构

4.pom.xml文件信息
<project xmlns="http://maven.apache.org/POM/4.0.0" xmlns:xsi="http://www.w3.org/2001/XMLSchema-instance"
	xsi:schemaLocation="http://maven.apache.org/POM/4.0.0 http://maven.apache.org/xsd/maven-4.0.0.xsd">
	<modelVersion>4.0.0</modelVersion>
	<groupId>com.etc</groupId>
	<artifactId>spring4demo01</artifactId>
	<version>1.0.0-SNAPSHOT</version>
	<properties>
		<java.version>1.7</java.version>
	</properties>
	<dependencies>
		<!-- https://mvnrepository.com/artifact/junit/junit -->
		<dependency>
			<groupId>junit</groupId>
			<artifactId>junit</artifactId>
			<version>4.12</version>
			<scope>test</scope>
		</dependency>
		<!-- https://mvnrepository.com/artifact/org.springframework/spring-context -->
		<dependency>
			<groupId>org.springframework</groupId>
			<artifactId>spring-context</artifactId>
			<version>4.1.9.RELEASE</version>
		</dependency>
	</dependencies>

	<build>
		<plugins>
			<plugin>
				<groupId>org.apache.maven.plugins</groupId>
				<artifactId>maven-compiler-plugin</artifactId>
				<version>2.3.2</version>
				<configuration>
					<source>${java.version}</source>
					<target>${java.version}</target>
				</configuration>
			</plugin>
		</plugins>
	</build>
</project>
常用注解
- 声明bean的注解
| 注解 | 说明 |
| @Component | 声明组件注解,bean没有明确角色。 |
| @Service | 业务逻辑层声明bean组件使用(service层或者biz层)。 |
| @Repository | 数据访问层声明bean组件使用(dao层)。 |
| @Controller | MVC模型中,在控制层(C)声明bean组件层使用。 |
以上注解位于:org.springframework.stereotype
- 注入bean的注解
| 注解 | 说明 |
| @AutoWired | 按照类型装配注入,可以不通过getter和setter访问器注入。 |
| @Qualifier |
通常和@AutoWired注解配合使用。 如果@AutoWired找到多个可以装配类型, 则可以通过@Qualifier注解指定bean名称注入。 用法:@Qualifier("entityDao") |
| @Resource |
JSR-250提供的注解,位于javax.annotation包下。 注入时候默认按照名称注入,如果无法匹配名称,则转换为按照类型注入。 名称指属性名称或者setter访问器方法名。 |
| @Inject | 用法和@AutoWired类似。 |
示例代码
数据访问层代码
package com.etc.dao;

import org.springframework.stereotype.Repository;

@Repository //数据访问层注解
public class EntityDao {

	public String getData(){
		return "get data from database";
	}
}
业务逻辑层代码
package com.etc.service;

import org.springframework.beans.factory.annotation.Autowired;
import org.springframework.stereotype.Service;

import com.etc.dao.EntityDao;


@Service //service层注解
public class EntityService {

	@Autowired //注入bean
	private EntityDao entityDao;

	public String getData(){
		return entityDao.getData();
	}

}
配置类代码
package com.etc.config;

import org.springframework.context.annotation.ComponentScan;
import org.springframework.context.annotation.Configuration;

@Configuration //声明DiConfig类为配置类
@ComponentScan("com.etc.service,com.etc.dao")  //扫描service和dao包所有使用注解声明的bean,并创建和注册为spring bean
public class DiConfig {

}
测试类
package com.etc.test;

import org.junit.Test;
import org.springframework.context.annotation.AnnotationConfigApplicationContext;

import com.etc.config.DiConfig;
import com.etc.service.EntityService;

public class TestClass {

	/**测试使用注解实现IOC*/
	@Test
	public void test1() {
		AnnotationConfigApplicationContext context = new AnnotationConfigApplicationContext(
				DiConfig.class);
		EntityService es = context.getBean(EntityService.class);
		System.out.println(es.getData());
		context.close();
	}

}
测试结果
一月 15, 2018 9:22:54 上午 org.springframework.context.annotation.AnnotationConfigApplicationContext prepareRefresh
信息: Refreshing org.springframework.context.annotation.AnnotationConfigApplicationContext@442c8ab0: startup date [Mon Jan 15 09:22:54 CST 2018]; root of context hierarchy
get data from database
一月 15, 2018 9:22:54 上午 org.springframework.context.annotation.AnnotationConfigApplicationContext doClose
信息: Closing org.springframework.context.annotation.AnnotationConfigApplicationContext@442c8ab0: startup date [Mon Jan 15 09:22:54 CST 2018]; root of context hierarchy
