标签:android style blog http color io os 使用 java
Android上的界面展示都是通过Activity实现的,Activity实在是太常用了。但是Activity也有它的局限性,同样的界面在手机上显示可能很好看,在平板上就未必了,因为平板的屏幕非常大,手机的界面放在平板上可能会有过分被拉长、控件间距过大等情况。这个时候更好的体验效果是在Activity中嵌入"小Activity",然后每个"小Activity"又可以拥有自己的布局。因此,我们今天的主角Fragment登场了。
一、Fragment初探:
Fragment是activity的界面中的一部分或一种行为。你可以把多个Fragment们组合到一个activity中来创建一个多面界面,并且你可以在多个activity中重用一个Fragment。你可以把Fragment认为模块化的一段activity,它具有自己的生命周期,接收它自己的事件,并可以在activity运行时被添加或删除。
Fragment不能独立存在,它必须嵌入到activity中,而且Fragment的生命周期直接受所在的activity的影响。例如:当activity暂停时,它拥有的所有的Fragment们都暂停了,当activity销毁时,它拥有的所有Fragment们都被销毁。然而,当activity运行时(在onResume()之后,onPause()之前),你可以单独地操作每个Fragment,比如添加或删除它们。当你在执行上述针对Fragment的事务时,你可以将事务添加到一个栈中,这个栈被activity管理,栈中的每一条都是一个Fragment的一次事务。有了这个栈,就可以反向执行Fragment的事务,这样就可以在Fragment级支持“返回”键(向后导航)。
当向activity中添加一个Fragment时,它须置于ViewGroup控件中,并且需定义Fragment自己的界面。你可以在layoutxml文件中声明Fragment,元素为:<fragment>;也可以在代码中创建Fragment,然后把它加入到ViewGroup控件中。然而,Fragment不一定非要放在activity的界面中,它可以隐藏在后台为actvitiy工作。
设计的哲学:
为了让界面可以在平板上更好地展示,Android在3.0版本引入了Fragment(碎片)功能,通过官方文档中的这张图片可以很明显地看到Fragment的好处:
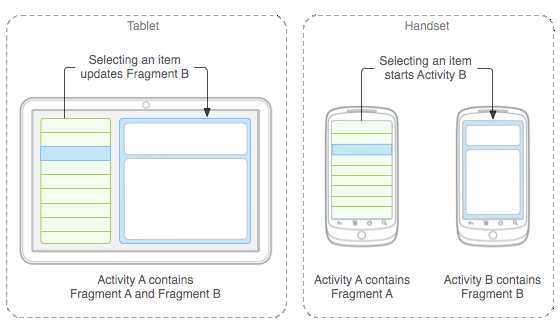
注:左边为平板,右边为手持设备。
二、Fragment的生命周期
因为Fragment必须嵌入在Acitivity中使用,所以Fragment的生命周期和它所在的Activity是密切相关的。
如果Activity是暂停状态,其中所有的Fragment都是暂停状态;如果Activity是stopped状态,这个Activity中所有的Fragment都不能被启动;如果Activity被销毁,那么它其中的所有Fragment都会被销毁。
但是,当Activity在活动状态,可以独立控制Fragment的状态,比如加上或者移除Fragment。
当这样进行fragment transaction(转换)的时候,可以把fragment放入Activity的back stack中,这样用户就可以进行返回操作。
使用Fragment时,需要继承Fragment或者Fragment的子类(DialogFragment, ListFragment, PreferenceFragment, WebViewFragment),所以Fragment的代码看起来和Activity的类似。
每当创建一个Fragment时,首先添加以下三个回调方法:
将Fragment加载到Activity当中有两种方式:
第一种方式虽然简单但灵活性不够。添加Fragment到Activity的布局文件当中,就等同于将Fragment及其视图与activity的视图绑定在一起,且在activity的生命周期过程中,无法切换fragment视图。
第二种方式比较复杂,但也是唯一一种可以在运行时控制fragment的方式(加载、移除、替换)。
下面将分别介绍一下。
三、在Activity的布局文件中添加Fragment:(不推荐)
平板的模拟器参数如下:
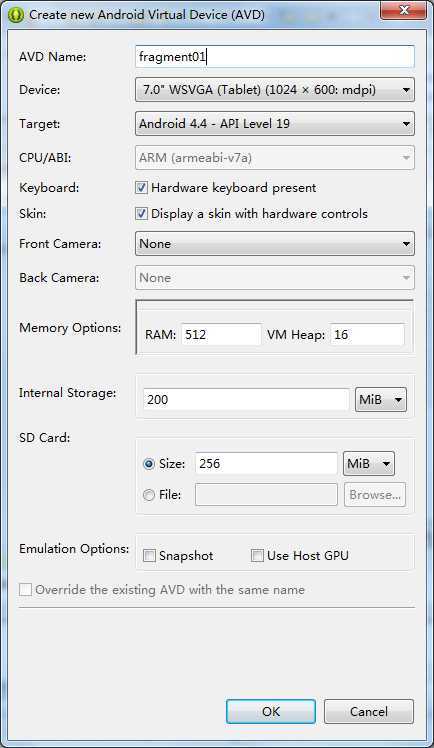
然后新建一个工程文件。然后继续如下步骤:
(1)新建文件fragment_hello.xml和HelloFragment.java:
fragment_hello.xml代码如下:(即Fragment的布局文件)
<?xml version="1.0" encoding="utf-8"?>
<LinearLayout xmlns:android="http://schemas.android.com/apk/res/android"
    android:layout_width="match_parent"
    android:layout_height="match_parent"
    android:orientation="vertical" >

    <EditText
        android:layout_width="match_parent"
        android:layout_height="wrap_content"
        android:hint="请输入内容"/>
    <RatingBar
        android:id="@+id/ratingBar1"
        android:layout_width="wrap_content"
        android:layout_height="wrap_content" />
</LinearLayout>
HelloFragment.java代码如下:
 1 package com.example.m01_fragment01;
 2
 3 import android.app.Fragment;
 4 import android.os.Bundle;
 5 import android.view.LayoutInflater;
 6 import android.view.View;
 7 import android.view.ViewGroup;
 8
 9 public class HelloFragment extends Fragment {
10
11     @Override
12     public void onCreate(Bundle savedInstanceState) {
13         super.onCreate(savedInstanceState);
14     }
15
16     @Override
17     public View onCreateView(LayoutInflater inflater, ViewGroup container,
18             Bundle savedInstanceState) {
19         View view = inflater.inflate(R.layout.fragment_hello, null);  // View android.view.LayoutInflater.inflate(int resource, ViewGroup root)
20         return view;
21     }
22
23     @Override
24     public void onPause() {
25         super.onPause();
26     }
27 }
重点在于第19和20行,通过inflate()方法将自定义的fragment的布局加载进来。
19行代码中,第二个参数中,如果布局没有根,那就用null。
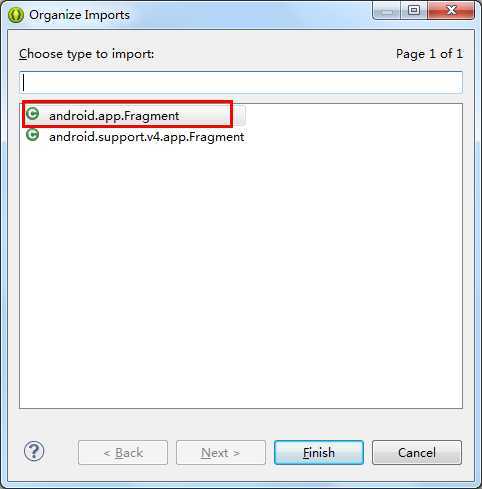
注:上方代码中,因为我们的程序是面对Android 4.0以上版本的,所以导入Fragment的包时,选择第一个:android.app.Fragment
(2)将Fragment添加到Activity的布局中:
修改activity_main.xml的代码如下:
 1 <LinearLayout xmlns:android="http://schemas.android.com/apk/res/android"
 2     xmlns:tools="http://schemas.android.com/tools"
 3     android:layout_width="match_parent"
 4     android:layout_height="match_parent"
 5     tools:context=".MainActivity" >
 6
 7     <fragment
 8         android:id="@+id/fragment_hello"
 9         android:name="com.example.m01_fragment02.HelloFragment"
10         android:layout_width="wrap_content"
11         android:layout_height="wrap_content" />
12 </LinearLayout>
08行和09行是关键。其中android:name属性填上你自己创建的fragment的完整类名。如下图:
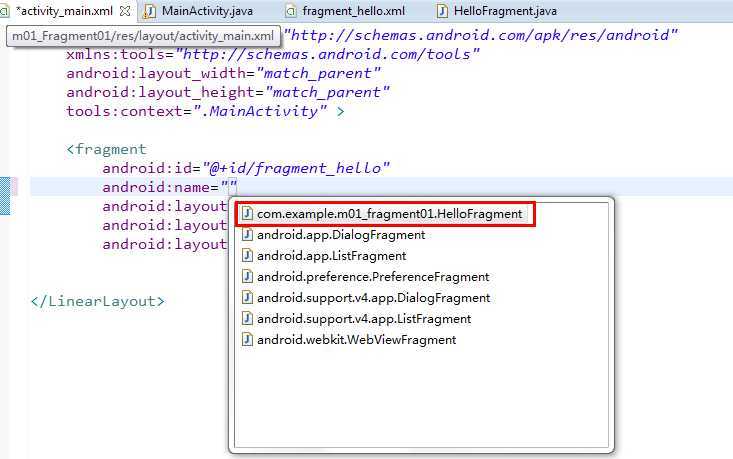
当系统创建这个Activity的布局文件时,系统会实例化每一个fragment,并且调用它们的onCreateView()方法,来获得相应fragment的布局,并将返回值插入fragment标签所在的地方。
运行之后,效果如下:
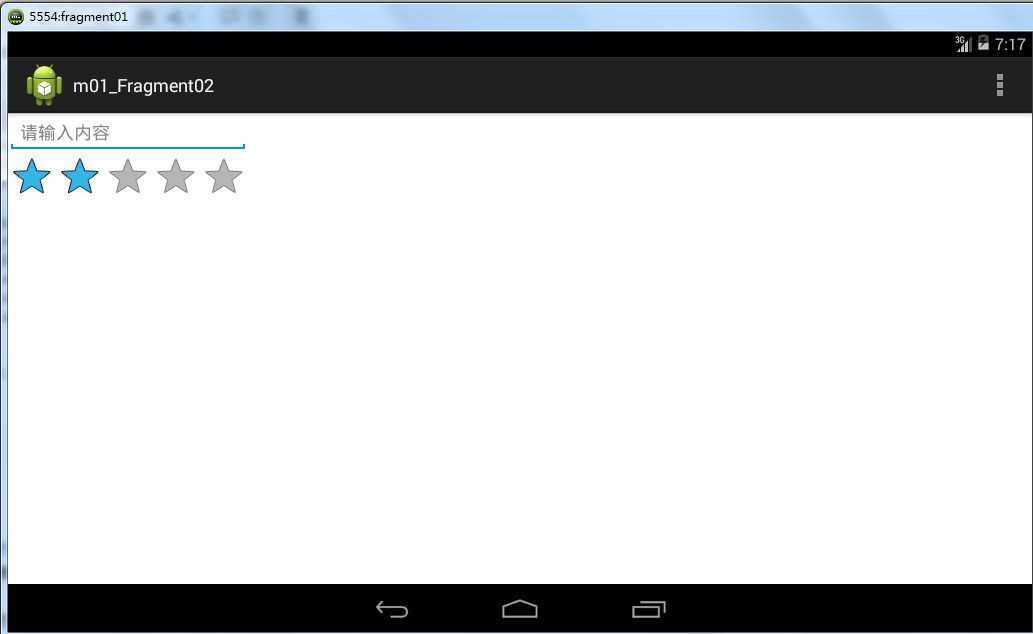

实际上,这种方式在开发中并不推荐,我们来介绍另外一种方法。
四、在activity代码中添加fragment:
【实例】点击左侧fragment中的按钮,弹出右侧的fragment。新建一个工程文件,然后步骤如下:
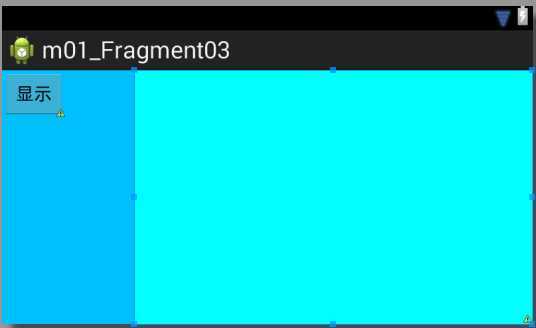
(1)将activity_main的布局分为两部分:左边占1/4,右边占3/4。修改activity_main.xml的代码如下:
<LinearLayout xmlns:android="http://schemas.android.com/apk/res/android"
    xmlns:tools="http://schemas.android.com/tools"
    android:layout_width="match_parent"
    android:layout_height="match_parent"
    tools:context=".MainActivity"
    android:orientation="horizontal" >

    <LinearLayout
        android:id="@+id/left"
        android:layout_width="0dp"
        android:layout_height="match_parent"
        android:orientation="vertical"
        android:layout_weight="1"
        android:background="#00BFFF" >

        <Button
            android:id="@+id/button1"
            android:layout_width="wrap_content"
            android:layout_height="wrap_content"
            android:text="显示"/>

    </LinearLayout>

    <LinearLayout
         android:id="@+id/right"
        android:layout_width="0dp"
        android:layout_height="match_parent"
        android:layout_weight="3"
        android:background="#00FFFF"
        android:orientation="vertical" >

    </LinearLayout>

</LinearLayout>
上方代码中,一个LinearLayout代表一个Fragment的容器,记得要给每个fragment加一个容器的id。上方代码的布局效果如下:
既然两个fragment的空间都分配好了,接下来右边的Fragment写出来。
(2)新建文件fragment_right.xml和RightFragment.java:
fragment_right.xml代码如下:(添加一个文本和按钮)
<?xml version="1.0" encoding="utf-8"?>
<LinearLayout xmlns:android="http://schemas.android.com/apk/res/android"
android:layout_width="match_parent"
android:layout_height="match_parent"
android:orientation="vertical" >
<TextView
android:id="@+id/textView1"
android:layout_width="wrap_content"
android:layout_height="wrap_content"
android:text="新闻内容" />
<Button
android:id="@+id/button2"
android:layout_width="wrap_content"
android:layout_height="wrap_content"
android:text="Button" />
</LinearLayout>
RightFragment.java代码如下:
package com.example.m01_fragment03;
import android.app.Fragment;
import android.os.Bundle;
import android.view.LayoutInflater;
import android.view.View;
import android.view.ViewGroup;
public class RightFragment extends Fragment {
@Override
public void onCreate(Bundle savedInstanceState) {
super.onCreate(savedInstanceState);
}
@Override
public View onCreateView(LayoutInflater inflater, ViewGroup container,
Bundle savedInstanceState) {
View view = inflater.inflate(R.layout.fragment_right, null);
return view;
}
@Override
public void onPause() {
super.onPause();
}
}
紧接着,我们修改上方onCreateView()方法中的代码,实现点击按钮,能够弹出吐司:
public View onCreateView(LayoutInflater inflater, ViewGroup container,
Bundle savedInstanceState) {
View view = inflater.inflate(R.layout.fragment_right, null);
Button button = (Button)view.findViewById(R.id.button2);
button.setOnClickListener(new OnClickListener() {
@Override
public void onClick(View v) {
Toast.makeText(getActivity(), "我是fragment", Toast.LENGTH_SHORT).show();
}
});
return view;
}
第04行代码:有一个单词view不要忘了。
第08行代码:第一个参数一定是getActivity,以此来获得父类的Activity
(3)在activity代码中添加fragment:
点击MainActivity中左侧的按钮,弹出右侧的Fragment,
MainActivity.java的监听器部分的代码如下:
button.setOnClickListener(new OnClickListener() {
@Override
public void onClick(View v) {
//步骤一:添加一个FragmentTransaction的实例
FragmentManager fragmentManager =getFragmentManager();
FragmentTransaction transaction = fragmentManager.beginTransaction();
//步骤二:用add()方法加上Fragment的对象rightFragment
RightFragment rightFragment = new RightFragment();
transaction.add(R.id.right, rightFragment);
//步骤三:调用commit()方法使得FragmentTransaction实例的改变生效
transaction.commit();
}
});
记住上面的三个步骤。
第12行代码是整个程序的核心。add()方法里的第一个参数是容器视图资源ID,而不是layout。容器视图资源ID有两个作用:
运行后,效果如下:

点击左侧的按钮后,出现右侧的界面。点击右侧的按钮,弹出吐司。效果如下:

当然,这个代码还不够成熟,因为还涉及到了生命周期没有处理。我们将在下一章节中进行讲解。
Android系列之Fragment(一)---Fragment加载到Activity当中
标签:android style blog http color io os 使用 java
原文地址:http://www.cnblogs.com/smyhvae/p/3978989.html