一、random模块
import random
print(random.random())  #0-1之间的小数
print(random.randint(1,5)) #1-5之间(包括1和5)的整数
print(random.randrange(1,5)) #1-5之间(包含1,不好包含5)的整数
print(random.choice([‘a‘,‘b‘,‘c‘])) #给定列表中任意元素
print(random.sample([‘a‘,‘b‘,‘c‘,‘d‘],2)) #给定列表中任意n个元素组合
print(random.uniform(1,3)) #1-3之间(不含1,3)的小数
item = [‘a‘,‘b‘,5,1,7,[‘aaa‘,‘bbb‘]]
random.shuffle(item)   #打乱元素顺序
print(item)


1 import random
2 def code(n):
3     res = ""
4     for i in range(n):
5         a = random.randint(0,9)
6         b = chr(random.randint(65,90))
7         res +=str(random.choice([a,b]))
8     return res
9 print(code(6))
二、os模块
import os

print(os.getcwd()) #获取当前工作路径
print(os.chdir("D:\\"))  #切换工作目录
print(os.curdir)  #返回当前目录,即"."
print(os.pardir)  #返回当前目录的父目录字符串名,即".."
print(os.makedirs("aaa/bbb")) #创建递归目录
print(os.removedirs("aaa/bbb")) #若目录为空则删除,并递归到上一级目录,如若也为空,则删除,以此类推
print(os.mkdir("abc"))  #生成单个目录
print(os.rmdir("abc"))   #删除单级空目录,若目录不为空则无法删除
print(os.listdir("D:\\")) #列出制定目录下所有文件和目录,包括隐藏文件,以列表打出
print(os.remove("test.txt")) #删除一个文件
print(os.stat("test.py"))  #获取文件或目录信息
print(os.sep)  #获取操作系统特定的路径分隔符,win下"\\",linux下"/"
print(os.linesep) #获取当前平台使用的行终止符,win下"\t\n",linux下"\n"
print(os.pathsep) #获取分割环境变量路径的字符串,win下;,linux下为:
print(os.name)  #操作系统平台字符串,win为nt,linux为posix
print(os.system("ipconfig"))  #运行操作系统命令,直接显示
print(os.environ) #获取系统环境变量
print(os.path.abspath("test.py")) #返回文件的绝对路径
print(os.path.split(os.path.abspath("test.py"))) #将路径分割为目录和文件名
print(os.path.exists(os.path.abspath("test.py"))) #返回路径是否存在
print(os.path.isabs("test.py"))  #判断路径是否是绝对路径
print(os.path.isfile("D:\\"))   #判断是否是文件
print(os.path.isdir("D:\\"))   #判断是否为目录
print(os.path.join("C:\\","D:\\","backup")) #将多个路径组合,从左往右,若右侧有绝对路径,则左侧的所有参数将被忽略
print(os.path.getatime("test.py")) #获取文件或目录最后存取时间
print(os.path.getmtime("test.py"))  #获取文件或目录最后修改时间
print(os.path.getsize("test.py"))   #获取文件大小
print(os.path.normcase("C:/windows\sySTMem32\\"))   #会返回标准格式的路径,大写变小写,斜杠转为反斜杠
print(os.path.normpath("C://windows\\system32/../Temp/"))  #会获取标准格式最终路径
#方式一,跨平台兼容性好
import os,sys
possible_topdir = os.path.normpath(os.path.join(
    os.path.abspath(__file__),
    os.pardir,   #上一级,即".."
    os.pardir
))
sys.path.insert(0,possible_topdir)

#方式二
path = os.path.dirname(os.path.dirname(os.path.abspath(__file__)))
sys.path.insert(0,path)
三、sys模块
import  sys
print(sys.argv)   #命令行接收的参数列表,第一个元素为程序本身路径
# print(sys.exit(n))  #退出程序,正常退出为exit(0)
print(sys.version)  #获取python解释程序的版本信息
print(sys.maxsize)  #获取小整数最大值,大于该值为大整数,小整数32位python为4字节,64位系统为8字节,python2中为maxint
print(sys.path)    #返回模块的搜索路径,初始化时使用PYTHONPATH环境变量的值
print(sys.platform)  #返回操作系统平台名称
 1 import time
 2 def process(percent,width=50):
 3     if percent >= 1:
 4         percent = 1    #因为recv每次加1024,可能超过total_size,防止出现percent大于1的情况
 5     show_str = (‘[%%-%ds]‘%width)%("#"* int(width*percent))  #%%将字符串中%转义为普通的%符号,%-50s为左对齐50位长度字符串,int将小数转为整数
 6     print("\r%s %d%%"%(show_str,int(100*percent)),end="")    #\r为光标调整到行开头,end=""为不换行,这样可以覆盖先前的进度
 7
 8 recv_size = 0
 9 total_size = 10241
10 while recv_size<total_size:
11     time.sleep(0.1)
12     recv_size+=1024
13     process(recv_size/total_size)
四、shutil模块
import shutil
shutil.copyfileobj(open("test.py",‘r‘,encoding="utf-8"),open("aaa.py",‘w‘,encoding="utf-8"))  #将文件内容拷贝到另一个文件中
shutil.copyfile("test.py","bbb.py")  #目标文件无需存在
shutil.copymode("test.py","aaa.py")  #仅拷贝权限,内容、组、用户均不变
shutil.copymode("test.py","aaa.txt") #仅拷贝状态信息,包括mode bits,atime,mtime,flags
shutil.copy("test.py","aaa.txt")   #拷贝内容和权限
shutil.copy2("test.py","aaa.txt") #拷贝文件和状态信息
shutil.copytree("D:\\test","D:\\aaa",ignore=shutil.ignore_patterns("*,pyc","tmp*")) #递归的去拷贝文件夹,目标目录不能存在,对目标目录腹肌目录需有科协权限,ignore是需排除的文件。
shutil.rmtree("D:\\test")  #递归的删除文件
shutil.move("D:\\test","D:\\aaa")  #递归的移动文件,类似mv,就是重命名
shutil.make_archive(base_name,format,...)
用于创建压缩包,并返回文件路径,例如zip,tar
- base_name:压缩包的文件名,可以是路径。只是文件名时,保存至当当前目录,否则保存至指定路径。如设置为data,则保存在当前路径,设置为/tmp/data则保存在/tmp中
- format:压缩包的种类,zip,tar,bztar,gztar
- root_dir:要压缩的文件夹路径(默认当前目录)
- owner:用户,默认当前用户
- group:组,默认当前组
- logger:用于记录日志,通常为logging.Logger对象
import shutil
#将/data下的文件打包放在当前目录
ret = shutil.make_archive("data.bak","gztar",root_dir="/data")
#将/data下的文件打包放在/tmp/目录
ret = shutil.make_archive("/tmp/data.bak",‘gztar‘,root_dir="/data")
五、json和pickle模块
1.序列化介绍
将对象(变量)从内存中编程可存储或传输的过程称为序列化,反之为反序列化。序列化可提供数据的持久状态保存和跨平台数据交换两个功能。
python中eval只能执行字符串表达式,无法对特殊数据类型进行处理。
2.json
将对象序列化为json,可被所有语言读取,方便存储到硬盘或通过网络传输。json比XML更快,可直接在web页面中读取,使用方便。
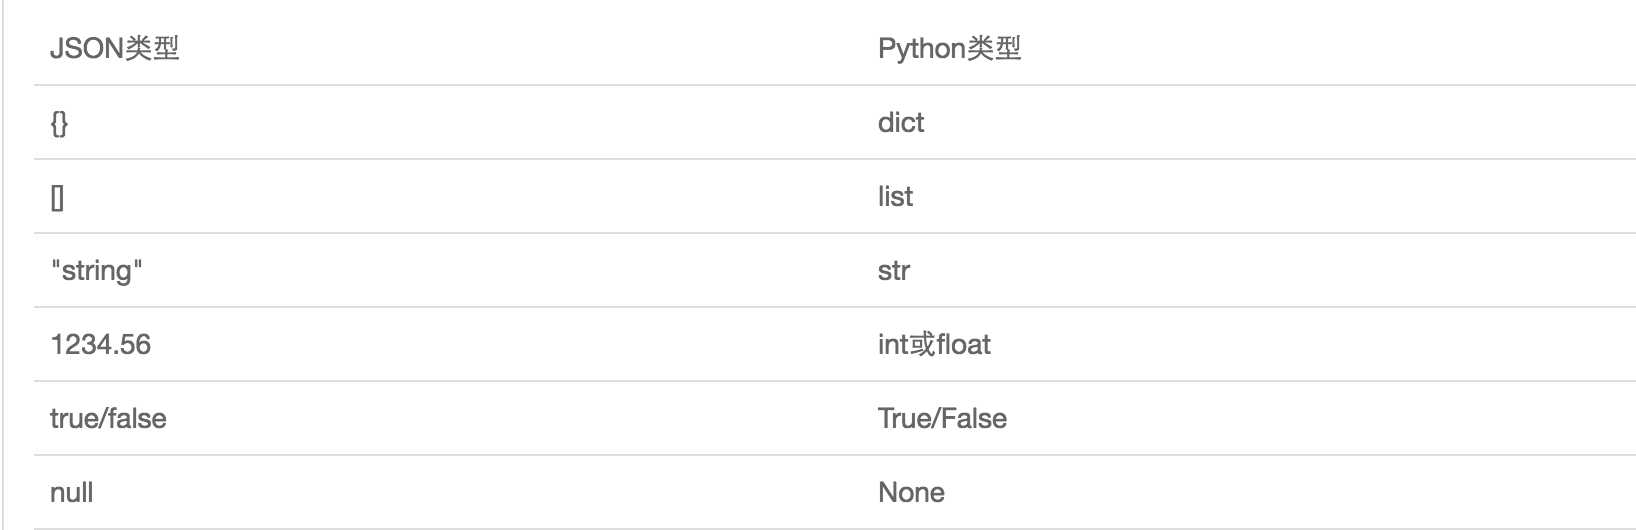
json和Python内置数据类型对应:

#序列化
import json,time
user = {"name":"xxx","age":33,"sex":"male"}
with open("user.json",‘w‘,encoding="utf-8") as f:
    f.write(json.dumps(user))
#dump和dumps作用一样,更简洁
info = ["abc","xxx","123"]
json.dump(info,open("info.json","w",encoding="utf-8"))
#反序列化
import json
with open("user.json",‘r‘,encoding="utf-8") as f:
    user = json.loads(f.read())
    print(user["name"])
#load和loads作用相同,更简洁
info = json.load(open("info.json",‘r‘,encoding="utf-8"))
print(info[0])
#字符串中字典反序列化
json_str = ‘{"name":"xxx"}‘
print(json.loads(json_str)["name"])
3.pickle

pickle只能用于Python中对象的序列化,且不同版本python可能都不兼容,只能用pickle保存不重要的数据。
import pickle
#序列化
user = {"name":"xxx","age":111,"sex":"male"}
print(type(user))
pk = pickle.dumps(user)
print(pk,type(pk))
with open("序列化对象_pickle","wb") as f:
    f.write(pk)
#反序列化
with open("序列化对象_pickle","rb") as f:
    data = pickle.loads(f.read())
    print(data["name"])
六、shelve模块
shelve模块只有open函数,返回类似字典的对象,可读可写,key必须为字符串,
import shelve
f = shelve.open(r"shelve.txt")
f["user"] = {"name":"xxx","age":111}
f["info"] = ["xxx","abc"]
print(f["user"]["name"])
f.close()
七、XML模块
xml类似json,用于数据交换,各类语言都支持xml。
import xml.etree.ElementTree as ET
tree = ET.parse("aaa.xml")
root = tree.getroot()
print(root.tag)    #获取根节点名称
#便利xml文档
for child in root:
    print(child.tag,child.attrib,child.attrib["name"])
    for i in child:
        print(i.tag,i.attrib,i.text)     #获取标签名,属性,文本
#只遍历year节点
for node in root.iter("year"):    #iter搜索特定标签,返回迭代器对象
    print(node.tag,node.text)
import xml.etree.ElementTree as ET
tree = ET.parse("aaa.xml")
root = tree.getroot()
#修改
for node in root.iter("year"):
    new_year= int(node.text)+1   #year节点的文本内容加一
    node.text = str(new_year)    #修改文本内容
    node.set("updated",‘yes‘)   #为year节点添加updated属性
    node.set("version","1.0")   #为year节点添加version属性
tree.write("aaa.xml")
#删除node
for country in root.findall("country"):
    rank = int(country.find("rank").text)
    if rank > 50:
        root.remove(country)
tree.write("aaa.xml")
#在country节点内添加(append)节点century
for country in root.findall("country"):
    for year in country.findall("year"):
        century = ET.Element("century")
        if int(year.text) >= 2000:
            century.text = "21世纪"
        else:
            century.text = "20世纪"
        century.attrib = {"update": "yes"}
        country.append(century)  # 向country下添加子节点
tree.write("aaa.xml")
 1 import xml.etree.ElementTree as ET
 2 new_xml = ET.Element("namelist")
 3 name = ET.SubElement(new_xml,"name",attrib={"enrolled":"yes"})
 4 age = ET.SubElement(name,"age",attrib={"checked":"no"})
 5 sex = ET.SubElement(name,"sex")
 6 sex.text = "99"
 7 name2 = ET.SubElement(new_xml,"name",attrib={"enrolled":"yes"})
 8 age = ET.SubElement(name2,"age")
 9 age.text = "199"
10 et = ET.ElementTree(new_xml) #生成文档对象
11 et.write("bbb.xml",encoding="utf-8",xml_declaration=True)
12 ET.dump(new_xml) #打印生成格式
八、configparser模块
import configparser
config = configparser.ConfigParser()
config.read("aaa.ini")
print(config.sections()) #查看所有标题
print(config.options("section1"))  #获取某标题内的所有key value的key
print(config.items("section1"))  #获取某标题内所有内容,(key,value)格式
print(config.get("section1","user"))  #获取section1标题下user的值,字符串格式
print(config.getint("section1","age")) #获取seciton1标题下age的值,整数格式
print(config.getboolean("section1","is_admin")) #获取section1标题下is_admin的值,布尔值格式
print(config.getfloat("section1","salary"))  #获取section1标题下salary的值,浮点型格式
import configparser

config = configparser.ConfigParser()
config.read("my.ini",encoding="gbk")
#删除整个标题seciton2
config.remove_section("section2")
#删除标题section1下的k1和k2
config.remove_option("section1","k1")
config.remove_option("section1","k2")
#判断是否存在某个标题和某个选项
print(config.has_section("section1"))
print(config.has_option("section1","user"))
#添加一个标题
config.add_section("section3")
#在标题下添加name=xxx,age=11
config.set("section3","name","xxx")
config.set("section3","age","11")
#将最终修改的内容写入文件
config.write(open("my.ini","w"))
九、hashlib模块
hashlib在python3中替代了md5和sha模块,提供sha1,sha223,sha256,sha384,sha512算法
hash算法有三个特点:
- 内容相同则hash运算结果相同,内容修改后hash值改变
- 不可逆推
- 使用相同算法,无论校验多长数据,得到的哈希值长度固定
import hashlib
m = hashlib.md5()
m.update("hello".encode("utf-8"))
m.update("world".encode("utf-8"))
print(m.hexdigest())
update多次和update一次效果一样,update多次为校验大文件提供了可能。
python重hmac模块,可使用key和内容进行处理加密
import hmac
h = hmac.new("kkkkk".encode("utf-8"))
h.update("hello".encode("utf-8"))
print(h.hexdigest())
十、suprocess模块
import subprocess
import time

obj = subprocess.Popen("tasklist",shell=True,
                 stdout=subprocess.PIPE,
                 stderr=subprocess.PIPE,
                 )
print(obj.stdout.read().decode("gbk"))   #命令执行结果
print(obj.stderr.read().decode("gbk"))   #命令执行出错的结果
十一、面向对象
1、面向过程与面向对象
面向过程:核心是过程,过程即解决问题的步骤,基于该思想写程序就像在设计流水线,是机械式的思维方式。优点是将复杂过程流程化,进而简单化。缺点扩展性差。
面向对象:核心是对象,对象是特征与技能的结合体,基于该思想编写程序就好比在创造世界,世界由一个个对象组成,是“上帝式”思维方式。优点是扩展性强。缺点是编程复杂度高,易过度设计。
2、类
对象是特征与技能的结合体,类是一系列对象相似的特征与技能的结合体。现实世界中现有具体存在的对象,后总结出类。程序中先定义类,后创建对象。
类有两种属性,数据属性和函数属性,特点为:
- 类的数据属性是所有对象共享的
- 累的函数属性是绑定给对象用的
class Stuedent:
    school = "xxx"
    def __init__(self,name,age,sex):
        self.name = name
        self.age = age
        self.sex = sex

    def learn(self):
        print("%s is learning"% self.name)

    def sleep(self):
        print("%s is sleeping"% self.name)

s1 = Stuedent("aaa",11,"male")
s2 = Stuedent("bbb",22,"male")
print(id(s1.name),id(s2.name))   #通过对象方法创建的变量id不同
#类的数据属性所有对象共享,所有对象指向同一个内存地址
print(id(s1.school),id(s2.school))
s1.sleep()
s2.sleep()
#类中定义的函数是绑定给对象使用:
#1.不同搞对象就是不同绑定方法
#2.绑定给谁就应该由谁来调用,谁来调用就会把谁当做第一个参数传给对应函数
print(s1.sleep,s2.sleep)
#查找一个对象属性顺序:先找对象自己的__dict__,再找类的__dict__
print(s1.__dict__)